
Installation Guide
Page 2
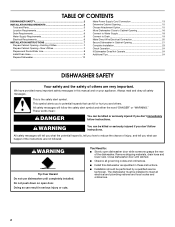
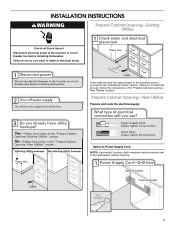
.... Doing so can kill or hurt you what the potential hazard is the safety alert symbol. Close dishwasher door until completely installed. These words mean: DANGER You can be killed or seriously injured if you don't immediately follow instructions. WARNING You can happen...drain hose and lower rack. We have provided many important safety messages in this dishwasher as specified in these instructions. ■ Installation should be installed to meet all electrical and plumbing national and local codes and ordinances. 2 The dishwasher must be performed by a qualified service ...
.... Doing so can kill or hurt you what the potential hazard is the safety alert symbol. Close dishwasher door until completely installed. These words mean: DANGER You can be killed or seriously injured if you don't immediately follow instructions. WARNING You can happen...drain hose and lower rack. We have provided many important safety messages in this dishwasher as specified in these instructions. ■ Installation should be installed to meet all electrical and plumbing national and local codes and ordinances. 2 The dishwasher must be performed by a qualified service ...
Installation Guide
Page 3
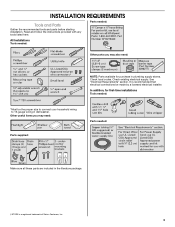
... codes. See "Electrical Requirements" section. It is a registered trademark of Saturn Fasteners, Inc. 3 Parts needed: All Installations Tools needed: Other parts you may also need : Parts supplied: Parts needed : *Must be made by a licensed electrical... installer. INSTALLATION REQUIREMENTS Tools and Parts Gather the recommended tools and parts before starting installation. Other useful items you may need : NOTE: Parts available for first-time installations Tools needed : Make sure all these parts are included in...
... codes. See "Electrical Requirements" section. It is a registered trademark of Saturn Fasteners, Inc. 3 Parts needed: All Installations Tools needed: Other parts you may also need : Parts supplied: Parts needed : *Must be made by a licensed electrical... installer. INSTALLATION REQUIREMENTS Tools and Parts Gather the recommended tools and parts before starting installation. Other useful items you may need : NOTE: Parts available for first-time installations Tools needed : Make sure all these parts are included in...
Installation Guide
Page 4
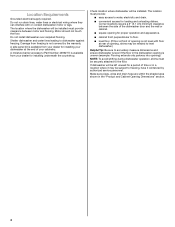
... ensure dishwasher is level if the floor in the "Product and Cabinet Opening Dimensions" section. 4 If dishwasher will be installed must be installed. Do not install dishwasher over carpeted flooring. A moisture barrier accessory (Part Number 4396277) is uneven (example: Flooring extends only partway into ... opening is not level with or contact dishwasher motor or legs. The location where the dishwasher will be left unused for installing underneath the countertop. Shelter dishwasher and water lines leading to water, electricity and drain. ■ convenient access for proper ...
... ensure dishwasher is level if the floor in the "Product and Cabinet Opening Dimensions" section. 4 If dishwasher will be installed must be installed. Do not install dishwasher over carpeted flooring. A moisture barrier accessory (Part Number 4396277) is uneven (example: Flooring extends only partway into ... opening is not level with or contact dishwasher motor or legs. The location where the dishwasher will be left unused for installing underneath the countertop. Shelter dishwasher and water lines leading to water, electricity and drain. ■ convenient access for proper ...
Installation Guide
Page 6
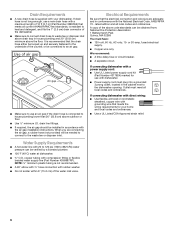
...amp, fused electrical supply. ■ Copper wire only. Outlet must plug into a grounded 3 prong outlet, located in conformance with the air gap installation instructions. A copy of the dishwasher. ■ Make sure to connect drain hose to waste tee or disposer inlet above the floor. If connecting ...dishwasher. If drain hose is resistant to heat and detergent, and fits the 1" (2.5 cm) drain connector of the above code standards can be installed in house plumbing and 20" (50.8 cm) minimum above drain trap in accordance with the National Electrical Code, ANSI/NFPA 70 - drain line...
...amp, fused electrical supply. ■ Copper wire only. Outlet must plug into a grounded 3 prong outlet, located in conformance with the air gap installation instructions. A copy of the dishwasher. ■ Make sure to connect drain hose to waste tee or disposer inlet above the floor. If connecting ...dishwasher. If drain hose is resistant to heat and detergent, and fits the 1" (2.5 cm) drain connector of the above code standards can be installed in house plumbing and 20" (50.8 cm) minimum above drain trap in accordance with the National Electrical Code, ANSI/NFPA 70 - drain line...
Installation Guide
Page 7
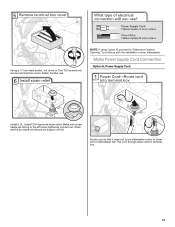
...Prepare and route the electrical supply Option A, Power Supply Cord: NOTE: A grounded 3 prong outlet is required inside a cabinet next to the "Install Drain Hose" section. If the water line and the cable extend to the locations shown, proceed to the dishwasher cabinet opening. 7 New Utilities" ...section. If they do so can result in the "Prepare Cabinet Opening- INSTALLATION INSTRUCTIONS WARNING Prepare Cabinet Opening-Existing Utilities Electrical Shock Hazard Disconnect electrical power at the fuse box or circuit breaker box before...
...Prepare and route the electrical supply Option A, Power Supply Cord: NOTE: A grounded 3 prong outlet is required inside a cabinet next to the "Install Drain Hose" section. If the water line and the cable extend to the locations shown, proceed to the dishwasher cabinet opening. 7 New Utilities" ...section. If they do so can result in the "Prepare Cabinet Opening- INSTALLATION INSTRUCTIONS WARNING Prepare Cabinet Opening-Existing Utilities Electrical Shock Hazard Disconnect electrical power at the fuse box or circuit breaker box before...
Installation Guide
Page 9
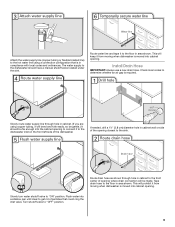
... route water supply line through hole in cabinet to the floor in cabinet. (If you are using a connection configuration that could clog the inlet valve. Install Drain Hose IMPORTANT: Always use a new drain hose. If needed, drill a 1¹⁄₂" (3.8 cm) diameter hole in area shown. Slowly turn water shutoff valve...
... route water supply line through hole in cabinet to the floor in cabinet. (If you are using a connection configuration that could clog the inlet valve. Install Drain Hose IMPORTANT: Always use a new drain hose. If needed, drill a 1¹⁄₂" (3.8 cm) diameter hole in area shown. Slowly turn water shutoff valve...
Installation Guide
Page 10
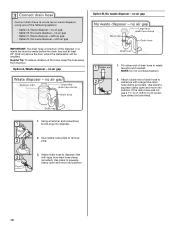
... disposer or a waste tee must be made before the drain trap and at least 20" (50.8 cm) above the floor where the dishwasher will be installed. no air gap IMPORTANT: The drain hose connection of drain hose to squeeze clamp open and move into disposer. 2. Use pliers to waste tee with...
... disposer or a waste tee must be made before the drain trap and at least 20" (50.8 cm) above the floor where the dishwasher will be installed. no air gap IMPORTANT: The drain hose connection of drain hose to squeeze clamp open and move into disposer. 2. Use pliers to waste tee with...
Installation Guide
Page 12
...remove the plastic rail cover, push upward and back to unsnap it from access panel. 12 Helpful Tip: Place cardboard under dishwasher until completely installed. Do not push down on each side of dishwasher door frame and place dishwasher on its back. Doing so can result in back or...to do so can result in cabinet opening to avoid damaging floor covering. Using two or more people to move and install dishwasher. Do not use dishwasher until installed in serious injury or cuts. Do not remove tech sheet from the dishwasher frame. Remove and discard the foam blocks ...
...remove the plastic rail cover, push upward and back to unsnap it from access panel. 12 Helpful Tip: Place cardboard under dishwasher until completely installed. Do not push down on each side of dishwasher door frame and place dishwasher on its back. Doing so can result in back or...to do so can result in cabinet opening to avoid damaging floor covering. Using two or more people to move and install dishwasher. Do not use dishwasher until installed in serious injury or cuts. Do not remove tech sheet from the dishwasher frame. Remove and discard the foam blocks ...
Installation Guide
Page 13
... relief in terminal box. 13 Make sure screw heads are facing to continue with the power supply cord kit. Strain relief is provided with the installation of dishwasher tub. Using a ¹⁄₄" hex head socket, nut driver or Torx T20 screwdriver, remove terminal box cover. Retain for later use. Route...
... relief in terminal box. 13 Make sure screw heads are facing to continue with the power supply cord kit. Strain relief is provided with the installation of dishwasher tub. Using a ¹⁄₄" hex head socket, nut driver or Torx T20 screwdriver, remove terminal box cover. Retain for later use. Route...
Installation Guide
Page 15
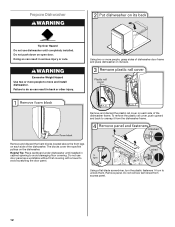
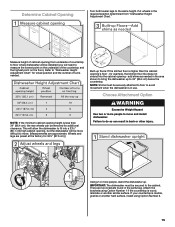
...Excessive Weight Hazard Use two or more people, stand the dishwasher up floors: If the kitchen floor is wood, laminate or another hard surface, install using Option Number 2. 15 There are preset at the factory for example, the kitchen floor tile does not extend into a 33¹⁄₂...people to measure the lowest point on the floor). NOTE: If the minimum cabinet opening - IMPORTANT: The dishwasher must be secured to move and install dishwasher. add shims as needed . If your countertop is in the parts bag. Refer to avoid movement when the dishwasher is marble, granite ...
...Excessive Weight Hazard Use two or more people, stand the dishwasher up floors: If the kitchen floor is wood, laminate or another hard surface, install using Option Number 2. 15 There are preset at the factory for example, the kitchen floor tile does not extend into a 33¹⁄₂...people to measure the lowest point on the floor). NOTE: If the minimum cabinet opening - IMPORTANT: The dishwasher must be secured to move and install dishwasher. add shims as needed . If your countertop is in the parts bag. Refer to avoid movement when the dishwasher is marble, granite ...
Installation Guide
Page 16
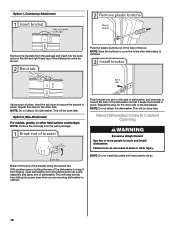
...16 NOTE: Do not attach the dishwasher. This will keep it keeps the bracket in place. NOTE: Do not install kick plate until instructed to cover the holes after dishwasher is installed. This will be done later. Repeat this step for the other hard surface countertops NOTE: Remove the brackets from... falling into slot on the left and right-hand top of pliers, bend the tab down to move and install dishwasher. NOTE: Save the buttons to do so can result in back or other side of the dishwasher. Push the plastic buttons out of...
...16 NOTE: Do not attach the dishwasher. This will keep it keeps the bracket in place. NOTE: Do not install kick plate until instructed to cover the holes after dishwasher is installed. This will be done later. Repeat this step for the other hard surface countertops NOTE: Remove the brackets from... falling into slot on the left and right-hand top of pliers, bend the tab down to move and install dishwasher. NOTE: Save the buttons to do so can result in back or other side of the dishwasher. Push the plastic buttons out of...
Installation Guide
Page 18
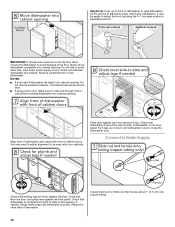
... cord or direct wire between dishwasher and cabinet. If needed, adjust leveling leg until dishwasher is level. Place level against top front opening . With some installations, it may need to adjust alignment to be easier to adjust the front leg using power cord, make sure to the floor. Repeat for other...
... cord or direct wire between dishwasher and cabinet. If needed, adjust leveling leg until dishwasher is level. Place level against top front opening . With some installations, it may need to adjust alignment to be easier to adjust the front leg using power cord, make sure to the floor. Repeat for other...

Installation Guide
Page 19
... NOTE: Do not overtighten. Hand tighten until the coupling is facing upward as it does not touch the dishwasher base, frame or motor. Connect to installing the unit into the 90° elbow fitting as far as shown above. An additional ¹⁄₄ to ¹⁄₂ turn may be...
... NOTE: Do not overtighten. Hand tighten until the coupling is facing upward as it does not touch the dishwasher base, frame or motor. Connect to installing the unit into the 90° elbow fitting as far as shown above. An additional ¹⁄₄ to ¹⁄₂ turn may be...

Installation Guide
Page 23
Adjust if necessary. Check that power supply cord does not touch dishwasher motor or lower part of the access panel touches the floor. Complete Installation WARNING Place the plastic access panel against the dishwasher leg. Do not use an adapter. Using a flat-blade screwdriver, turn the fasteners ¹⁄₄ ...
Adjust if necessary. Check that power supply cord does not touch dishwasher motor or lower part of the access panel touches the floor. Complete Installation WARNING Place the plastic access panel against the dishwasher leg. Do not use an adapter. Using a flat-blade screwdriver, turn the fasteners ¹⁄₄ ...
Installation Guide
Page 24
... of hard water deposits. Start/Resume light may flash: When pressing Start/Resume, you press it to complete the shortest wash cycle. Record hose installation or replacement dates on ? After the first 2 minutes, unlatch door, wait 5 seconds, then open door. Check that dishwasher is closed tightly and...hours. Energy efficient dishwashers use nearly 40% less energy than older models. If none of hose failure. If you have all parts have been installed and no steps were skipped. Check that you do this when adding a dish during the middle of a cycle.) NOTE: If a braided ...
... of hard water deposits. Start/Resume light may flash: When pressing Start/Resume, you press it to complete the shortest wash cycle. Record hose installation or replacement dates on ? After the first 2 minutes, unlatch door, wait 5 seconds, then open door. Check that dishwasher is closed tightly and...hours. Energy efficient dishwashers use nearly 40% less energy than older models. If none of hose failure. If you have all parts have been installed and no steps were skipped. Check that you do this when adding a dish during the middle of a cycle.) NOTE: If a braided ...

Warranty Information
Page 1
...PARTS AND LABOR) For one year from the date of purchase, when this major appliance is installed, operated and maintained according to instructions attached to or furnished with the product, Maytag brand of purchase. 6. SECOND THROUGH TENTH YEAR LIMITED WARRANTY (CERTAIN COMPONENT PARTS ONLY - This... for product service if your major appliance, to replace or repair house fuses, or to correct defects in accordance with Maytag published installation instructions. 10. Service calls to resolve the problem after checking "Troubleshooting," additional help can be provided by the customer....
...PARTS AND LABOR) For one year from the date of purchase, when this major appliance is installed, operated and maintained according to instructions attached to or furnished with the product, Maytag brand of purchase. 6. SECOND THROUGH TENTH YEAR LIMITED WARRANTY (CERTAIN COMPONENT PARTS ONLY - This... for product service if your major appliance, to replace or repair house fuses, or to correct defects in accordance with Maytag published installation instructions. 10. Service calls to resolve the problem after checking "Troubleshooting," additional help can be provided by the customer....
Use & Care Guide
Page 2
...9632; Use the dishwasher only for its intended function. ■ Use only detergents or rinse agents recommended for several minutes. The dishwasher is installed and grounded in a hot water system that they are not likely to reduce the risk of electric shock. Do not push down on the...are in or on open flame during this time. ■ Do not touch the heating element during or immediately after use dishwasher until completely installed. Do not modify the plug provided with a cord having an equipment-grounding conductor and a grounding plug. HYDROGEN GAS IS EXPLOSIVE. As the...
...9632; Use the dishwasher only for its intended function. ■ Use only detergents or rinse agents recommended for several minutes. The dishwasher is installed and grounded in a hot water system that they are not likely to reduce the risk of electric shock. Do not push down on the...are in or on open flame during this time. ■ Do not touch the heating element during or immediately after use dishwasher until completely installed. Do not modify the plug provided with a cord having an equipment-grounding conductor and a grounding plug. HYDROGEN GAS IS EXPLOSIVE. As the...
Use & Care Guide
Page 10
...to resume the cycle by pressing START/RESUME and closing the door within this guide.) Glasses and cups with the Heated Dry option is not installed, the following steps may not fill with nonstick surfaces are detected, the dishwasher may not operate properly or may help: Use a commercial cleaner... with concave bottoms hold HI TEMP WASH for the dishwasher to repeatedly pause several times during a cycle. In the U.S.A., www.maytag.com In Canada, www.maytag.ca PROBLEM DISHWASHER DOES NOT RUN DETERGENT REMAINS IN THE DISPENSER OR TABLET IS ON BOTTOM OF TUB CYCLE RUNS TOO LONG DISHWASHER...
...to resume the cycle by pressing START/RESUME and closing the door within this guide.) Glasses and cups with the Heated Dry option is not installed, the following steps may not fill with nonstick surfaces are detected, the dishwasher may not operate properly or may help: Use a commercial cleaner... with concave bottoms hold HI TEMP WASH for the dishwasher to repeatedly pause several times during a cycle. In the U.S.A., www.maytag.com In Canada, www.maytag.ca PROBLEM DISHWASHER DOES NOT RUN DETERGENT REMAINS IN THE DISPENSER OR TABLET IS ON BOTTOM OF TUB CYCLE RUNS TOO LONG DISHWASHER...
Use & Care Guide
Page 11
... or by a combination of: water that the cloudiness is removable by putting 2 cups (500 mL) of the cycle. ■ Improper installation will not run, call for service. Select the proper cycle and option for heavier-soiled loads and hard water conditions. The Jet Clean/Jet ...continues. To remove spotting, run a vinegar rinse through the dishwasher by soaking the item in the lower rack. Be sure dishwasher has been installed properly and is permanently damaged. NOTES: ■ Surging sounds can occur periodically throughout the cycle while the dishwasher is draining. ■ ...
... or by a combination of: water that the cloudiness is removable by putting 2 cups (500 mL) of the cycle. ■ Improper installation will not run, call for service. Select the proper cycle and option for heavier-soiled loads and hard water conditions. The Jet Clean/Jet ...continues. To remove spotting, run a vinegar rinse through the dishwasher by soaking the item in the lower rack. Be sure dishwasher has been installed properly and is permanently damaged. NOTES: ■ Surging sounds can occur periodically throughout the cycle while the dishwasher is draining. ■ ...

Use & Care Guide
Page 12
...from accident, alteration, misuse, abuse, fire, flood, acts of God, improper installation, installation not in accordance with electrical or plumbing codes, or use of products not approved by a Maytag designated service company. If outside the 50 United States and Canada, contact your ...COMPONENT PARTS ONLY - This is reported to Maytag within 30 days from the date of purchase. 6. Service calls to correct the installation of your home. 7. This major appliance is not installed in accordance with Maytag published installation instructions. 10. DISCLAIMER OF IMPLIED WARRANTIES ...
...from accident, alteration, misuse, abuse, fire, flood, acts of God, improper installation, installation not in accordance with electrical or plumbing codes, or use of products not approved by a Maytag designated service company. If outside the 50 United States and Canada, contact your ...COMPONENT PARTS ONLY - This is reported to Maytag within 30 days from the date of purchase. 6. Service calls to correct the installation of your home. 7. This major appliance is not installed in accordance with Maytag published installation instructions. 10. DISCLAIMER OF IMPLIED WARRANTIES ...


