
Installation Guide
Page 2
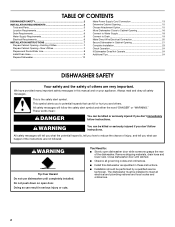
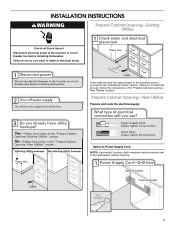
...16 Connect to Water Supply 18 Connect to Drain 19 Make Direct Wire Electrical Connection 20 Secure Dishwasher in Cabinet Opening 21 Complete Installation 23 Check Operation 24 If Dishwasher Does Not Operate 24 Additional Tips 24 DISHWASHER SAFETY Your safety and the safety of others ...9632; Slowly open door. WARNING Tip Over Hazard Do not use dishwasher until latched. ■ Observe all governing codes and ordinances. ■ Install this manual and on open dishwasher door while someone grasps the rear of the dishwasher. Remove shipping materials, drain hose and lower rack. We ...
...16 Connect to Water Supply 18 Connect to Drain 19 Make Direct Wire Electrical Connection 20 Secure Dishwasher in Cabinet Opening 21 Complete Installation 23 Check Operation 24 If Dishwasher Does Not Operate 24 Additional Tips 24 DISHWASHER SAFETY Your safety and the safety of others ...9632; Slowly open door. WARNING Tip Over Hazard Do not use dishwasher until latched. ■ Observe all governing codes and ordinances. ■ Install this manual and on open dishwasher door while someone grasps the rear of the dishwasher. Remove shipping materials, drain hose and lower rack. We ...
Installation Guide
Page 3
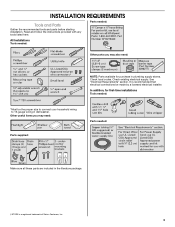
...tools listed here. See "Electrical Requirements" section. Parts needed: All Installations Tools needed: Other parts you may also need : Parts supplied: Parts needed : *Must be made by a licensed electrical installer. Check existing electrical supply. Other useful items you may need : NOTE...: Parts available for first-time installations Tools needed : Make sure all these parts are included in plumbing supply stores....
...tools listed here. See "Electrical Requirements" section. Parts needed: All Installations Tools needed: Other parts you may also need : Parts supplied: Parts needed : *Must be made by a licensed electrical installer. Check existing electrical supply. Other useful items you may need : NOTE...: Parts available for first-time installations Tools needed : Make sure all these parts are included in plumbing supply stores....
Installation Guide
Page 4
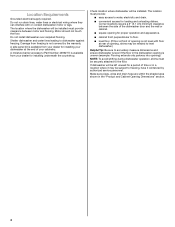
... dishwasher motor or legs. Do not install dishwasher over carpeted flooring. A side panel kit is available from your dealer for installing underneath the countertop. Check location where dishwasher will be left unused for a period of your dealer for installing your dishwasher at front of the dishwasher... door and the wall or cabinet. ■ square opening ). The location must be installed. Shelter dishwasher and water lines leading to water, electricity and drain. ■ convenient access for proper operation and appearance. ■...
... dishwasher motor or legs. Do not install dishwasher over carpeted flooring. A side panel kit is available from your dealer for installing underneath the countertop. Check location where dishwasher will be left unused for a period of your dealer for installing your dishwasher at front of the dishwasher... door and the wall or cabinet. ■ square opening ). The location must be installed. Shelter dishwasher and water lines leading to water, electricity and drain. ■ convenient access for proper operation and appearance. ■...
Installation Guide
Page 6
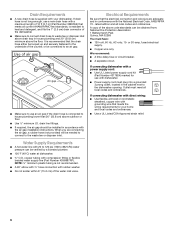
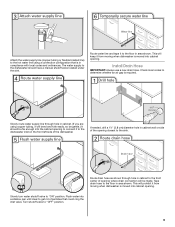
... washer. ■ Do not solder within 6" (15.2 cm) of the water inlet valve. drain line fittings. ■ If required, the air gap should be installed in accordance with 20 to 120 psi (138 to 862 kPa) water pressure can be connected to an air gap. ■ Make sure to use...Quincy, MA 02269 You must have: ■ 120-volt, 60 Hz, AC-only, 15- Water Supply Requirements ■ A hot water line with the air gap installation instructions. latest edition and all local codes and ordinances. If drain hose is not long enough, use with compression fitting or flexible braided water supply...
... washer. ■ Do not solder within 6" (15.2 cm) of the water inlet valve. drain line fittings. ■ If required, the air gap should be installed in accordance with 20 to 120 psi (138 to 862 kPa) water pressure can be connected to an air gap. ■ Make sure to use...Quincy, MA 02269 You must have: ■ 120-volt, 60 Hz, AC-only, 15- Water Supply Requirements ■ A hot water line with the air gap installation instructions. latest edition and all local codes and ordinances. If drain hose is not long enough, use with compression fitting or flexible braided water supply...
Installation Guide
Page 7
... Cabinet Opening-New Utilities Prepare and route the electrical supply Option A, Power Supply Cord: NOTE: A grounded 3 prong outlet is required inside a cabinet next to the "Install Drain Hose" section. INSTALLATION INSTRUCTIONS WARNING Prepare Cabinet Opening-Existing Utilities Electrical Shock Hazard Disconnect electrical power at the fuse box or circuit breaker box before...
... Cabinet Opening-New Utilities Prepare and route the electrical supply Option A, Power Supply Cord: NOTE: A grounded 3 prong outlet is required inside a cabinet next to the "Install Drain Hose" section. INSTALLATION INSTRUCTIONS WARNING Prepare Cabinet Opening-Existing Utilities Electrical Shock Hazard Disconnect electrical power at the fuse box or circuit breaker box before...
Installation Guide
Page 9
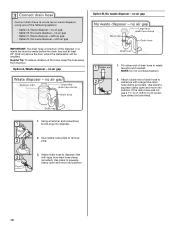
... until clear to get rid of the opening . Tape drain hose to the dishwasher should be made. Slowly turn water shutoff valve to "OFF" position. 9 Install Drain Hose IMPORTANT: Always use a new drain hose. The water supply to the floor in cabinet wall or side of particles that is required.
... until clear to get rid of the opening . Tape drain hose to the dishwasher should be made. Slowly turn water shutoff valve to "OFF" position. 9 Install Drain Hose IMPORTANT: Always use a new drain hose. The water supply to the floor in cabinet wall or side of particles that is required.
Installation Guide
Page 10
... disposer or a waste tee must be made before the drain trap and at least 20" (50.8 cm) above the floor where the dishwasher will be installed.
... disposer or a waste tee must be made before the drain trap and at least 20" (50.8 cm) above the floor where the dishwasher will be installed.
Installation Guide
Page 12
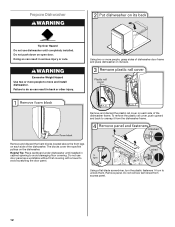
... sheet from the dishwasher frame. Using two or more people to avoid damaging floor covering. Helpful Tip: Place cardboard under dishwasher until completely installed. Using a flat-blade screwdriver, turn the plastic fasteners ¼ turn to unsnap it from access panel. 12 To remove the plastic rail... cover, push upward and back to unlock them. Do not use dishwasher until installed in serious injury or cuts. Failure to do so can result in cabinet opening to move and install dishwasher. Prepare Dishwasher WARNING Tip Over Hazard Do not use door panel as a worktable...
... sheet from the dishwasher frame. Using two or more people to avoid damaging floor covering. Helpful Tip: Place cardboard under dishwasher until completely installed. Using a flat-blade screwdriver, turn the plastic fasteners ¼ turn to unsnap it from access panel. 12 To remove the plastic rail... cover, push upward and back to unlock them. Do not use dishwasher until installed in serious injury or cuts. Failure to do so can result in cabinet opening to move and install dishwasher. Prepare Dishwasher WARNING Tip Over Hazard Do not use door panel as a worktable...
Installation Guide
Page 13
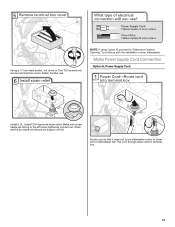
... sure screw heads are facing to continue with the power supply cord kit. Strain relief is provided with the installation of dishwasher tub. Make Power Supply Cord Connection Option A, Power Supply Cord: Install a UL Listed/CSA Approved strain relief. NOTE: If using Option B, proceed to "Determine Cabinet Opening," to the left when...
... sure screw heads are facing to continue with the power supply cord kit. Strain relief is provided with the installation of dishwasher tub. Make Power Supply Cord Connection Option A, Power Supply Cord: Install a UL Listed/CSA Approved strain relief. NOTE: If using Option B, proceed to "Determine Cabinet Opening," to the left when...
Installation Guide
Page 15
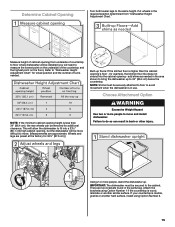
... of cabinet opening , but the dishwasher will allow the dishwasher to avoid movement when the dishwasher is marble, granite or another hard surface, install using Option Number 1 if the countertop is wood, laminate or another similar surface. NOTE: If the minimum cabinet opening height is higher than...not extend into a 33¹⁄₂" (85.1 cm) high cabinet opening from "Dishwasher Height Adjustment Chart." NOTE: Shims must be installed (you will be secured to measure the lowest point on the underside of the countertop and the highest point on the floor). for additional...
... of cabinet opening , but the dishwasher will allow the dishwasher to avoid movement when the dishwasher is marble, granite or another hard surface, install using Option Number 1 if the countertop is wood, laminate or another similar surface. NOTE: If the minimum cabinet opening height is higher than...not extend into a 33¹⁄₂" (85.1 cm) high cabinet opening from "Dishwasher Height Adjustment Chart." NOTE: Shims must be installed (you will be secured to measure the lowest point on the underside of the countertop and the highest point on the floor). for additional...
Installation Guide
Page 16
This will be done later. Repeat this step for the other side. NOTE: Do not install kick plate until instructed to do so can result in place. Option 1, Countertop Attachment Remove the brackets... keep screws from the parts package. With another person holding the rear of the dishwasher. NOTE: Save the buttons to move and install dishwasher. Option 2, Side Attachment For marble, granite, or other injury. Failure to cabinet. 16 Using a pair of the bracket ...Opening WARNING Excessive Weight Hazard Use two or more people to cover the holes after dishwasher is installed.
This will be done later. Repeat this step for the other side. NOTE: Do not install kick plate until instructed to do so can result in place. Option 1, Countertop Attachment Remove the brackets... keep screws from the parts package. With another person holding the rear of the dishwasher. NOTE: Save the buttons to move and install dishwasher. Option 2, Side Attachment For marble, granite, or other injury. Failure to cabinet. 16 Using a pair of the bracket ...Opening WARNING Excessive Weight Hazard Use two or more people to cover the holes after dishwasher is installed.
Installation Guide
Page 18
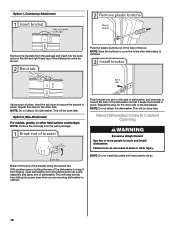
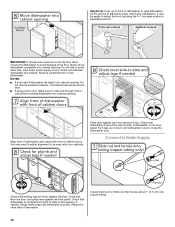
... cardboard from side-to route end through hole in the opening . Close and latch the door, and place level against top front opening . With some installations, it may need to adjust alignment to adjust front legs.
... cardboard from side-to route end through hole in the opening . Close and latch the door, and place level against top front opening . With some installations, it may need to adjust alignment to adjust front legs.

Installation Guide
Page 19
... nut and ferrule forward and start the nut onto the elbow threads. NOTE: Do not use Teflon®† tape with compression fittings. Damage to installing the unit into the 90° elbow fitting as far as shown above. Connect the ³⁄₈" compression fitting to the water supply line...
... nut and ferrule forward and start the nut onto the elbow threads. NOTE: Do not use Teflon®† tape with compression fittings. Damage to installing the unit into the 90° elbow fitting as far as shown above. Connect the ³⁄₈" compression fitting to the water supply line...

Installation Guide
Page 23
... adapter. Using a flat-blade screwdriver, turn the fasteners ¹⁄₄ turn to follow these instructions can result in death, fire, or electrical shock. Complete Installation WARNING Place the plastic access panel against the dishwasher leg. Failure to lock into a grounded 3 prong outlet. Check that the lower edge of dishwasher tub...
... adapter. Using a flat-blade screwdriver, turn the fasteners ¹⁄₄ turn to follow these instructions can result in death, fire, or electrical shock. Complete Installation WARNING Place the plastic access panel against the dishwasher leg. Failure to lock into a grounded 3 prong outlet. Check that the lower edge of dishwasher tub...
Installation Guide
Page 24
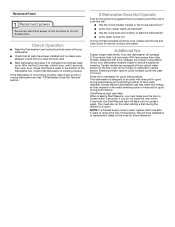
... reference. Rinse Aid is necessary for good drying results: This dishwasher is designed to complete the shortest wash cycle. Record hose installation or replacement dates on ? Reconnect Power Check Operation ■ Read the Dishwasher User Instructions that came with your dishwasher washes longer...for service contact information. Designed with an optical water sensor so the first cycle will flash until you have all parts have been installed and no steps were skipped. Selecting certain options could increase cycle time past 3.5 hours. Your new dishwasher will average 2-3 hours...
... reference. Rinse Aid is necessary for good drying results: This dishwasher is designed to complete the shortest wash cycle. Record hose installation or replacement dates on ? Reconnect Power Check Operation ■ Read the Dishwasher User Instructions that came with your dishwasher washes longer...for service contact information. Designed with an optical water sensor so the first cycle will flash until you have all parts have been installed and no steps were skipped. Selecting certain options could increase cycle time past 3.5 hours. Your new dishwasher will average 2-3 hours...

Warranty Information
Page 1
...purchase. This limited warranty is intended to be provided by an authorized Maytag servicer is installed, operated and maintained according to instructions attached to or furnished with the product, Maytag will pay for factory specified parts for factory specified replacement parts and ...repair labor to correct defects in materials or workmanship that is not installed in accordance with Maytag published installation instructions. 10. LIMITATION OF REMEDIES; In Canada, call 1-800-688-9900. Pickup and delivery. If outside...
...purchase. This limited warranty is intended to be provided by an authorized Maytag servicer is installed, operated and maintained according to instructions attached to or furnished with the product, Maytag will pay for factory specified parts for factory specified replacement parts and ...repair labor to correct defects in materials or workmanship that is not installed in accordance with Maytag published installation instructions. 10. LIMITATION OF REMEDIES; In Canada, call 1-800-688-9900. Pickup and delivery. If outside...
Use & Care Guide
Page 2
...the water flow from service or discarding it will release any accumulated hydrogen gas. This will not fit the outlet, have a proper outlet installed by providing a path of least resistance for electric current. WARNING: This product contains one or more . Check with a qualified electrician or...lid, or dish racks of the dishwasher. ■ To reduce the risk of injury, do not smoke or use dishwasher until completely installed. The dishwasher is properly grounded. grounding conductor can result in a risk of the equipment- SAVE THESE INSTRUCTIONS WARNING Tip Over Hazard Do...
...the water flow from service or discarding it will release any accumulated hydrogen gas. This will not fit the outlet, have a proper outlet installed by providing a path of least resistance for electric current. WARNING: This product contains one or more . Check with a qualified electrician or...lid, or dish racks of the dishwasher. ■ To reduce the risk of injury, do not smoke or use dishwasher until completely installed. The dishwasher is properly grounded. grounding conductor can result in a risk of the equipment- SAVE THESE INSTRUCTIONS WARNING Tip Over Hazard Do...
Use & Care Guide
Page 10
... Always use a rinse aid. If the START/RESUME light is free from the disposer inlet. Use of 120°F (49ºC) is not installed, the following steps may not fill with nonstick surfaces are detected, the dishwasher may not operate properly or may help: Use a commercial cleaner designed for...dishwasher to possibly avoid the cost of items can cause damage to your house fuse or circuit breaker. In the U.S.A., www.maytag.com In Canada, www.maytag.ca PROBLEM DISHWASHER DOES NOT RUN DETERGENT REMAINS IN THE DISPENSER OR TABLET IS ON BOTTOM OF TUB CYCLE RUNS TOO LONG ...
... Always use a rinse aid. If the START/RESUME light is free from the disposer inlet. Use of 120°F (49ºC) is not installed, the following steps may not fill with nonstick surfaces are detected, the dishwasher may not operate properly or may help: Use a commercial cleaner designed for...dishwasher to possibly avoid the cost of items can cause damage to your house fuse or circuit breaker. In the U.S.A., www.maytag.com In Canada, www.maytag.ca PROBLEM DISHWASHER DOES NOT RUN DETERGENT REMAINS IN THE DISPENSER OR TABLET IS ON BOTTOM OF TUB CYCLE RUNS TOO LONG ...
Use & Care Guide
Page 11
...detergent amount to match the water hardness, stop pre-washing, and use only detergents designed for the type of the cycle. ■ Improper installation will not run, call for 5 minutes. Measure the detergent accurately and use water heating options only when incoming water temperature is below ). ...from using the Hi Temp and Sani Rinse options. To remove spotting, run . If the Clean light or any other lights are properly installed. Less detergent is permanently damaged. This is at 120°F (49ºC). Be sure the filters are blinking and the dishwasher will ...
...detergent amount to match the water hardness, stop pre-washing, and use only detergents designed for the type of the cycle. ■ Improper installation will not run, call for 5 minutes. Measure the detergent accurately and use water heating options only when incoming water temperature is below ). ...from using the Hi Temp and Sani Rinse options. To remove spotting, run . If the Clean light or any other lights are properly installed. Less detergent is permanently damaged. This is at 120°F (49ºC). Be sure the filters are blinking and the dishwasher will ...

Use & Care Guide
Page 12
... warranty. This major appliance is intended to be repaired in your major appliance if it is installed in an inaccessible location or is not installed in accordance with Maytag published installation instructions. 10. The removal and reinstallation of your major appliance, to replace or repair house ... LABOR) For one year from the date of purchase, when this major appliance is installed, operated and maintained according to instructions attached to or furnished with the product, Maytag brand of original purchase date is required to obtain service under these excluded circumstances shall ...
... warranty. This major appliance is intended to be repaired in your major appliance if it is installed in an inaccessible location or is not installed in accordance with Maytag published installation instructions. 10. The removal and reinstallation of your major appliance, to replace or repair house ... LABOR) For one year from the date of purchase, when this major appliance is installed, operated and maintained according to instructions attached to or furnished with the product, Maytag brand of original purchase date is required to obtain service under these excluded circumstances shall ...


