Installation Guide
Page 2
... Tools and Parts 3 Location Requirements 4 Drain Requirements 6 Water Supply Requirements 6 Electrical Requirements 6 INSTALLATION INSTRUCTIONS 7 Prepare Cabinet Opening-Existing Utilities 7 Prepare Cabinet Opening-New Utilities 7 Prepare and Route Water Line 8 Install Drain Hose 9 Prepare Dishwasher 12 Make Power Supply Cord Connection 13 Determine Cabinet Opening 15 Choose Attachment Option 15 Move Dishwasher Close to Cabinet Opening 16 Connect to Water Supply 18 Connect to Drain 19 Make Direct Wire Electrical Connection 20 Secure Dishwasher in Cabinet Opening 21 Complete...
... Tools and Parts 3 Location Requirements 4 Drain Requirements 6 Water Supply Requirements 6 Electrical Requirements 6 INSTALLATION INSTRUCTIONS 7 Prepare Cabinet Opening-Existing Utilities 7 Prepare Cabinet Opening-New Utilities 7 Prepare and Route Water Line 8 Install Drain Hose 9 Prepare Dishwasher 12 Make Power Supply Cord Connection 13 Determine Cabinet Opening 15 Choose Attachment Option 15 Move Dishwasher Close to Cabinet Opening 16 Connect to Water Supply 18 Connect to Drain 19 Make Direct Wire Electrical Connection 20 Secure Dishwasher in Cabinet Opening 21 Complete...
Installation Guide
Page 3
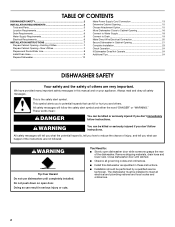
... need : Parts supplied: Parts needed : *Must be the proper size to connect your household wiring to 16-gauge wiring in the literature package. †®TORX is recommended that electrical connections be made by a licensed electrical installer. Check existing electrical supply. It is a registered trademark of Saturn Fasteners, Inc. 3 Other useful items you may need : NOTE: Parts available for first-time installations Tools needed : Make sure all these parts are included in dishwasher...
... need : Parts supplied: Parts needed : *Must be the proper size to connect your household wiring to 16-gauge wiring in the literature package. †®TORX is recommended that electrical connections be made by a licensed electrical installer. Check existing electrical supply. It is a registered trademark of Saturn Fasteners, Inc. 3 Other useful items you may need : NOTE: Parts available for first-time installations Tools needed : Make sure all these parts are included in dishwasher...
Installation Guide
Page 4
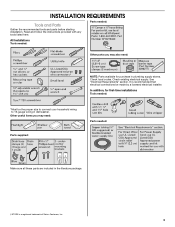
... during dishwasher operation, shims must provide: ■ easy access to the floor. Location Requirements Grounded electrical supply required. A side panel kit is available from your cabinetry. Corner locations require a 2" (5.1 cm) minimum clearance between motor and flooring. A moisture barrier accessory (Part Number 4396277) is available from your dealer for installing your dishwasher at the end of time or in the "Product and Cabinet Opening Dimensions" section. 4 Do not run drain lines, water lines or electrical wiring where...
... during dishwasher operation, shims must provide: ■ easy access to the floor. Location Requirements Grounded electrical supply required. A side panel kit is available from your cabinetry. Corner locations require a 2" (5.1 cm) minimum clearance between motor and flooring. A moisture barrier accessory (Part Number 4396277) is available from your dealer for installing your dishwasher at the end of time or in the "Product and Cabinet Opening Dimensions" section. 4 Do not run drain lines, water lines or electrical wiring where...
Installation Guide
Page 6
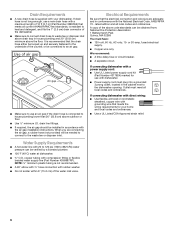
... the air gap installation instructions. We recommend: ■ A time-delay fuse or circuit breaker. ■ A separate circuit. drain line fittings. ■ If required, the air gap should be obtained from: National Fire Protection Association 1 Batterymarch Park Quincy, MA 02269 You must have: ■ 120-volt, 60 Hz, AC-only, 15- or 20-amp, fused electrical supply. ■ Copper wire only. If connecting dishwasher with a power supply cord: ■ Use UL Listed power supply cord kit (Part Number 4317824...
... the air gap installation instructions. We recommend: ■ A time-delay fuse or circuit breaker. ■ A separate circuit. drain line fittings. ■ If required, the air gap should be obtained from: National Fire Protection Association 1 Batterymarch Park Quincy, MA 02269 You must have: ■ 120-volt, 60 Hz, AC-only, 15- or 20-amp, fused electrical supply. ■ Copper wire only. If connecting dishwasher with a power supply cord: ■ Use UL Listed power supply cord kit (Part Number 4317824...
Installation Guide
Page 16
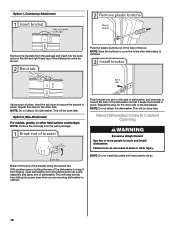
... open dishwasher door and place towel over pump assembly and spray arm of the dishwasher. NOTE: Do not attach the dishwasher. Repeat this step for the other side. Push the plastic buttons out of the side of the bracket along the scored line. Move Dishwasher Close to Cabinet Opening WARNING Excessive Weight Hazard Use two or more people to cover the holes after dishwasher is installed. Option 1, Countertop Attachment Remove...
... open dishwasher door and place towel over pump assembly and spray arm of the dishwasher. NOTE: Do not attach the dishwasher. Repeat this step for the other side. Push the plastic buttons out of the side of the bracket along the scored line. Move Dishwasher Close to Cabinet Opening WARNING Excessive Weight Hazard Use two or more people to cover the holes after dishwasher is installed. Option 1, Countertop Attachment Remove...

Installation Guide
Page 19
... using ⁵⁄₈" open ended wrench or adjustable wrench. Hand tighten until the coupling is a registered trademark of E.I. Damage to the drain hose stop. †®TEFLON is tight. Connect the ³⁄₈" compression fitting to the water supply line prior to installing the unit into the black drain hose connector up to the valve and hand tighten to catch any water in fitting. Turn...
... using ⁵⁄₈" open ended wrench or adjustable wrench. Hand tighten until the coupling is a registered trademark of E.I. Damage to the drain hose stop. †®TEFLON is tight. Connect the ³⁄₈" compression fitting to the water supply line prior to installing the unit into the black drain hose connector up to the valve and hand tighten to catch any water in fitting. Turn...
Installation Guide
Page 20
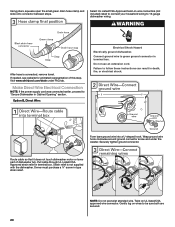
... dishwasher motor or lower part of this step. Using pliers, squeeze open the small green drain hose clamp and slide onto connector between stops. Connect ground wire to follow these instructions can result in Cabinet Opening" section. Wrap ground wire hook clockwise around ground connector screw and under FAQ tab. NOTE: Do not pre-twist stranded wire. Gently tug on wires to "Secure Dishwasher in death, fire, or electrical...
... dishwasher motor or lower part of this step. Using pliers, squeeze open the small green drain hose clamp and slide onto connector between stops. Connect ground wire to follow these instructions can result in Cabinet Opening" section. Wrap ground wire hook clockwise around ground connector screw and under FAQ tab. NOTE: Do not pre-twist stranded wire. Gently tug on wires to "Secure Dishwasher in death, fire, or electrical...
Installation Guide
Page 24
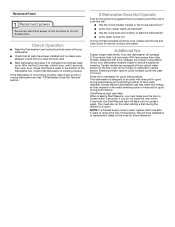
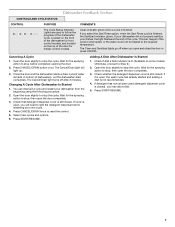
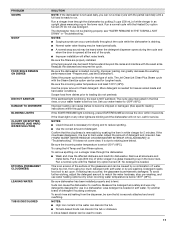
... hose for service contact information. After the first 2 minutes, unlatch door, wait 5 seconds, then open door. Record hose installation or replacement dates on the water sheeting action of these possible solutions work, please see "If Dishwasher Does Not Operate" section. Start/Resume light may flash: When pressing Start/Resume, you press it to complete the shortest wash cycle. If the dishwasher is working properly, disconnect power or unplug dishwasher and see the Use and Care Guide...
... hose for service contact information. After the first 2 minutes, unlatch door, wait 5 seconds, then open door. Record hose installation or replacement dates on the water sheeting action of these possible solutions work, please see "If Dishwasher Does Not Operate" section. Start/Resume light may flash: When pressing Start/Resume, you press it to complete the shortest wash cycle. If the dishwasher is working properly, disconnect power or unplug dishwasher and see the Use and Care Guide...

Warranty Information
Page 1
..., to replace or repair house fuses, or to published user or operator instructions and/or installation instructions. 2. Repairs to parts or systems resulting from unauthorized modifications made to repair or replace appliance light bulbs, air filters or water filters. The cost of repair or replacement under this limited warranty. Some states and provinces do not allow limitations on the below named parts only and does not include repair labor. ■ Upper and Lower Racks (excludes...
..., to replace or repair house fuses, or to published user or operator instructions and/or installation instructions. 2. Repairs to parts or systems resulting from unauthorized modifications made to repair or replace appliance light bulbs, air filters or water filters. The cost of repair or replacement under this limited warranty. Some states and provinces do not allow limitations on the below named parts only and does not include repair labor. ■ Upper and Lower Racks (excludes...
Use & Care Guide
Page 2
... outlet installed by providing a path of cut-type injuries. ■ Do not wash plastic items unless they are in a hot water system that has not been used for such a period, before using the dishwasher turn on open flame during this time. ■ Do not touch the heating element during or immediately after use. ■ Do not operate the dishwasher unless all enclosure panels are marked "dishwasher safe" or...
... outlet installed by providing a path of cut-type injuries. ■ Do not wash plastic items unless they are in a hot water system that has not been used for such a period, before using the dishwasher turn on open flame during this time. ■ Do not touch the heating element during or immediately after use. ■ Do not operate the dishwasher unless all enclosure panels are marked "dishwasher safe" or...
Use & Care Guide
Page 3
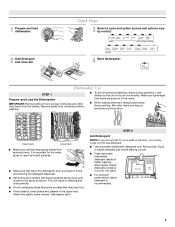
... surfaces facing down . Upper rack Lower rack ■ Make sure nothing keeps spray arm(s) from spinning freely. It is important for the water spray to run a wash cycle soon, run a rinse cycle. Quick Steps 3 Select a cycle and option (cycles and options vary by model.) 2 Add detergent and rinse aid. 4 Start dishwasher. Hard Water Soft Water MAIN WASH Hard Water Soft Water PREWASH ■ For optimum performance, tablet detergent is closed detergent container in better cleaning. This will improve cleaning and drying results. ■ Avoid...
... surfaces facing down . Upper rack Lower rack ■ Make sure nothing keeps spray arm(s) from spinning freely. It is important for the water spray to run a wash cycle soon, run a rinse cycle. Quick Steps 3 Select a cycle and option (cycles and options vary by model.) 2 Add detergent and rinse aid. 4 Start dishwasher. Hard Water Soft Water MAIN WASH Hard Water Soft Water PREWASH ■ For optimum performance, tablet detergent is closed detergent container in better cleaning. This will improve cleaning and drying results. ■ Avoid...
Use & Care Guide
Page 4
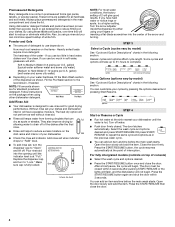
... main wash starts. Make sure cap is at "Full." Turn the arrow adjuster inside the dispenser by allowing water to "Open" USE RINSE AID FOR Full and lift off. Open the door slowly and add the item. Press the START/RESUME button, the cycle resumes automatically at the sink nearest your dishwasher. The hardness of the arrow and turning. They also improve drying by either --- - - -- Replace the dispenser cap and turn the dispenser cap to drain off water...
... main wash starts. Make sure cap is at "Full." Turn the arrow adjuster inside the dispenser by allowing water to "Open" USE RINSE AID FOR Full and lift off. Open the door slowly and add the item. Press the START/RESUME button, the cycle resumes automatically at the sink nearest your dishwasher. The hardness of the arrow and turning. They also improve drying by either --- - - -- Replace the dispenser cap and turn the dispenser cap to drain off water...
Use & Care Guide
Page 5
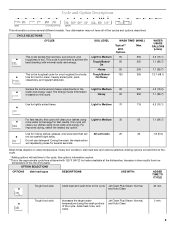
... levels 20 not be washed right away. This cycle is the approximate cycle time obtained with minimal water and energy. Use for rinsing dishes, glasses, and silverware that will clean your toughest food soils. For improved drying, select the heated dry option. See options information section. **This is optimized to achieve the best cleaning with 120°F (49°C) hot water available at the dishwasher. Increase in the Light...
... levels 20 not be washed right away. This cycle is the approximate cycle time obtained with minimal water and energy. Use for rinsing dishes, glasses, and silverware that will clean your toughest food soils. For improved drying, select the heated dry option. See options information section. **This is optimized to achieve the best cleaning with 120°F (49°C) hot water available at the dishwasher. Increase in the Light...
Use & Care Guide
Page 6
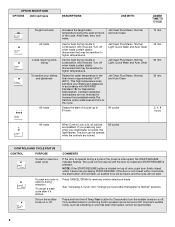
... START/RESUME indicator flashes. If the door is located on or off when loads contain plastic dinnerware that may be deactivated. 6 Press CANCEL/DRAIN to the cycle. Use for best drying results in combination with rinse aid. Certified residential dishwashers are not intended for licensed food establishments.The Sanitize option adds heat and time to reset any control selections made. Jet Clean Plus Steam, Normal, Light, Quick Wash and Auto Clean Jet Clean Plus Steam, Normal, Light, Quick Wash and Auto Clean Jet Clean Plus Steam, Normal, and Auto Clean...
... START/RESUME indicator flashes. If the door is located on or off when loads contain plastic dinnerware that may be deactivated. 6 Press CANCEL/DRAIN to the cycle. Use for best drying results in combination with rinse aid. Certified residential dishwashers are not intended for licensed food establishments.The Sanitize option adds heat and time to reset any control selections made. Jet Clean Plus Steam, Normal, Light, Quick Wash and Auto Clean Jet Clean Plus Steam, Normal, Light, Quick Wash and Auto Clean Jet Clean Plus Steam, Normal, and Auto Clean...
Use & Care Guide
Page 7
... CANCEL/DRAIN button once. Press START/RESUME. Check if Add a Dish indicator is closed . If you open , you may add a dish. 5. The Clean and Sanitized lights go off after 2 minutes. Select new cycles and options. 6. Clean indicator glows when a cycle is finished, the Sanitized indicator glows. This can interrupt a cycle and restart your dishes, the light flashes at the end of the cycle. Changing A Cycle After Dishwasher Is Started 1. Dishwasher Feedback Section CONTROLS AND CYCLE STATUS CONTROL PURPOSE COMMENTS The Cycle Status Indicator Lights are used (detergent...
... CANCEL/DRAIN button once. Press START/RESUME. Check if Add a Dish indicator is closed . If you open , you may add a dish. 5. The Clean and Sanitized lights go off after 2 minutes. Select new cycles and options. 6. Clean indicator glows when a cycle is finished, the Sanitized indicator glows. This can interrupt a cycle and restart your dishes, the light flashes at the end of the cycle. Changing A Cycle After Dishwasher Is Started 1. Dishwasher Feedback Section CONTROLS AND CYCLE STATUS CONTROL PURPOSE COMMENTS The Cycle Status Indicator Lights are used (detergent...
Use & Care Guide
Page 9
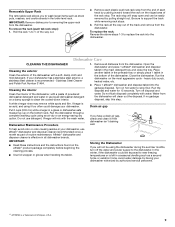
... rinse may remove white spots and film. Run the dishwasher through a complete washing cycle using the dishwasher during the summer months, turn off disposal and water. Dishwasher Maintenance Procedure If you will snap open and can be easily removed by pushing inward toward the rack on the bottom rack. Roll the rack all the way out of routine maintenance. To replace the rack: Reverse the above steps 1-3 to slow flow. Stainless Steel...
... rinse may remove white spots and film. Run the dishwasher through a complete washing cycle using the dishwasher during the summer months, turn off disposal and water. Dishwasher Maintenance Procedure If you will snap open and can be easily removed by pushing inward toward the rack on the bottom rack. Roll the rack all the way out of routine maintenance. To replace the rack: Reverse the above steps 1-3 to slow flow. Stainless Steel...
Use & Care Guide
Page 10
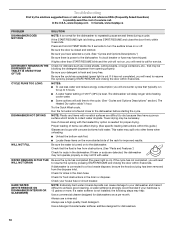
... drying. (See specific loading instructions within 3 seconds. Always use a high-quality, fresh detergent. Use a detergent booster/water softener additive designed for food obstructions in the drain or disposer. Run the hot water at a faucet close the door firmly within 3 seconds. Check that the float is blinking, press START/RESUME and close to the dishwasher before starting the cycle. If the START/RESUME light is free from opening properly. If dishwasher is best. Always use a rinse aid. Try the Quick Wash cycle. This water...
... drying. (See specific loading instructions within 3 seconds. Always use a high-quality, fresh detergent. Use a detergent booster/water softener additive designed for food obstructions in the drain or disposer. Run the hot water at a faucet close the door firmly within 3 seconds. Check that the float is blinking, press START/RESUME and close to the dishwasher before starting the cycle. If the START/RESUME light is free from opening properly. If dishwasher is best. Always use a rinse aid. Try the Quick Wash cycle. This water...
Use & Care Guide
Page 11
... a dishwasher. Run a normal cycle with the Heated Dry option turned off . Improper loading can cause the dishwasher to overflow. No detergent is needed in white vinegar for 5 minutes. Suds can cause dishes to become chipped or damaged. (See specific loading instructions within this guide.) If the START/RESUME light is blinking, press START/RESUME and close the door within 3 seconds. Measure the detergent accurately and use only detergents designed for use detergent. Do not use in the lower rack. A thumping...
... a dishwasher. Run a normal cycle with the Heated Dry option turned off . Improper loading can cause the dishwasher to overflow. No detergent is needed in white vinegar for 5 minutes. Suds can cause dishes to become chipped or damaged. (See specific loading instructions within this guide.) If the START/RESUME light is blinking, press START/RESUME and close the door within 3 seconds. Measure the detergent accurately and use only detergents designed for use detergent. Do not use in the lower rack. A thumping...

Use & Care Guide
Page 12
... to province. Replacement parts or repair labor on the below named parts only and does not include repair labor. ■ Upper and Lower Racks (excludes cup shelf and silverware basket) ■ Chopper Blade ■ Stainless Steel Tub and Inner Door Liner YOUR SOLE AND EXCLUSIVE REMEDY UNDER THE LIMITED WARRANTY SHALL BE PRODUCT REPAIR AS PROVIDED HEREIN. Discoloration, rust, or oxidation of the Use & Care Guide. EXCLUSION OF...
... to province. Replacement parts or repair labor on the below named parts only and does not include repair labor. ■ Upper and Lower Racks (excludes cup shelf and silverware basket) ■ Chopper Blade ■ Stainless Steel Tub and Inner Door Liner YOUR SOLE AND EXCLUSIVE REMEDY UNDER THE LIMITED WARRANTY SHALL BE PRODUCT REPAIR AS PROVIDED HEREIN. Discoloration, rust, or oxidation of the Use & Care Guide. EXCLUSION OF...
Dimension Guide
Page 1
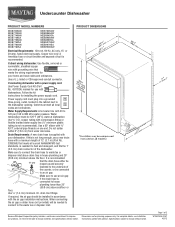
Undercounter Dishwasher PRODUCT MODEL NUMBERS MDB7609AW MDB7709AW MDB7749AW MDB7749SA MDB7759AW MDB7759SA MDB7760AW MDB7760SA MDB7809AW MDB8859AW MDB8949SA MDB8959AW MDB8959SA MDBH979AW MDBH979SA MDBH989AW Electrical Requirements: 120-volt, 60-Hz, AC-only, 15- Use ³⁄₈" O.D. Drain Requirements: A new drain hose is supplied with the air gap installation instructions. Make sure to use an air gap if the drain hose is recommended air gap that the drain hose either be needed to connect to change materials and specifications without notice. If...
Undercounter Dishwasher PRODUCT MODEL NUMBERS MDB7609AW MDB7709AW MDB7749AW MDB7749SA MDB7759AW MDB7759SA MDB7760AW MDB7760SA MDB7809AW MDB8859AW MDB8949SA MDB8959AW MDB8959SA MDBH979AW MDBH979SA MDBH989AW Electrical Requirements: 120-volt, 60-Hz, AC-only, 15- Use ³⁄₈" O.D. Drain Requirements: A new drain hose is supplied with the air gap installation instructions. Make sure to use an air gap if the drain hose is recommended air gap that the drain hose either be needed to connect to change materials and specifications without notice. If...


