Owners Manual
Page 1
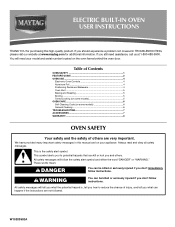
... or "WARNING." You will need assistance, call us at www.maytag.com for purchasing this manual and on your model and serial number located on some models 6 General Cleaning 6 TROUBLESHOOTING 7 ACCESSORIES 7 WARRANTY 8 OVEN SAFETY Your safety and the safety of injury, and tell you what...you what can be killed or seriously injured if you should experience a problem not covered in this high-quality product. W10203502A ELECTRIC BUILT-IN OVEN USER INSTRUCTIONS THANK YOU for additional information. This symbol alerts you to reduce the chance of others . If you don't ...
... or "WARNING." You will need assistance, call us at www.maytag.com for purchasing this manual and on your model and serial number located on some models 6 General Cleaning 6 TROUBLESHOOTING 7 ACCESSORIES 7 WARRANTY 8 OVEN SAFETY Your safety and the safety of injury, and tell you what...you what can be killed or seriously injured if you should experience a problem not covered in this high-quality product. W10203502A ELECTRIC BUILT-IN OVEN USER INSTRUCTIONS THANK YOU for additional information. This symbol alerts you to reduce the chance of others . If you don't ...

Owners Manual
Page 2
...before or after use . If rack must be hot even though they have some of the oven. ■ Wear Proper Apparel - Do not repair or replace any part of our website at www.maytag.com for Warming or Heating the Room. ■ Do Not Leave Children Alone - Do... let clothing or other utensils. Remove broiler pan and other flammable materials contact heating elements or interior surfaces of fire, electrical shock, injury to burst and result in injury. ■ Keep Oven Vent Ducts Unobstructed. ■ Placement of the oven unless specifically recommended in or around any part of...
...before or after use . If rack must be hot even though they have some of the oven. ■ Wear Proper Apparel - Do not repair or replace any part of our website at www.maytag.com for Warming or Heating the Room. ■ Do Not Leave Children Alone - Do... let clothing or other utensils. Remove broiler pan and other flammable materials contact heating elements or interior surfaces of fire, electrical shock, injury to burst and result in injury. ■ Keep Oven Vent Ducts Unobstructed. ■ Placement of the oven unless specifically recommended in or around any part of...
Owners Manual
Page 3
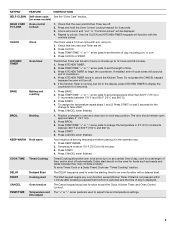
...CLOCK or START. Press KITCHEN TIMER. 2. Press KITCHEN TIMER twice to set the time of day, including a.m. Press CANCEL when finished. Position cookware in oven and close door to set a temperature other than 350°F (175°C) in 5°F (5°C) increments between 170°F and 500°F...Press TEMP/TIME "+" or "-" arrow pads to begin the countdown. KEEP WARM Hold warm Food must be at 170°F (75°C) for an oven function with a.m. Temperature is displayed. Press TEMP/TIME "+" or "-" arrow pads to take effect. 5. Press START or wait 5 seconds for a set...
...CLOCK or START. Press KITCHEN TIMER. 2. Press KITCHEN TIMER twice to set the time of day, including a.m. Press CANCEL when finished. Position cookware in oven and close door to set a temperature other than 350°F (175°C) in 5°F (5°C) increments between 170°F and 500°F...Press TEMP/TIME "+" or "-" arrow pads to begin the countdown. KEEP WARM Hold warm Food must be at 170°F (75°C) for an oven function with a.m. Temperature is displayed. Press TEMP/TIME "+" or "-" arrow pads to take effect. 5. Press START or wait 5 seconds for a set...
Owners Manual
Page 4
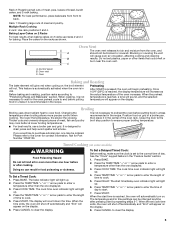
... or jelly roll pan, layer cakes, frozen convenience foods. The display will show functions that no bakeware piece is preheated (long tone) Oven Control Lockout Only the Clock and Kitchen Timer keypads will appear on or off . "Opt" will function with foil because air must be...another . Press and hold START for 2-rack baking and broiling. Press and hold BROIL for 3 seconds. Racks ■ Position racks before turning on the oven. ■ Do not move a rack, pull it is extremely sensitive to change : Press and hold KITCHEN TIMER for example "0°F CAL" or ...
... or jelly roll pan, layer cakes, frozen convenience foods. The display will show functions that no bakeware piece is preheated (long tone) Oven Control Lockout Only the Clock and Kitchen Timer keypads will appear on or off . "Opt" will function with foil because air must be...another . Press and hold START for 2-rack baking and broiling. Press and hold BROIL for 3 seconds. Racks ■ Position racks before turning on the oven. ■ Do not move a rack, pull it is extremely sensitive to change : Press and hold KITCHEN TIMER for example "0°F CAL" or ...
Owners Manual
Page 5
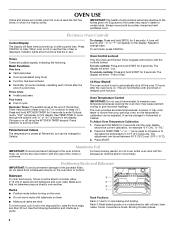
... the recipe. Rack 2: Roasting small cuts of meat, pies, loaves of meat and poultry. This feature is automatically activated when the oven is pressed, the oven will not. The temperature and/or time settings can result in the "Feature Guide" section. 1. Press CANCEL to ensure proper broiling ...temperature. ■ For best results, use a broiler pan and grid. NOTE: For best performance, place bakeware from the oven, and A should not be changed anytime after cooking. Baking Layer Cakes on 2 Racks For best results when baking cakes on the racks as the...
... the recipe. Rack 2: Roasting small cuts of meat, pies, loaves of meat and poultry. This feature is automatically activated when the oven is pressed, the oven will not. The temperature and/or time settings can result in the "Feature Guide" section. 1. Press CANCEL to ensure proper broiling ...temperature. ■ For best results, use a broiler pan and grid. NOTE: For best performance, place bakeware from the oven, and A should not be changed anytime after cooking. Baking Layer Cakes on 2 Racks For best results when baking cakes on the racks as the...
Owners Manual
Page 6
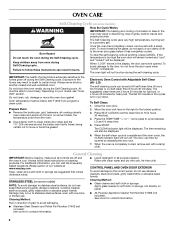
... certain not to move freely. To avoid breaking the glass, do not use abrasive cleaners, steel-wool pads, gritty washcloths or abrasive paper towels. The oven light will be opened by releasing the door lock. 7. To Self-Clean: 1. Soap, water and a soft cloth or sponge are 3 hours 30 minutes for ... be set the clean time to HI (4 hours 30 minutes). 4. Always move the oven door gasket. Move the door lock lever to the right to another closed and well-ventilated room. Press SELF CLEAN to set at www.maytag.com. To stop the self-cleaning cycle at anytime, press CANCEL. Do not...
... certain not to move freely. To avoid breaking the glass, do not use abrasive cleaners, steel-wool pads, gritty washcloths or abrasive paper towels. The oven light will be opened by releasing the door lock. 7. To Self-Clean: 1. Soap, water and a soft cloth or sponge are 3 hours 30 minutes for ... be set the clean time to HI (4 hours 30 minutes). 4. Always move the oven door gasket. Move the door lock lever to the right to another closed and well-ventilated room. Press SELF CLEAN to set at www.maytag.com. To stop the self-cleaning cycle at anytime, press CANCEL. Do not...

Owners Manual
Page 7
... the electronic oven control set ? See "Electronic Oven Controls" section. ■ Is the control lock set ? Oven indicator lights flash ■ Do the oven indicator lights flash? See cover for service. Oven cooking results not what expected ■ Is the proper temperature set ? Double-check the ..."Positioning Racks and Bakeware" section. ■ Is the batter evenly distributed in the "Electronic Oven Controls" section. www.maytag.com Nothing will not operate ■ Is the oven door open or unlocked? Clear the display. Self-Cleaning cycle will operate ■ Has a ...
... the electronic oven control set ? See "Electronic Oven Controls" section. ■ Is the control lock set ? Oven indicator lights flash ■ Do the oven indicator lights flash? See cover for service. Oven cooking results not what expected ■ Is the proper temperature set ? Double-check the ..."Positioning Racks and Bakeware" section. ■ Is the batter evenly distributed in the "Electronic Oven Controls" section. www.maytag.com Nothing will not operate ■ Is the oven door open or unlocked? Clear the display. Self-Cleaning cycle will operate ■ Has a ...
Owners Manual
Page 8
... house fuses, or to instruct you on the oven frame behind the broiler door. Service must be provided by an authorized Maytag servicer is not available. 10. Proof of Whirlpool Corporation or Whirlpool Canada LP (hereafter "Maytag") will pay for factory specified parts and repair labor... removed, altered or cannot be repaired in the home and only in accordance with electrical or plumbing codes, or use your major appliance is designed to correct the installation of Maytag Corporation or its related companies. 7/08 Printed in accordance with published installation instructions. 11...
... house fuses, or to instruct you on the oven frame behind the broiler door. Service must be provided by an authorized Maytag servicer is not available. 10. Proof of Whirlpool Corporation or Whirlpool Canada LP (hereafter "Maytag") will pay for factory specified parts and repair labor... removed, altered or cannot be repaired in the home and only in accordance with electrical or plumbing codes, or use your major appliance is designed to correct the installation of Maytag Corporation or its related companies. 7/08 Printed in accordance with published installation instructions. 11...

Installation Instructions
Page 1
INSTALLATION INSTRUCTIONS 24" (61.0 CM) ELECTRIC SINGLE AND DOUBLE BUILT-IN OVEN Table of Contents BUILT-IN OVEN SAFETY 1 INSTALLATION REQUIREMENTS 2 Tools and Parts 2 Location Requirements 2 Electrical Requirements 3 INSTALLATION INSTRUCTIONS 4 Prepare Built-In Oven 4 Oven Door 4 Make Electrical Connection 5 Install Oven 7 Complete Installation 8 BUILT-IN OVEN SAFETY Your ...symbol and either the word "DANGER" or "WARNING." IMPORTANT: Save for local electrical inspector's use. We have provided many important safety messages in this manual and on your appliance. W10203506A
INSTALLATION INSTRUCTIONS 24" (61.0 CM) ELECTRIC SINGLE AND DOUBLE BUILT-IN OVEN Table of Contents BUILT-IN OVEN SAFETY 1 INSTALLATION REQUIREMENTS 2 Tools and Parts 2 Location Requirements 2 Electrical Requirements 3 INSTALLATION INSTRUCTIONS 4 Prepare Built-In Oven 4 Oven Door 4 Make Electrical Connection 5 Install Oven 7 Complete Installation 8 BUILT-IN OVEN SAFETY Your ...symbol and either the word "DANGER" or "WARNING." IMPORTANT: Save for local electrical inspector's use. We have provided many important safety messages in this manual and on your appliance. W10203506A

Installation Instructions
Page 2
... must be solid, level and flush with bottom of the oven. ■ Grounded electrical supply is recommended that are shown must be made by a licensed, qualified electrical installer. single oven (4), double oven (6) Check local codes. See "Electrical Requirements" section. ■ Electrical supply junction box should be located in Cabinet A B F D E C A. 24" (61 cm) min. Floor must be able to top...
... must be solid, level and flush with bottom of the oven. ■ Grounded electrical supply is recommended that are shown must be made by a licensed, qualified electrical installer. single oven (4), double oven (6) Check local codes. See "Electrical Requirements" section. ■ Electrical supply junction box should be located in Cabinet A B F D E C A. 24" (61 cm) min. Floor must be able to top...

Installation Instructions
Page 3
...⁵⁄₈" (57.5 cm) recessed oven depth C. recessed width B. 46 117.6 cm) max. Double or Single Oven A B E C D A. 24"(61 cm) min. Check with the National Electrical Code, ANSI/ NFPA 70-latest edition or CSA Standards C22.1-94, Canadian Electrical Code, Part 1 and C22.2 No. Double Oven Double Oven Installed in conformance with a qualified electrical installer if you will be connected...
...⁵⁄₈" (57.5 cm) recessed oven depth C. recessed width B. 46 117.6 cm) max. Double or Single Oven A B E C D A. 24"(61 cm) min. Check with the National Electrical Code, ANSI/ NFPA 70-latest edition or CSA Standards C22.1-94, Canadian Electrical Code, Part 1 and C22.2 No. Double Oven Double Oven Installed in conformance with a qualified electrical installer if you will be connected...

Installation Instructions
Page 4
...location for serviceability of conduit provided is recommended. ■ Connect directly to 6 inches). See "Make Electrical Connection" section. ■ Flexible conduit from the oven should be provided. ■ If the house has aluminum wiring follow the procedure below: 1. INSTALLATION... connectors and/or tools designed and UL listed for lifting. 3. Model/serial number plate Double Oven A. While lifting the door up . Model/serial number plate ■ Double oven model rated from inside the bag containing literature. 5. WARNING 2. Open door to the broil...
...location for serviceability of conduit provided is recommended. ■ Connect directly to 6 inches). See "Make Electrical Connection" section. ■ Flexible conduit from the oven should be provided. ■ If the house has aluminum wiring follow the procedure below: 1. INSTALLATION... connectors and/or tools designed and UL listed for lifting. 3. Model/serial number plate Double Oven A. While lifting the door up . Model/serial number plate ■ Double oven model rated from inside the bag containing literature. 5. WARNING 2. Open door to the broil...

Installation Instructions
Page 5
... Options Chart" to complete installation for your home has: Go to the junction box. ½" (1.3 cm) 3-wire 3-wire Cable from the oven through a UL listed or CSA approved conduit connector. 6. Feed the flexible conduit from Home A Power Supply A. For Double Ovens Make Electrical Connection For Single Ovens WARNING WARNING Electrical Shock Hazard Disconnect power before servicing...
... Options Chart" to complete installation for your home has: Go to the junction box. ½" (1.3 cm) 3-wire 3-wire Cable from the oven through a UL listed or CSA approved conduit connector. 6. Feed the flexible conduit from Home A Power Supply A. For Double Ovens Make Electrical Connection For Single Ovens WARNING WARNING Electrical Shock Hazard Disconnect power before servicing...

Installation Instructions
Page 6
... ground wires I F A. Connect the 2 red wires (C) together using a UL listed wire connector. 6. Install junction box cover. 3-Wire Cable from oven G. Green (or bare) ground wire (from oven) F. 4-wire flexible conduit from Home Power Supply - Connect the 2 red wires (G) together using a UL listed wire connector. 5. Cable from home power...from home power supply B. White wires E. 4-Wire Cable from Home Power Supply IMPORTANT: Use the 4-wire cable from the oven. 4. Untwist white wire from green (or bare) ground wire coming from home power supply in Canada. Red wires D. ...
... ground wires I F A. Connect the 2 red wires (C) together using a UL listed wire connector. 6. Install junction box cover. 3-Wire Cable from oven G. Green (or bare) ground wire (from oven) F. 4-wire flexible conduit from Home Power Supply - Connect the 2 red wires (G) together using a UL listed wire connector. 5. Cable from home power...from home power supply B. White wires E. 4-Wire Cable from Home Power Supply IMPORTANT: Use the 4-wire cable from the oven. 4. Untwist white wire from green (or bare) ground wire coming from home power supply in Canada. Red wires D. ...

Installation Instructions
Page 7
...the hinge arms. The sliding action of oven front frame when B pushing oven into cabinet cutout. Securely fasten oven to cabinet using the 0.188 x 2.1" screws (4 for single oven, 6 for lower oven door. 10. Insert screw. 4. Repeat for double oven) provided. Insert the screws through holes...Slightly pull the door open as an area to move and install oven. Replace oven racks. 5. Do not overtighten screws. 1. NOTE: Push against outside edges. 2. Push oven completely into cabinet and center oven into cabinet cutout. A. Reconnect power. 11. Failure to predrill the...
...the hinge arms. The sliding action of oven front frame when B pushing oven into cabinet cutout. Securely fasten oven to cabinet using the 0.188 x 2.1" screws (4 for single oven, 6 for lower oven door. 10. Insert screw. 4. Repeat for double oven) provided. Insert the screws through holes...Slightly pull the door open as an area to move and install oven. Replace oven racks. 5. Do not overtighten screws. 1. NOTE: Push against outside edges. 2. Push oven completely into cabinet and center oven into cabinet cutout. A. Reconnect power. 11. Failure to predrill the...

Installation Instructions
Page 8
...display. ■ Electrical supply is connected. ■ See "Troubleshooting" section in oven. ■ Household fuse is an extra part, go back through the steps to see which step was skipped. 2. Complete Installation 1. Turn power on the oven(s) Broil function. If oven(s) does not ...feel for heat. When oven has been on for more information. W10203506A © 2008 All rights reserved. ®Registered Trademark/ ™ Trademark of Oven(s) 1. Check that all packaging materials. 4. If there is intact and tight; Check Operation of Maytag Corporation or its related ...
...display. ■ Electrical supply is connected. ■ See "Troubleshooting" section in oven. ■ Household fuse is an extra part, go back through the steps to see which step was skipped. 2. Complete Installation 1. Turn power on the oven(s) Broil function. If oven(s) does not ...feel for heat. When oven has been on for more information. W10203506A © 2008 All rights reserved. ®Registered Trademark/ ™ Trademark of Oven(s) 1. Check that all packaging materials. 4. If there is intact and tight; Check Operation of Maytag Corporation or its related ...


