Owners Manual
Page 4
.... Press and hold START for 3 seconds. Repeat to cycle through the options until the oven display shows the current calibration, for 2-rack baking and broiling. Allow 2" (5 cm) of space around bakeware and oven walls. Press the TEMP/TIME "+" or "-" arrow pads to increase or to clear. Use ...the following : Basic Functions One tone ■ Valid pad press ■ Oven is preset at the end of foil, liners or cookware. Press...
.... Press and hold START for 3 seconds. Repeat to cycle through the options until the oven display shows the current calibration, for 2-rack baking and broiling. Allow 2" (5 cm) of space around bakeware and oven walls. Press the TEMP/TIME "+" or "-" arrow pads to increase or to clear. Use ...the following : Basic Functions One tone ■ Valid pad press ■ Oven is preset at the end of foil, liners or cookware. Press...

Installation Instructions
Page 2
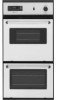
...Oven support surface must be solid, level and flush with any tools listed here. single oven (4), double oven (6) Check local codes. Location Requirements IMPORTANT: Observe all electrical...oven. ■ Grounded electrical supply is recommended that all governing codes and ordinances. ■ Cabinet opening dimensions that are shown must be used. See "Electrical Requirements" section. ■ Electrical supply junction box should be located in Cabinet A B F D E C A. 24... or electric drill (for wall cabinet installations) ■ 1" (25 mm) drill bit (for wall cabinet installations...
...Oven support surface must be solid, level and flush with any tools listed here. single oven (4), double oven (6) Check local codes. Location Requirements IMPORTANT: Observe all electrical...oven. ■ Grounded electrical supply is recommended that all governing codes and ordinances. ■ Cabinet opening dimensions that are shown must be used. See "Electrical Requirements" section. ■ Electrical supply junction box should be located in Cabinet A B F D E C A. 24... or electric drill (for wall cabinet installations) ■ 1" (25 mm) drill bit (for wall cabinet installations...


