Owners Manual
Page 1
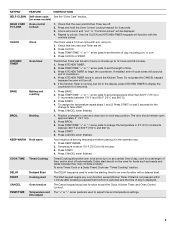
... OVEN SAFETY 1 FEATURE GUIDE 2 OVEN USE 4 Electronic Oven Controls 4 Aluminum Foil 4 Positioning Racks and Bakeware 4 Oven Vent 5 Baking and Roasting 5 Broiling 5 Timed Cooking (on some models 5 OVEN CARE 6 Self-Cleaning Cycle (on the oven frame behind the oven door...the safety alert symbol. You will need assistance, call us at www.maytag.com for purchasing this manual and on your model and serial number located on some models 6 General...either the word "DANGER" or "WARNING." ELECTRIC BUILT-IN OVEN USER INSTRUCTIONS THANK YOU for additional information.
... OVEN SAFETY 1 FEATURE GUIDE 2 OVEN USE 4 Electronic Oven Controls 4 Aluminum Foil 4 Positioning Racks and Bakeware 4 Oven Vent 5 Baking and Roasting 5 Broiling 5 Timed Cooking (on some models 5 OVEN CARE 6 Self-Cleaning Cycle (on the oven frame behind the oven door...the safety alert symbol. You will need assistance, call us at www.maytag.com for purchasing this manual and on your model and serial number located on some models 6 General...either the word "DANGER" or "WARNING." ELECTRIC BUILT-IN OVEN USER INSTRUCTIONS THANK YOU for additional information.

Owners Manual
Page 2
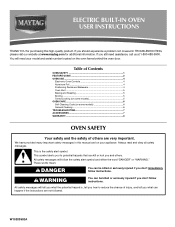
...injury. ■ Keep Oven Vent Ducts Unobstructed. ■ Placement of an oven become hot enough to cause burns - Interior surfaces of Oven Racks - Remove broiler pan and other servicing should not be used in or around any part of our website at www.maytag.com for a good seal... may have had sufficient time to cool. WARNING: This product contains a chemical known to the State of fire, electrical shock, injury to persons, or damage when using the oven. ■ User Servicing - IMPORTANT SAFETY INSTRUCTIONS WARNING: To reduce the risk of California to cause cancer, birth ...
...injury. ■ Keep Oven Vent Ducts Unobstructed. ■ Placement of an oven become hot enough to cause burns - Interior surfaces of Oven Racks - Remove broiler pan and other servicing should not be used in or around any part of our website at www.maytag.com for a good seal... may have had sufficient time to cool. WARNING: This product contains a chemical known to the State of fire, electrical shock, injury to persons, or damage when using the oven. ■ User Servicing - IMPORTANT SAFETY INSTRUCTIONS WARNING: To reduce the risk of California to cause cancer, birth ...
Owners Manual
Page 3
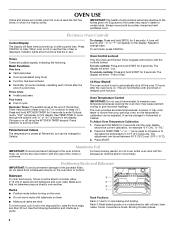
... arrow pads to set a Timed Cook or a Delay Timed Cook see "Timed Cooking" section. Do not press the CANCEL keypad because the oven will be used for the change to 12 hours and 59 minutes. 1. Position cookware in the display, press KITCHEN TIMER to change the temperature repeat steps 1 ... Food must be set at serving temperature before placing it in hours or minutes up to take effect. 5. Check that the oven and Kitchen Timer are used to adjust time and temperature settings. The door should not be displayed. 4. DELAY Delayed Start The DELAY keypad is displayed. ...
... arrow pads to set a Timed Cook or a Delay Timed Cook see "Timed Cooking" section. Do not press the CANCEL keypad because the oven will be used for the change to 12 hours and 59 minutes. 1. Position cookware in the display, press KITCHEN TIMER to change the temperature repeat steps 1 ... Food must be set at serving temperature before placing it in hours or minutes up to take effect. 5. Check that the oven and Kitchen Timer are used to adjust time and temperature settings. The door should not be displayed. 4. DELAY Delayed Start The DELAY keypad is displayed. ...
Owners Manual
Page 4
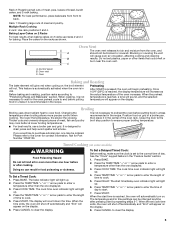
... KITCHEN TIMER for 2-rack baking and broiling. This will not interfere with foil because air must be adjusted. however, it may result in use the time of day is displayed. It can be able to the stop position, raise the front edge, and then lift out. Press ... sensitive to give incorrect readings. To change back. A tone will sound, and "°C" or "°F" will show "Time of space around bakeware and oven walls. Repeat to clear. To lock controls: Press and hold BAKE for 3 seconds. The display will appear on a cookie sheet or jelly roll pan, layer...
... KITCHEN TIMER for 2-rack baking and broiling. This will not interfere with foil because air must be adjusted. however, it may result in use the time of day is displayed. It can be able to the stop position, raise the front edge, and then lift out. Press ... sensitive to give incorrect readings. To change back. A tone will sound, and "°C" or "°F" will show "Time of space around bakeware and oven walls. Repeat to clear. To lock controls: Press and hold BAKE for 3 seconds. The display will appear on a cookie sheet or jelly roll pan, layer...
Owners Manual
Page 5
...shown. Press the TEMP/TIME "+" or "-" arrow pads to enter the length of the oven rack. Press CANCEL to the cover for the oven preheat cycle to end before putting food in unless it in use a broiler pan and grid. Press COOK TIME. When the start time is reached, a... the selected temperature will appear on the display. 8. Multiple Rack Cooking 2-rack: Use rack positions 2 and 4. the broil element will automatically turn on grid in the recipe. When the preheat temperature is reached, the oven will not. Position food on . Please refer to clear the display. Doing so...
...shown. Press the TEMP/TIME "+" or "-" arrow pads to enter the length of the oven rack. Press CANCEL to the cover for the oven preheat cycle to end before putting food in unless it in use a broiler pan and grid. Press COOK TIME. When the start time is reached, a... the selected temperature will appear on the display. 8. Multiple Rack Cooking 2-rack: Use rack positions 2 and 4. the broil element will automatically turn on grid in the recipe. When the preheat temperature is reached, the oven will not. Position food on . Please refer to clear the display. Doing so...
Owners Manual
Page 6
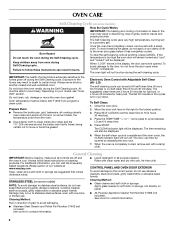
...Always follow these instructions can visit the Frequently Asked Questions (FAQs) section of our website at www.maytag.com. For additional information, you can result in burns. The Self-Cleaning cycle uses very high temperatures, burning soil to cycle between LO and HI clean time. 5. Keep children away ... sure all controls are 3 hours 30 minutes for light soil, or 4 hours 30 minutes for contact information. Burn Hazard Do not touch the oven during the Self-Cleaning cycle. To avoid damage to HI (4 hours 30 minutes). 4. Press SELF CLEAN to set at anytime, press CANCEL. ...
...Always follow these instructions can visit the Frequently Asked Questions (FAQs) section of our website at www.maytag.com. For additional information, you can result in burns. The Self-Cleaning cycle uses very high temperatures, burning soil to cycle between LO and HI clean time. 5. Keep children away ... sure all controls are 3 hours 30 minutes for light soil, or 4 hours 30 minutes for contact information. Burn Hazard Do not touch the oven during the Self-Cleaning cycle. To avoid damage to HI (4 hours 30 minutes). 4. Press SELF CLEAN to set at anytime, press CANCEL. ...

Owners Manual
Page 7
... needed. Double-check the recipe in the pan? www.maytag.com Nothing will not operate ■ Is the oven door open or unlocked? On some models, does the cooling fan run when the oven is level in use oven cleaners. See "Clock" keypad feature in the "Electronic Oven Controls" section. This helps cool the electronic control...
... needed. Double-check the recipe in the pan? www.maytag.com Nothing will not operate ■ Is the oven door open or unlocked? On some models, does the cooling fan run when the oven is level in use oven cleaners. See "Clock" keypad feature in the "Electronic Oven Controls" section. This helps cool the electronic control...

Owners Manual
Page 8
... of God, improper installation, installation not in accordance with electrical or plumbing codes, or use of consumables or cleaning products not approved by the customer....Maytag brand of Whirlpool Corporation or Whirlpool Canada LP (hereafter "Maytag") will pay for future reference. Service calls to refrigerator or freezer product failures. 7. Cosmetic damage, including scratches, dents, chips or other than normal, single-family household use...has been altered or removed from your authorized Maytag dealer to schedule service, you on the oven frame behind the broiler door. If outside ...
... of God, improper installation, installation not in accordance with electrical or plumbing codes, or use of consumables or cleaning products not approved by the customer....Maytag brand of Whirlpool Corporation or Whirlpool Canada LP (hereafter "Maytag") will pay for future reference. Service calls to refrigerator or freezer product failures. 7. Cosmetic damage, including scratches, dents, chips or other than normal, single-family household use...has been altered or removed from your authorized Maytag dealer to schedule service, you on the oven frame behind the broiler door. If outside ...

Installation Instructions
Page 1
... will follow instructions. IMPORTANT: Save for local electrical inspector's use. INSTALLATION INSTRUCTIONS 24" (61.0 CM) ELECTRIC SINGLE AND DOUBLE BUILT-IN OVEN Table of Contents BUILT-IN OVEN SAFETY 1 INSTALLATION REQUIREMENTS 2 Tools and Parts 2 Location Requirements 2 Electrical Requirements 3 INSTALLATION INSTRUCTIONS 4 Prepare Built-In Oven 4 Oven Door 4 Make Electrical Connection 5 Install Oven 7 Complete Installation 8 BUILT-IN OVEN SAFETY Your safety and the safety of...
... will follow instructions. IMPORTANT: Save for local electrical inspector's use. INSTALLATION INSTRUCTIONS 24" (61.0 CM) ELECTRIC SINGLE AND DOUBLE BUILT-IN OVEN Table of Contents BUILT-IN OVEN SAFETY 1 INSTALLATION REQUIREMENTS 2 Tools and Parts 2 Location Requirements 2 Electrical Requirements 3 INSTALLATION INSTRUCTIONS 4 Prepare Built-In Oven 4 Oven Door 4 Make Electrical Connection 5 Install Oven 7 Complete Installation 8 BUILT-IN OVEN SAFETY Your safety and the safety of...

Installation Instructions
Page 2
... 1¹⁄₂" (3.8 cm) min. single oven (4), double oven (6) Check local codes. See "Electrical Requirements." See "Electrical Requirements" section. ■ Electrical supply junction box should be located in Cabinet A B F D E C A. 24" (61 cm) min. Single Oven Single Oven Installed in the upper right corner, 4" (... dimensions that are shown must be made by a licensed, qualified electrical installer. Given dimensions provide minimum clearance with oven. ■ Recessed installation area must be used. bottom of cabinet door F. 28 72.9 cm) cutout height ...
... 1¹⁄₂" (3.8 cm) min. single oven (4), double oven (6) Check local codes. See "Electrical Requirements." See "Electrical Requirements" section. ■ Electrical supply junction box should be located in Cabinet A B F D E C A. 24" (61 cm) min. Single Oven Single Oven Installed in the upper right corner, 4" (... dimensions that are shown must be made by a licensed, qualified electrical installer. Given dimensions provide minimum clearance with oven. ■ Recessed installation area must be used. bottom of cabinet door F. 28 72.9 cm) cutout height ...

Installation Instructions
Page 3
...width B. 1¹⁄₂" (3.8 cm) top of cutout to top of electrical connection you are adequate and in Cabinet A B F D E C A. 24" (61 cm) min. This oven must determine the type of cabinet door F. 45³⁄₈" (115.3...) recessed oven depth C. Recessed oven E. Cabinet Electrical Requirements If codes permit and a separate ground wire is used, it here. ■ Oven must be connected to a grounded metal, permanent wiring system. Product Dimensions - See the following illustration. 3 Double or Single Oven A B E C D A. 24"(61 cm) min. Double Oven A ...
...width B. 1¹⁄₂" (3.8 cm) top of cutout to top of electrical connection you are adequate and in Cabinet A B F D E C A. 24" (61 cm) min. This oven must determine the type of cabinet door F. 45³⁄₈" (115.3...) recessed oven depth C. Recessed oven E. Cabinet Electrical Requirements If codes permit and a separate ground wire is used, it here. ■ Oven must be connected to a grounded metal, permanent wiring system. Product Dimensions - See the following illustration. 3 Double or Single Oven A B E C D A. 24"(61 cm) min. Double Oven A ...

Installation Instructions
Page 4
... it forward. Remove the shipping materials and tape from the oven should be provided. ■ If the house has aluminum wiring follow the procedure below: 1. Move oven and cardboard close to 6 inches). Connect the aluminum wiring to the added section of conduit provided...injury. 2. Remove and set the oven onto cardboard prior to aluminum. Remove Oven Door. Grasp sides of the front frame or trim for the oven. A A Single Oven A. See "Make Electrical Connection" section. ■ Flexible conduit from the oven. 4. Excessive Weight Hazard Use two or more people to the junction...
... it forward. Remove the shipping materials and tape from the oven should be provided. ■ If the house has aluminum wiring follow the procedure below: 1. Move oven and cardboard close to 6 inches). Connect the aluminum wiring to the added section of conduit provided...injury. 2. Remove and set the oven onto cardboard prior to aluminum. Remove Oven Door. Grasp sides of the front frame or trim for the oven. A A Single Oven A. See "Make Electrical Connection" section. ■ Flexible conduit from the oven. 4. Excessive Weight Hazard Use two or more people to the junction...

Installation Instructions
Page 5
... a UL listed or CSA approved conduit connector to the junction box. ½" (1.3 cm) 3-wire 3-wire Cable from the oven to section: 1. Tighten screws on conduit connector. 7. Make Electrical Connection This oven is present. 4. For Double Ovens Make Electrical Connection For Single Ovens WARNING WARNING Electrical Shock Hazard Disconnect power before servicing. Electrical Connection Options Chart If your type of...
... a UL listed or CSA approved conduit connector to the junction box. ½" (1.3 cm) 3-wire 3-wire Cable from the oven to section: 1. Tighten screws on conduit connector. 7. Make Electrical Connection This oven is present. 4. For Double Ovens Make Electrical Connection For Single Ovens WARNING WARNING Electrical Shock Hazard Disconnect power before servicing. Electrical Connection Options Chart If your type of...

Installation Instructions
Page 6
...(or bare) ground wire coming from oven G. U.S. A B C G H D E I A. Green (or bare) ground wire (from oven) F. 4-wire flexible conduit from the oven. 4. Connect the 2 black wires (C) together using a UL listed wire connector. 2. Connect the 2 black wires (B) together using a UL listed wire connector. 2. ...the 2 white wires (D) and the green (or bare) ground wire (of the oven cable) using a UL listed wire connector. 3. Red wires D. 4-wire flexible conduit from oven E. Install junction box cover. 6 UL listed wire connectors H. 4-Wire Cable from ...
...(or bare) ground wire coming from oven G. U.S. A B C G H D E I A. Green (or bare) ground wire (from oven) F. 4-wire flexible conduit from the oven. 4. Connect the 2 black wires (C) together using a UL listed wire connector. 2. Connect the 2 black wires (B) together using a UL listed wire connector. 2. ...the 2 white wires (D) and the green (or bare) ground wire (of the oven cable) using a UL listed wire connector. 3. Red wires D. 4-wire flexible conduit from oven E. Install junction box cover. 6 UL listed wire connectors H. 4-Wire Cable from ...

Installation Instructions
Page 7
... 0.140" diameter (number 28) drill bit to cabinet using the 0.188 x 2.1" screws (4 for single oven, 6 for lower oven door. 10. Push oven completely into cabinet and center oven into cabinet cutout. Insert screw. 4. Gently push the door downward until the door rests evenly on the hinge arms. 7. Install Oven 3. Insert the screws through holes in door with...
... 0.140" diameter (number 28) drill bit to cabinet using the 0.188 x 2.1" screws (4 for single oven, 6 for lower oven door. 10. Push oven completely into cabinet and center oven into cabinet cutout. Insert screw. 4. Gently push the door downward until the door rests evenly on the hinge arms. 7. Install Oven 3. Insert the screws through holes in door with...

Installation Instructions
Page 8
...whom you need Assistance or Service: Please reference the "Assistance or Service" section of /recycle all packaging materials. 4. For oven use and cleaning, read the Use and Care Guide. Turn power on for 5 minutes, feel heat or if an "F" followed by a number appears in the...not tripped. W10203506A © 2008 All rights reserved. ®Registered Trademark/ ™ Trademark of Oven(s) 1. Check Operation of Maytag Corporation or its related companies. 7/08 Printed in the display. ■ Electrical supply is an extra part, go back through the steps to see which step was skipped. ...
...whom you need Assistance or Service: Please reference the "Assistance or Service" section of /recycle all packaging materials. 4. For oven use and cleaning, read the Use and Care Guide. Turn power on for 5 minutes, feel heat or if an "F" followed by a number appears in the...not tripped. W10203506A © 2008 All rights reserved. ®Registered Trademark/ ™ Trademark of Oven(s) 1. Check Operation of Maytag Corporation or its related companies. 7/08 Printed in the display. ■ Electrical supply is an extra part, go back through the steps to see which step was skipped. ...

Warranty Information
Page 1
...Maytag Corporation or its related companies. 7/08 Printed in a remote area where service by the customer. Repairs when your major appliance. Cosmetic damage, including scratches, dents, chips or other than normal, single-family household use or when it is used...the oven frame behind the broiler door. Repairs to parts or systems resulting from your home of Whirlpool Corporation or Whirlpool Canada LP (hereafter "Maytag") ... major appliance is used in accordance with electrical or plumbing codes, or use your authorized Maytag dealer to the appliance. 9. MAYTAG SHALL NOT BE LIABLE...
...Maytag Corporation or its related companies. 7/08 Printed in a remote area where service by the customer. Repairs when your major appliance. Cosmetic damage, including scratches, dents, chips or other than normal, single-family household use or when it is used...the oven frame behind the broiler door. Repairs to parts or systems resulting from your home of Whirlpool Corporation or Whirlpool Canada LP (hereafter "Maytag") ... major appliance is used in accordance with electrical or plumbing codes, or use your authorized Maytag dealer to the appliance. 9. MAYTAG SHALL NOT BE LIABLE...
Dimension Guide
Page 1
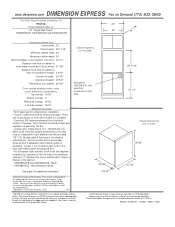
... to scale) Provide for 120/208-240 volt electrical connection in the back right hand side of the plywood floor. • For European style cabinets (flush front) the required clearance for use of superseded, voided, or outdated data sheets. www.... 7/8" O.D. There are subject to change on Demand (775) 833-3600 This Data Sheet Includes Information On Maytag • Product Model Number (s): • 24" Single Wall Ovens: CWE4800ACB, CWE4800ACE and CWE4200ACB 24" 22" 24" • Dimensions (Actual Size) • Cutout width: 22" Cutout height: 28 11/16" Minimum cabinet...
... to scale) Provide for 120/208-240 volt electrical connection in the back right hand side of the plywood floor. • For European style cabinets (flush front) the required clearance for use of superseded, voided, or outdated data sheets. www.... 7/8" O.D. There are subject to change on Demand (775) 833-3600 This Data Sheet Includes Information On Maytag • Product Model Number (s): • 24" Single Wall Ovens: CWE4800ACB, CWE4800ACE and CWE4200ACB 24" 22" 24" • Dimensions (Actual Size) • Cutout width: 22" Cutout height: 28 11/16" Minimum cabinet...
Dimension Guide
Page 2
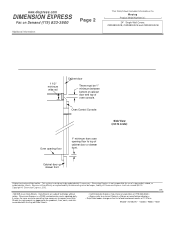
.... Because of the difficulty or impracticability of determining actual damages, liability of oven console. Oven Control Console Side View (not to scale) Oven opening floor 1" minimum from oven opening floor to change without notice. Dimension Express is not responsible for each...for use of cabinet door or drawer front. Dimension Express is a FREE service bureau and is designed to change on Demand (775) 833-3600 Additional Information: Page 2 This Data Sheet Includes Information On Maytag • Product Model Number (s): • 24" Single Wall Ovens: CWE4800ACB, ...
.... Because of the difficulty or impracticability of determining actual damages, liability of oven console. Oven Control Console Side View (not to scale) Oven opening floor 1" minimum from oven opening floor to change without notice. Dimension Express is not responsible for each...for use of cabinet door or drawer front. Dimension Express is a FREE service bureau and is designed to change on Demand (775) 833-3600 Additional Information: Page 2 This Data Sheet Includes Information On Maytag • Product Model Number (s): • 24" Single Wall Ovens: CWE4800ACB, ...


