
VP4001 .pcf File
Page 7
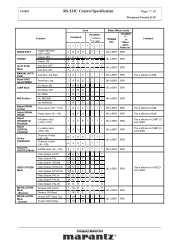
... in COMP.1/2 and VIDEO. ADJUSTMENT LAMP Mode IRIS Position Adjust SIGNAL CLOCK Adjust SIGNAL PHASE Adjust HORIZONTAL POSITION Adjust VERTICAL POSITION Set the OVERSCAN Adjust the SUBTITLE Mode VIDEO SYSTEM Mode INSTALLATION Mode (Reverse) INSTALLATION Mode (Inverse) Image Shift value (-24 &#...ERR ERR This is value C1 C2 C3 C4 P1 P2 P3 P4 LNDS _ * * * Status (Return) code "POWER ON" "STANDB Y" or "40sec. VP4001 RS-232C Control Specification Page: 7 / 15 Document Version [1.0] Function IMAGE SHIFT FREEZE AUTO SYNC. Eco Mode: ON Eco Mode: OFF Iris: WIDE Iris: MEDIUM ...
... in COMP.1/2 and VIDEO. ADJUSTMENT LAMP Mode IRIS Position Adjust SIGNAL CLOCK Adjust SIGNAL PHASE Adjust HORIZONTAL POSITION Adjust VERTICAL POSITION Set the OVERSCAN Adjust the SUBTITLE Mode VIDEO SYSTEM Mode INSTALLATION Mode (Reverse) INSTALLATION Mode (Inverse) Image Shift value (-24 &#...ERR ERR This is value C1 C2 C3 C4 P1 P2 P3 P4 LNDS _ * * * Status (Return) code "POWER ON" "STANDB Y" or "40sec. VP4001 RS-232C Control Specification Page: 7 / 15 Document Version [1.0] Function IMAGE SHIFT FREEZE AUTO SYNC. Eco Mode: ON Eco Mode: OFF Iris: WIDE Iris: MEDIUM ...

VP4001 .pcf File
Page 9
... PICTURE Mode Adjust CONTRAST Adjust BRIGHTNESS Adjust COLOR Adjust TINT Adjust SHARPNESS Adjust RED Adjust BLUE COLOR TEMP. BRILLIANT COLOR Mode Reset PICTURE SETTING ASPECT Mode DNR Position PROGRESSIVE Mode Picture mode: Standard Picture mode: Natural Picture mode: Dynamic Picture mode: Theater1 Picture mode: Theater2 Picture... _ _ 2 RASV_ _ _ 7 RASV_ _ _ 1 VANR_ _ _ 0 VANR_ _ _ 1 VANR_ _ _ 2 VANR_ _ _ 3 VA I P_ _ _ 0 VA I P_ _ _ 1 VA I P_ _ _ 2 Status (Return) code "POWER ON" "STANDB Y" or "40sec. VP4001 RS-232C Control Specification Page: 9 / 15 Document Version [1.0] 4-1-2.
... PICTURE Mode Adjust CONTRAST Adjust BRIGHTNESS Adjust COLOR Adjust TINT Adjust SHARPNESS Adjust RED Adjust BLUE COLOR TEMP. BRILLIANT COLOR Mode Reset PICTURE SETTING ASPECT Mode DNR Position PROGRESSIVE Mode Picture mode: Standard Picture mode: Natural Picture mode: Dynamic Picture mode: Theater1 Picture mode: Theater2 Picture... _ _ 2 RASV_ _ _ 7 RASV_ _ _ 1 VANR_ _ _ 0 VANR_ _ _ 1 VANR_ _ _ 2 VANR_ _ _ 3 VA I P_ _ _ 0 VA I P_ _ _ 1 VA I P_ _ _ 2 Status (Return) code "POWER ON" "STANDB Y" or "40sec. VP4001 RS-232C Control Specification Page: 9 / 15 Document Version [1.0] 4-1-2.

VP4001 .pcf File
Page 10
... PICTURE Mode Adjust CONTRAST Adjust BRIGHTNESS Adjust COLOR Adjust TINT Adjust SHARPNESS Adjust RED Adjust BLUE COLOR TEMP. VP4001 RS-232C Control Specification Page: 10 / 15 Document Version [1.0] 4-1-3. BRILLIANT COLOR Mode Reset PICTURE SETTING ASPECT Mode DNR Position PROGRESSIVE Mode Picture mode: Standard Picture mode: Natural Picture mode: Dynamic Picture mode: Theater1...
... PICTURE Mode Adjust CONTRAST Adjust BRIGHTNESS Adjust COLOR Adjust TINT Adjust SHARPNESS Adjust RED Adjust BLUE COLOR TEMP. VP4001 RS-232C Control Specification Page: 10 / 15 Document Version [1.0] 4-1-3. BRILLIANT COLOR Mode Reset PICTURE SETTING ASPECT Mode DNR Position PROGRESSIVE Mode Picture mode: Standard Picture mode: Natural Picture mode: Dynamic Picture mode: Theater1...

VP4001 .pcf File
Page 11
... P3 P4 PICTURE Mode Adjust CONTRAST Adjust BRIGHTNESS Adjust COLOR Adjust TINT Adjust SHARPNESS Adjust RED Adjust BLUE COLOR TEMP. BRILLIANT COLOR Mode Reset PICTURE SETTING ASPECT Mode DNR Position PROGRESSIVE Mode Picture mode: Standard Picture mode: Natural Picture mode: Dynamic Picture mode: Theater1 Picture mode: Theater2 Picture mode: Memory Contrast... ERR ERR OK or ERR ERR OK or ERR ERR OK or ERR ERR OK or ERR ERR OK or ERR ERR Comment Company Restricted VP4001 RS-232C Control Specification Page: 11 / 15 Document Version [1.0] 4-1-4.
... P3 P4 PICTURE Mode Adjust CONTRAST Adjust BRIGHTNESS Adjust COLOR Adjust TINT Adjust SHARPNESS Adjust RED Adjust BLUE COLOR TEMP. BRILLIANT COLOR Mode Reset PICTURE SETTING ASPECT Mode DNR Position PROGRESSIVE Mode Picture mode: Standard Picture mode: Natural Picture mode: Dynamic Picture mode: Theater1 Picture mode: Theater2 Picture mode: Memory Contrast... ERR ERR OK or ERR ERR OK or ERR ERR OK or ERR ERR OK or ERR ERR OK or ERR ERR Comment Company Restricted VP4001 RS-232C Control Specification Page: 11 / 15 Document Version [1.0] 4-1-4.

VP4001 .pcf File
Page 12
... PICTURE Mode Adjust CONTRAST Adjust BRIGHTNESS Adjust COLOR Adjust TINT Adjust SHARPNESS Adjust RED Adjust BLUE COLOR TEMP. VP4001 RS-232C Control Specification Page: 12 / 15 Document Version [1.0] 4-1-5. BRILLIANT COLOR Mode Reset PICTURE SETTING ASPECT Mode DNR Position PROGRESSIVE Mode Picture mode: Standard Picture mode: Natural Picture mode: Dynamic Picture mode: Theater1...
... PICTURE Mode Adjust CONTRAST Adjust BRIGHTNESS Adjust COLOR Adjust TINT Adjust SHARPNESS Adjust RED Adjust BLUE COLOR TEMP. VP4001 RS-232C Control Specification Page: 12 / 15 Document Version [1.0] 4-1-5. BRILLIANT COLOR Mode Reset PICTURE SETTING ASPECT Mode DNR Position PROGRESSIVE Mode Picture mode: Standard Picture mode: Natural Picture mode: Dynamic Picture mode: Theater1...

VP4001 .pcf File
Page 13
Normal Command for RGB&HDMI input Company Restricted BRILLIANT COLOR Mode Reset PICTURE SETTING ASPECT Mode DNR Position PROGRESSIVE Mode SIGNAL TYPE Picture mode: Standard Picture mode: Natural Picture mode: Dynamic Picture mode: Theater1 Picture mode: Theater2 Picture mode: ... or ERR ERR OK or ERR ERR OK or ERR ERR OK or ERR ERR OK or ERR ERR OK or ERR ERR Comment Common setting for RGB Input Code Function Command Parameter "_" is Space "*" is value C1 C2 C3 C4 P1 P2 P3 P4 PICTURE Mode Adjust CONTRAST Adjust BRIGHTNESS...
Normal Command for RGB&HDMI input Company Restricted BRILLIANT COLOR Mode Reset PICTURE SETTING ASPECT Mode DNR Position PROGRESSIVE Mode SIGNAL TYPE Picture mode: Standard Picture mode: Natural Picture mode: Dynamic Picture mode: Theater1 Picture mode: Theater2 Picture mode: ... or ERR ERR OK or ERR ERR OK or ERR ERR OK or ERR ERR OK or ERR ERR OK or ERR ERR Comment Common setting for RGB Input Code Function Command Parameter "_" is Space "*" is value C1 C2 C3 C4 P1 P2 P3 P4 PICTURE Mode Adjust CONTRAST Adjust BRIGHTNESS...

VP4001 .pcf File
Page 14
... Color Temp.: 7500K Color Temp.: 8500K RBCT _ 0 7 5 OK or ERR ERR RBCT _ 0 8 5 Color Temp.: 9300K RBCT _ 0 9 3 Color Temp.: 10500K RBCT _ 1 0 5 BRILLIANT COLOR Mode Reset PICTURE SETTING Brilliant Color: 0 Brilliant Color: 1 Brilliant Color: 2 Picture reset Aspect: FULL R B WE _ _ _ 0 R B W E _ _ _ 1 OK or ERR ERR R B WE _ _ _ 2 R B R E _ _ _ 1 OK ... ERR Adjust BLUE Blue value(-30-+30) R B B E _ * * * OK or ERR ERR Color Temp.: 5500K RBCT _ 0 5 5 Color Temp.: 6500K RBCT _ 0 6 5 COLOR TEMP. VP4001 RS-232C Control Specification Page: 14 / 15 Document Version [1.0] 4-1-7.
... Color Temp.: 7500K Color Temp.: 8500K RBCT _ 0 7 5 OK or ERR ERR RBCT _ 0 8 5 Color Temp.: 9300K RBCT _ 0 9 3 Color Temp.: 10500K RBCT _ 1 0 5 BRILLIANT COLOR Mode Reset PICTURE SETTING Brilliant Color: 0 Brilliant Color: 1 Brilliant Color: 2 Picture reset Aspect: FULL R B WE _ _ _ 0 R B W E _ _ _ 1 OK or ERR ERR R B WE _ _ _ 2 R B R E _ _ _ 1 OK ... ERR Adjust BLUE Blue value(-30-+30) R B B E _ * * * OK or ERR ERR Color Temp.: 5500K RBCT _ 0 5 5 Color Temp.: 6500K RBCT _ 0 6 5 COLOR TEMP. VP4001 RS-232C Control Specification Page: 14 / 15 Document Version [1.0] 4-1-7.

VP4001 User Manual
Page 4
... for the selected input mode is displayed. 2 Press Q or O to select the menu icon to the previous screen when the menu is not available for setting up and operating the projector. INPUT ENTER ASPECT MENU INPUT LAMP STANDBY/ON INPUT MENU ENTER ASPECT INPUT STANDBY ON COMP.1 COMP.2 S-VIDEO C1 C2...
... for the selected input mode is displayed. 2 Press Q or O to select the menu icon to the previous screen when the menu is not available for setting up and operating the projector. INPUT ENTER ASPECT MENU INPUT LAMP STANDBY/ON INPUT MENU ENTER ASPECT INPUT STANDBY ON COMP.1 COMP.2 S-VIDEO C1 C2...
VP4001 User Manual
Page 5
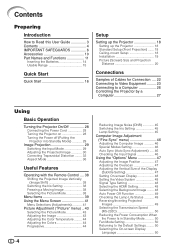
... SAFEGUARDS 6 Accessories 10 Part Names and Functions 11 Inserting the Batteries 14 Usable Range 15 Quick Start Quick Start 16 Setup Setting up the Projector 18 Setting up the Projector 18 Standard Setup (Front Projection) ....... 18 Ceiling-mount Setup 18 Installation 19 Picture (Screen) Size and... Mode 36 Useful Features Operating with the Remote Control .... 38 Shifting the Projected Image Vertically (Image Shift 38 Switching the Iris Setting 38 Freezing a Moving Image 38 Selecting the Picture Mode 38 Menu Items 39 Using the Menu Screen 41 Menu Selections (Adjustments 41...
... SAFEGUARDS 6 Accessories 10 Part Names and Functions 11 Inserting the Batteries 14 Usable Range 15 Quick Start Quick Start 16 Setup Setting up the Projector 18 Setting up the Projector 18 Standard Setup (Front Projection) ....... 18 Ceiling-mount Setup 18 Installation 19 Picture (Screen) Size and... Mode 36 Useful Features Operating with the Remote Control .... 38 Shifting the Projected Image Vertically (Image Shift 38 Switching the Iris Setting 38 Freezing a Moving Image 38 Selecting the Picture Mode 38 Menu Items 39 Using the Menu Screen 41 Menu Selections (Adjustments 41...

VP4001 User Manual
Page 6
Introduction Reference Appendix Maintenance 51 Maintenance Indicators 52 Regarding the Lamp 54 Lamp 54 Caution Concerning the Lamp 54 Replacing the Lamp 54 Removing and Installing the Lamp Unit 55 Resetting the Lamp Timer 56 Connecting Pin Assignments 57 RS-232C Specifications and Command Settings 58 Computer Compatibility Chart 59 Troubleshooting 60 Specifications 62 Dimensions 63 Index 64 CONSUMER LIMITED WARRANTY (VALID IN USA ONLY 65 LIMITED WARRANTY (VALID IN CANADA ONLY 66 5
Introduction Reference Appendix Maintenance 51 Maintenance Indicators 52 Regarding the Lamp 54 Lamp 54 Caution Concerning the Lamp 54 Replacing the Lamp 54 Removing and Installing the Lamp Unit 55 Resetting the Lamp Timer 56 Connecting Pin Assignments 57 RS-232C Specifications and Command Settings 58 Computer Compatibility Chart 59 Troubleshooting 60 Specifications 62 Dimensions 63 Index 64 CONSUMER LIMITED WARRANTY (VALID IN USA ONLY 65 LIMITED WARRANTY (VALID IN CANADA ONLY 66 5

VP4001 User Manual
Page 9
... Remove the projector power cord from the vent may appear when the power is not in and turn on . Observe the following safeguards when setting up the screen in these environments, the vents and lens must be installed in places exposed to hard impact and/or vibration. Internal cleaning ... the surface of space between the exhaust vent and the nearest wall or obstruction. Do not set "Fan Mode" to avoid personal injury caused by Marantz Authorized Dealer or Service Center. Avoid locations with thin air, set up the projector in an area free from -4°F to 140°F (-20°C ...
... Remove the projector power cord from the vent may appear when the power is not in and turn on . Observe the following safeguards when setting up the screen in these environments, the vents and lens must be installed in places exposed to hard impact and/or vibration. Internal cleaning ... the surface of space between the exhaust vent and the nearest wall or obstruction. Do not set "Fan Mode" to avoid personal injury caused by Marantz Authorized Dealer or Service Center. Avoid locations with thin air, set up the projector in an area free from -4°F to 140°F (-20°C ...

VP4001 User Manual
Page 12
ENTER button 41 For setting items selected or adjusted on and putting the projector into standby mode. ASPECT button For switching 36 the screen size. Front View Focus ring For .... LAMP STANDBY/ON INPUT STANDBY/ON LAMP TEMP. HEIGHT ADJUST 30 lever TEMP. Video, Video, RGB or HDMI. 41 MENU button For displaying adjustment and setting screens. 41 Adjustment buttons (P/R/O/Q) For selecting menu items. 51 Intake vent 30 Zoom ring For enlarging/ reducing the picture. 15 Remote control sensor (front) Push...
ENTER button 41 For setting items selected or adjusted on and putting the projector into standby mode. ASPECT button For switching 36 the screen size. Front View Focus ring For .... LAMP STANDBY/ON INPUT STANDBY/ON LAMP TEMP. HEIGHT ADJUST 30 lever TEMP. Video, Video, RGB or HDMI. 41 MENU button For displaying adjustment and setting screens. 41 Adjustment buttons (P/R/O/Q) For selecting menu items. 51 Intake vent 30 Zoom ring For enlarging/ reducing the picture. 15 Remote control sensor (front) Push...

VP4001 User Manual
Page 14
.... 1, Comp. 2, S-Video, Video, RGB and HDMI buttons For switching to the respective input modes. 41 MENU button For displaying adjustment and setting screens. 41 Adjustment buttons (P/R/O/Q) • For selecting menu items. • For adjusting the Keystone Correction when in this user guide where the...For selecting the appropriate picture. Introduction Numbers in Z refer to the main pages in the Keystone Correction mode. 41 ENTER button For setting items selected or adjusted on the remote control. 38 IRIS button For switching "WIDE", "MEDIUM" and "NARROW". 38 IMAGE SHIFT buttons...
.... 1, Comp. 2, S-Video, Video, RGB and HDMI buttons For switching to the respective input modes. 41 MENU button For displaying adjustment and setting screens. 41 Adjustment buttons (P/R/O/Q) • For selecting menu items. • For adjusting the Keystone Correction when in this user guide where the...For selecting the appropriate picture. Introduction Numbers in Z refer to the main pages in the Keystone Correction mode. 41 ENTER button For setting items selected or adjusted on the remote control. 38 IRIS button For switching "WIDE", "MEDIUM" and "NARROW". 38 IMAGE SHIFT buttons...

VP4001 User Manual
Page 18
...INPUT TEMP. Turn the Power off \P. 29 Press the / I STANDBY/ON button on the projector or the STANDBY button on the remote control to set and setup will end. 8. Adjust the focus by turning the zoom ring. On the On the remote projector control STANDBY On-screen Display • ... outlet after the cooling fan stops. 17 Adjust the focus, image size, and projector angle \PP. 30, 31 1. Follow steps 2 and 3 to also set the upper-right, lower-right, and lower-left positions of the projected image. 3. On the On the remote On-screen display projector control INPUT VIDEO...
...INPUT TEMP. Turn the Power off \P. 29 Press the / I STANDBY/ON button on the projector or the STANDBY button on the remote control to set and setup will end. 8. Adjust the focus by turning the zoom ring. On the On the remote projector control STANDBY On-screen Display • ... outlet after the cooling fan stops. 17 Adjust the focus, image size, and projector angle \PP. 30, 31 1. Follow steps 2 and 3 to also set the upper-right, lower-right, and lower-left positions of the projected image. 3. On the On the remote On-screen display projector control INPUT VIDEO...

VP4001 User Manual
Page 19
...page 20.) Example of this installation. Standard Setup (Front Projection) I Invert the image by setting "Ceiling + Front" in "Installation". Before mounting the projector, contact your nearest Marantz Authorized Dealer or Service Center to the screen with the projector's feet flat and level.... Setting up the Projector Setting up the Projector For optimal image quality, position the projector perpendicular to...
...page 20.) Example of this installation. Standard Setup (Front Projection) I Invert the image by setting "Ceiling + Front" in "Installation". Before mounting the projector, contact your nearest Marantz Authorized Dealer or Service Center to the screen with the projector's feet flat and level.... Setting up the Projector Setting up the Projector For optimal image quality, position the projector perpendicular to...

VP4001 User Manual
Page 20
... © "Rear" Menu item © "Ceiling + Rear" Indication of the Projection Image Size and Projection Distance Refer to page 20 for the projection setting in use. (You can use any of the 4 projection modes, shown in "Options2" menu. Example: When using a wide screen (16:9) Picture (...'2-"2.89m'1) (13."0-1m1-'63".5 m1)9'(16.00"m-2-27'1.012m"9)'(99."1-3m4-'51"0.5 m) Projection Distance 19 Installation The projector can set the Installation in the diagram below. Select the mode most appropriate for additional information concerning "Picture (Screen) Size and Projection Distance".
... © "Rear" Menu item © "Ceiling + Rear" Indication of the Projection Image Size and Projection Distance Refer to page 20 for the projection setting in use. (You can use any of the 4 projection modes, shown in "Options2" menu. Example: When using a wide screen (16:9) Picture (...'2-"2.89m'1) (13."0-1m1-'63".5 m1)9'(16.00"m-2-27'1.012m"9)'(99."1-3m4-'51"0.5 m) Projection Distance 19 Installation The projector can set the Installation in the diagram below. Select the mode most appropriate for additional information concerning "Picture (Screen) Size and Projection Distance".

VP4001 User Manual
Page 21
Setting up the Projector (Continued) Picture (Screen) Size and Projection Distance The projection screen size varies according to the distance from the lens of image position (...
Setting up the Projector (Continued) Picture (Screen) Size and Projection Distance The projection screen size varies according to the distance from the lens of image position (...
VP4001 User Manual
Page 28
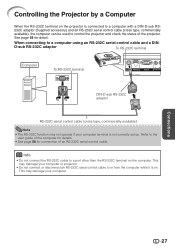
... control cable. Refer to control the projector and check the status of the projector. This may not operate if your computer terminal is not correctly set up. Controlling the Projector by a Computer When the RS-232C terminal on the projector is connected to a computer with a DIN-D-sub RS232C adaptor (Supplied accessory...
... control cable. Refer to control the projector and check the status of the projector. This may not operate if your computer terminal is not correctly set up. Controlling the Projector by a Computer When the RS-232C terminal on the projector is connected to a computer with a DIN-D-sub RS232C adaptor (Supplied accessory...

VP4001 User Manual
Page 34
Selecting the Type of the displayed image may appear jagged, when adjusting the Keystone setting. • Also read "About Copyrights" on the remote control. • "GEOMETRIC ADJUSTMENT" will be visible in detailed images. However, this is not a malfunction. • If ...
Selecting the Type of the displayed image may appear jagged, when adjusting the Keystone setting. • Also read "About Copyrights" on the remote control. • "GEOMETRIC ADJUSTMENT" will be visible in detailed images. However, this is not a malfunction. • If ...

VP4001 User Manual
Page 35
...(Continued) GEOMETRIC ADJUSTMENT Info • When adjusting a 4:3-aspect-ratio input signal to a 4:3-aspect-ratio screen, correct the trapezoidal distortion by setting "ASPECT" to "FULL" (16:9). 1 Press c KEYSTONE on the remote control repeatedly until the displayed red arrows line up the screen edges... the upper left corner, the Reset Confirmation screen displays. • When you confirm the lower left position, the screen adjustments will be set the position. • The arrow in the image aspect ratio becoming slightly distorted. • Try "H&V KEYSTONE" when "GEOMETRIC ADJUSTMENT" ...
...(Continued) GEOMETRIC ADJUSTMENT Info • When adjusting a 4:3-aspect-ratio input signal to a 4:3-aspect-ratio screen, correct the trapezoidal distortion by setting "ASPECT" to "FULL" (16:9). 1 Press c KEYSTONE on the remote control repeatedly until the displayed red arrows line up the screen edges... the upper left corner, the Reset Confirmation screen displays. • When you confirm the lower left position, the screen adjustments will be set the position. • The arrow in the image aspect ratio becoming slightly distorted. • Try "H&V KEYSTONE" when "GEOMETRIC ADJUSTMENT" ...