
VP4001 .pcf File
Page 7
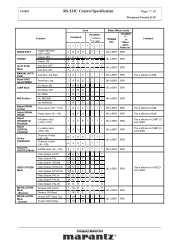
... * OK or ERR ERR This is effective in S-VIDEO and VIDEO. Mode MANUAL AUTO SYNC. VP4001 RS-232C Control Specification Page: 7 / 15 Document Version [1.0] Function IMAGE SHIFT FREEZE AUTO SYNC. Start Reset Sync. position value (-60 to +150) V- I MI N___1 This is value C1 C2 C3..._ _ 1 AADJ _ _ _ 0 OK or ERR ERR AADJ _ _ _ 1 A D J S _ _ _ 1 OK or ERR ERR This is effective in COMP.1/2 and VIDEO. Reset SYNC. ADJUSTMENT LAMP Mode IRIS Position Adjust SIGNAL CLOCK Adjust SIGNAL PHASE Adjust HORIZONTAL POSITION Adjust VERTICAL POSITION Set the OVERSCAN Adjust the SUBTITLE Mode...
... * OK or ERR ERR This is effective in S-VIDEO and VIDEO. Mode MANUAL AUTO SYNC. VP4001 RS-232C Control Specification Page: 7 / 15 Document Version [1.0] Function IMAGE SHIFT FREEZE AUTO SYNC. Start Reset Sync. position value (-60 to +150) V- I MI N___1 This is value C1 C2 C3..._ _ 1 AADJ _ _ _ 0 OK or ERR ERR AADJ _ _ _ 1 A D J S _ _ _ 1 OK or ERR ERR This is effective in COMP.1/2 and VIDEO. Reset SYNC. ADJUSTMENT LAMP Mode IRIS Position Adjust SIGNAL CLOCK Adjust SIGNAL PHASE Adjust HORIZONTAL POSITION Adjust VERTICAL POSITION Set the OVERSCAN Adjust the SUBTITLE Mode...

VP4001 .pcf File
Page 8
... the lamp cover 8: Lamp Life: less than 5% 16: Lamp broken 32: Failure of turning on the lamp 64: Abnormal high temp. VP4001 RS-232C Control Specification Page: 8 / 15 Document Version [1.0] Function SPECIAL DISPLAY Mode *1 Special Mode:1 Special Mode:2 Special Mode:3 Special Mode... CURRENT INPUT Input Check Check LAMP STATUS Power Status Check Check LAMP TIME Check LAMP LIFE Check MODEL NAME RESET ALL Lamp Elapsed Time Display Lamp Life (%) Display Model Name Check All Reset Code Command Parameter "_" is Space "*" is value C1 C2 C3 C4 P1 P2 P3 P4 S P MD _ _ _ 1 S P MD _ ...
... the lamp cover 8: Lamp Life: less than 5% 16: Lamp broken 32: Failure of turning on the lamp 64: Abnormal high temp. VP4001 RS-232C Control Specification Page: 8 / 15 Document Version [1.0] Function SPECIAL DISPLAY Mode *1 Special Mode:1 Special Mode:2 Special Mode:3 Special Mode... CURRENT INPUT Input Check Check LAMP STATUS Power Status Check Check LAMP TIME Check LAMP LIFE Check MODEL NAME RESET ALL Lamp Elapsed Time Display Lamp Life (%) Display Model Name Check All Reset Code Command Parameter "_" is Space "*" is value C1 C2 C3 C4 P1 P2 P3 P4 S P MD _ _ _ 1 S P MD _ ...

VP4001 .pcf File
Page 9
... ERR OK or ERR ERR OK or ERR ERR Comment Company Restricted VP4001 RS-232C Control Specification Page: 9 / 15 Document Version [1.0] 4-1-2. BRILLIANT COLOR Mode Reset PICTURE SETTING ASPECT Mode DNR Position PROGRESSIVE Mode Picture mode: Standard Picture... Color: 2 VARD_ * * * VABE_ * * * VACT _ 0 5 5 VACT _ 0 6 5 VACT _ 0 7 5 VACT _ 0 8 5 VACT _ 0 9 3 VACT _ 1 0 5 V A WE _ _ _ 0 V A WE _ _ _ 1 V A WE _ _ _ 2 Picture reset VARE_ _ _ 1 Aspect: FULL Aspect: NORMAL Aspect: ZOOM 3D DNR : OFF 3D DNR : Level1 3D DNR : Level2 3D DNR : Level3 IP Conversion: 2D Progressive IP Conversion...
... ERR OK or ERR ERR OK or ERR ERR Comment Company Restricted VP4001 RS-232C Control Specification Page: 9 / 15 Document Version [1.0] 4-1-2. BRILLIANT COLOR Mode Reset PICTURE SETTING ASPECT Mode DNR Position PROGRESSIVE Mode Picture mode: Standard Picture... Color: 2 VARD_ * * * VABE_ * * * VACT _ 0 5 5 VACT _ 0 6 5 VACT _ 0 7 5 VACT _ 0 8 5 VACT _ 0 9 3 VACT _ 1 0 5 V A WE _ _ _ 0 V A WE _ _ _ 1 V A WE _ _ _ 2 Picture reset VARE_ _ _ 1 Aspect: FULL Aspect: NORMAL Aspect: ZOOM 3D DNR : OFF 3D DNR : Level1 3D DNR : Level2 3D DNR : Level3 IP Conversion: 2D Progressive IP Conversion...

VP4001 .pcf File
Page 10
VP4001 RS-232C Control Specification Page: 10 / 15 Document Version [1.0] 4-1-3. Normal Command for COMPONENT 2 Input Code Function Command Parameter "_" is Space "*" is value ...Temp.: 9300K Color Temp.: 10500K Brilliant Color: 0 Brilliant Color: 1 Brilliant Color: 2 VBRD_ * * * VBBE_ * * * VBCT _ 0 5 5 VBCT _ 0 6 5 VBCT _ 0 7 5 VBCT _ 0 8 5 VBCT _ 0 9 3 VBCT _ 1 0 5 V B WE _ _ _ 0 V B WE _ _ _ 1 V B WE _ _ _ 2 Picture reset VBRE_ _ _ 1 Aspect: FULL Aspect: NORMAL Aspect: ZOOM 3D DNR : OFF 3D DNR : Level1 3D DNR : Level2 3D DNR : Level3 IP Conversion: 2D Progressive IP Conversion...
VP4001 RS-232C Control Specification Page: 10 / 15 Document Version [1.0] 4-1-3. Normal Command for COMPONENT 2 Input Code Function Command Parameter "_" is Space "*" is value ...Temp.: 9300K Color Temp.: 10500K Brilliant Color: 0 Brilliant Color: 1 Brilliant Color: 2 VBRD_ * * * VBBE_ * * * VBCT _ 0 5 5 VBCT _ 0 6 5 VBCT _ 0 7 5 VBCT _ 0 8 5 VBCT _ 0 9 3 VBCT _ 1 0 5 V B WE _ _ _ 0 V B WE _ _ _ 1 V B WE _ _ _ 2 Picture reset VBRE_ _ _ 1 Aspect: FULL Aspect: NORMAL Aspect: ZOOM 3D DNR : OFF 3D DNR : Level1 3D DNR : Level2 3D DNR : Level3 IP Conversion: 2D Progressive IP Conversion...

VP4001 .pcf File
Page 11
...P3 P4 PICTURE Mode Adjust CONTRAST Adjust BRIGHTNESS Adjust COLOR Adjust TINT Adjust SHARPNESS Adjust RED Adjust BLUE COLOR TEMP. VP4001 RS-232C Control Specification Page: 11 / 15 Document Version [1.0] 4-1-4. within Power on" OK or ERR ERR ...: 1 Brilliant Color: 2 VCRD_ * * * VCBE_ * * * VCCT _ 0 5 5 VCCT _ 0 6 5 VCCT _ 0 7 5 VCCT _ 0 8 5 VCCT _ 0 9 3 VCCT _ 1 0 5 V C WE _ _ _ 0 V C WE _ _ _ 1 V C WE _ _ _ 2 Picture reset VCRE _ _ _ 1 Aspect: FULL Aspect: NORMAL Aspect: ZOOM 3D DNR : OFF 3D DNR : Level1 3D DNR : Level2 3D DNR : Level3 IP Conversion: 2D Progressive IP Conversion...
...P3 P4 PICTURE Mode Adjust CONTRAST Adjust BRIGHTNESS Adjust COLOR Adjust TINT Adjust SHARPNESS Adjust RED Adjust BLUE COLOR TEMP. VP4001 RS-232C Control Specification Page: 11 / 15 Document Version [1.0] 4-1-4. within Power on" OK or ERR ERR ...: 1 Brilliant Color: 2 VCRD_ * * * VCBE_ * * * VCCT _ 0 5 5 VCCT _ 0 6 5 VCCT _ 0 7 5 VCCT _ 0 8 5 VCCT _ 0 9 3 VCCT _ 1 0 5 V C WE _ _ _ 0 V C WE _ _ _ 1 V C WE _ _ _ 2 Picture reset VCRE _ _ _ 1 Aspect: FULL Aspect: NORMAL Aspect: ZOOM 3D DNR : OFF 3D DNR : Level1 3D DNR : Level2 3D DNR : Level3 IP Conversion: 2D Progressive IP Conversion...

VP4001 .pcf File
Page 12
....: 10500K Brilliant Color: 0 Brilliant Color: 1 Brilliant Color: 2 VDRD_ * * * VDBE_ * * * VDCT _ 0 5 5 VDCT _ 0 6 5 VDCT _ 0 7 5 VDCT _ 0 8 5 VDCT _ 0 9 3 VDCT _ 1 0 5 V D WE _ _ _ 0 V D WE _ _ _ 1 V D WE _ _ _ 2 Picture reset VDRE _ _ _ 1 Aspect: FULL Aspect: NORMAL Aspect: ZOOM 3D DNR : OFF 3D DNR : Level1 3D DNR : Level2 3D DNR : Level3 IP Conversion: 2D Progressive IP Conversion...PICTURE Mode Adjust CONTRAST Adjust BRIGHTNESS Adjust COLOR Adjust TINT Adjust SHARPNESS Adjust RED Adjust BLUE COLOR TEMP. VP4001 RS-232C Control Specification Page: 12 / 15 Document Version [1.0] 4-1-5.
....: 10500K Brilliant Color: 0 Brilliant Color: 1 Brilliant Color: 2 VDRD_ * * * VDBE_ * * * VDCT _ 0 5 5 VDCT _ 0 6 5 VDCT _ 0 7 5 VDCT _ 0 8 5 VDCT _ 0 9 3 VDCT _ 1 0 5 V D WE _ _ _ 0 V D WE _ _ _ 1 V D WE _ _ _ 2 Picture reset VDRE _ _ _ 1 Aspect: FULL Aspect: NORMAL Aspect: ZOOM 3D DNR : OFF 3D DNR : Level1 3D DNR : Level2 3D DNR : Level3 IP Conversion: 2D Progressive IP Conversion...PICTURE Mode Adjust CONTRAST Adjust BRIGHTNESS Adjust COLOR Adjust TINT Adjust SHARPNESS Adjust RED Adjust BLUE COLOR TEMP. VP4001 RS-232C Control Specification Page: 12 / 15 Document Version [1.0] 4-1-5.

VP4001 .pcf File
Page 13
... Brilliant Color: 2 RARD_ * * * RABE_ * * * RACT _ 0 5 5 RACT _ 0 6 5 RACT _ 0 7 5 RACT _ 0 8 5 RACT _ 0 9 3 RACT _ 1 0 5 R A WE _ _ _ 0 R A WE _ _ _ 1 R A WE _ _ _ 2 Picture reset RARE_ _ _ 1 Aspect: FULL Aspect: NORMAL Aspect: ZOOM Aspect: THROUGH 3D DNR : OFF 3D DNR : Level1 3D DNR : Level2 3D DNR : Level3 IP Conversion: 2D Progressive... I P_ _ _ 2 I AS I _ _ _ 0 I AS I _ _ _ 1 I AS I _ _ _ 2 Status (Return) code "POWER ON" "STANDB Y" or "40sec. Normal Command for RGB&HDMI input Company Restricted VP4001 RS-232C Control Specification Page: 13 / 15 Document Version [1.0] 4-1-6.
... Brilliant Color: 2 RARD_ * * * RABE_ * * * RACT _ 0 5 5 RACT _ 0 6 5 RACT _ 0 7 5 RACT _ 0 8 5 RACT _ 0 9 3 RACT _ 1 0 5 R A WE _ _ _ 0 R A WE _ _ _ 1 R A WE _ _ _ 2 Picture reset RARE_ _ _ 1 Aspect: FULL Aspect: NORMAL Aspect: ZOOM Aspect: THROUGH 3D DNR : OFF 3D DNR : Level1 3D DNR : Level2 3D DNR : Level3 IP Conversion: 2D Progressive... I P_ _ _ 2 I AS I _ _ _ 0 I AS I _ _ _ 1 I AS I _ _ _ 2 Status (Return) code "POWER ON" "STANDB Y" or "40sec. Normal Command for RGB&HDMI input Company Restricted VP4001 RS-232C Control Specification Page: 13 / 15 Document Version [1.0] 4-1-6.

VP4001 .pcf File
Page 14
....: 7500K Color Temp.: 8500K RBCT _ 0 7 5 OK or ERR ERR RBCT _ 0 8 5 Color Temp.: 9300K RBCT _ 0 9 3 Color Temp.: 10500K RBCT _ 1 0 5 BRILLIANT COLOR Mode Reset PICTURE SETTING Brilliant Color: 0 Brilliant Color: 1 Brilliant Color: 2 Picture reset Aspect: FULL R B WE _ _ _ 0 R B W E _ _ _ 1 OK or ERR ERR R B WE _ _ _ 2 R B R E _ _ _ 1 OK or ERR... HDMI Setting HDMI_Setting : Normal HDMI_Setting : Expand HMB D _ _ _ 1 OK or ERR ERR HMB D _ _ _ 2 Common setting for RGB&HDMI input Company Restricted VP4001 RS-232C Control Specification Page: 14 / 15 Document Version [1.0] 4-1-7.
....: 7500K Color Temp.: 8500K RBCT _ 0 7 5 OK or ERR ERR RBCT _ 0 8 5 Color Temp.: 9300K RBCT _ 0 9 3 Color Temp.: 10500K RBCT _ 1 0 5 BRILLIANT COLOR Mode Reset PICTURE SETTING Brilliant Color: 0 Brilliant Color: 1 Brilliant Color: 2 Picture reset Aspect: FULL R B WE _ _ _ 0 R B W E _ _ _ 1 OK or ERR ERR R B WE _ _ _ 2 R B R E _ _ _ 1 OK or ERR... HDMI Setting HDMI_Setting : Normal HDMI_Setting : Expand HMB D _ _ _ 1 OK or ERR ERR HMB D _ _ _ 2 Common setting for RGB&HDMI input Company Restricted VP4001 RS-232C Control Specification Page: 14 / 15 Document Version [1.0] 4-1-7.

VP4001 User Manual
Page 6
Introduction Reference Appendix Maintenance 51 Maintenance Indicators 52 Regarding the Lamp 54 Lamp 54 Caution Concerning the Lamp 54 Replacing the Lamp 54 Removing and Installing the Lamp Unit 55 Resetting the Lamp Timer 56 Connecting Pin Assignments 57 RS-232C Specifications and Command Settings 58 Computer Compatibility Chart 59 Troubleshooting 60 Specifications 62 Dimensions 63 Index 64 CONSUMER LIMITED WARRANTY (VALID IN USA ONLY 65 LIMITED WARRANTY (VALID IN CANADA ONLY 66 5
Introduction Reference Appendix Maintenance 51 Maintenance Indicators 52 Regarding the Lamp 54 Lamp 54 Caution Concerning the Lamp 54 Replacing the Lamp 54 Removing and Installing the Lamp Unit 55 Resetting the Lamp Timer 56 Connecting Pin Assignments 57 RS-232C Specifications and Command Settings 58 Computer Compatibility Chart 59 Troubleshooting 60 Specifications 62 Dimensions 63 Index 64 CONSUMER LIMITED WARRANTY (VALID IN USA ONLY 65 LIMITED WARRANTY (VALID IN CANADA ONLY 66 5

VP4001 User Manual
Page 35
R On-screen display Adjust upper left corner GEOMETRIC ADJUSTMENT ADJUST RESET NEXT END 2 Adjust the focus, size, and projection angle so that the screen edges line up into the blue area. • Line up in the ...-ratio screen, correct the trapezoidal distortion by setting "ASPECT" to the previous screen. • If you press e RETURN before adjusting the upper left corner, the Reset Confirmation screen displays. • When you will return to "FULL" (16:9). 1 Press c KEYSTONE on the remote control repeatedly until the displayed red arrows line up...
R On-screen display Adjust upper left corner GEOMETRIC ADJUSTMENT ADJUST RESET NEXT END 2 Adjust the focus, size, and projection angle so that the screen edges line up into the blue area. • Line up in the ...-ratio screen, correct the trapezoidal distortion by setting "ASPECT" to the previous screen. • If you press e RETURN before adjusting the upper left corner, the Reset Confirmation screen displays. • When you will return to "FULL" (16:9). 1 Press c KEYSTONE on the remote control repeatedly until the displayed red arrows line up...

VP4001 User Manual
Page 36
R On-screen display H&V KEYSTONE END ENTER ADJUST RESET 3 Press P or R on the remote control repeatedly until "H & V KEYSTONE" is made using both "H KEY- Horizontal Keystone Correction (Adjustment with P / R) 4 Press O or...ADJUSTMENT" mode has been used to adjust the image, a confirmation screen displays before the "H & V KEYSTONE" screen, asking if you want to reset the adjustments or not. Then select RESET. Vertical Keystone Correction (Adjustment with O / Q) Basic Operation 5 PresscKEYSTONEoriENTERon the remote control and the "H&V KEYSTONE" mode ends. Note • If...
R On-screen display H&V KEYSTONE END ENTER ADJUST RESET 3 Press P or R on the remote control repeatedly until "H & V KEYSTONE" is made using both "H KEY- Horizontal Keystone Correction (Adjustment with P / R) 4 Press O or...ADJUSTMENT" mode has been used to adjust the image, a confirmation screen displays before the "H & V KEYSTONE" screen, asking if you want to reset the adjustments or not. Then select RESET. Vertical Keystone Correction (Adjustment with O / Q) Basic Operation 5 PresscKEYSTONEoriENTERon the remote control and the "H&V KEYSTONE" mode ends. Note • If...

VP4001 User Manual
Page 40
... C. S. - function cannot be used. *2 Item that cannot be set in the projector. Progressive DNR IRIS Lamp Setting Reset SEL./ADJ. RETURN 7500K 1 Comp. 1 Standard 3D Progressive Level 1 WIDE Normal Single ADJ END CLR Temp Page 44 BrilliantColor™ [0/1/2] Page ...43 C.M.S. S. - S. M. B M Reset 0 0 ENTER Page 44 C.M.S.-Value Page 44 RETURN END Reset *1 When a video signal, S-video signal, or component 480I/ 576I signal is input and the Progressive mode is set to "...
... C. S. - function cannot be used. *2 Item that cannot be set in the projector. Progressive DNR IRIS Lamp Setting Reset SEL./ADJ. RETURN 7500K 1 Comp. 1 Standard 3D Progressive Level 1 WIDE Normal Single ADJ END CLR Temp Page 44 BrilliantColor™ [0/1/2] Page ...43 C.M.S. S. - S. M. B M Reset 0 0 ENTER Page 44 C.M.S.-Value Page 44 RETURN END Reset *1 When a video signal, S-video signal, or component 480I/ 576I signal is input and the Progressive mode is set to "...

VP4001 User Manual
Page 41
.... freq Page 46 1035I 1080I The resolution changes depending on the input signal. Menu Items (Continued) "Fine Sync" menu Fine Sync Clock Phase H-Pos V-Pos Reset Special Modes Auto Sync RGB 0 0 0 0 1080I On Cur. freq : H 33.8 kHz / V 60 Hz SEL./ADJ. "Options2" menu Options 2 ...Installation RS-232C STANDBY Mode Fan Mode All Reset Language Comp. 1 Front 9600 bps Eco Normal English SEL./ADJ. sig. "Options1" menu Options 1 Image Shift Overscan H Overscan V Subtitle OSD Display Video System Signal ...
.... freq Page 46 1035I 1080I The resolution changes depending on the input signal. Menu Items (Continued) "Fine Sync" menu Fine Sync Clock Phase H-Pos V-Pos Reset Special Modes Auto Sync RGB 0 0 0 0 1080I On Cur. freq : H 33.8 kHz / V 60 Hz SEL./ADJ. "Options2" menu Options 2 ...Installation RS-232C STANDBY Mode Fan Mode All Reset Language Comp. 1 Front 9600 bps Eco Normal English SEL./ADJ. sig. "Options1" menu Options 1 Image Shift Overscan H Overscan V Subtitle OSD Display Video System Signal ...

VP4001 User Manual
Page 44
...Adjusting the Image Adjustment items O button Q button Contrast For less contrast. For stronger red. Note • To reset all adjustment items, select "Reset" and press iENTER. Tint*1 For making the effect stronger. *1 Item that cannot be adjusted in memory. For ...Blue Comp. 1 Standard 0 0 0 0 0 0 0 Q PAGE 2 Picture Picture Mode CLR Temp BrilliantColor™ C. Progressive DNR IRIS Lamp Setting Reset Menu operation = Page 41 7500K 1 Comp. 1 Standard 3D Progressive Level 1 WIDE Normal 1 Selecting the Picture Mode Selectable items Standard Natural Dynamic Theater ...
...Adjusting the Image Adjustment items O button Q button Contrast For less contrast. For stronger red. Note • To reset all adjustment items, select "Reset" and press iENTER. Tint*1 For making the effect stronger. *1 Item that cannot be adjusted in memory. For ...Blue Comp. 1 Standard 0 0 0 0 0 0 0 Q PAGE 2 Picture Picture Mode CLR Temp BrilliantColor™ C. Progressive DNR IRIS Lamp Setting Reset Menu operation = Page 41 7500K 1 Comp. 1 Standard 3D Progressive Level 1 WIDE Normal 1 Selecting the Picture Mode Selectable items Standard Natural Dynamic Theater ...

VP4001 User Manual
Page 45
...) or two-two pull down enhancement will be adjusted with P or R and adjust it with PAL50Hz and SECAM to the default settings, select "Reset" and pressiENTER. This function adjusts each color to play back a high-definition image. The projector can be made either "Hue", "Saturation", or ...source* clearly. Film Mode Reproduces the image of the main colors. Example of film transformed with the original encoded as is 480I or 576I. Reset The adjustments of "Hue", "Saturation" and "Value" of the main colors. Progressive moving images such as sports. 3D Useful to display ...
...) or two-two pull down enhancement will be adjusted with P or R and adjust it with PAL50Hz and SECAM to the default settings, select "Reset" and pressiENTER. This function adjusts each color to play back a high-definition image. The projector can be made either "Hue", "Saturation", or ...source* clearly. Film Mode Reproduces the image of the main colors. Example of film transformed with the original encoded as is 480I or 576I. Reset The adjustments of "Hue", "Saturation" and "Value" of the main colors. Progressive moving images such as sports. 3D Useful to display ...

VP4001 User Manual
Page 47
... time to complete, depending on the image of the screen. Note • You can be changed according to the input signal. • To reset all adjustment items, select "Reset" and press iENTER. 3 Auto Sync (Auto Sync Adjustment) Selectable items On Off Description Auto Sync adjustment will occur when the projector is also... turned on -screen image by moving it to a computer. Computer Image Adjustment ("Fine Sync" menu) Menu operation = Page 41 Fine Sync Clock Phase H-Pos V-Pos Reset Special Modes Auto Sync RGB 0 0 0 0 1080I On Cur.
... time to complete, depending on the image of the screen. Note • You can be changed according to the input signal. • To reset all adjustment items, select "Reset" and press iENTER. 3 Auto Sync (Auto Sync Adjustment) Selectable items On Off Description Auto Sync adjustment will occur when the projector is also... turned on -screen image by moving it to a computer. Computer Image Adjustment ("Fine Sync" menu) Menu operation = Page 41 Fine Sync Clock Phase H-Pos V-Pos Reset Special Modes Auto Sync RGB 0 0 0 0 1080I On Cur.
VP4001 User Manual
Page 50
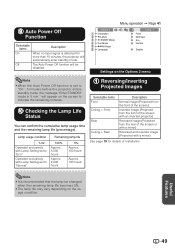
... to "On", 5 minutes before the projector enters standby mode, the message "Enter STANDBY mode in X min." Options 2 1 Installation 2 RS-232C 3 STANDBY Mode 4 Fan Mode 5 All Reset 6 Language Menu operation = Page 41 Comp. 1 Front 9600 bps Eco Normal English Settings on the usage condition. Note • It is recommended that the lamp...
... to "On", 5 minutes before the projector enters standby mode, the message "Enter STANDBY mode in X min." Options 2 1 Installation 2 RS-232C 3 STANDBY Mode 4 Fan Mode 5 All Reset 6 Language Menu operation = Page 41 Comp. 1 Front 9600 bps Eco Normal English Settings on the usage condition. Note • It is recommended that the lamp...

VP4001 User Manual
Page 51
...-screen Display Language The projector can switch the on-screen display language among 11 languages. Selectable items Description 5 Returning to the Default Settings Use "All Reset" to initialize all the adjustments you want to "Standard", the RS-232C function is activated and power is in standby mode. Language Standard Eco The...
...-screen Display Language The projector can switch the on-screen display language among 11 languages. Selectable items Description 5 Returning to the Default Settings Use "All Reset" to initialize all the adjustments you want to "Standard", the RS-232C function is activated and power is in standby mode. Language Standard Eco The...

VP4001 User Manual
Page 57
...; Loosen the securing screws from the lamp unit. At this may cause the lamp to secure the lamp unit cover. Securing screws 2 1 Resetting the Lamp Timer Reset the lamp timer after replacing the lamp. Fasten the securing screws. 6 Replace the lamp unit cover. • Align the tab on the ...is displayed, indicating that the lamp timer is connected to the projector. Info • Make sure to close it while pressing the tab (w) to reset the lamp timer only when replacing the lamp. INPUT ENTER ASPECT MENU INPUT / I STANDBY/ON on the lamp unit cover (q) and place it ...
...; Loosen the securing screws from the lamp unit. At this may cause the lamp to secure the lamp unit cover. Securing screws 2 1 Resetting the Lamp Timer Reset the lamp timer after replacing the lamp. Fasten the securing screws. 6 Replace the lamp unit cover. • Align the tab on the ...is displayed, indicating that the lamp timer is connected to the projector. Info • Make sure to close it while pressing the tab (w) to reset the lamp timer only when replacing the lamp. INPUT ENTER ASPECT MENU INPUT / I STANDBY/ON on the lamp unit cover (q) and place it ...