

Crestron Sample File
Page 1
... the amount of vertical lens shift for the VP-12S4) and is a completely new video processing engine. The VP-12S4 will wonder how that could even be changed as fifty percent of the screen height above the top of the viewable area. HD included - VP-12S4 DLP™ HIGH DEFINITION PROJECTOR After the continuing evolution and success of...
... the amount of vertical lens shift for the VP-12S4) and is a completely new video processing engine. The VP-12S4 will wonder how that could even be changed as fifty percent of the screen height above the top of the viewable area. HD included - VP-12S4 DLP™ HIGH DEFINITION PROJECTOR After the continuing evolution and success of...

User Manual
Page 7
...Lamp Replacement 2 Caution Concerning the Lamp Unit 2 Caution Concerning the Setup of the Projector 2 Notes on Operation ...2 FEATURES...3 ACCESSORIES ...3 PROJECTOR LAYOUT AND FUNCTIONAL OVERVIEW 4 Front and Top View...4 Rear and Terminals View 5 ...Video, DVD Player, Satellite, Cable Tuner or PC 9 Advanced Connection ...9 INITIAL SETTING 10 Turning on the Power...10 Zooming and Focusing 10 Detail Focusing ...10 Adjusting the Image Position 11 Adjusting the Height ...11 Keystone Correction ...11 INSTALLATION...12 Recommended Setting 12 Screen Size and Projection Distance (inch) VP-12S4...
...Lamp Replacement 2 Caution Concerning the Lamp Unit 2 Caution Concerning the Setup of the Projector 2 Notes on Operation ...2 FEATURES...3 ACCESSORIES ...3 PROJECTOR LAYOUT AND FUNCTIONAL OVERVIEW 4 Front and Top View...4 Rear and Terminals View 5 ...Video, DVD Player, Satellite, Cable Tuner or PC 9 Advanced Connection ...9 INITIAL SETTING 10 Turning on the Power...10 Zooming and Focusing 10 Detail Focusing ...10 Adjusting the Image Position 11 Adjusting the Height ...11 Keystone Correction ...11 INSTALLATION...12 Recommended Setting 12 Screen Size and Projection Distance (inch) VP-12S4...

User Manual
Page 10
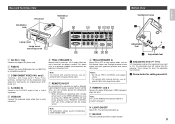
...is coming out. 13 IR sensor q Focus ring ( P.10) Adjust the picture focus. u INPUT SELECT button ( P.15) Selects the input signal (COMPONENT 1, COMPONENT 2, S-VIDEO, VIDEO, RGB, HDMI 1 and HDMI 2). o The 3 / 4 / 1 / 2 buttons Control the MENU cursor. It is almost impossible to have zero pixel defects, even ... are trying our best to control the quality in order to note that the warranty does not cover the SHP lamp for Marantz, but all projector manufactures. This is not a problem only for lamp failures: flickering, and getting darker along with accumulated lamp usage hours. ...
...is coming out. 13 IR sensor q Focus ring ( P.10) Adjust the picture focus. u INPUT SELECT button ( P.15) Selects the input signal (COMPONENT 1, COMPONENT 2, S-VIDEO, VIDEO, RGB, HDMI 1 and HDMI 2). o The 3 / 4 / 1 / 2 buttons Control the MENU cursor. It is almost impossible to have zero pixel defects, even ... are trying our best to control the quality in order to note that the warranty does not cover the SHP lamp for Marantz, but all projector manufactures. This is not a problem only for lamp failures: flickering, and getting darker along with accumulated lamp usage hours. ...
User Manual
Page 11
... "REMOTE CONTROL OUT" jack of the component with external devices, use an ordinal 3.5mm mini-plug (mono) cable. b VIDEO IN Connect the composite video output from the projector. When the unit is turned off . HDMI IN 1 and 2 Connect the digital RGB signal (TMDS compliant, single link ...a remote sensor (such as the power source. • To connect with the remote sensor. Connect them to the component video output of this projector to another Marantz audio component using a supplied System Control cable, you can remotely operate the components as a single system. • When ...
... "REMOTE CONTROL OUT" jack of the component with external devices, use an ordinal 3.5mm mini-plug (mono) cable. b VIDEO IN Connect the composite video output from the projector. When the unit is turned off . HDMI IN 1 and 2 Connect the digital RGB signal (TMDS compliant, single link ...a remote sensor (such as the power source. • To connect with the remote sensor. Connect them to the component video output of this projector to another Marantz audio component using a supplied System Control cable, you can remotely operate the components as a single system. • When ...

User Manual
Page 12
... ZOOM S DYN Z ™1 k VIDEO V USER THROUGH 1-3 T ™2 RGB CINEMA l RGB 4-6 ™3 HDMI BLANK ¡0 1 7-9 ™4 INFO. on how to select gamma curve. ( P.19) ¡5 ON button ( P.15) Turn the projector on. ¡6 PATTERN button ( P.10) Projects a focus pattern on ...161;2 REMOTE CONTROLLER RC -12VPS4 ™6 ™7 ¡3 ™8 ™9 ¡4 a STANDBY button ( P.16) Turn the projector off . ™4 BLANK button Select the blanking mode. Theater mode is designed for high fidelity black appearance and is pressed, the selection rotates...
... ZOOM S DYN Z ™1 k VIDEO V USER THROUGH 1-3 T ™2 RGB CINEMA l RGB 4-6 ™3 HDMI BLANK ¡0 1 7-9 ™4 INFO. on how to select gamma curve. ( P.19) ¡5 ON button ( P.15) Turn the projector on. ¡6 PATTERN button ( P.10) Projects a focus pattern on ...161;2 REMOTE CONTROLLER RC -12VPS4 ™6 ™7 ¡3 ™8 ™9 ¡4 a STANDBY button ( P.16) Turn the projector off . ™4 BLANK button Select the blanking mode. Theater mode is designed for high fidelity black appearance and is pressed, the selection rotates...
User Manual
Page 14
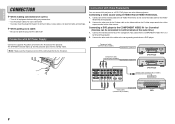
... with Video Equipments You can connect this projector to the S-video output terminal or video output terminal of the projector. 2. Connecting a video source using S-VIDEO IN and VIDEO IN terminals. 1. Component cable (commercially available) COMPONENT VIDEO OUT Component cable (commercially available) COMPONENT VIDEO OUT STANDBY FL OFF DVD Player STANDBY FL OFF DVD Player S-video cable (commercially available) S-VIDEO OUT VIDEO OUT Video cable...
... with Video Equipments You can connect this projector to the S-video output terminal or video output terminal of the projector. 2. Connecting a video source using S-VIDEO IN and VIDEO IN terminals. 1. Component cable (commercially available) COMPONENT VIDEO OUT Component cable (commercially available) COMPONENT VIDEO OUT STANDBY FL OFF DVD Player STANDBY FL OFF DVD Player S-video cable (commercially available) S-VIDEO OUT VIDEO OUT Video cable...

User Manual
Page 15
... Tuner /PC using PC or Marantz receiver equipment. DVD player). For the details of the HDMI terminal on a HD-Video, Satellite, Cable Tuner or personal computer. Connect one end of the RGB cable to the RGB IN port, or one end of this projector to the HDMI terminal of the... device. Connect the other end to the HDMI terminal, follow the procedure below system, consult with Marantz authorized dealer. Note : When projecting a video image from a device connected to the corresponding port on the...
... Tuner /PC using PC or Marantz receiver equipment. DVD player). For the details of the HDMI terminal on a HD-Video, Satellite, Cable Tuner or personal computer. Connect one end of the RGB cable to the RGB IN port, or one end of this projector to the HDMI terminal of the... device. Connect the other end to the HDMI terminal, follow the procedure below system, consult with Marantz authorized dealer. Note : When projecting a video image from a device connected to the corresponding port on the...
User Manual
Page 21
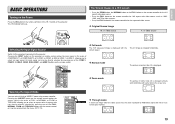
... controller or the / I button on the remote controller for 16:9 aspect ratio video source, such as 1080i, 1035i, and 720p video systems. • Press the FULL button on the projector. An input signal can be directly selected by pressing one of COMPONENT1 ➔ ...COMPONENT2 ➔ S-VIDEO ➔ VIDEO ➔ RGB ➔ HDMI 1 ➔ HDMI 2, allowing you to the projector. An aspect ratio can also be directly selected by pressing one of ASPECT mode using remote controller. LIGHT...
... controller or the / I button on the remote controller for 16:9 aspect ratio video source, such as 1080i, 1035i, and 720p video systems. • Press the FULL button on the projector. An input signal can be directly selected by pressing one of COMPONENT1 ➔ ...COMPONENT2 ➔ S-VIDEO ➔ VIDEO ➔ RGB ➔ HDMI 1 ➔ HDMI 2, allowing you to the projector. An aspect ratio can also be directly selected by pressing one of ASPECT mode using remote controller. LIGHT...
User Manual
Page 22
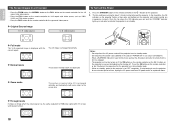
...10070; Normal mode The picture in standby mode. - When a WARNING indicator lit up a red color to indicate the projector is on standby. ❖ Original Source Image 16 : 9 video source 4 : 3 video source STANDBY ON PATTERN V-MUTE MENU ❖ Full mode The 16:9 squeezed image is enlarged vertically and horizontally (with ...state of time, unplug the AC power cord from AC power outlet as 1080i, 1035i, and 720p video systems. • Press the FULL button on standby, power to touch. The projector will not be turned on if the ON button on the remote controller or the / I button ...
...10070; Normal mode The picture in standby mode. - When a WARNING indicator lit up a red color to indicate the projector is on standby. ❖ Original Source Image 16 : 9 video source 4 : 3 video source STANDBY ON PATTERN V-MUTE MENU ❖ Full mode The 16:9 squeezed image is enlarged vertically and horizontally (with ...state of time, unplug the AC power cord from AC power outlet as 1080i, 1035i, and 720p video systems. • Press the FULL button on standby, power to touch. The projector will not be turned on if the ON button on the remote controller or the / I button ...

User Manual
Page 26
... (2:2 pulldown for red. - B Gain This menu allows the users to set the luminance gain. - VCR Mode On : A projector is not performed. - Black level Select the black level by a video source. - Luminance Gain This menu allows the users to set the bias for red. - R Gain This menu allows the users... to set the gain for green. - Off : A projector is basically off. FRC (Frame Rate Conversion) Auto : Frame Rate...
... (2:2 pulldown for red. - B Gain This menu allows the users to set the luminance gain. - VCR Mode On : A projector is not performed. - Black level Select the black level by a video source. - Luminance Gain This menu allows the users to set the bias for red. - R Gain This menu allows the users... to set the gain for green. - Off : A projector is basically off. FRC (Frame Rate Conversion) Auto : Frame Rate...

User Manual
Page 30
...4. STANDBY ON PATTERN V-MUTE MENU ENTER 2. After the cooling fan stops, Unplug the AC 4. Information Video Input Picture Mode Gamma Aspect Lamp Mode Iris Lamp Life Total Time Component 2 -480p User 1 A ... i REMOTE CONTROLLER RC -12VPS4 Notes: • The maximum life limit of 2000 hours. The projector is designed to cool down if running time exceeds 1,000 hours. Promptly replace the lamp with a...the remaining lamp life is now initialized. When the lamp life becomes less than a Marantz replacement lamp unit. ❖ How to replace the lamp if Lamp Life gets under...
...4. STANDBY ON PATTERN V-MUTE MENU ENTER 2. After the cooling fan stops, Unplug the AC 4. Information Video Input Picture Mode Gamma Aspect Lamp Mode Iris Lamp Life Total Time Component 2 -480p User 1 A ... i REMOTE CONTROLLER RC -12VPS4 Notes: • The maximum life limit of 2000 hours. The projector is designed to cool down if running time exceeds 1,000 hours. Promptly replace the lamp with a...the remaining lamp life is now initialized. When the lamp life becomes less than a Marantz replacement lamp unit. ❖ How to replace the lamp if Lamp Life gets under...

User Manual
Page 31
...SERIAL NO. Do not remove AC 120V 6a0nHyZoth2e.0rWscrews. EXPLOSER SI ELLE, N'EST PAS MANIPULEE CORRECTEMENT, CONFIER L'OPERATION A UN PERSONNEL D'ENTRETIEN QUALIFIE. 25 VP-16S1 / U1M AC 120V 60HZ 2.0A ATTENTION : LA LAMPE SOUS HAUTE PRESSION PEUT SI ELLE, N'EST PAS MANIPULEE CORRECTEMENT, CONFIER L'OPERATION A UN ...FABRIQUE AU JAPON 9. Install a new lamp unit in the direction of the arrow. Lamp cover 8. Install the lamp cover back in the video projector and turn on the power and project the image. • If the lamp is replaced before reaching its 2000 hours lamp life, see...
...SERIAL NO. Do not remove AC 120V 6a0nHyZoth2e.0rWscrews. EXPLOSER SI ELLE, N'EST PAS MANIPULEE CORRECTEMENT, CONFIER L'OPERATION A UN PERSONNEL D'ENTRETIEN QUALIFIE. 25 VP-16S1 / U1M AC 120V 60HZ 2.0A ATTENTION : LA LAMPE SOUS HAUTE PRESSION PEUT SI ELLE, N'EST PAS MANIPULEE CORRECTEMENT, CONFIER L'OPERATION A UN ...FABRIQUE AU JAPON 9. Install a new lamp unit in the direction of the arrow. Lamp cover 8. Install the lamp cover back in the video projector and turn on the power and project the image. • If the lamp is replaced before reaching its 2000 hours lamp life, see...


