
Owners Manual English
Page 1
Connections Playback Settings Tips Appendix AV Surround Receiver SR8015 Front panel Display Rear panel 1 Remote Owner's Manual Index Contents .
Connections Playback Settings Tips Appendix AV Surround Receiver SR8015 Front panel Display Rear panel 1 Remote Owner's Manual Index Contents .
Owners Manual English
Page 5
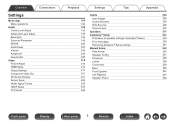
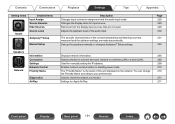
... Audyssey® Setup 231 196 Procedure for speaker settings (Audyssey® Setup) 233 196 Error messages 239 202 Retrieving Audyssey® Setup settings 241 203 Manual Setup 242 204 Amp Assign 242 205 Speaker Config. 251 208 Distances 256 210 Levels 258 210 Crossovers 259 212 Bass 260 217 Front Speaker...
... Audyssey® Setup 231 196 Procedure for speaker settings (Audyssey® Setup) 233 196 Error messages 239 202 Retrieving Audyssey® Setup settings 241 203 Manual Setup 242 204 Amp Assign 242 205 Speaker Config. 251 208 Distances 256 210 Levels 258 210 Crossovers 259 212 Bass 260 217 Front Speaker...
Owners Manual English
Page 8
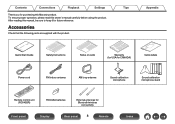
Tips Appendix . After reading this manual, be sure to keep it for Bluetooth/wireless connectivity Front panel Display Rear panel 8 Remote Index Accessories Check that the following parts are supplied with ... calibration microphone Sound calibration microphone stand Remote control unit (RC045SR) R03/AAA batteries External antennas for future reference. To ensure proper operation, please read this Marantz product. Contents Connections Playback Settings Thank you for purchasing this owner's manual carefully before using the product.
Tips Appendix . After reading this manual, be sure to keep it for Bluetooth/wireless connectivity Front panel Display Rear panel 8 Remote Index Accessories Check that the following parts are supplied with ... calibration microphone Sound calibration microphone stand Remote control unit (RC045SR) R03/AAA batteries External antennas for future reference. To ensure proper operation, please read this Marantz product. Contents Connections Playback Settings Thank you for purchasing this owner's manual carefully before using the product.
Owners Manual English
Page 16
...can select and play back the respective inputs in MAIN ZONE, ZONE2 and ZONE3. This is useful when you to . z Download the appropriate "Marantz 2016 AVR Remote" App for your iOS or Android devices. This unit needs to let the background music propagate throughout the whole house. 0 ...for performing basic operations of this unit as well as access to the receiver's status display, option menus, Marantz Blu-ray Disc player control, and online owner's manual for your convenience. "Marantz 2016 AVR Remote" App also gives you full control of the unit with many new features, the graphics...
...can select and play back the respective inputs in MAIN ZONE, ZONE2 and ZONE3. This is useful when you to . z Download the appropriate "Marantz 2016 AVR Remote" App for your iOS or Android devices. This unit needs to let the background music propagate throughout the whole house. 0 ...for performing basic operations of this unit as well as access to the receiver's status display, option menus, Marantz Blu-ray Disc player control, and online owner's manual for your convenience. "Marantz 2016 AVR Remote" App also gives you full control of the unit with many new features, the graphics...
Owners Manual English
Page 30
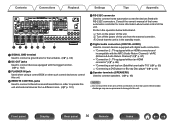
... when using a control BOX or other such control devices to the unit. Perform the operation below beforehand. A Turn on the rear panel. Consult the owner's manual of the home automation controller for the turntable. (v p. 94) L DC OUT jacks Used to connect devices equipped with the ARC (Audio Return Channel) / eARC (Enhanced...
... when using a control BOX or other such control devices to the unit. Perform the operation below beforehand. A Turn on the rear panel. Consult the owner's manual of the home automation controller for the turntable. (v p. 94) L DC OUT jacks Used to connect devices equipped with the ARC (Audio Return Channel) / eARC (Enhanced...
Owners Manual English
Page 86
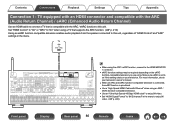
... (ARC / eARC) 0 When using the ARC / eARC function, connect to the HDMI MONITOR 1 connector. 0 eARC function settings may be required depending on your television's owner's manual. 0 When an ARC and eARC function-compatible television is connected, the eARC function is compatible with Ethernet" when using an ARC / eARC function-compatible television...
... (ARC / eARC) 0 When using the ARC / eARC function, connect to the HDMI MONITOR 1 connector. 0 eARC function settings may be required depending on your television's owner's manual. 0 When an ARC and eARC function-compatible television is connected, the eARC function is compatible with Ethernet" when using an ARC / eARC function-compatible television...
Owners Manual English
Page 120
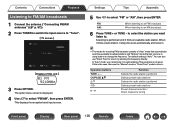
... Tips Appendix 5 Use o p to . to select the station you want listen to select "FM" or "AM", then press ENTER. You can also use the "Manual" mode or "Direct Tune" mode to "Tuner". In "Auto" mode, you tune in using buttons to an AM broadcast. 6 Press TUNE + or TUNE - Operation... Tuner CH 1 FM 92.10MHz STEREO AUTO Now Playing Tune Preset OPTION Option G Display of "Auto" mode that automatically searches available broadcast stations and "Manual" mode that lets you cannot tune in to tune in by entering the frequency directly. The option menu screen is the case, then use "Direct...
... Tips Appendix 5 Use o p to . to select the station you want listen to select "FM" or "AM", then press ENTER. You can also use the "Manual" mode or "Direct Tune" mode to "Tuner". In "Auto" mode, you tune in using buttons to an AM broadcast. 6 Press TUNE + or TUNE - Operation... Tuner CH 1 FM 92.10MHz STEREO AUTO Now Playing Tune Preset OPTION Option G Display of "Auto" mode that automatically searches available broadcast stations and "Manual" mode that lets you cannot tune in to tune in by entering the frequency directly. The option menu screen is the case, then use "Direct...
Owners Manual English
Page 122
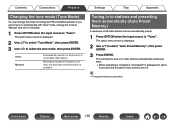
... Preset Memory", then press ENTER. 3 Press ENTER. The option menu screen is displayed. 2 Use ui to select "Tune Mode", then press ENTER. 3 Use o p to "Manual" and tune in automatically with "Auto" mode, change the frequency one step at a time each time the button is overwritten.... Manually change the mode to select the tune mode, then press ENTER. If you cannot tune in manually. 1 Press OPTION when the input source is displayed for and tune to a receivable radio station. Auto...
... Preset Memory", then press ENTER. 3 Press ENTER. The option menu screen is displayed. 2 Use ui to select "Tune Mode", then press ENTER. 3 Use o p to "Manual" and tune in automatically with "Auto" mode, change the frequency one step at a time each time the button is overwritten.... Manually change the mode to select the tune mode, then press ENTER. If you cannot tune in manually. 1 Press OPTION when the input source is displayed for and tune to a receivable radio station. Auto...
Owners Manual English
Page 143
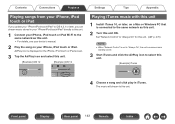
..." to "Always On" for this unit. (v p. 270) NOTE 0 When "Network Control" is connected to the same network as this unit. 0 For details, see your device's manual. 2 Play the song on a Mac or Windows PC that is set to "Always On", the unit consumes more standby power. 3 Start iTunes and click the...
..." to "Always On" for this unit. (v p. 270) NOTE 0 When "Network Control" is connected to the same network as this unit. 0 For details, see your device's manual. 2 Play the song on a Mac or Windows PC that is set to "Always On", the unit consumes more standby power. 3 Start iTunes and click the...
Owners Manual English
Page 152
... in a bright room during the day. An option menu screen is displayed. 2 Use ui to select "Picture Mode", then press ENTER. Adjusts the picture quality manually. 4 Press ENTER. 0 "Picture Mode" settings are stored for each input source.
... in a bright room during the day. An option menu screen is displayed. 2 Use ui to select "Picture Mode", then press ENTER. Adjusts the picture quality manually. 4 Press ENTER. 0 "Picture Mode" settings are stored for each input source.
Owners Manual English
Page 154
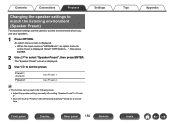
... "Speaker Preset" screen is displayed. Preset 1 (Default): Preset 2: Use Preset 1. Use Preset 2. 0 This function can be used in the following cases. 0 Adjust the speaker settings manually after setting "Speaker Preset" to "Preset 2". 0 Save the result to "Preset 2" after performing Audyssey® Setup for online music is displayed. 3 Use o p to select "Speaker...
... "Speaker Preset" screen is displayed. Preset 1 (Default): Preset 2: Use Preset 1. Use Preset 2. 0 This function can be used in the following cases. 0 Adjust the speaker settings manually after setting "Speaker Preset" to "Preset 2". 0 Save the result to "Preset 2" after performing Audyssey® Setup for online music is displayed. 3 Use o p to select "Speaker...
Owners Manual English
Page 169
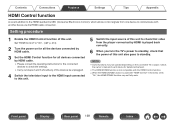
Set "HDMI Control" to "On". (v p. 214) 2 Turn the power on the connected TV or player. Check the owner's manual of each device for the connected devices to check the settings. 0 Carry out steps 2 and 3 should any of the devices be unplugged. 4 Switch the television ...
Set "HDMI Control" to "On". (v p. 214) 2 Turn the power on the connected TV or player. Check the owner's manual of each device for the connected devices to check the settings. 0 Carry out steps 2 and 3 should any of the devices be unplugged. 4 Switch the television ...
Owners Manual English
Page 191
... of the connected speakers and listening room are measured and the optimum settings are not used. Sets up the speakers manually or changes Audyssey® Setup settings. Contents Connections Playback Settings Tips Appendix Setting items Inputs Detailed items Input Assign Source... Rename Hide Sources Source Level Audyssey® Setup Manual Setup ... Page 226 229 229 230 231 242 Displays network information. 265 Selects whether to connect the home network to a...
... of the connected speakers and listening room are measured and the optimum settings are not used. Sets up the speakers manually or changes Audyssey® Setup settings. Contents Connections Playback Settings Tips Appendix Setting items Inputs Detailed items Input Assign Source... Rename Hide Sources Source Level Audyssey® Setup Manual Setup ... Page 226 229 229 230 231 242 Displays network information. 265 Selects whether to connect the home network to a...
Owners Manual English
Page 193
... for the latest firmware information about this unit. Save and restore device settings by using a USB memory device. Changes the display title of the separate manual "Quick Start Guide" Front panel Display Rear panel 193 Remote Index Changes the Smart Select Name display title to the display on the TV screen... audio playback with ZONE2 and ZONE3. Makes settings for activating trigger out function. Makes settings related to one you prefer. Various settings are reset to Marantz.
... for the latest firmware information about this unit. Save and restore device settings by using a USB memory device. Changes the display title of the separate manual "Quick Start Guide" Front panel Display Rear panel 193 Remote Index Changes the Smart Select Name display title to the display on the TV screen... audio playback with ZONE2 and ZONE3. Makes settings for activating trigger out function. Makes settings related to one you prefer. Various settings are reset to Marantz.
Owners Manual English
Page 199
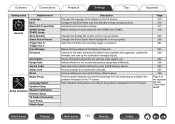
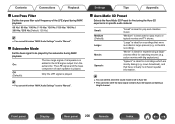
... High Pass Filter Set the high pass filter cutoff frequency for IMAX playback. "Crossovers", "Bass" - Auto (Default): Manual: Applies the optimized speaker settings to reproduce similar to "Manual". Auto (Default): On: Off: Automatically enables the IMAX mode when IMAX content is detected. Settings Tips Appendix o IMAX ... IMAX contents from online streaming service using TV Apps or player Apps (such as Blu-ray player's App), this parameter to "On" manually. 0 This setting can only be set when headphones are used. 0 You can enable IMAX mode by setting this unit may not detect...
... High Pass Filter Set the high pass filter cutoff frequency for IMAX playback. "Crossovers", "Bass" - Auto (Default): Manual: Applies the optimized speaker settings to reproduce similar to "Manual". Auto (Default): On: Off: Automatically enables the IMAX mode when IMAX content is detected. Settings Tips Appendix o IMAX ... IMAX contents from online streaming service using TV Apps or player Apps (such as Blu-ray player's App), this parameter to "On" manually. 0 This setting can only be set when headphones are used. 0 You can enable IMAX mode by setting this unit may not detect...
Owners Manual English
Page 200
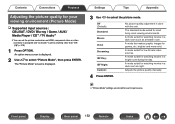
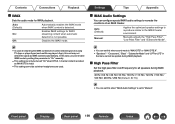
...recordings which are mostly dialog (e.g. action movies with big explosions). Front panel Display Rear panel 200 Remote Index o Subwoofer Mode Set the bass signal to "Manual". Settings Tips Appendix o Auro-Matic 3D Preset Selects the Auro-Matic 3D Preset for fine tuning the Auro-3D experience to... "Manual". "Large" is set to be set if the input signal contains Auro-3D signals containing a Height channel. "Movie" is ideal for experiencing a largecinema effect ...
...recordings which are mostly dialog (e.g. action movies with big explosions). Front panel Display Rear panel 200 Remote Index o Subwoofer Mode Set the bass signal to "Manual". Settings Tips Appendix o Auro-Matic 3D Preset Selects the Auro-Matic 3D Preset for fine tuning the Auro-3D experience to... "Manual". "Large" is set to be set if the input signal contains Auro-3D signals containing a Height channel. "Movie" is ideal for experiencing a largecinema effect ...
Owners Manual English
Page 203
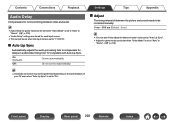
... correct automatically. On (Default): Off: Correct automatically. Contents Connections Playback Audio Delay Compensates for incorrect timing between the picture and sound needs to be corrected manually. 0 ms - 500 ms (Default : 0 ms) 0 You can also finely adjust the delay correction value set by "Auto Lip Sync". 0 Adjust for game mode can be...
... correct automatically. On (Default): Off: Correct automatically. Contents Connections Playback Audio Delay Compensates for incorrect timing between the picture and sound needs to be corrected manually. 0 ms - 500 ms (Default : 0 ms) 0 You can also finely adjust the delay correction value set by "Auto Lip Sync". 0 Adjust for game mode can be...
Owners Manual English
Page 210
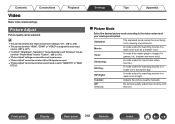
.... Standard: Movie: Vivid: Streaming: ISF Day: ISF Night: Custom: Off (Default): The standard mode suited for low bit rate video sources. Adjusts the picture quality manually. Playback 0 This can be set when the "Video Conversion" setting is "On". (v p. 218) 0 This can be set to the video content and your viewing environment...
.... Standard: Movie: Vivid: Streaming: ISF Day: ISF Night: Custom: Off (Default): The standard mode suited for low bit rate video sources. Adjusts the picture quality manually. Playback 0 This can be set when the "Video Conversion" setting is "On". (v p. 218) 0 This can be set to the video content and your viewing environment...

Owners Manual English
Page 231
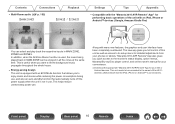
... Listening position SR . You do not have to perform Audyssey® Setup when you have already performed "Speaker Calibration" in the illustration (up the speakers manually, use "Manual Setup" on the menu. (v p. 242) Audyssey® Setup To perform measurement, place the Sound calibration microphone in multiple locations all around the listening area...
... Listening position SR . You do not have to perform Audyssey® Setup when you have already performed "Speaker Calibration" in the illustration (up the speakers manually, use "Manual Setup" on the menu. (v p. 242) Audyssey® Setup To perform measurement, place the Sound calibration microphone in multiple locations all around the listening area...
Owners Manual English
Page 241
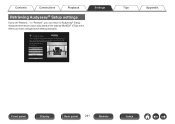
... the start by MultEQ® XT32) even when you set "Restore..." Contents Connections Playback Retrieving Audyssey® Setup settings If you have changed each setting manually.
... the start by MultEQ® XT32) even when you set "Restore..." Contents Connections Playback Retrieving Audyssey® Setup settings If you have changed each setting manually.


