
HEOS CLI PROTOCOL Specification
Page 4
... unsolicited events but still it is done through HEOS app. Retrieve current HEOS ecosystem status. New JSON objects may be added to set statically and manually programmed into the control system. It is done through CLI, it is a good idea to send un-register command.This is recommended to keep a idle...
... unsolicited events but still it is done through HEOS app. Retrieve current HEOS ecosystem status. New JSON objects may be added to set statically and manually programmed into the control system. It is done through CLI, it is a good idea to send un-register command.This is recommended to keep a idle...
Owners Manual English
Page 1
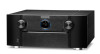
Contents . Connections Playback Settings Tips Appendix AV Surround Receiver SR8012 Front panel Display Rear panel 1 Remote Owner's Manual Index
Contents . Connections Playback Settings Tips Appendix AV Surround Receiver SR8012 Front panel Display Rear panel 1 Remote Owner's Manual Index
Owners Manual English
Page 5
... Audyssey® Setup 210 178 Procedure for speaker settings (Audyssey® Setup) 212 183 Error messages 218 184 Retrieving Audyssey® Setup settings 220 185 Manual Setup 221 186 Amp Assign 221 189 Speaker Config. 228 191 Distances 233 191 Levels 234 193 Crossovers 235 198 Bass 236 201 Front Speaker...
... Audyssey® Setup 210 178 Procedure for speaker settings (Audyssey® Setup) 212 183 Error messages 218 184 Retrieving Audyssey® Setup settings 220 185 Manual Setup 221 186 Amp Assign 221 189 Speaker Config. 228 191 Distances 233 191 Levels 234 193 Crossovers 235 198 Bass 236 201 Front Speaker...
Owners Manual English
Page 8
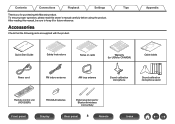
... antenna Sound calibration microphone Sound calibration microphone stand Remote control unit (RC038SR) R03/AAA batteries External antennas for future reference. Tips Appendix . After reading this manual, be sure to keep it for Bluetooth/wireless connectivity Front panel Display Rear panel 8 Remote Index Accessories Check that the following parts are supplied with...
... antenna Sound calibration microphone Sound calibration microphone stand Remote control unit (RC038SR) R03/AAA batteries External antennas for future reference. Tips Appendix . After reading this manual, be sure to keep it for Bluetooth/wireless connectivity Front panel Display Rear panel 8 Remote Index Accessories Check that the following parts are supplied with...
Owners Manual English
Page 15
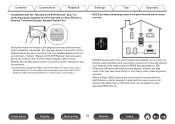
...(Google, Amazon Kindle Fire) Settings Tips Appendix 0 HEOS provides streaming music from your phones or tablets. z Download the appropriate "Marantz 2016 AVR Remote" App for your own music library or from many new features, the graphics and user interface have been completely overhauled...that enables you quick access to the receiver's status display, option menus, Marantz Blu-ray Disc player control, and online owner's manual for your convenience. Contents Connections Playback 0 Compatible with the "Marantz 2016 AVR Remote" Appz for performing basic operations of the AVR as ...
...(Google, Amazon Kindle Fire) Settings Tips Appendix 0 HEOS provides streaming music from your phones or tablets. z Download the appropriate "Marantz 2016 AVR Remote" App for your own music library or from many new features, the graphics and user interface have been completely overhauled...that enables you quick access to the receiver's status display, option menus, Marantz Blu-ray Disc player control, and online owner's manual for your convenience. Contents Connections Playback 0 Compatible with the "Marantz 2016 AVR Remote" Appz for performing basic operations of the AVR as ...
Owners Manual English
Page 29
... jacks Used to operate this unit. C Check that the unit is in order to connect infrared receivers/transmitters in the standby mode. Consult the owner's manual of the home automation controller for more information about serial control of this unit and external devices from the external controller. A Turn on the rear...
... jacks Used to operate this unit. C Check that the unit is in order to connect infrared receivers/transmitters in the standby mode. Consult the owner's manual of the home automation controller for more information about serial control of this unit and external devices from the external controller. A Turn on the rear...
Owners Manual English
Page 107
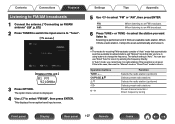
...4 Use ui to tune in by entering the frequency directly. In "Auto" mode, you want listen to "Tuner". You can also use the "Manual" mode or "Direct Tune" mode to select "FM/AM", then press ENTER. AM: When listening to an FM broadcast. This displays the reception... CH 1 FM 92.10MHz STEREO AUTO Now Playing Tune Preset OPTION Option G Display of "Auto" mode that automatically searches available broadcast stations and "Manual" mode that lets you tune in using buttons to select "FM" or "AM", then press ENTER. Contents Connections Playback Listening to FM/AM broadcasts...
...4 Use ui to tune in by entering the frequency directly. In "Auto" mode, you want listen to "Tuner". You can also use the "Manual" mode or "Direct Tune" mode to select "FM/AM", then press ENTER. AM: When listening to an FM broadcast. This displays the reception... CH 1 FM 92.10MHz STEREO AUTO Now Playing Tune Preset OPTION Option G Display of "Auto" mode that automatically searches available broadcast stations and "Manual" mode that lets you tune in using buttons to select "FM" or "AM", then press ENTER. Contents Connections Playback Listening to FM/AM broadcasts...

Owners Manual English
Page 109
... overwritten. The unit starts to tune in to select "Auto Preset Memory", then press ENTER. 3 Press ENTER. Settings Tips Appendix Tuning in manually. 1 Press OPTION when the input source is "Tuner". If you cannot tune in automatically with "Auto" mode, change the frequency one step... preset memory is displayed. 2 Use ui to select "Tune Mode", then press ENTER. 3 Use o p to a receivable radio station. Manually change the mode to "Manual" and tune in to stations and presetting them . 0 When presetting is completed, "Completed" is displayed for and tune to select the tune...
... overwritten. The unit starts to tune in to select "Auto Preset Memory", then press ENTER. 3 Press ENTER. Settings Tips Appendix Tuning in manually. 1 Press OPTION when the input source is "Tuner". If you cannot tune in automatically with "Auto" mode, change the frequency one step... preset memory is displayed. 2 Use ui to select "Tune Mode", then press ENTER. 3 Use o p to a receivable radio station. Manually change the mode to "Manual" and tune in to stations and presetting them . 0 When presetting is completed, "Completed" is displayed for and tune to select the tune...
Owners Manual English
Page 130
..." to "Always On" for this unit. (v p. 245) NOTE 0 When "Network Control" is connected to the same network as this unit. 0 For details, see your device's manual. 2 Play the song on a Mac or Windows PC that is set to "Always On", the unit consumes more standby power. 3 Start iTunes and click the...
..." to "Always On" for this unit. (v p. 245) NOTE 0 When "Network Control" is connected to the same network as this unit. 0 For details, see your device's manual. 2 Play the song on a Mac or Windows PC that is set to "Always On", the unit consumes more standby power. 3 Start iTunes and click the...
Owners Manual English
Page 139
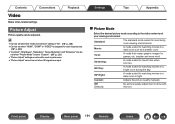
A mode suited for watching movies in a bright room during the day. A mode suited for low bit rate video sources. Adjusts the picture quality manually. 4 Press ENTER. 0 "Picture Mode" settings are stored for watching movies in a dark room such as a theater room. A mode suited for each input source. Front panel ...
A mode suited for watching movies in a bright room during the day. A mode suited for low bit rate video sources. Adjusts the picture quality manually. 4 Press ENTER. 0 "Picture Mode" settings are stored for watching movies in a dark room such as a theater room. A mode suited for each input source. Front panel ...

Owners Manual English
Page 153
NOTE 0 Some functions may not fully work. Front panel Display Rear panel 153 Remote Index Check the owner's manual of each device for details beforehand. 0 The HDMI ZONE2 function is not compatible with the HDMI Control function. 0 When the HDMI ZONE2 function is played ...
NOTE 0 Some functions may not fully work. Front panel Display Rear panel 153 Remote Index Check the owner's manual of each device for details beforehand. 0 The HDMI ZONE2 function is not compatible with the HDMI Control function. 0 When the HDMI ZONE2 function is played ...
Owners Manual English
Page 173
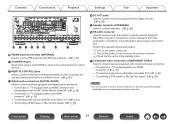
... Playback Settings Tips Appendix Setting items Inputs Detailed items Input Assign Source Rename Hide Sources Source Level Input Select Audyssey® Setup Manual Setup ... Adjusts the playback level of this unit displayed on the network. You can change 245 the Friendly Name according to ...a wired LAN. 240 Used for input source. Removes from the display input sources that are made automatically. Changes the display name for manually setting the IP address. 243 Enables network communication in standby power mode. 245 The "Friendly Name" is the name of the audio input...
... Playback Settings Tips Appendix Setting items Inputs Detailed items Input Assign Source Rename Hide Sources Source Level Input Select Audyssey® Setup Manual Setup ... Adjusts the playback level of this unit displayed on the network. You can change 245 the Friendly Name according to ...a wired LAN. 240 Used for input source. Removes from the display input sources that are made automatically. Changes the display name for manually setting the IP address. 243 Enables network communication in standby power mode. 245 The "Friendly Name" is the name of the audio input...

Owners Manual English
Page 175
... and restore device settings by using a USB memory device. Checks for the latest firmware information about this unit. Changes the display title of the separate manual "Quick Start Guide" Front panel Display Rear panel 175 Remote Index Page 248 248 251 253 253 254 254 255 258 259 260 260 Page...
... and restore device settings by using a USB memory device. Checks for the latest firmware information about this unit. Changes the display title of the separate manual "Quick Start Guide" Front panel Display Rear panel 175 Remote Index Page 248 248 251 253 253 254 254 255 258 259 260 260 Page...
Owners Manual English
Page 184
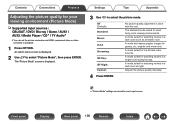
... the audio processing time to "7.1CH IN". Contents Connections Playback Audio Delay Compensates for incorrect timing between the picture and sound needs to be corrected manually. 0 ms - 500 ms (Default : 0 ms) 0 You can also finely adjust the delay correction value set by "Auto Lip Sync". 0 Adjust for game mode can be...
... the audio processing time to "7.1CH IN". Contents Connections Playback Audio Delay Compensates for incorrect timing between the picture and sound needs to be corrected manually. 0 ms - 500 ms (Default : 0 ms) 0 You can also finely adjust the delay correction value set by "Auto Lip Sync". 0 Adjust for game mode can be...
Owners Manual English
Page 191
... vivid. A mode suited for most living room viewing environments. A mode suited for watching movies in a dark room such as a theater room. Adjusts the picture quality manually. No picture quality adjustment is set to the video content and your viewing environment. Picture Adjust Picture quality can be set when "HDMI", "COMP" or...
... vivid. A mode suited for most living room viewing environments. A mode suited for watching movies in a dark room such as a theater room. Adjusts the picture quality manually. No picture quality adjustment is set to the video content and your viewing environment. Picture Adjust Picture quality can be set when "HDMI", "COMP" or...
Owners Manual English
Page 210
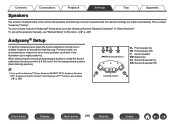
... area. To set up to perform Audyssey® Setup when you measure in six or more positions, as shown in the illustration (up the speakers manually, use "Manual Setup" on the menu. (v p. 221) Audyssey® Setup To perform measurement, place the Sound calibration microphone in "Setup Assistant". Front panel Display Rear panel...
... area. To set up to perform Audyssey® Setup when you measure in six or more positions, as shown in the illustration (up the speakers manually, use "Manual Setup" on the menu. (v p. 221) Audyssey® Setup To perform measurement, place the Sound calibration microphone in "Setup Assistant". Front panel Display Rear panel...
Owners Manual English
Page 220
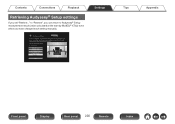
... then optimize your speakers using the included microphone and microphone stand. Contents Connections Playback Retrieving Audyssey® Setup settings If you have changed each setting manually.
... then optimize your speakers using the included microphone and microphone stand. Contents Connections Playback Retrieving Audyssey® Setup settings If you have changed each setting manually.
Owners Manual English
Page 221
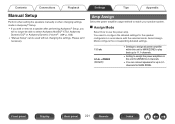
...can connect speakers for up to select Audyssey MultEQ® XT32, Audyssey Dynamic EQ® or Audyssey Dynamic Volume®. (v p. 186) 0 "Manual Setup" can be able to 9.1channels for the speaker configuration in this unit to MAIN ZONE to play back up to 11.1-channels. 0 Setting to... the power amplifier usage method to use the power amp. Please set if necessary. Contents Connections Playback Settings Tips Appendix Manual Setup Perform when setting the speakers manually or when changing settings made in Audyssey® Setup. 0 If you add or remove a speaker after performing Audyssey...
...can connect speakers for up to select Audyssey MultEQ® XT32, Audyssey Dynamic EQ® or Audyssey Dynamic Volume®. (v p. 186) 0 "Manual Setup" can be able to 9.1channels for the speaker configuration in this unit to MAIN ZONE to play back up to 11.1-channels. 0 Setting to... the power amplifier usage method to use the power amp. Please set if necessary. Contents Connections Playback Settings Tips Appendix Manual Setup Perform when setting the speakers manually or when changing settings made in Audyssey® Setup. 0 If you add or remove a speaker after performing Audyssey...
Owners Manual English
Page 235
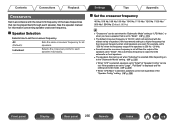
... "Subwoofer Mode" setting is "LFE+Main", or when you have a speaker that the crossover frequency when small speakers are set to set . See the speaker manual for information concerning speaker crossover frequency. Settings Tips Appendix o Set the crossover frequency 40 Hz / 60 Hz / 80 Hz / 90 Hz / 100 Hz / 110 Hz...
... "Subwoofer Mode" setting is "LFE+Main", or when you have a speaker that the crossover frequency when small speakers are set to set . See the speaker manual for information concerning speaker crossover frequency. Settings Tips Appendix o Set the crossover frequency 40 Hz / 60 Hz / 80 Hz / 90 Hz / 100 Hz / 110 Hz...
Owners Manual English
Page 237
.... Settings Tips Appendix 2ch Playback Select the method for 2-channel playback. o Setting Select the method for very low bass frequencies. 0 When "Speaker Config." - Auto (Default): Manual: The settings in the menu is set to "None", "Large" is used . B : Front speaker B is set to "9.1ch + Front B". (v p. 222) 0 This can adequately play back...
.... Settings Tips Appendix 2ch Playback Select the method for 2-channel playback. o Setting Select the method for very low bass frequencies. 0 When "Speaker Config." - Auto (Default): Manual: The settings in the menu is set to "None", "Large" is used . B : Front speaker B is set to "9.1ch + Front B". (v p. 222) 0 This can adequately play back...


