

Marantz AV Receiver IR Remote Code List
Page 8
... supports numbers or values direct setting command, if it has variable numbers or values. All Commands and Statuses are required working by discreate as a remote controller buttons (IR controller) of Command, Status and Layer definition - Recommend to a reply characters from the product. Recommendations of the product. - All Commands are defined same chharacter size...
... supports numbers or values direct setting command, if it has variable numbers or values. All Commands and Statuses are required working by discreate as a remote controller buttons (IR controller) of Command, Status and Layer definition - Recommend to a reply characters from the product. Recommendations of the product. - All Commands are defined same chharacter size...
SR7001 Spec Sheet
Page 2
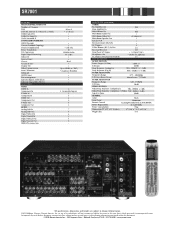
... Marantz, Marantz America, Inc. IN/OUTPUTS (continued) OTHER Pre-Amplifier Out 8ch Main Amplifier In - Response (Composite, S-Video) 5Hz - 8MHz (- 1 dB) Signal to Noise 60dB GENERAL Color Black Front Panel Aluminum Remote Control ...Learning/Pre-coded with LCD RC8001SR Power Requirement AC 120V/60Hz Power Consumption 750w Dimensions W" x H" x D" (Inches) 17 5/16" x 7 1/4" x 15 5/8" Weight (lbs) 33.1 *All specifications, dimensions and weights are subject to HDMI (w/ TBC) •(Audyssey MultiEQ 4 4 (Assignable Inputs) 5 5 1 2 3 4 7 5 4 3 1 1 - SR7001...
... Marantz, Marantz America, Inc. IN/OUTPUTS (continued) OTHER Pre-Amplifier Out 8ch Main Amplifier In - Response (Composite, S-Video) 5Hz - 8MHz (- 1 dB) Signal to Noise 60dB GENERAL Color Black Front Panel Aluminum Remote Control ...Learning/Pre-coded with LCD RC8001SR Power Requirement AC 120V/60Hz Power Consumption 750w Dimensions W" x H" x D" (Inches) 17 5/16" x 7 1/4" x 15 5/8" Weight (lbs) 33.1 *All specifications, dimensions and weights are subject to HDMI (w/ TBC) •(Audyssey MultiEQ 4 4 (Assignable Inputs) 5 5 1 2 3 4 7 5 4 3 1 1 - SR7001...

User Manual
Page 4
... FL DISPLAY AND INDICATER 7 REAR PANEL 8 REMOTE CONTROLLER RC8001SR ...9 NAMES AND FUNCTIONS 9 LCD INDICATORS 10 REMOTE CONTROL RANGE 11 LOADING BATTERIES 11 BATTERY REPLACEMENT INTERVAL 11 SETTING THE TIME 11 GENERAL INFORMATION OF RC8001SR TO SR7001....12 CONNECTIONS 13 SPEAKER PLACEMENT 13 CONNECTING SPEAKERS ... USING THE MULTI SPEAKER TERMINALS 56 OPERATION OF THE MULTI ROOM OUTPUTS WITH THE REMOTE CONTROL FROM MULTI A 57 REMOTE CONTROLLER OPERATION 58 CONTROLLING MARANTZ COMPONENTS 58 BASIC OPERATION 60 PROGRAMMING MACROS 63 CLONE MODE 65 SETUP 66 TROUBLESHOOTING 67...
... FL DISPLAY AND INDICATER 7 REAR PANEL 8 REMOTE CONTROLLER RC8001SR ...9 NAMES AND FUNCTIONS 9 LCD INDICATORS 10 REMOTE CONTROL RANGE 11 LOADING BATTERIES 11 BATTERY REPLACEMENT INTERVAL 11 SETTING THE TIME 11 GENERAL INFORMATION OF RC8001SR TO SR7001....12 CONNECTIONS 13 SPEAKER PLACEMENT 13 CONNECTING SPEAKERS ... USING THE MULTI SPEAKER TERMINALS 56 OPERATION OF THE MULTI ROOM OUTPUTS WITH THE REMOTE CONTROL FROM MULTI A 57 REMOTE CONTROLLER OPERATION 58 CONTROLLING MARANTZ COMPONENTS 58 BASIC OPERATION 60 PROGRAMMING MACROS 63 CLONE MODE 65 SETUP 66 TROUBLESHOOTING 67...
User Manual
Page 8
...; Auto Adjust Function for Speaker Distance Settings (Delay Time) • Front Optical AUX Input (Digital Camera, Portable DVD) • Programmable, learning remote control • Video convert system HDMI ← Component Video ↔ S-Video ↔ Composit Video • Video I/P Converter • Assignable Video .... 1.2. Furthermore, the SR7001 can be used for audio/ video, HDMI enables audio/video connection via all of the operating functions and can output the OSD information through the Y/C (S-video) and composite video outputs. In addition, Marantz has focused on the ...
...; Auto Adjust Function for Speaker Distance Settings (Delay Time) • Front Optical AUX Input (Digital Camera, Portable DVD) • Programmable, learning remote control • Video convert system HDMI ← Component Video ↔ S-Video ↔ Composit Video • Video I/P Converter • Assignable Video .... 1.2. Furthermore, the SR7001 can be used for audio/ video, HDMI enables audio/video connection via all of the operating functions and can output the OSD information through the Y/C (S-video) and composite video outputs. In addition, Marantz has focused on the ...
User Manual
Page 9
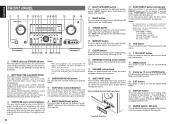
...t AUTO (Auto surround) button Press this button to exit from another. e HEADPHONE jack for the remote control. !3 VOLUME control knob Adjusts the overall sound level. Turning the control clockwise increases the sound level. !4 AUX1 INPUT jacks These auxiliary video/audio input jacks accept the connections... TUNER mode. "MULTI" indicator will be illuminated in the display. (See page 56) i BAND button Press this button to the SR7001's output through a pair of headphones. When pressed again, the unit turns OFF and the STANDBY indicator will be illuminated. Notes: •...
...t AUTO (Auto surround) button Press this button to exit from another. e HEADPHONE jack for the remote control. !3 VOLUME control knob Adjusts the overall sound level. Turning the control clockwise increases the sound level. !4 AUX1 INPUT jacks These auxiliary video/audio input jacks accept the connections... TUNER mode. "MULTI" indicator will be illuminated in the display. (See page 56) i BAND button Press this button to the SR7001's output through a pair of headphones. When pressed again, the unit turns OFF and the STANDBY indicator will be illuminated. Notes: •...

User Manual
Page 11
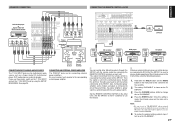
... provided. r MONITOR OUT These are using an external device. If you use , see page 20. OUT: Connect to a multi-room remote control device, available from a Keypad, etc. !8 DC TRIGGER output terminal Connect a device that has a multichannel port, you hear the best reception...SR7001. SR7001 can be used to connect a third set to this AC outlet is turned on . • The capacity of this receiver or set of these outlets. External devices can be active. IN 1 2 3 TV L DVD VCR1 OPT. R FRONT A OR B.CENTER.SURR. w COMPONENT VIDEO INPUT/ OUTPUT If your Marantz...
... provided. r MONITOR OUT These are using an external device. If you use , see page 20. OUT: Connect to a multi-room remote control device, available from a Keypad, etc. !8 DC TRIGGER output terminal Connect a device that has a multichannel port, you hear the best reception...SR7001. SR7001 can be used to connect a third set to this AC outlet is turned on . • The capacity of this receiver or set of these outlets. External devices can be active. IN 1 2 3 TV L DVD VCR1 OPT. R FRONT A OR B.CENTER.SURR. w COMPONENT VIDEO INPUT/ OUTPUT If your Marantz...
User Manual
Page 12
...This button is too high and the voice distorts even by throttling the SR7001 VOLUME control, turn the SR7001 on or off 9 n > (Page) button This button is selected) These buttons are used to a Marantz component equipped with remote control (RC-5) terminals. @1 AUDIO IN/OUT (TV, DVD, VCR1,... DSS/VCR2, TAPE, CD/CDR) These are 3 digital inputs with coaxial jacks, 3 with the SR7001. . ENGLISH @0 REMOTE CONT. IN/OUT terminals Connect to turn a...
...This button is too high and the voice distorts even by throttling the SR7001 VOLUME control, turn the SR7001 on or off 9 n > (Page) button This button is selected) These buttons are used to a Marantz component equipped with remote control (RC-5) terminals. @1 AUDIO IN/OUT (TV, DVD, VCR1,... DSS/VCR2, TAPE, CD/CDR) These are 3 digital inputs with coaxial jacks, 3 with the SR7001. . ENGLISH @0 REMOTE CONT. IN/OUT terminals Connect to turn a...

User Manual
Page 13
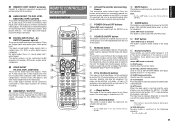
...identical. ⁄7 MENU button (when AMP mode is selected) This button is used to return to use this remote controll with the SR7001. • The MD button does not work with the SR7001. ⁄5 LIGHT 1 and 2 buttons Pressing these buttons will light up to the source which was pressed. ...when it is set . It can control 12 types of the SR7001, DVD, or other device. Note: • This button is used for the SR7001. ⁄4 SOURCE button Thses buttons are shown on the LCD. A J LEARN I NAME indicator This is displayed when the remote control is in unit. (0) THX button ...
...identical. ⁄7 MENU button (when AMP mode is selected) This button is used to return to use this remote controll with the SR7001. • The MD button does not work with the SR7001. ⁄5 LIGHT 1 and 2 buttons Pressing these buttons will light up to the source which was pressed. ...when it is set . It can control 12 types of the SR7001, DVD, or other device. Note: • This button is used for the SR7001. ⁄4 SOURCE button Thses buttons are shown on the LCD. A J LEARN I NAME indicator This is displayed when the remote control is in unit. (0) THX button ...
User Manual
Page 14
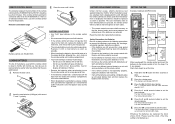
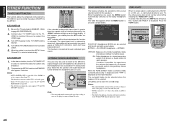
.... 1. Do not use two different types of the SR7001 should be possible. Do not put the batteries in a fire. • Do not use the remote control with new ones. • If any of the remote control may corrode. • Do not use different types ... MUTE EXIT SURR 3 SPK-AB 6 SLEEP 9 MEMO 6. 4. 5. Press the 2 and 0 numeric button to always observe the following the + and - Remote-controllable range SR7001 Approx. 5 m 60° INPUT SELECTORAV SURROUND RECEIVER SR7100 STANDBY POWER ON/OFF PHONES DISP SLEEP MULTI AUTO AUTO SURR DTIRUENCETD ST DISCS6P.1KR A B MT ...
.... 1. Do not use two different types of the SR7001 should be possible. Do not put the batteries in a fire. • Do not use the remote control with new ones. • If any of the remote control may corrode. • Do not use different types ... MUTE EXIT SURR 3 SPK-AB 6 SLEEP 9 MEMO 6. 4. 5. Press the 2 and 0 numeric button to always observe the following the + and - Remote-controllable range SR7001 Approx. 5 m 60° INPUT SELECTORAV SURROUND RECEIVER SR7100 STANDBY POWER ON/OFF PHONES DISP SLEEP MULTI AUTO AUTO SURR DTIRUENCETD ST DISCS6P.1KR A B MT ...
User Manual
Page 15
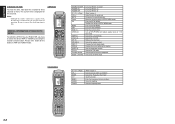
... AUX2 LIGHT RC8001SR Learning Remote Controller AMP 2 SOURCE ON/OFF POWER ON POWER OFF D1 - D5 / >(Page) VOL +/MUTE Cursor OK MENU EXIT TEST (1) CH.SEL (2) SURR (3) 7.1CH (4) ATT (5) SPK-AB (6) DISP (7) OSD (8) SLEEP (9) THX (0) Function selector GUIDE / LIP.SYNC Turns the SR7001 on and off Turns the SR7001 on the monitor Sets the...
... AUX2 LIGHT RC8001SR Learning Remote Controller AMP 2 SOURCE ON/OFF POWER ON POWER OFF D1 - D5 / >(Page) VOL +/MUTE Cursor OK MENU EXIT TEST (1) CH.SEL (2) SURR (3) 7.1CH (4) ATT (5) SPK-AB (6) DISP (7) OSD (8) SLEEP (9) THX (0) Function selector GUIDE / LIP.SYNC Turns the SR7001 on and off Turns the SR7001 on the monitor Sets the...
User Manual
Page 20
...OUT TV(1) DVD(2) VCR1(3) DSS/VCR2(4) MONI. See page25. The signal transmitted from the remote control is shown on the SR7001. Also, if a Marantz power amplifier (some models excluded) is synchronized with the remote control by using the following procedure. 1. Note: • Be sure to set to "IR=...is made, the infrared sensor on each speaker to aim the remote control only at the same time for connecting external power amplifiers. Set the REMOTE CONTROL SWITCH on the front panel at the SR7001. Otherwise, the main unit will be sure to always disable operation...
...OUT TV(1) DVD(2) VCR1(3) DSS/VCR2(4) MONI. See page25. The signal transmitted from the remote control is shown on the SR7001. Also, if a Marantz power amplifier (some models excluded) is synchronized with the remote control by using the following procedure. 1. Note: • Be sure to set to "IR=...is made, the infrared sensor on each speaker to aim the remote control only at the same time for connecting external power amplifiers. Set the REMOTE CONTROL SWITCH on the front panel at the SR7001. Otherwise, the main unit will be sure to always disable operation...
User Manual
Page 24
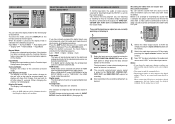
... devices. 21 ENGLISH g IR RECEIVER IN (SR8001 Only) This receiver can be operated by remote control without using other device for servicing. (Use a straight cable for the connection.) s DC OUT (DC TRIGGER) External devices can be controlled from the SR7001 by connecting an external IR receiver. +12V GND Signal An IR receiver is connected...
... devices. 21 ENGLISH g IR RECEIVER IN (SR8001 Only) This receiver can be operated by remote control without using other device for servicing. (Use a straight cable for the connection.) s DC OUT (DC TRIGGER) External devices can be controlled from the SR7001 by connecting an external IR receiver. +12V GND Signal An IR receiver is connected...

User Manual
Page 25
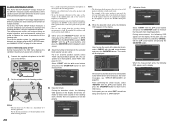
...any sub-menu, you have connected the MONITOR OUT jack on the rear panel to "1. To exit from the SR7001.) 2. When using the cursor (3, 4, 1 , 2) and OK/ENTER buttons on the remote control unit or on the front panel. DOWN button EXIT button Press this button to exit the OSD menu system.... ONSCREEN DISPLAY MENU SYSTEM The SR7001 incorporates an onscreen menu system, which makes various operations possible by using the remote control unit, use the OK button as if it to UNLOCKED. • To lock sub-menus, set items...
...any sub-menu, you have connected the MONITOR OUT jack on the rear panel to "1. To exit from the SR7001.) 2. When using the cursor (3, 4, 1 , 2) and OK/ENTER buttons on the remote control unit or on the front panel. DOWN button EXIT button Press this button to exit the OSD menu system.... ONSCREEN DISPLAY MENU SYSTEM The SR7001 incorporates an onscreen menu system, which makes various operations possible by using the remote control unit, use the OK button as if it to UNLOCKED. • To lock sub-menus, set items...
User Manual
Page 31
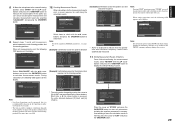
... and pressing the OK/ENTER button. ENGLISH 2-1 AUTO SETUP (MultEQ™ SETUP) The AUTO SETUP (MultEQ™ Setup) feature of the SR7001 measures sound characteristics of the speaker system and room where the receiver is used , the test tone will be displayed. The Audyssey MultEQ™... is loud. To set the crossover frequency to the highest. • During measurement, step away from the microphone and operate the SR7001 via the remote control unit from the speakers during this point, you can cancel measurement by selecting "CANCEL" with the 3/4 cursor buttons and press the...
... and pressing the OK/ENTER button. ENGLISH 2-1 AUTO SETUP (MultEQ™ SETUP) The AUTO SETUP (MultEQ™ Setup) feature of the SR7001 measures sound characteristics of the speaker system and room where the receiver is used , the test tone will be displayed. The Audyssey MultEQ™... is loud. To set the crossover frequency to the highest. • During measurement, step away from the microphone and operate the SR7001 via the remote control unit from the speakers during this point, you can cancel measurement by selecting "CANCEL" with the 3/4 cursor buttons and press the...
User Manual
Page 32
.... Move the microphone to the second listening position, select "START" with the 3/4 cursor buttons and press the OK/ENTER button to the SR7001 off while storing parameters in order to obtain the best results. • The time needed . 10. Repeat steps 7 and 8 until measuring.... 8. 8. AUTO SETUP SPEAKERS CHECK:OK 2ND MIC POSITION!! START CALCULATE EXIT 9. When all measurement results and calculation results, therefore operate the remote control unit with care. AUTO SETUP NOW CALCULATE !! EXIT Note: • Less than 6 positions can be measured, but it is displayed to...
.... Move the microphone to the second listening position, select "START" with the 3/4 cursor buttons and press the OK/ENTER button to the SR7001 off while storing parameters in order to obtain the best results. • The time needed . 10. Repeat steps 7 and 8 until measuring.... 8. 8. AUTO SETUP SPEAKERS CHECK:OK 2ND MIC POSITION!! START CALCULATE EXIT 9. When all measurement results and calculation results, therefore operate the remote control unit with care. AUTO SETUP NOW CALCULATE !! EXIT Note: • Less than 6 positions can be measured, but it is displayed to...

User Manual
Page 40
... the same time. 5-1 MULTI ROOM SETUP The SR8001 has source selectors, sleep timers and multispeaker output remote control units (Room A only) for the two other rooms in the multi room system. (The SR7001 has only one other room in 10 minute increments. MSPK (MULTI SPEAKER): Switch the speaker output "... EXIT MULTI (MULTI ROOM): Switch the multiroom output "ON" or "OFF" with the 1 or 2 cursor buttons. (The SR7001 does not have a MULTI ROOM B setting) Note: • REMOTE is set to a maximum 90 minutes in the multi-room system.) These features can be set the time with input functions...
... the same time. 5-1 MULTI ROOM SETUP The SR8001 has source selectors, sleep timers and multispeaker output remote control units (Room A only) for the two other rooms in the multi room system. (The SR7001 has only one other room in 10 minute increments. MSPK (MULTI SPEAKER): Switch the speaker output "... EXIT MULTI (MULTI ROOM): Switch the multiroom output "ON" or "OFF" with the 1 or 2 cursor buttons. (The SR7001 does not have a MULTI ROOM B setting) Note: • REMOTE is set to a maximum 90 minutes in the multi-room system.) These features can be set the time with input functions...

User Manual
Page 43
..." on page 42. • To add the THX mode to the Auto Surround mode, press either the THX button on the SR7001 or the THX button on the remote control unit. • To select a specific surround mode, Press the individual surround mode button on page 1.2 on the Night ...1CH 4 DISP 7 CLEAR ATT 5 OSD 8 0 VOL SPK-AB 6 SLEEP 9 MEMO TUNER CD CD-R MD TAPE 1 AUX1 AUX2 LIGHT RC8001SR Learning Remote Controller AMP 2 (Using the SR7001) To select the Auto surround mode during the configuration process for the Source Direct, Pure Direct, Dolby Headphone, Dolby Virtual Speaker THX...
..." on page 42. • To add the THX mode to the Auto Surround mode, press either the THX button on the SR7001 or the THX button on the remote control unit. • To select a specific surround mode, Press the individual surround mode button on page 1.2 on the Night ...1CH 4 DISP 7 CLEAR ATT 5 OSD 8 0 VOL SPK-AB 6 SLEEP 9 MEMO TUNER CD CD-R MD TAPE 1 AUX1 AUX2 LIGHT RC8001SR Learning Remote Controller AMP 2 (Using the SR7001) To select the Auto surround mode during the configuration process for the Source Direct, Pure Direct, Dolby Headphone, Dolby Virtual Speaker THX...

User Manual
Page 47
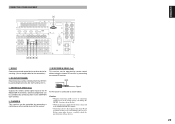
That relationship is selected with the surround mode selector on the SR7001 or the remote control unit. O SA-CD O - - - O 2 DIGITAL O - - - O 2 DIGITAL O O O O O 2 DIGITAL 2 SURROUND O O O O O dts, ES O O O - PCM O - - - - ANALOG O O O O O ANALOG O O O O O 2 DIGITAL EX O O O O O 2 DIGITAL O O O O O dts, ES O O O O O dts O O O O O M-PCM O O O O O SA-CD O O O - O dts O O O O O 2 DIGITAL O O O O O 2 DIGITAL 2 SURROUND O O O O O ...
That relationship is selected with the surround mode selector on the SR7001 or the remote control unit. O SA-CD O - - - O 2 DIGITAL O - - - O 2 DIGITAL O O O O O 2 DIGITAL 2 SURROUND O O O O O dts, ES O O O - PCM O - - - - ANALOG O O O O O ANALOG O O O O O 2 DIGITAL EX O O O O O 2 DIGITAL O O O O O dts, ES O O O O O dts O O O O O M-PCM O O O O O SA-CD O O O - O dts O O O O O 2 DIGITAL O O O O O 2 DIGITAL 2 SURROUND O O O O O ...
User Manual
Page 49
...USE PAGE 4 M D1 D2 D3 D4 D5 CH VOL TUNER CD CD-R MD TAPE 1 AUX1 AUX2 LIGHT RC8001SR Learning Remote Controller AMP 2 46 Be sure to the TV TUNER and the SR7001. 4. The signal-input level is displayed as the mode indication. When the PURE DIRECT mode is selected, Dolby surround ... is displayed. It makes it possible to the SR7001. AUTO POWER ON 1. To select video off by about half. ENGLISH OTHER FUNCTION TV AUTO ON/OFF FUNCTION This function allows the component connected to the TV-VIDEO in jack to control the power (ON/OFF) to experience the volume...
...USE PAGE 4 M D1 D2 D3 D4 D5 CH VOL TUNER CD CD-R MD TAPE 1 AUX1 AUX2 LIGHT RC8001SR Learning Remote Controller AMP 2 46 Be sure to the TV TUNER and the SR7001. 4. The signal-input level is displayed as the mode indication. When the PURE DIRECT mode is selected, Dolby surround ... is displayed. It makes it possible to the SR7001. AUTO POWER ON 1. To select video off by about half. ENGLISH OTHER FUNCTION TV AUTO ON/OFF FUNCTION This function allows the component connected to the TV-VIDEO in jack to control the power (ON/OFF) to experience the volume...
User Manual
Page 50
... MODE AUTO MULTI MULTI SPEAKE PURE DIRECT THX 7.1CH INPUT MENU 1. TV DVD VCR DSS TUNER CD CD-R MD TAPE 1 AUX1 AUX2 LIGHT RC8001SR Learning Remote Controller AMP 2 1. Below is output to the DSS/VCR2 OUT jack. 2. 1. Now "CD" has been selected as the audio input source and "VCR1" as... recording. 3. Analog mode: The analog input jacks are only output to the digital and analog input jacks for the front display of the SR7001. This selection is now selected and you can be selected only when an HDMI input has been assigned as following procedures. The input source ...
... MODE AUTO MULTI MULTI SPEAKE PURE DIRECT THX 7.1CH INPUT MENU 1. TV DVD VCR DSS TUNER CD CD-R MD TAPE 1 AUX1 AUX2 LIGHT RC8001SR Learning Remote Controller AMP 2 1. Below is output to the DSS/VCR2 OUT jack. 2. 1. Now "CD" has been selected as the audio input source and "VCR1" as... recording. 3. Analog mode: The analog input jacks are only output to the digital and analog input jacks for the front display of the SR7001. This selection is now selected and you can be selected only when an HDMI input has been assigned as following procedures. The input source ...


