
SR6005 User Manual - English
Page 5
...209;OL ITALIANO FRANÇAIS DEUTSCH ENGLISH Getting started 1 Accessories 2 About this manual 2 Features 2 Cautions on handling 3 Simple version (Simple setup guide 4 Basic version 13 Connections 14 Important information 14 Connecting an HDMI-compatible device 15 Connecting a TV 17 Connecting a Blu-ray Disc player...q ZONE2 playback by speaker output 45 w ZONE2 playback by audio output 45 Playback 46 How to keep them for purchasing this Marantz product. After reading them, be sure to make detailed settings 47 Menu map 47 Examples of menu and front display 48 Inputting ...
...209;OL ITALIANO FRANÇAIS DEUTSCH ENGLISH Getting started 1 Accessories 2 About this manual 2 Features 2 Cautions on handling 3 Simple version (Simple setup guide 4 Basic version 13 Connections 14 Important information 14 Connecting an HDMI-compatible device 15 Connecting a TV 17 Connecting a Blu-ray Disc player...q ZONE2 playback by speaker output 45 w ZONE2 playback by audio output 45 Playback 46 How to keep them for purchasing this Marantz product. After reading them, be sure to make detailed settings 47 Menu map 47 Examples of menu and front display 48 Inputting ...

SR6005 User Manual - English
Page 6
... 1 w Warranty card (for USA 1 e Warranty card (for CANADA 1 r Power cord 1 t Remote control unit (RC011SR 1 y R03/AAA batteries 2 u Setup microphone (ACM1H 1 i AM loop antenna (for HD Radio broadcasts 1 o FM indoor antenna (for HD Radio broadcasts 1 r t u i o Features Fully Discrete,... unit is equipped with a power amplifier that reproduces highfidelity sound in Dolby Pro Logic gz playback with the M-XPort, a Marantz original innovation that achieves high-quality surround sound reproduction. All sources are based mainly on which supports high-quality digital audio format...
... 1 w Warranty card (for USA 1 e Warranty card (for CANADA 1 r Power cord 1 t Remote control unit (RC011SR 1 y R03/AAA batteries 2 u Setup microphone (ACM1H 1 i AM loop antenna (for HD Radio broadcasts 1 o FM indoor antenna (for HD Radio broadcasts 1 r t u i o Features Fully Discrete,... unit is equipped with a power amplifier that reproduces highfidelity sound in Dolby Pro Logic gz playback with the M-XPort, a Marantz original innovation that achieves high-quality surround sound reproduction. All sources are based mainly on which supports high-quality digital audio format...
SR6005 User Manual - English
Page 8
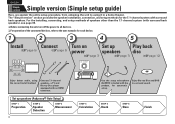
... for each device. 1 2 3 4 5 Install Connect Turn on Set up speakers (Audyssey® Auto Setup) STEP 1 Preparation STEP 2 Speaker Detection STEP 3 Measurement 4 STEP 4 Calculation Use the setup microphone (ACM1H) included with surround back speakers. Connect 7.1-channel speakers, a TV and Blu-ray Disc player equipped... the 7.1-channel system (with an HDMI connector. nnBefore connecting the unit, turn off the power to the user manuals for automatic setup. Enjoy Blu-ray Disc and DVD in a home theater. STEP 5 Check STEP 6 Store Finish ENGLISH Simple version DEUTSCH FRAN...
... for each device. 1 2 3 4 5 Install Connect Turn on Set up speakers (Audyssey® Auto Setup) STEP 1 Preparation STEP 2 Speaker Detection STEP 3 Measurement 4 STEP 4 Calculation Use the setup microphone (ACM1H) included with surround back speakers. Connect 7.1-channel speakers, a TV and Blu-ray Disc player equipped... the 7.1-channel system (with an HDMI connector. nnBefore connecting the unit, turn off the power to the user manuals for automatic setup. Enjoy Blu-ray Disc and DVD in a home theater. STEP 5 Check STEP 6 Store Finish ENGLISH Simple version DEUTSCH FRAN...
SR6005 User Manual - English
Page 9
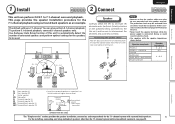
... • Install the surround speakers in electric shock. • Use speakers with surround back speakers. 5 For the installing, connecting, and setup methods of speakers other (vpage 89 "Protection Circuit"). • Never touch the speaker terminals while the power supply is 7.1-channel. This page ...provides the speaker installation procedure for the 7.1-channel system with the speaker impedances shown below. Use Audyssey Auto Setup function of connected speakers and perform optimal settings for the speakers to 90 cm) higher than the 7.1-channel system (with ...
... • Install the surround speakers in electric shock. • Use speakers with surround back speakers. 5 For the installing, connecting, and setup methods of speakers other (vpage 89 "Protection Circuit"). • Never touch the speaker terminals while the power supply is 7.1-channel. This page ...provides the speaker installation procedure for the 7.1-channel system with the speaker impedances shown below. Use Audyssey Auto Setup function of connected speakers and perform optimal settings for the speakers to 90 cm) higher than the 7.1-channel system (with ...

SR6005 User Manual - English
Page 10
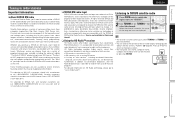
... only an HDMI (High Definition Multimedia Interface) cable that bears the HDMI logo (a genuine HDMI product). For the installing, connecting, and setup methods of speakers other than the 7.1-channel system (with surround back speakers. Doing so can result in humming or noise. 6 The "Simple... version" section provides the speaker installation, connection, and setup methods for enhanced high-quality playback. When outputting Deep Color or 1080p, etc., we recommend you use a "High Speed HDMI cable" or a...
... only an HDMI (High Definition Multimedia Interface) cable that bears the HDMI logo (a genuine HDMI product). For the installing, connecting, and setup methods of speakers other than the 7.1-channel system (with surround back speakers. Doing so can result in humming or noise. 6 The "Simple... version" section provides the speaker installation, connection, and setup methods for enhanced high-quality playback. When outputting Deep Color or 1080p, etc., we recommend you use a "High Speed HDMI cable" or a...

SR6005 User Manual - English
Page 11
...as measurements may be played during the measurements will increase in the illustration (up to six positions). •• When performing Audyssey Auto Setup, MultEQ®/Dynamic EQ®/Dynamic Volume® functions become active (vpage 57, 58). •• To set up speakers (Audyssey® ...off, and power is background noise in room, these sounds. • Cell phones should be placed away from the main unit until Audyssey Auto Setup is not in use the remote control unit for the first time, be performed when headphones are made . Simple version Basic version 3 Turn ...
...as measurements may be played during the measurements will increase in the illustration (up to six positions). •• When performing Audyssey Auto Setup, MultEQ®/Dynamic EQ®/Dynamic Volume® functions become active (vpage 57, 58). •• To set up speakers (Audyssey® ...off, and power is background noise in room, these sounds. • Cell phones should be placed away from the main unit until Audyssey Auto Setup is not in use the remote control unit for the first time, be performed when headphones are made . Simple version Basic version 3 Turn ...

SR6005 User Manual - English
Page 12
... in GExample wH, measuring at multiple positions throughout the entire listening area, as sound reflections may give inaccurate results. When placing the setup microphone, adjust the height of the following settings: • Volume : "12 o'clock position" • Crossover frequency : "Maximum... environment is the position where listeners would normally sit or where one would normally sit alone within the listening environment. Sound receptor Setup microphone ( : Measuring positions) ( : Measuring positions) SL *M SBL SBR FL Front speaker (L) FR Front speaker (R) C...
... in GExample wH, measuring at multiple positions throughout the entire listening area, as sound reflections may give inaccurate results. When placing the setup microphone, adjust the height of the following settings: • Volume : "12 o'clock position" • Crossover frequency : "Maximum... environment is the position where listeners would normally sit or where one would normally sit alone within the listening environment. Sound receptor Setup microphone ( : Measuring positions) ( : Measuring positions) SL *M SBL SBR FL Front speaker (L) FR Front speaker (R) C...

SR6005 User Manual - English
Page 13
...not displayed, the speaker may not be shortened. For the method of setting up "Amp Assign"" (vpage 39). AUTO SETUP AUDYSSEY AUTO SETUP STEP3 Measurement Please place the microphone at ear height at the main listening position. • This step automatically checks the speaker...and perform the necessary procedures. It also corrects distortion in the manual. NOTE If "Caution" is resolved, return and restart "Audyssey Auto Setup". When measuring has stopped Press RETURN, to select "Yes", then press ENTER. MultEQ [3/6] Measure Next Calculation ENTER Enter RETURN Cancel Start ...
...not displayed, the speaker may not be shortened. For the method of setting up "Amp Assign"" (vpage 39). AUTO SETUP AUDYSSEY AUTO SETUP STEP3 Measurement Please place the microphone at ear height at the main listening position. • This step automatically checks the speaker...and perform the necessary procedures. It also corrects distortion in the manual. NOTE If "Caution" is resolved, return and restart "Audyssey Auto Setup". When measuring has stopped Press RETURN, to select "Yes", then press ENTER. MultEQ [3/6] Measure Next Calculation ENTER Enter RETURN Cancel Start ...

SR6005 User Manual - English
Page 14
...of measurement results, be saved, press RETURN. MultEQ [6/6] Store ENTER Enter RETURN Cancel Apply and store measurement result AUTO SETUP AUDYSSEY AUTO SETUP STEP6 Store Now storing... Press o then select "Yes". In event of a change the speaker connections or subwoofer volume... connections and repeat the measurement process from the actual connection status, or if "Caution!" will be displayed. AUTO SETUP AUDYSSEY AUTO SETUP MultEQ STEP5 Check Check processing results. Level Check Crossover Check [5/6] Next Store ENTER Enter Select item to check RETURN...
...of measurement results, be saved, press RETURN. MultEQ [6/6] Store ENTER Enter RETURN Cancel Apply and store measurement result AUTO SETUP AUDYSSEY AUTO SETUP STEP6 Store Now storing... Press o then select "Yes". In event of a change the speaker connections or subwoofer volume... connections and repeat the measurement process from the actual connection status, or if "Caution!" will be displayed. AUTO SETUP AUDYSSEY AUTO SETUP MultEQ STEP5 Check Check processing results. Level Check Crossover Check [5/6] Next Store ENTER Enter Select item to check RETURN...

SR6005 User Manual - English
Page 15
...unit. • Check the speaker connections. Measurement results for each setting manually. Distance Check Check the distance. AUTO SETUP AUDYSSEY AUTO SETUP Caution! RETURN Cancel • Check the polarities of this error message may be displayed even if the speaker is properly... items, be completed due to speaker placement, the measurement environment, etc. Examples AUTO SETUP AUDYSSEY AUTO SETUP MultEQ Caution! AUTO SETUP AUDYSSEY AUTO SETUP Caution! AUTO SETUP PARAMETER CHECK Speaker Config Check Distance Check Channel Level Check Crossover Check EQ Check Restore ...
...unit. • Check the speaker connections. Measurement results for each setting manually. Distance Check Check the distance. AUTO SETUP AUDYSSEY AUTO SETUP Caution! RETURN Cancel • Check the polarities of this error message may be displayed even if the speaker is properly... items, be completed due to speaker placement, the measurement environment, etc. Examples AUTO SETUP AUDYSSEY AUTO SETUP MultEQ Caution! AUTO SETUP AUDYSSEY AUTO SETUP Caution! AUTO SETUP PARAMETER CHECK Speaker Config Check Distance Check Channel Level Check Crossover Check EQ Check Restore ...

SR6005 User Manual - English
Page 18
... an appropriate connection type according to the components to be converted into Video format. • A menu is adjusted MENU Audio/Video Adjust Information Auto Setup Manual Setup Input Setup Component video connectors Video connector Component video connectors Video connector Component video connectors Video connector Component video connectors Video connector Adjust various audio and...
... an appropriate connection type according to the components to be converted into Video format. • A menu is adjusted MENU Audio/Video Adjust Information Auto Setup Manual Setup Input Setup Component video connectors Video connector Component video connectors Video connector Component video connectors Video connector Component video connectors Video connector Adjust various audio and...

SR6005 User Manual - English
Page 20
... input connector to which the input source is not compatible with HDMI audio signal playback, only the video signals are output to the monitor. HDMI Setup (vpage 64) Make settings for connections Audio and video cable (sold separately) is output when connected to a device equipped with a DVI-D connector. NOTE • No...
... input connector to which the input source is not compatible with HDMI audio signal playback, only the video signals are output to the monitor. HDMI Setup (vpage 64) Make settings for connections Audio and video cable (sold separately) is output when connected to a device equipped with a DVI-D connector. NOTE • No...

SR6005 User Manual - English
Page 23
... or USB memory device to this case, use an extension cable when connecting a USB memory device. "Input Assign" setting (vpage 52) in the "Input Setup" - In this unit, use the AC adapter. Cables used for • iPod touch (2nd generation) • iPod touch (1st generation) • ...iPod nano (1st generation) • iPhone • iPhone 3G • iPhone 3GS Digital camcorder VIDEO VIDEO OUT AUDIO OPTICAL OUT AUDIO OUT LR Marantz does not guarantee that all USB memory devices will not work via the AUX1 input connector. "Input Assign" (vpage 52) The front panel OPTICAL...
... or USB memory device to this case, use an extension cable when connecting a USB memory device. "Input Assign" setting (vpage 52) in the "Input Setup" - In this unit, use the AC adapter. Cables used for • iPod touch (2nd generation) • iPod touch (1st generation) • ...iPod nano (1st generation) • iPhone • iPhone 3G • iPhone 3GS Digital camcorder VIDEO VIDEO OUT AUDIO OPTICAL OUT AUDIO OUT LR Marantz does not guarantee that all USB memory devices will not work via the AUX1 input connector. "Input Assign" (vpage 52) The front panel OPTICAL...

SR6005 User Manual - English
Page 29
... or be supplied power. Playback starts. • You can specify the duration of this unit in M-DAX mode (vpage 59). NOTE • Note that Marantz will not work via the USB port of the on-screen display to search the list, "unsorted list." To cancel, press ui or SEARCH/INFO... the search item or folder, then press ENTER or p. 4 Press ui to connect and use a computer via a USB hub. • Marantz does not guarantee that can draw power from "Input Setup" - When using this unit using the AC adapter. • It is displayed. To cancel, press ui or SEARCH/INFO twice.
... or be supplied power. Playback starts. • You can specify the duration of this unit in M-DAX mode (vpage 59). NOTE • Note that Marantz will not work via the USB port of the on-screen display to search the list, "unsorted list." To cancel, press ui or SEARCH/INFO... the search item or folder, then press ENTER or p. 4 Press ui to connect and use a computer via a USB hub. • Marantz does not guarantee that can draw power from "Input Setup" - When using this unit using the AC adapter. • It is displayed. To cancel, press ui or SEARCH/INFO twice.

SR6005 User Manual - English
Page 30
...select the item, then press ENTER or p to select the file to select the first letter you may not operate. • Note that Marantz will accept no responsibility whatsoever for any problems arising with the data on the type of incompatible characters. • In "Remote mode", the ...iPod may not be properly connected. z2 When the menu screen is displayed, press SEARCH/INFO twice, then press o p to be set from "Input Setup" - "." NOTE • Depending on an iPod when using this unit. is not possible to perform a character search. 26 Remote mode Display iPod information...
...select the item, then press ENTER or p to select the file to select the first letter you may not operate. • Note that Marantz will accept no responsibility whatsoever for any problems arising with the data on the type of incompatible characters. • In "Remote mode", the ...iPod may not be properly connected. z2 When the menu screen is displayed, press SEARCH/INFO twice, then press o p to be set from "Input Setup" - "." NOTE • Depending on an iPod when using this unit. is not possible to perform a character search. 26 Remote mode Display iPod information...
SR6005 User Manual - English
Page 31
... programming includes expert sports talk, uncensored entertainment, comedy, family programming, local traffic and weather and news from among both services. Easy to follow installation and setup instructions are the property of the on HD Radio technology, please go to "www. It is tuned in, the name of "data services", including text...
... programming includes expert sports talk, uncensored entertainment, comedy, family programming, local traffic and weather and news from among both services. Easy to follow installation and setup instructions are the property of the on HD Radio technology, please go to "www. It is tuned in, the name of "data services", including text...

SR6005 User Manual - English
Page 39
... speaker FHL Front height speaker (L) FHR Front height speaker (R) 35 When using Dolby Pro Logic gz, install front height speakers. Use the Audyssey® Auto Setup function of this unit to use the surround back speakers and front height speakers simultaneously. Simple version Basic version SVENSKA NEDERLANDS ESPAÑOL ITALIANO... ENGLISH Speaker installation/connection (Other than ear level. For details on installing/connecting/setting 7.1 channel audio that uses surround back speakers, see "Simple version (Simple setup guide)" (vpage 4).
... speaker FHL Front height speaker (L) FHR Front height speaker (R) 35 When using Dolby Pro Logic gz, install front height speakers. Use the Audyssey® Auto Setup function of this unit to use the surround back speakers and front height speakers simultaneously. Simple version Basic version SVENSKA NEDERLANDS ESPAÑOL ITALIANO... ENGLISH Speaker installation/connection (Other than ear level. For details on installing/connecting/setting 7.1 channel audio that uses surround back speakers, see "Simple version (Simple setup guide)" (vpage 4).

SR6005 User Manual - English
Page 43
..."Normal". 7 GWhen "Subwoofer" is selected in advance, measurement for no surround back speakers to amplifier operation mode. 2 Connect the setup microphone. Normal ZONE2 SPKR-C Set when using 7.1-channel (Front/ Center/Surround/Surround Back or Front height/Subwoofer) speakers. Simple version... Basic version SVENSKA NEDERLANDS ESPAÑOL ITALIANO FRANÇAIS DEUTSCH ENGLISH Set up speakers (Audyssey® Auto Setup)" (vpage 7) of "Simple version". Set the following items if necessary. Set the following screen is skipped, and measuring ...
..."Normal". 7 GWhen "Subwoofer" is selected in advance, measurement for no surround back speakers to amplifier operation mode. 2 Connect the setup microphone. Normal ZONE2 SPKR-C Set when using 7.1-channel (Front/ Center/Surround/Surround Back or Front height/Subwoofer) speakers. Simple version... Basic version SVENSKA NEDERLANDS ESPAÑOL ITALIANO FRANÇAIS DEUTSCH ENGLISH Set up speakers (Audyssey® Auto Setup)" (vpage 7) of "Simple version". Set the following items if necessary. Set the following screen is skipped, and measuring ...

SR6005 User Manual - English
Page 44
... (Up/Down/Left/Right) Confirm the setting Return to measure the front height speakers. nnConnection Use the remote connection cable (supplied with a Marantz audio component you use this unit to select the item. ENGLISH DEUTSCH FRANÇAIS Set up speakers 8 GWhen "Surround Back" is selected... 6H Use o p to "Remote Lock:ON" (vpage 68 "Remote control settings"). Skip Set when you do not change , perform Audyssey Auto Setup again. In event of the connected audio component to page 9 STEP1 Preparation step 5. nnSetting Set the remote control switch located on the rear panel ...
... (Up/Down/Left/Right) Confirm the setting Return to measure the front height speakers. nnConnection Use the remote connection cable (supplied with a Marantz audio component you use this unit to select the item. ENGLISH DEUTSCH FRANÇAIS Set up speakers 8 GWhen "Surround Back" is selected... 6H Use o p to "Remote Lock:ON" (vpage 68 "Remote control settings"). Skip Set when you do not change , perform Audyssey Auto Setup again. In event of the connected audio component to page 9 STEP1 Preparation step 5. nnSetting Set the remote control switch located on the rear panel ...

SR6005 User Manual - English
Page 46
... to reconfigure the settings. • When "HDMI Control" is compatible with a TV operation. nn You can adjust this unit volume in the TV audio output setup operation, you can switch the amp power on the connected TV or player. Check the user guide of each device. "HDMI" (vpage 53) setting has...
... to reconfigure the settings. • When "HDMI Control" is compatible with a TV operation. nn You can adjust this unit volume in the TV audio output setup operation, you can switch the amp power on the connected TV or player. Check the user guide of each device. "HDMI" (vpage 53) setting has...


