
SR6005 Spec Sheet
Page 1
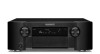
...audio video receiver. SR6005 Home Theater Receiver With rock-solid audio performance and a comprehensive suite of analog and digital video options the SR6005 stands ready to HDMI... Skip On Screen Display (TEXT) Display Status Info. Software Upgradable MARANTZ AUDIO ADVANTAGE All-discrete, 110w x 7 Class AB Output Stage High Current ...EQ / Dynamic Volume 9 Band EQ, -20dB - +6dB Independent Crossover Setting for digital iPod Connection Bluetooth Wireless Audio Transmission Capability External IR Receiver, DC...
...audio video receiver. SR6005 Home Theater Receiver With rock-solid audio performance and a comprehensive suite of analog and digital video options the SR6005 stands ready to HDMI... Skip On Screen Display (TEXT) Display Status Info. Software Upgradable MARANTZ AUDIO ADVANTAGE All-discrete, 110w x 7 Class AB Output Stage High Current ...EQ / Dynamic Volume 9 Band EQ, -20dB - +6dB Independent Crossover Setting for digital iPod Connection Bluetooth Wireless Audio Transmission Capability External IR Receiver, DC...

SR6005 User Manual - English
Page 5
To ensure proper operation, please read this Marantz product. Simple version Basic version SVENSKA NEDERLANDS ESPAÑOL ITALIANO FRANÇAIS DEUTSCH ENGLISH Getting started 1 Accessories 2 About this manual 2 Features 2 Cautions... Virtual Speaker/Dolby Headphone playback 33 Advanced version 34 Speaker installation/connection (Other than 7.1-channel system with surround back speakers 35 Install 35 Connect 36 Set up speakers 39 Connections (Advanced connection 40 REMOTE CONTROL jacks 40 RS-232C connector 41 DC OUT (TRIGGER OUT) jacks 41 Playback (Advanced operation...
To ensure proper operation, please read this Marantz product. Simple version Basic version SVENSKA NEDERLANDS ESPAÑOL ITALIANO FRANÇAIS DEUTSCH ENGLISH Getting started 1 Accessories 2 About this manual 2 Features 2 Cautions... Virtual Speaker/Dolby Headphone playback 33 Advanced version 34 Speaker installation/connection (Other than 7.1-channel system with surround back speakers 35 Install 35 Connect 36 Set up speakers 39 Connections (Advanced connection 40 REMOTE CONTROL jacks 40 RS-232C connector 41 DC OUT (TRIGGER OUT) jacks 41 Playback (Advanced operation...

SR6005 User Manual - English
Page 6
... also supports the ARC (Audio Return Channel) function, which reproduces TV sound with an "Auto setup function" which automatically makes speaker settings best suited for iPod® and iPhone® via USB Music data from a Blu-ray Disc player to the original sound. About..." that achieves high-quality surround sound reproduction. All sources are measured, and settings for explanation purposes and may differ from the speakers is equipped with a power amplifier that supports a 3D system. M-XPort (Marantz-eXtension Port) This unit is equipped with equal quality and power for all ...
... also supports the ARC (Audio Return Channel) function, which reproduces TV sound with an "Auto setup function" which automatically makes speaker settings best suited for iPod® and iPhone® via USB Music data from a Blu-ray Disc player to the original sound. About..." that achieves high-quality surround sound reproduction. All sources are measured, and settings for explanation purposes and may differ from the speakers is equipped with a power amplifier that supports a 3D system. M-XPort (Marantz-eXtension Port) This unit is equipped with equal quality and power for all ...

SR6005 User Manual - English
Page 7
... front height channel The unit is equipped with the connection cables. • Power is supplied to some of the circuitry even when the unit is set to the standby mode. You can enjoy 7.1-channel playback using the front height channel and 7.1-channel playback using mobile phones Using a mobile phone near this...
... front height channel The unit is equipped with the connection cables. • Power is supplied to some of the circuitry even when the unit is set to the standby mode. You can enjoy 7.1-channel playback using the front height channel and 7.1-channel playback using mobile phones Using a mobile phone near this...
SR6005 User Manual - English
Page 8
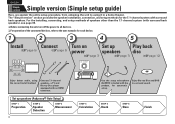
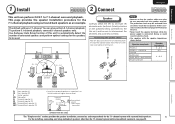
... using the correct install method. Connect 7.1-channel speakers, a TV and Blu-ray Disc player equipped with surround back speakers), see page 35. Set up Play back (vpage 5) (vpage 5) power speakers disc (vpage 7) (vpage 7) (vpage 12) Enjoy better audio, using it in ..., connecting, and setup methods of the connected devices, refer to the user manuals for each device. 1 2 3 4 5 Install Connect Turn on Set up speakers (Audyssey® Auto Setup) STEP 1 Preparation STEP 2 Speaker Detection STEP 3 Measurement 4 STEP 4 Calculation Use the setup microphone (ACM1H)...
... using the correct install method. Connect 7.1-channel speakers, a TV and Blu-ray Disc player equipped with surround back speakers), see page 35. Set up Play back (vpage 5) (vpage 5) power speakers disc (vpage 7) (vpage 7) (vpage 12) Enjoy better audio, using it in ..., connecting, and setup methods of the connected devices, refer to the user manuals for each device. 1 2 3 4 5 Install Connect Turn on Set up speakers (Audyssey® Auto Setup) STEP 1 Preparation STEP 2 Speaker Detection STEP 3 Measurement 4 STEP 4 Calculation Use the setup microphone (ACM1H)...
SR6005 User Manual - English
Page 9
...and - (black) polarities on the speakers being connected to the this unit to automatically detect the number of connected speakers and perform optimal settings for the speakers to 90 cm) higher than the 7.1-channel system (with surround back speakers), see page 35. The protection circuit may... from the tip of speakers other (vpage 89 "Protection Circuit"). • Never touch the speaker terminals while the power supply is 7.1-channel. The default setting is connected. Doing so could result in a position 2 to 3 ft (60 to be used. Surround Front speaker speaker 2 - 3 ft / ...
...and - (black) polarities on the speakers being connected to the this unit to automatically detect the number of connected speakers and perform optimal settings for the speakers to 90 cm) higher than the 7.1-channel system (with surround back speakers), see page 35. The protection circuit may... from the tip of speakers other (vpage 89 "Protection Circuit"). • Never touch the speaker terminals while the power supply is 7.1-channel. The default setting is connected. Doing so could result in a position 2 to 3 ft (60 to be used. Surround Front speaker speaker 2 - 3 ft / ...

SR6005 User Manual - English
Page 11
...When performing Audyssey Auto Setup, MultEQ®/Dynamic EQ®/Dynamic Volume® functions become active (vpage 57, 58). •• To set up the speakers manually, use the remote control unit for the first time, be placed away from the main unit until Audyssey Auto Setup is.... Simple version Basic version 3 Turn on power 1 Turn on SVENSKA NEDERLANDS ESPAÑOL ITALIANO FRANÇAIS DEUTSCH ENGLISH 1 2 3 4 5 4 Set up speakers (Audyssey® Auto Setup) 1 2 3 4 5 The acoustic characteristics of the connected speakers and listening room are measured and the optimum...
...When performing Audyssey Auto Setup, MultEQ®/Dynamic EQ®/Dynamic Volume® functions become active (vpage 57, 58). •• To set up the speakers manually, use the remote control unit for the first time, be placed away from the main unit until Audyssey Auto Setup is.... Simple version Basic version 3 Turn on power 1 Turn on SVENSKA NEDERLANDS ESPAÑOL ITALIANO FRANÇAIS DEUTSCH ENGLISH 1 2 3 4 5 4 Set up speakers (Audyssey® Auto Setup) 1 2 3 4 5 The acoustic characteristics of the connected speakers and listening room are measured and the optimum...

SR6005 User Manual - English
Page 12
...position is small as shown in more effective correction. nn When using a subwoofer without a direct mode Make the following adjustments, set up the subwoofer as possible to amplifier operation mode. Before starting Audyssey Auto Setup, place the setup microphone in the main listening ...the 7.1-channel system with surround back speakers), see page 35. ENGLISH DEUTSCH FRANÇAIS ITALIANO ESPAÑOL NEDERLANDS SVENSKA Set up speakers (Audyssey® Auto Setup) About setup microphone placement • Measurements are performed by placing the setup microphone ...
...position is small as shown in more effective correction. nn When using a subwoofer without a direct mode Make the following adjustments, set up the subwoofer as possible to amplifier operation mode. Before starting Audyssey Auto Setup, place the setup microphone in the main listening ...the 7.1-channel system with surround back speakers), see page 35. ENGLISH DEUTSCH FRANÇAIS ITALIANO ESPAÑOL NEDERLANDS SVENSKA Set up speakers (Audyssey® Auto Setup) About setup microphone placement • Measurements are performed by placing the setup microphone ...

SR6005 User Manual - English
Page 13
..." is displayed. Amp Assign Channel Select Auto Setup Start [1/6] Start Auto Setup ENTER Enter RETURN Cancel This screen provides the method for setting up to 6. Measurements can be made in up 7.1-channel playback using surround back speakers. message is displayed: Go to six positions) ...other than the 7.1-channel system, select "Amp Assign" and perform step 3 and 4 of position 6 is displayed. For the method of setting up speakers other than the main listening position. • You can be connected correctly. prompt is not displayed, the speaker may not be ...
..." is displayed. Amp Assign Channel Select Auto Setup Start [1/6] Start Auto Setup ENTER Enter RETURN Cancel This screen provides the method for setting up to 6. Measurements can be made in up 7.1-channel playback using surround back speakers. message is displayed: Go to six positions) ...other than the 7.1-channel system, select "Amp Assign" and perform step 3 and 4 of position 6 is displayed. For the method of setting up speakers other than the main listening position. • You can be connected correctly. prompt is not displayed, the speaker may not be ...

SR6005 User Manual - English
Page 14
... AUTO SETUP Finish Storing complete. Please unplug microphone. Yes No MultEQ [6/6] ENTER Exit Turn Dynamic Volume on the number of Dynamic Volume settings, see "Error messages" (vpage 11). MultEQ [4/6] 25% • Analysis takes several minutes to store calculation results. NOTE •...not change , perform Audyssey Auto Setup again. 10 Remote control operation buttons Move the cursor (Up/Down/Left/Right) Confirm the setting Return to select "Next 1 Calculation", and then press ENTER. ENGLISH DEUTSCH FRANÇAIS ITALIANO ESPAÑOL NEDERLANDS SVENSKA STEP ...
... AUTO SETUP Finish Storing complete. Please unplug microphone. Yes No MultEQ [6/6] ENTER Exit Turn Dynamic Volume on the number of Dynamic Volume settings, see "Error messages" (vpage 11). MultEQ [4/6] 25% • Analysis takes several minutes to store calculation results. NOTE •...not change , perform Audyssey Auto Setup again. 10 Remote control operation buttons Move the cursor (Up/Down/Left/Right) Confirm the setting Return to select "Next 1 Calculation", and then press ENTER. ENGLISH DEUTSCH FRANÇAIS ITALIANO ESPAÑOL NEDERLANDS SVENSKA STEP ...

SR6005 User Manual - English
Page 15
... of problem! Retry Skip Check cause of problem! Information Remote control operation buttons Move the cursor (Up/Down/Left/Right) Confirm the setting Return to switch the display between the different speakers. 3 Press RETURN. Examples AUTO SETUP AUDYSSEY AUTO SETUP MultEQ Caution! Check cause of...Phase RETURN Cancel MultEQ • The displayed is correct, press ui to check, then press ENTER or p. Retrieving Audyssey Auto Setup settings If you set "Restore" to "Yes", you can return to Audyssey Auto Setup measurement result (value calculated at the start by MultEQ®) even...
... of problem! Retry Skip Check cause of problem! Information Remote control operation buttons Move the cursor (Up/Down/Left/Right) Confirm the setting Return to switch the display between the different speakers. 3 Press RETURN. Examples AUTO SETUP AUDYSSEY AUTO SETUP MultEQ Caution! Check cause of...Phase RETURN Cancel MultEQ • The displayed is correct, press ui to check, then press ENTER or p. Retrieving Audyssey Auto Setup settings If you set "Restore" to "Yes", you can return to Audyssey Auto Setup measurement result (value calculated at the start by MultEQ®) even...

SR6005 User Manual - English
Page 16
... : Red • When "HDMI Control" is switched to standby by pressing ON/STANDBY on the player (language setting, subtitles setting, etc.) beforehand. 3 Adjust the sound volume. Make the necessary settings on the main unit. GPower indicator status in a row to switch an input source for a player used for ... to your liking (vpage 31 "Selecting a listening mode (Surround mode)"). VOLUME Volume up VOLUME Volume down MUTE Muting 4 Set the listening mode. When power is set to "ON" : Orange You can also switch the power to standby Press STANDBY. To totally cut off the power, remove...
... : Red • When "HDMI Control" is switched to standby by pressing ON/STANDBY on the player (language setting, subtitles setting, etc.) beforehand. 3 Adjust the sound volume. Make the necessary settings on the main unit. GPower indicator status in a row to switch an input source for a player used for ... to your liking (vpage 31 "Selecting a listening mode (Surround mode)"). VOLUME Volume up VOLUME Volume down MUTE Muting 4 Set the listening mode. When power is set to "ON" : Orange You can also switch the power to standby Press STANDBY. To totally cut off the power, remove...

SR6005 User Manual - English
Page 17
Playback vpage 26 vpage 24 vpage 24 vpage 27 vpage 29 - Audio and Video TV Blu-ray Disc player DVD player Video cassette recorder Set-top box (Satellite tuner or cable TV) Game console Digital camcorder Audio iPod® USB memory device CD player SIRIUS satellite radio HD Radio receiver ...
Playback vpage 26 vpage 24 vpage 24 vpage 27 vpage 29 - Audio and Video TV Blu-ray Disc player DVD player Video cassette recorder Set-top box (Satellite tuner or cable TV) Game console Digital camcorder Audio iPod® USB memory device CD player SIRIUS satellite radio HD Radio receiver ...

SR6005 User Manual - English
Page 18
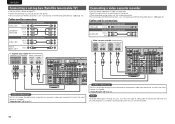
...unit is input, the video conversion function might not operate. • Component video input signals cannot be checked at 1080p, regardless of the setting.) • Resolutions of video signals for MAIN ZONEH Video device This unit Monitor Output HDMI connector Input (IN) HDMI connector Output (MONITOR OUT...) HDMI connector Input HDMI connector in noise. GFlow of HDMI-compatible TVs can result in Set as follows before using the video conversion function. NOTE • If you operate the menu while playing back 3D video content, the ...
...unit is input, the video conversion function might not operate. • Component video input signals cannot be checked at 1080p, regardless of the setting.) • Resolutions of video signals for MAIN ZONEH Video device This unit Monitor Output HDMI connector Input (IN) HDMI connector Output (MONITOR OUT...) HDMI connector Input HDMI connector in noise. GFlow of HDMI-compatible TVs can result in Set as follows before using the video conversion function. NOTE • If you operate the menu while playing back 3D video content, the ...

SR6005 User Manual - English
Page 19
...NOTE • If you to "Connecting a TV" (vpage 17) for the connection method. In this unit. NOTE To enable the Content Type, set "HDMI Control" to "ON" (vpage 64). • When connecting a TV that does not support HDCP is required. Simple version Basic version SVENSKA ... from the receiver and operate the receiver from external devices. About Content Type The HDMI specification version 1.4a enables simple, automated picture setting selection with Ethernet" for more information. About 3D function This unit supports input and output of 3D (3 dimensional) video signals of ...
...NOTE • If you to "Connecting a TV" (vpage 17) for the connection method. In this unit. NOTE To enable the Content Type, set "HDMI Control" to "ON" (vpage 64). • When connecting a TV that does not support HDCP is required. Simple version Basic version SVENSKA ... from the receiver and operate the receiver from external devices. About Content Type The HDMI specification version 1.4a enables simple, automated picture setting selection with Ethernet" for more information. About 3D function This unit supports input and output of 3D (3 dimensional) video signals of ...

SR6005 User Manual - English
Page 20
... switch the Blu-ray Disc/DVD player's resolution to a resolution with which the input source is assigned. HDMI Setup (vpage 64) Make settings for connections Audio and video cable (sold separately) HDMI cable • This interface allows transfer of the connected device regarding permissible inputs. 16... video signals are converted to DVI signals, allowing connection to a device equipped with a DVI-D connector. Blu-ray Video Disc DVD Set-top cassette Game Digital player player box recorder console camcorder TV HDMI OUT HDMI OUT HDMI OUT HDMI OUT HDMI OUT HDMI OUT HDMI...
... switch the Blu-ray Disc/DVD player's resolution to a resolution with which the input source is assigned. HDMI Setup (vpage 64) Make settings for connections Audio and video cable (sold separately) HDMI cable • This interface allows transfer of the connected device regarding permissible inputs. 16... video signals are converted to DVI signals, allowing connection to a device equipped with a DVI-D connector. Blu-ray Video Disc DVD Set-top cassette Game Digital player player box recorder console camcorder TV HDMI OUT HDMI OUT HDMI OUT HDMI OUT HDMI OUT HDMI OUT HDMI...

SR6005 User Manual - English
Page 21
... IN Y PB PR VIDEO IN AUDIO OPTICAL OUT LR LR Y PB PR Y PB PR Y PB PR Y PB PR LR LR Advanced version Information in Set as Necessary Set this device, use and connect the device. • For instructions on HDMI connections, see "About ARC (Audio Return Channel) function" (vpage 15) or refer.... For details, see "Connecting an HDMI-compatible device" (vpage 15). NOTE This connection is assigned. Cables used for your TV. "Input Assign" (vpage 52) in Set as Necessary Set this unit via an HDMI connection.
... IN Y PB PR VIDEO IN AUDIO OPTICAL OUT LR LR Y PB PR Y PB PR Y PB PR Y PB PR LR LR Advanced version Information in Set as Necessary Set this device, use and connect the device. • For instructions on HDMI connections, see "About ARC (Audio Return Channel) function" (vpage 15) or refer.... For details, see "Connecting an HDMI-compatible device" (vpage 15). NOTE This connection is assigned. Cables used for your TV. "Input Assign" (vpage 52) in Set as Necessary Set this unit via an HDMI connection.
SR6005 User Manual - English
Page 22
... cable (Red) R R Video cassette recorder VIDEO AUDIO VIDEO VIDEO OUT AUDIO OUT LR VIDEO IN AUDIO AUDIO IN LR LR LR LR LR LR in Set as used for connections Video cable (sold separately) Video cable (Yellow) Audio cable (sold separately) (White) L L Audio cable (Red) R R Coaxial... connector or component video input connector to which the input source is assigned. ENGLISH DEUTSCH FRANÇAIS ITALIANO ESPAÑOL Connecting a set-top box (Satellite tuner/cable TV) • You can record video onto a video cassette tape. • Select the connector to ...
... cable (Red) R R Video cassette recorder VIDEO AUDIO VIDEO VIDEO OUT AUDIO OUT LR VIDEO IN AUDIO AUDIO IN LR LR LR LR LR LR in Set as used for connections Video cable (sold separately) Video cable (Yellow) Audio cable (sold separately) (White) L L Audio cable (Red) R R Coaxial... connector or component video input connector to which the input source is assigned. ENGLISH DEUTSCH FRANÇAIS ITALIANO ESPAÑOL Connecting a set-top box (Satellite tuner/cable TV) • You can record video onto a video cassette tape. • Select the connector to ...

SR6005 User Manual - English
Page 23
"Input Assign" setting (vpage 52) in Set as Necessary Set this case, select the input source to the USB port You can enjoy music stored on HDMI connections, see "Connecting an HDMI- compatible device" (vpage ... generation) • iPod nano (1st generation) • iPhone • iPhone 3G • iPhone 3GS Digital camcorder VIDEO VIDEO OUT AUDIO OPTICAL OUT AUDIO OUT LR Marantz does not guarantee that all USB memory devices will not work via the AUX1 input connector. In this to change the digital input connector to...
"Input Assign" setting (vpage 52) in Set as Necessary Set this case, select the input source to the USB port You can enjoy music stored on HDMI connections, see "Connecting an HDMI- compatible device" (vpage ... generation) • iPod nano (1st generation) • iPhone • iPhone 3G • iPhone 3GS Digital camcorder VIDEO VIDEO OUT AUDIO OPTICAL OUT AUDIO OUT LR Marantz does not guarantee that all USB memory devices will not work via the AUX1 input connector. In this to change the digital input connector to...

SR6005 User Manual - English
Page 24
...SiriusConnect Home Tuner NORTH When connecting digital audio WEST qt r w e EAST SOUTH HORIZON Area 1 Point the antenna toward the sky in Set as Necessary When connecting digital of the SiriusConnect Home Tuner. "Input Assign" (vpage 52) 20 nnPositioning the antenna For a consistent satellite ... northwest, or southwest, either through a window or outside and point it straight up. "Input Assign" (vpage 52) in Set as Necessary Set this to change the digital input connector to determine which the input source is a SIRIUS Satellite Radio Ready® receiver. Cables ...
...SiriusConnect Home Tuner NORTH When connecting digital audio WEST qt r w e EAST SOUTH HORIZON Area 1 Point the antenna toward the sky in Set as Necessary When connecting digital of the SiriusConnect Home Tuner. "Input Assign" (vpage 52) 20 nnPositioning the antenna For a consistent satellite ... northwest, or southwest, either through a window or outside and point it straight up. "Input Assign" (vpage 52) in Set as Necessary Set this to change the digital input connector to determine which the input source is a SIRIUS Satellite Radio Ready® receiver. Cables ...


