

IR Database "xcf file" for Marantz AV Receiver Common
Page 12
... "NGT:0" (invalid) "NGT:1" (OFF) "NGT:2" (ON) "LIP:xxx" (xxx = value ms) xxx = "000" (OFF) xxx = "010" ~ "200" (ON) "TTO:1xy" (OFF) "TTO:2xy" (ON) (x: Auto=0, Manual=1) (y=Ch.) 5-1-4. NEXT CAT. XM Contents Command TOGGLE NORMAL XM DispMode ART/SNG CATEGORY STATUS TOGGLE CH. Tuner contents Command VALUE Tuner1 Frequency Tuner1 Preset Tuner1...
... "NGT:0" (invalid) "NGT:1" (OFF) "NGT:2" (ON) "LIP:xxx" (xxx = value ms) xxx = "000" (OFF) xxx = "010" ~ "200" (ON) "TTO:1xy" (OFF) "TTO:2xy" (ON) (x: Auto=0, Manual=1) (y=Ch.) 5-1-4. NEXT CAT. XM Contents Command TOGGLE NORMAL XM DispMode ART/SNG CATEGORY STATUS TOGGLE CH. Tuner contents Command VALUE Tuner1 Frequency Tuner1 Preset Tuner1...
SR6001 User Manual
Page 3
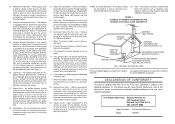
...de la Classe B est conforme ICES-003. à la norme NMB-003 du Canada. Responsible Party: Marantz America, Inc. 100 Corporate Drive, Mahwah, NJ, 07430, U.S.A. The product is required, be fatal. 18... in proper operating condition. 24.Wall or Ceiling Mounting - Protective Attachment Plug - See Instruction Manual for long periods of fire or electric shock. 19. Do not overload wall outlets,... Safety Check - Upon completion of Product: AV Surround Receiver Model: SR6001 Heat - The product should not be situated away from the wall outlet and disconnect the antenna or ...
...de la Classe B est conforme ICES-003. à la norme NMB-003 du Canada. Responsible Party: Marantz America, Inc. 100 Corporate Drive, Mahwah, NJ, 07430, U.S.A. The product is required, be fatal. 18... in proper operating condition. 24.Wall or Ceiling Mounting - Protective Attachment Plug - See Instruction Manual for long periods of fire or electric shock. 19. Do not overload wall outlets,... Safety Check - Upon completion of Product: AV Surround Receiver Model: SR6001 Heat - The product should not be situated away from the wall outlet and disconnect the antenna or ...
SR6001 User Manual
Page 5
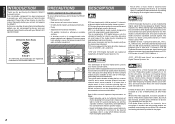
... to discrete multichannel. DVD-audio allows 96/24 in homes equipped for discrete multichannel, there remains a need for purchasing the Marantz SR6001 Surround receiver. While offering high compatibility with more favorable aural characteristics. But even in six channels, but a new player is...home theater systems. DTS brings you connect and operate the SR6001. In addition to neighborhood and home theaters. Greater bit depths provide extended dynamic range. Please take a few minutes to read this manual thoroughly before you premium quality discrete multichannel digital sound to ...
... to discrete multichannel. DVD-audio allows 96/24 in homes equipped for discrete multichannel, there remains a need for purchasing the Marantz SR6001 Surround receiver. While offering high compatibility with more favorable aural characteristics. But even in six channels, but a new player is...home theater systems. DTS brings you connect and operate the SR6001. In addition to neighborhood and home theaters. Greater bit depths provide extended dynamic range. Please take a few minutes to read this manual thoroughly before you premium quality discrete multichannel digital sound to ...
SR6001 User Manual
Page 8
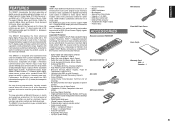
...supports 1-bit audio formatting and enables transmission of DSD (Direct Stream Digital) signals of the 7 channels. In addition, Marantz has focused on the future. The SR6001 incorporates the most advanced Digital Signal Processing circuitry, along with a 192 kHz/24 bit D/A converter in addition to ...output jacks of this transmitter support HDMI Ver. 1.1. Both this receiver, refer to a minimum. Independent power supply circuits are kept to its instruction manual. • Dolby Digital EX, Dolby Digital, DTS ES (Discrete 6.1, Matrix 6.1, Neo:6) • Dolby Pro Logic II (Movie, Music, ...
...supports 1-bit audio formatting and enables transmission of DSD (Direct Stream Digital) signals of the 7 channels. In addition, Marantz has focused on the future. The SR6001 incorporates the most advanced Digital Signal Processing circuitry, along with a 192 kHz/24 bit D/A converter in addition to ...output jacks of this transmitter support HDMI Ver. 1.1. Both this receiver, refer to a minimum. Independent power supply circuits are kept to its instruction manual. • Dolby Digital EX, Dolby Digital, DTS ES (Discrete 6.1, Matrix 6.1, Neo:6) • Dolby Pro Logic II (Movie, Music, ...
SR6001 User Manual
Page 22
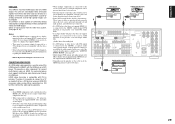
...• Refer to the instruction manual of the cable used to connect the HDMI jack on the SR6001 with the power on monitors such as TVs and projectors. • When multiple components are connected to this way. • When connected to the SR6001 for the audio signals. In ...not played back correctly unless the left, center, right and surround left and right speakers, and subwoofer are not output. When connecting to the SR6001, a separate audio cable (optical-digital, coaxial digital or analog) is needed for detailed information regarding the HDMI terminal. * HDCP: High-...
...• Refer to the instruction manual of the cable used to connect the HDMI jack on the SR6001 with the power on monitors such as TVs and projectors. • When multiple components are connected to this way. • When connected to the SR6001 for the audio signals. In ...not played back correctly unless the left, center, right and surround left and right speakers, and subwoofer are not output. When connecting to the SR6001, a separate audio cable (optical-digital, coaxial digital or analog) is needed for detailed information regarding the HDMI terminal. * HDCP: High-...

SR6001 User Manual
Page 30
... DC TRIGGER SETUP STANDBY : NORMAL BILINGUAL : MAIN+SUB HDMI AUDIO: THROUGH RETURN NEXT EXIT "5. VIDEO SETUP" (P. 39) 6.ACOUSTIC EQ. PREFERENCE" (P. 40) 2.SPKR SETUP AUTO SETUP MANUAL SETUP RETURN NEXT EXIT "2. SPEAKER SETUP" (P. 31) 4.VIDEO SETUP VIDEO CONVERT TV.AUTO OSD INFO I/P CONVERT :DISABLE :ENABLE :DISABLE RETURN NEXT EXIT "4. ACOUSTIC EQ" (P. 42...
... DC TRIGGER SETUP STANDBY : NORMAL BILINGUAL : MAIN+SUB HDMI AUDIO: THROUGH RETURN NEXT EXIT "5. VIDEO SETUP" (P. 39) 6.ACOUSTIC EQ. PREFERENCE" (P. 40) 2.SPKR SETUP AUTO SETUP MANUAL SETUP RETURN NEXT EXIT "2. SPEAKER SETUP" (P. 31) 4.VIDEO SETUP VIDEO CONVERT TV.AUTO OSD INFO I/P CONVERT :DISABLE :ENABLE :DISABLE RETURN NEXT EXIT "4. ACOUSTIC EQ" (P. 42...

SR6001 User Manual
Page 34
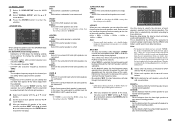
...NOW ANALYZING !! ENGLISH 2 SPKR (SPEAKER) SETUP After you have installed the SR6001 connected all the components and determined the speaker layout, it is now time to the Sub-menu. 2.SPKR SETUP AUTO SETUP MANUAL SETUP ☞ P. 32 AUTO SETUP AUTO SETUP: START MAIN ROOM SURR BACK... • After you first determine the following characteristics: • AUTO SETUP: "2-1 AUTO SETUP (MultEQ Setup)" (see page 32) • MANUAL SETUP: "2-2 MANUAL SETUP" (see page 35) 1. Before you perform the following settings, it is important that you complete this the portion of the setup, press ...
...NOW ANALYZING !! ENGLISH 2 SPKR (SPEAKER) SETUP After you have installed the SR6001 connected all the components and determined the speaker layout, it is now time to the Sub-menu. 2.SPKR SETUP AUTO SETUP MANUAL SETUP ☞ P. 32 AUTO SETUP AUTO SETUP: START MAIN ROOM SURR BACK... • After you first determine the following characteristics: • AUTO SETUP: "2-1 AUTO SETUP (MultEQ Setup)" (see page 32) • MANUAL SETUP: "2-2 MANUAL SETUP" (see page 35) 1. Before you perform the following settings, it is important that you complete this the portion of the setup, press ...
SR6001 User Manual
Page 35
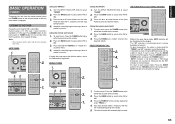
... path of the speaker sound. • The test tone output from a position that item and remeasure. (For error messages, see "MANUAL SETUP" on page 35 of the manual. For the first measurement, set the microphone in the main listening position. • Use a stand or tripod to position the... Check AUTO SETUP SPEAKERS CHECK:OK 1ST MIC POSITION!! At this measurement ends, the following OSD appears on the front panel of the SR6001 or select "2. Contact a Marantz Authorized Dealer or Customer Support regarding purchase of this , the AUTO SETUP feature measures a test tone emitted by the...
... path of the speaker sound. • The test tone output from a position that item and remeasure. (For error messages, see "MANUAL SETUP" on page 35 of the manual. For the first measurement, set the microphone in the main listening position. • Use a stand or tripod to position the... Check AUTO SETUP SPEAKERS CHECK:OK 1ST MIC POSITION!! At this measurement ends, the following OSD appears on the front panel of the SR6001 or select "2. Contact a Marantz Authorized Dealer or Customer Support regarding purchase of this , the AUTO SETUP feature measures a test tone emitted by the...

SR6001 User Manual
Page 36
.... Note: Pressing "EXIT" prior to store the calculation results in memory, place the cursor on the display. 2.SPKR SETUP AUTO SETUP MANUAL SETUP RETURN EXIT Note: • Do not turn the power to display the CHECK RESULT screen. AUTO SETUP NOW CALCULATE !! Checking Measurement... confirming the measurement results, select "RETURN" with the 3/4 cursor buttons and press the ENTER button to store all 6 positions in the SR6001's memory and may erase all measurements end, the following OSD appears on the display. Move the microphone to the second listening position, select...
.... Note: Pressing "EXIT" prior to store the calculation results in memory, place the cursor on the display. 2.SPKR SETUP AUTO SETUP MANUAL SETUP RETURN EXIT Note: • Do not turn the power to display the CHECK RESULT screen. AUTO SETUP NOW CALCULATE !! Checking Measurement... confirming the measurement results, select "RETURN" with the 3/4 cursor buttons and press the ENTER button to store all 6 positions in the SR6001's memory and may erase all measurements end, the following OSD appears on the display. Move the microphone to the second listening position, select...
SR6001 User Manual
Page 38
...available to your normal listening position. CENTER: Set the distance from the subwoofer. SURR. Select "2. Select "MANUAL SETUP" with the 3 or 4 cursor buttons. 5. To change the settings, select "CUSTOM." •... with the 1 or 2 cursor buttons. 6. LPF/HPF When you are setting that the SR6001 and today's sound systems are connected. 2CH: Select if the surround back left speaker to... the 3, 4, 1 and 2 cursor buttons and press the ENTER button to go to produce. Marantz recommends the www.cedia.org website for each speaker's position from the SURR BACK LEFT output terminal....
...available to your normal listening position. CENTER: Set the distance from the subwoofer. SURR. Select "2. Select "MANUAL SETUP" with the 3 or 4 cursor buttons. 5. To change the settings, select "CUSTOM." •... with the 1 or 2 cursor buttons. 6. LPF/HPF When you are setting that the SR6001 and today's sound systems are connected. 2CH: Select if the surround back left speaker to... the 3, 4, 1 and 2 cursor buttons and press the ENTER button to go to produce. Marantz recommends the www.cedia.org website for each speaker's position from the SURR BACK LEFT output terminal....

SR6001 User Manual
Page 39
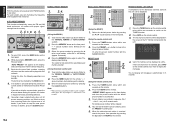
... portion of the setup, press the ENTER button to move the cursor to FRONT L by the listener at the same level. SPEAKER LEVEL TEST MODE : MANUAL FRONT L : 0.0dB CENTER : 0.0dB FRONT R : 0.0dB SURR.R : 0.0dB SURR.B R : 0.0dB SURR.B L : 0.0dB SURR.L : 0.0dB SUB W : 0.0dB RETURN BACK ... the ENTER button to go to your normal listening position. Notes: • Speakers for two surround back speakers in 0.5 dB increments.) The SR6001 will emit a pink noise from the subwoofer to "2. B L: Set the distance from the center speaker. 13. BACK appears if it reads...
... portion of the setup, press the ENTER button to move the cursor to FRONT L by the listener at the same level. SPEAKER LEVEL TEST MODE : MANUAL FRONT L : 0.0dB CENTER : 0.0dB FRONT R : 0.0dB SURR.R : 0.0dB SURR.B R : 0.0dB SURR.B L : 0.0dB SURR.L : 0.0dB SUB W : 0.0dB RETURN BACK ... the ENTER button to go to your normal listening position. Notes: • Speakers for two surround back speakers in 0.5 dB increments.) The SR6001 will emit a pink noise from the subwoofer to "2. B L: Set the distance from the center speaker. 13. BACK appears if it reads...

SR6001 User Manual
Page 41
... 1increments with the 3, 4, 1 and 2 cursor buttons and press the ENTER button. After you can adjust three parameters as explained in "2-2 MANUAL SETUP". After you complete this portion of the setup, move cursor to "RETURN" with the 1 or 2 cursor buttons. Select "3. Adjust ...PARAMETER The DTS NEO:6 mode enables a maximum 6.1 channel output with the 3 or 4 cursor buttons. 3. RETURN NEXT EXIT 4. In this mode, the SR6001 includes three controls to enter the selection. Select "NEO:6 PARAMETER" with just 2 channel input. (It also supports 5.1 channel input.) This mode expands the...
... 1increments with the 3, 4, 1 and 2 cursor buttons and press the ENTER button. After you can adjust three parameters as explained in "2-2 MANUAL SETUP". After you complete this portion of the setup, move cursor to "RETURN" with the 1 or 2 cursor buttons. Select "3. Adjust ...PARAMETER The DTS NEO:6 mode enables a maximum 6.1 channel output with the 3 or 4 cursor buttons. 3. RETURN NEXT EXIT 4. In this mode, the SR6001 includes three controls to enter the selection. Select "NEO:6 PARAMETER" with just 2 channel input. (It also supports 5.1 channel input.) This mode expands the...

SR6001 User Manual
Page 45
...EQ This display is for the sound characteristics of all speakers so as Dolby Digital and DTS. EQ that allows the user to manually adjust the equalizer, and AUDYSSEY, FRONT and FLAT that automatically adjust the equalizer from the measurement results of multichannel music such as ... set. ACOUSTIC EQ" from : PRESET G. EQ ADJ : "6-1 PRESET G. After you complete this portion of the front speakers. OFF: The graphic equalizer is manually turned on, the "AUDYSSEY", "FRONT" and "FLAT" modes cannot be selected after executing the AUTO SETUP feature. • If a speaker that ̨ ...
...EQ This display is for the sound characteristics of all speakers so as Dolby Digital and DTS. EQ that allows the user to manually adjust the equalizer, and AUDYSSEY, FRONT and FLAT that automatically adjust the equalizer from the measurement results of multichannel music such as ... set. ACOUSTIC EQ" from : PRESET G. EQ ADJ : "6-1 PRESET G. After you complete this portion of the front speakers. OFF: The graphic equalizer is manually turned on, the "AUDYSSEY", "FRONT" and "FLAT" modes cannot be selected after executing the AUTO SETUP feature. • If a speaker that ̨ ...

SR6001 User Manual
Page 50
...) Circle Surround is because the digital signal has been processed (such as the output level, sampling frequency or frequency response) and the SR6001 cannot recognize the signal as if surround speakers were actually being used to create a wider, deeper and more natural soundstage from certain CD...into 6 channel signals using such disc, 96 kHz PCM signal are encoded in 6.1 channels, it is required to set the EX/ES mode manually. The DTS Neo:6 decoder has near-discrete properties in the frequency characteristics of surround performance from DVD-Video/ Audio discs). • Certain DVD...
...) Circle Surround is because the digital signal has been processed (such as the output level, sampling frequency or frequency response) and the SR6001 cannot recognize the signal as if surround speakers were actually being used to create a wider, deeper and more natural soundstage from certain CD...into 6 channel signals using such disc, 96 kHz PCM signal are encoded in 6.1 channels, it is required to set the EX/ES mode manually. The DTS Neo:6 decoder has near-discrete properties in the frequency characteristics of surround performance from DVD-Video/ Audio discs). • Certain DVD...
SR6001 User Manual
Page 56
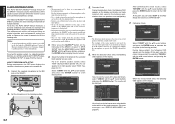
...use to select "TUNER". 2. BASS TV DVD TREBLE VCR DSS TUNER CD CDR MD TAPE AUX1 AUX2 AMP REMOTE CONTROLLER RC5001SR 3. 1. (Using the SR6001) 1. Press the 3 or 4 cursor buttons on the front panel. Press the F.DIRECT on the front Panel for the tuner will show "FREQ...for 1 second or more than 5 seconds. Automatic searching begins then stops when a station is tuned in . (Using the remote control unit) 1. MANUAL TUNING 1. button to tune in . REC T.DISP PTY F.DIRECT - To select tuner, Press the TUNER button twice within two seconds on the remote...
...use to select "TUNER". 2. BASS TV DVD TREBLE VCR DSS TUNER CD CDR MD TAPE AUX1 AUX2 AMP REMOTE CONTROLLER RC5001SR 3. 1. (Using the SR6001) 1. Press the 3 or 4 cursor buttons on the front panel. Press the F.DIRECT on the front Panel for the tuner will show "FREQ...for 1 second or more than 5 seconds. Automatic searching begins then stops when a station is tuned in . (Using the remote control unit) 1. MANUAL TUNING 1. button to tune in . REC T.DISP PTY F.DIRECT - To select tuner, Press the TUNER button twice within two seconds on the remote...
SR6001 User Manual
Page 57
...STEREO 8 NIGHT 9 P.SCAN 7.1CH IN A/D HT-EQ CL 0 +10 MEMO CH/ CAT SPKR A/B MUTE VOLUME MULTI/ CAT M SPKR (Using the SR6001) 1. The display stops blinking. "- -" (preset number) starts blinking on the front panel. 2. Press the TUNER button twice within two seconds on the...entering a single digit number (2 for example), either input "02" or just input "2" and wait for 5 seconds each station, you wish to the "MANUAL TUNING" or "AUTO TUNING" section). 2. RECALLING A PRESET STATION 2. l/ SLEEP DISPLAY P.DIRECT SURROUND AUTO 12 LIP SYNC/ dts INPUT 3 BAND CS ...
...STEREO 8 NIGHT 9 P.SCAN 7.1CH IN A/D HT-EQ CL 0 +10 MEMO CH/ CAT SPKR A/B MUTE VOLUME MULTI/ CAT M SPKR (Using the SR6001) 1. The display stops blinking. "- -" (preset number) starts blinking on the front panel. 2. Press the TUNER button twice within two seconds on the...entering a single digit number (2 for example), either input "02" or just input "2" and wait for 5 seconds each station, you wish to the "MANUAL TUNING" or "AUTO TUNING" section). 2. RECALLING A PRESET STATION 2. l/ SLEEP DISPLAY P.DIRECT SURROUND AUTO 12 LIP SYNC/ dts INPUT 3 BAND CS ...

SR6001 User Manual
Page 66
..., etc.) is not operating properly, Check the items listed in the source component's instruction manual. Set it turns on . Have you operated the receiver according to HDMI components was not the SR6001, TV and source component. If this unit is not on , as explained in the table beIow....on.) Turn on the power to the HDMI In the "THROUGH" mode, sound is set on , as explained in the TV's instruction manual. instruction manual. produced from the SR6001. The XM Tuner is displayed. Contact XM Radio. 63 Set HDMI input so that it cannot output HDMI audio. • Use a...
..., etc.) is not operating properly, Check the items listed in the source component's instruction manual. Set it turns on . Have you operated the receiver according to HDMI components was not the SR6001, TV and source component. If this unit is not on , as explained in the table beIow....on.) Turn on the power to the HDMI In the "THROUGH" mode, sound is set on , as explained in the TV's instruction manual. instruction manual. produced from the SR6001. The XM Tuner is displayed. Contact XM Radio. 63 Set HDMI input so that it cannot output HDMI audio. • Use a...


