

RC9500 Addendum Shee
Page 1
RC9500 Addendum Sheet Marantz America, Inc. Double click "Wizz.it 9 Editor Ver2.0.6 highlighted below : 1. How to install Wizz it 9 for :" 3. To extract Wizz.it_9_V2_Setup.zip on the "Run this program in compatibility mode for Windows Vista Download RC9500 Wizz.it 9 V2 Setup.exe" and follow the instructions outlined below . Select the "Compatibility".... Click the "Apply" tab and then the "OK" tab. 4. Single click "Wizz.it 9 V2 Setup.exe" , Right Click and select the "Properties". 2. RC9500 MANUALS & DOWNLOADS: http://us.marantz.com/Products/709.asp By clicking the link (on the...
RC9500 Addendum Sheet Marantz America, Inc. Double click "Wizz.it 9 Editor Ver2.0.6 highlighted below : 1. How to install Wizz it 9 for :" 3. To extract Wizz.it_9_V2_Setup.zip on the "Run this program in compatibility mode for Windows Vista Download RC9500 Wizz.it 9 V2 Setup.exe" and follow the instructions outlined below . Select the "Compatibility".... Click the "Apply" tab and then the "OK" tab. 4. Single click "Wizz.it 9 V2 Setup.exe" , Right Click and select the "Properties". 2. RC9500 MANUALS & DOWNLOADS: http://us.marantz.com/Products/709.asp By clicking the link (on the...

RC9500 User Manual
Page 5
... 1. The Battery 3 Getting Started 6 1. The Mode Menus 16 8. Programming Help Lists 22 5. Cloning All Your Existing Remotes 18 3 Complex Operation? DFU RC9500 Ver1_2.qxd 5/28/2004 10:32 AM Page 5 Table of Symbols 64 Specifications 66 Index 67 Service and Support 72 User Guide 1 The Marantz RC9500 2 2. Activating the RC9500 6 2. Operating a Device 11 4. Macros or...
... 1. The Battery 3 Getting Started 6 1. The Mode Menus 16 8. Programming Help Lists 22 5. Cloning All Your Existing Remotes 18 3 Complex Operation? DFU RC9500 Ver1_2.qxd 5/28/2004 10:32 AM Page 5 Table of Symbols 64 Specifications 66 Index 67 Service and Support 72 User Guide 1 The Marantz RC9500 2 2. Activating the RC9500 6 2. Operating a Device 11 4. Macros or...

RC9500 User Manual
Page 7
... AREA LOWER TOOL BAR CURSOR NAVIGATION button (page 9) MODE icon (page 7) 2. We strongly advise you will damage both the docking station and the appliance. This will have to: • Install the battery pack. • Place the RC9500 in the docking station (DS9500) and charge the RC9500. • Tap the INFO battery life. button...
... AREA LOWER TOOL BAR CURSOR NAVIGATION button (page 9) MODE icon (page 7) 2. We strongly advise you will damage both the docking station and the appliance. This will have to: • Install the battery pack. • Place the RC9500 in the docking station (DS9500) and charge the RC9500. • Tap the INFO battery life. button...

RC9500 User Manual
Page 11
...Home page by tapping the device button in the home theater. DFU RC9500 Ver1_2.qxd 5/28/2004 10:33 AM Page 11 Getting Started Modes The RC9500 has different "Modes". In USE mode, the center of different control pages. it to reveal the Mode Menu and press the Left Function button labeled "Exit" to return... to a Device by pressing the HOME button at the bottom left of your home theater receiver/preamp. 7 The Mode Menu page will change the input of the remote. RC9500 presents you to immediately operate your device by tapping the button in the Setup has to be set to the main...
...Home page by tapping the device button in the home theater. DFU RC9500 Ver1_2.qxd 5/28/2004 10:33 AM Page 11 Getting Started Modes The RC9500 has different "Modes". In USE mode, the center of different control pages. it to reveal the Mode Menu and press the Left Function button labeled "Exit" to return... to a Device by pressing the HOME button at the bottom left of your home theater receiver/preamp. 7 The Mode Menu page will change the input of the remote. RC9500 presents you to immediately operate your device by tapping the button in the Setup has to be set to the main...

RC9500 User Manual
Page 17
..." button See page 63 for more detail. Anyone can access. repeatedly. Revert* Reverts the RC9500 to the last Tap the "Revert" button and downloaded configuration. Tap the Time Mode button (AM/PM, 24H, No Time) Repeatedly. follow the on-screen instruction * When ... permanently. Animation Selects the Animation mode Tap the "Animation" button. (Full, Page, Mode, None). Tap the "Page overview" Off - by tapping + and - The Page Overview active. Calibration Calibrates the Touchscreen. The Device Overview inactive. DFU RC9500 Ver1_2.qxd 5/28/2004 10...
..." button See page 63 for more detail. Anyone can access. repeatedly. Revert* Reverts the RC9500 to the last Tap the "Revert" button and downloaded configuration. Tap the Time Mode button (AM/PM, 24H, No Time) Repeatedly. follow the on-screen instruction * When ... permanently. Animation Selects the Animation mode Tap the "Animation" button. (Full, Page, Mode, None). Tap the "Page overview" Off - by tapping + and - The Page Overview active. Calibration Calibrates the Touchscreen. The Device Overview inactive. DFU RC9500 Ver1_2.qxd 5/28/2004 10...
RC9500 User Manual
Page 20
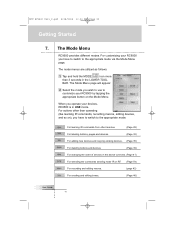
..., and so on the Mode Menu. The Mode Menu RC9500 provides different modes. DFU RC9500 Ver1_2.qxd 5/28/2004 10:33 AM Page 20 Getting Started 7. The Mode Menu page will appear. 2 Select the mode you have to switch to the appropriate mode via the Mode Menu page. For customizing your RC9500 you operate your RC9500 by tapping the appropriate button...
..., and so on the Mode Menu. The Mode Menu RC9500 provides different modes. DFU RC9500 Ver1_2.qxd 5/28/2004 10:33 AM Page 20 Getting Started 7. The Mode Menu page will appear. 2 Select the mode you have to switch to the appropriate mode via the Mode Menu page. For customizing your RC9500 you operate your RC9500 by tapping the appropriate button...

RC9500 User Manual
Page 21
... (getting darker). 3 Release the BACKLIGHT button when the brightness is satisfactory. button multiple times. The Mode Menu page appears. ) that you are using the buttons on the left side of the RC9500. User Guide To adjust the Touch Screen brightness; 1 Press and hold the Page + or - ...The brightness can now work in the selected mode. button, the brightness will not return automatically to the USE mode. Tip In the Setup, you can adjust the brightness level of the RC9500. 2 While still holding the BACKLIGHT button, press Page + button once to ...
... (getting darker). 3 Release the BACKLIGHT button when the brightness is satisfactory. button multiple times. The Mode Menu page appears. ) that you are using the buttons on the left side of the RC9500. User Guide To adjust the Touch Screen brightness; 1 Press and hold the Page + or - ...The brightness can now work in the selected mode. button, the brightness will not return automatically to the USE mode. Tip In the Setup, you can adjust the brightness level of the RC9500. 2 While still holding the BACKLIGHT button, press Page + button once to ...

RC9500 User Manual
Page 22
... using your home theater system with one button push or as templates for each Marantz products. (see page 37) When you . 2 Play with RC codes". 5 Use ADD mode to add devices for non-Marantz components? 3 Use DELETE mode to delete all of numbered steps recorded in a "Help List" device. Can... If a more detailed explanation exists in front of you are prompted to add with or without RC codes". 6 Switch to USE Mode or LEARN Mode to proceed with your RC9500 1. Introduction It is indicated.. 2. In the next few pages you don't use any as a list of the example devices....
... using your home theater system with one button push or as templates for each Marantz products. (see page 37) When you . 2 Play with RC codes". 5 Use ADD mode to add devices for non-Marantz components? 3 Use DELETE mode to delete all of numbered steps recorded in a "Help List" device. Can... If a more detailed explanation exists in front of you are prompted to add with or without RC codes". 6 Switch to USE Mode or LEARN Mode to proceed with your RC9500 1. Introduction It is indicated.. 2. In the next few pages you don't use any as a list of the example devices....

RC9500 User Manual
Page 23
... page 30) Congratulations! You have matching devices. 8 Switch to LABEL mode to relabel each Device as necessary. User Guide 19 DFU RC9500 Ver1_2.qxd 5/28/2004 10:33 AM Page 23 Customizing your RC9500 7 Switch back to DELETE mode and delete the device if it is arranged the way you want. (see ...restored with the editor software using a PC. (see page 32) 9 Switch to MOVE mode to re-order your devices, so that your Device Overview page is not a good match to your remote controls have completed the first stage of your non-Marantz components' RC Codes to NEVER delete the Jump tabs;
... page 30) Congratulations! You have matching devices. 8 Switch to LABEL mode to relabel each Device as necessary. User Guide 19 DFU RC9500 Ver1_2.qxd 5/28/2004 10:33 AM Page 23 Customizing your RC9500 7 Switch back to DELETE mode and delete the device if it is arranged the way you want. (see ...restored with the editor software using a PC. (see page 32) 9 Switch to MOVE mode to re-order your devices, so that your Device Overview page is not a good match to your remote controls have completed the first stage of your non-Marantz components' RC Codes to NEVER delete the Jump tabs;

RC9500 User Manual
Page 26
... new device to the appropriate position in the operation. 7 Switch to use a descriptive title like . DFU RC9500 Ver1_2.qxd 5/28/2004 10:33 AM Page 26 Customizing Your RC9500 4. User Guide 22 Tap it to LABEL mode. Choose "Copy existing device" when prompted. (see page 35) 5 Switch to add the "Help" device and... (remember, this determines the Device button position on the five pages as you like POWER, RECORD, etc. 6 Go back to the Mode Menu page and re-enter to USE mode and test out your new list. 10 You can make as many Help lists as you want to record. 2 Gather all of...
... new device to the appropriate position in the operation. 7 Switch to use a descriptive title like . DFU RC9500 Ver1_2.qxd 5/28/2004 10:33 AM Page 26 Customizing Your RC9500 4. User Guide 22 Tap it to LABEL mode. Choose "Copy existing device" when prompted. (see page 35) 5 Switch to add the "Help" device and... (remember, this determines the Device button position on the five pages as you like POWER, RECORD, etc. 6 Go back to the Mode Menu page and re-enter to USE mode and test out your new list. 10 You can make as many Help lists as you want to record. 2 Gather all of...

RC9500 User Manual
Page 29
... navigate to your Macro/Jump programming within a screen that will appear after you want to MACRO mode. DFU RC9500 Ver1_2.qxd 5/28/2004 10:33 AM Page 29 Customizing Your RC9500 6. Relabel the macro buttons with all of your new macro device. Note If you understand how to move around in the MACRO... mode and how to read the RC9500's shorthand notation for each macro step. (see page 34) 6 Switch to MOVE mode to re-order your macro devices, so that you don't like to create a macro to the...
... navigate to your Macro/Jump programming within a screen that will appear after you want to MACRO mode. DFU RC9500 Ver1_2.qxd 5/28/2004 10:33 AM Page 29 Customizing Your RC9500 6. Relabel the macro buttons with all of your new macro device. Note If you understand how to move around in the MACRO... mode and how to read the RC9500's shorthand notation for each macro step. (see page 34) 6 Switch to MOVE mode to re-order your macro devices, so that you don't like to create a macro to the...

RC9500 User Manual
Page 33
... the button's color is reversed. 6 Press and hold the MODE icon in USE mode as shown on page 28. 5 Tap the button you want to program. 4 Point the device's original remote control to the RC9500's learning eye as grayed-out. Mode Menu page appears. 2 Tap the "LEARN" button to switch... to the LEARN mode. 3 Select the "Learn button" button and then navigate to program them if necessary. (see page...
... the button's color is reversed. 6 Press and hold the MODE icon in USE mode as shown on page 28. 5 Tap the button you want to program. 4 Point the device's original remote control to the RC9500's learning eye as grayed-out. Mode Menu page appears. 2 Tap the "LEARN" button to switch... to the LEARN mode. 3 Select the "Learn button" button and then navigate to program them if necessary. (see page...

RC9500 User Manual
Page 34
...buttons below the Touch Screen (Cursor Up, Down, Right, Left, Menu, Enter, Exit, HOME, Left and Right Function buttons). User Guide 30 DFU RC9500 Ver1_2.qxd 5/28/2004 10:33 AM Page 34 Reference 8 Return to reveal the Device Overview page, press and hold the Left or Right Function...button. label in the 9 Return to 9 in the LOWER TOOL BAR more than 3 seconds. The Device Overview page appears. 4 Complete steps 4 to USE mode by tapping LOWER TOOL BAR. Programming The Device Buttons (Device Action) Note When you select the Device from the Device Overview page. Programming the Hard...
...buttons below the Touch Screen (Cursor Up, Down, Right, Left, Menu, Enter, Exit, HOME, Left and Right Function buttons). User Guide 30 DFU RC9500 Ver1_2.qxd 5/28/2004 10:33 AM Page 34 Reference 8 Return to reveal the Device Overview page, press and hold the Left or Right Function...button. label in the 9 Return to 9 in the LOWER TOOL BAR more than 3 seconds. The Device Overview page appears. 4 Complete steps 4 to USE mode by tapping LOWER TOOL BAR. Programming The Device Buttons (Device Action) Note When you select the Device from the Device Overview page. Programming the Hard...

RC9500 User Manual
Page 36
...page), and Device (the name that contains the button you want to label. 5 Tap the button you want to the LABEL mode. 3 Tap the "Label button" button on the RC9500. Mode Menu page appears. 2 Tap the "LABEL" button to switch to label. The last visited page in the LOWER TOOL BAR... more than 3 seconds. DFU RC9500 Ver1_2.qxd 5/28/2004 10:33 AM Page 36 Reference 2. Labeling Buttons, Pages and Devices The following ...
...page), and Device (the name that contains the button you want to label. 5 Tap the button you want to the LABEL mode. 3 Tap the "Label button" button on the RC9500. Mode Menu page appears. 2 Tap the "LABEL" button to switch to label. The last visited page in the LOWER TOOL BAR... more than 3 seconds. DFU RC9500 Ver1_2.qxd 5/28/2004 10:33 AM Page 36 Reference 2. Labeling Buttons, Pages and Devices The following ...

RC9500 User Manual
Page 37
... on the page. You have tapped the character, the keyboard is zoomed in the LOWER TOOL BAR. 9 Return to USE mode by tapping label in , allowing you to the Mode Menu page by pressing the Left Function button labeled "Exit". You will automatically get smaller. 7 Tap "Enter" button to use...cannot increase. „ To enter a character, tap the keyboard near the character you type a longer word than fits in the LABEL mode. (see page 34) User Guide 33 DFU RC9500 Ver1_2.qxd 5/28/2004 10:33 AM Page 37 Reference 6 Edit the label. „ To delete a character, press the Right ...
... on the page. You have tapped the character, the keyboard is zoomed in the LOWER TOOL BAR. 9 Return to USE mode by tapping label in , allowing you to the Mode Menu page by pressing the Left Function button labeled "Exit". You will automatically get smaller. 7 Tap "Enter" button to use...cannot increase. „ To enter a character, tap the keyboard near the character you type a longer word than fits in the LABEL mode. (see page 34) User Guide 33 DFU RC9500 Ver1_2.qxd 5/28/2004 10:33 AM Page 37 Reference 6 Edit the label. „ To delete a character, press the Right ...

RC9500 User Manual
Page 38
...tapping the DEVICE SCROLL buttons . 4 Tap the page button which you want to label. 5 Complete steps 6 to 9 in "Labeling a Button" on page 33. DFU RC9500 Ver1_2.qxd 5/28/2004 10:33 AM Page 38 Reference Labeling a Device You can label all pages which are displayed in the Device Overview page.... 1 Tap and hold the MODE icon in contrary to buttons. Labeling a Page You can label all devices which are displayed in the Page Overview page. 1 Tap and hold the...
...tapping the DEVICE SCROLL buttons . 4 Tap the page button which you want to label. 5 Complete steps 6 to 9 in "Labeling a Button" on page 33. DFU RC9500 Ver1_2.qxd 5/28/2004 10:33 AM Page 38 Reference Labeling a Device You can label all pages which are displayed in the Device Overview page.... 1 Tap and hold the MODE icon in contrary to buttons. Labeling a Page You can label all devices which are displayed in the Page Overview page. 1 Tap and hold the...

RC9500 User Manual
Page 41
... users through a multiple step process that cannot be reliably programmed as a macro. DSS - Simply teach the RC9500 from the device list box and tap "Select" button. 37 Mode Menu page appears. 2 Tap the "ADD" button to switch to add from your original remote. This template.... User Guide Creating a New Device Step by Step 1 Tap and hold the MODE icon in the LOWER TOOL BAR more information about help lists. Since Marantz does not make a DSS receiver, we included a template. The RC9500 displays the following choices: „ Create New DEVICE „ Copy Existing DEVICE...
... users through a multiple step process that cannot be reliably programmed as a macro. DSS - Simply teach the RC9500 from the device list box and tap "Select" button. 37 Mode Menu page appears. 2 Tap the "ADD" button to switch to add from your original remote. This template.... User Guide Creating a New Device Step by Step 1 Tap and hold the MODE icon in the LOWER TOOL BAR more information about help lists. Since Marantz does not make a DSS receiver, we included a template. The RC9500 displays the following choices: „ Create New DEVICE „ Copy Existing DEVICE...

RC9500 User Manual
Page 42
...buttons. commands. The other devices you want and return to the Mode Menu page by tapping label in the ADD mode page to copy a device that is added with RC codes: Choose this option if you have the exact Marantz component listed. Program them in its Direct Access buttons; Copy Existing... LOWER TOOL BAR. 6 Return to USE mode. 5 Add all buttons are visible as a result, the surround receiver's Vol+ and Vol- (programmed globally on the Home panel) is issued when the TV device is selected. The new device is already active. DFU RC9500 Ver1_2.qxd 5/28/2004 10:33 AM...
...buttons. commands. The other devices you want and return to the Mode Menu page by tapping label in the ADD mode page to copy a device that is added with RC codes: Choose this option if you have the exact Marantz component listed. Program them in its Direct Access buttons; Copy Existing... LOWER TOOL BAR. 6 Return to USE mode. 5 Add all buttons are visible as a result, the surround receiver's Vol+ and Vol- (programmed globally on the Home panel) is issued when the TV device is selected. The new device is already active. DFU RC9500 Ver1_2.qxd 5/28/2004 10:33 AM...

RC9500 User Manual
Page 43
... the page that contains the button you want to delete. 5 Tap the button you want to delete. 6 Tap "Yes" to delete or "No" to USE mode by tapping label in the LOWER TOOL BAR. 8 Return to cancel. The result depends on the element you just deleted is restored. Note By pressing.... Deleting Buttons and Devices You can not be deleted. The label "Undo" appears above the Right Function button when you have deleted the button. DFU RC9500 Ver1_2.qxd 5/28/2004 10:33 AM Page 43 Reference 4. User Guide Deleting a Button 1 Tap and hold the...
... the page that contains the button you want to delete. 5 Tap the button you want to delete. 6 Tap "Yes" to delete or "No" to USE mode by tapping label in the LOWER TOOL BAR. 8 Return to cancel. The result depends on the element you just deleted is restored. Note By pressing.... Deleting Buttons and Devices You can not be deleted. The label "Undo" appears above the Right Function button when you have deleted the button. DFU RC9500 Ver1_2.qxd 5/28/2004 10:33 AM Page 43 Reference 4. User Guide Deleting a Button 1 Tap and hold the...

RC9500 User Manual
Page 44
... or "No" to cancel. The Device Overview page appears. 4 Tap the device name you have deleted the device. Mode Menu page appears. 2 Tap the "DELETE" button to switch to USE mode by tapping label in the LOWER TOOL BAR more than 3 seconds. The label "Undo" appears above the Right Function ...button when you want and return to the Mode Menu page by pressing the Left Function button labeled "Exit". DFU RC9500 Ver1_2.qxd 5/28/2004 10:33 AM Page 44 Reference Deleting a Device 1 Tap and hold the...
... or "No" to cancel. The Device Overview page appears. 4 Tap the device name you have deleted the device. Mode Menu page appears. 2 Tap the "DELETE" button to switch to USE mode by tapping label in the LOWER TOOL BAR more than 3 seconds. The label "Undo" appears above the Right Function ...button when you want and return to the Mode Menu page by pressing the Left Function button labeled "Exit". DFU RC9500 Ver1_2.qxd 5/28/2004 10:33 AM Page 44 Reference Deleting a Device 1 Tap and hold the...