
User Guide
Page 6
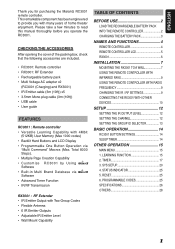
...IR / RF SETTINGS 9 CONNECTING THE RX3001 WITH OTHER DEVICES 10 SETUP 12 SETTING THE IR OUTPUT LEVEL 12 SETTING THE CHANNEL 12 SETTING THE GROUP ID SELECTOR 13 BASIC OPERATION 14 RC3001 BUTTON SETTINGS 14 SLEEP TIMER 14 OTHER OPERATION 15 MAIN MENU ... • Customize RC3001 by Using Software • Built-in Multi Brand Database via lMulti Commandz Macros (Max. SYS.SETUP 20 4. LEARNING FUNCTION 15 2. STATUS INDICATOR 25 5. PROGRAMMABLE CODES 25 SPECIFICATIONS 26 OTHERS 28 1 RESET 25 6. ENGLISH Thank you for purchasing the Marantz RC3001 remote controller. TIMER...
...IR / RF SETTINGS 9 CONNECTING THE RX3001 WITH OTHER DEVICES 10 SETUP 12 SETTING THE IR OUTPUT LEVEL 12 SETTING THE CHANNEL 12 SETTING THE GROUP ID SELECTOR 13 BASIC OPERATION 14 RC3001 BUTTON SETTINGS 14 SLEEP TIMER 14 OTHER OPERATION 15 MAIN MENU ... • Customize RC3001 by Using Software • Built-in Multi Brand Database via lMulti Commandz Macros (Max. SYS.SETUP 20 4. LEARNING FUNCTION 15 2. STATUS INDICATOR 25 5. PROGRAMMABLE CODES 25 SPECIFICATIONS 26 OTHERS 28 1 RESET 25 6. ENGLISH Thank you for purchasing the Marantz RC3001 remote controller. TIMER...

User Guide
Page 15
... INPUT SELECTOR VOLUME MULTI STANDBY POWER ON/OFF MULTI SPEAKER PHONES SURROUND MODE PURE DIRECT SIMPLE SETUP AUTO HT-EQ MENU ENTER DISPLAY MEMORY CLEAR EXIT BAND T-MODE DOWN UP MUTE ATT DIGITAL...MONO cable to Front panel. 10 or Affix the IR emitter to IR Flasher IN. IR RF RC3001 Remote controller RX3001 SA-CD Player CD Changer 5 DISC CD CHANGER CC4001 1 2 3 4 5 DISC ...CH AUDIO EX. ENGLISH CONNECTING THE RX3001 WITH OTHER DEVICES 1. CONNECTING TO MARANTZ EQUIPMENT Note: When connecting to other equipment, set the REMOTE CONTROL switch on the rear...
... INPUT SELECTOR VOLUME MULTI STANDBY POWER ON/OFF MULTI SPEAKER PHONES SURROUND MODE PURE DIRECT SIMPLE SETUP AUTO HT-EQ MENU ENTER DISPLAY MEMORY CLEAR EXIT BAND T-MODE DOWN UP MUTE ATT DIGITAL...MONO cable to Front panel. 10 or Affix the IR emitter to IR Flasher IN. IR RF RC3001 Remote controller RX3001 SA-CD Player CD Changer 5 DISC CD CHANGER CC4001 1 2 3 4 5 DISC ...CH AUDIO EX. ENGLISH CONNECTING THE RX3001 WITH OTHER DEVICES 1. CONNECTING TO MARANTZ EQUIPMENT Note: When connecting to other equipment, set the REMOTE CONTROL switch on the rear...

User Guide
Page 17
... 12 CH selector knob Notes: • When setting the channel with the CH selector, the available channels are CH1 to the same channel as the RC3001. Note: The default setting is high output (LEVEL 4), and so when the IR emitter is channel 1. • To change the channel setting in the Wizz....it 3 editor. 12 Be sure to set the IR output level according to 6. ENGLISH SETUP SETTING THE IR OUTPUT LEVEL The DIP switches at the bottom of the RX3001 can be so high that remote commands cannot be used to...
... 12 CH selector knob Notes: • When setting the channel with the CH selector, the available channels are CH1 to the same channel as the RC3001. Note: The default setting is high output (LEVEL 4), and so when the IR emitter is channel 1. • To change the channel setting in the Wizz....it 3 editor. 12 Be sure to set the IR output level according to 6. ENGLISH SETUP SETTING THE IR OUTPUT LEVEL The DIP switches at the bottom of the RX3001 can be so high that remote commands cannot be used to...

User Guide
Page 23
Check that the settings are displayed. time only operation. • The timer settings are correct. Setup time Device name HARD or SOFT button Key name EVERYDAY or ONE TIME • Either press the ENTER button or wait three seconds so that ...
Check that the settings are displayed. time only operation. • The timer settings are correct. Setup time Device name HARD or SOFT button Key name EVERYDAY or ONE TIME • Either press the ENTER button or wait three seconds so that ...

User Guide
Page 25
.... 2. Press the button next to the lCLOCKz indicator in the SYS.SETUP menu screen in the LCD to display the clock setting screen. • Either press the ENTER button or wait three seconds for the RC3001. 1. Please check it occasionally and set the current time. Use the numeric buttons (0...• LCD (LCD setting) • BEEP (Beep sound setting) • MEM CLEAR (Initialization setting) 3. The items below can become out of the RC3001, then press the button next to the lSYS. Please reset the time after replacing the battery pack. 20 CLOCK (CLOCK SETTING) This sets the clock...
.... 2. Press the button next to the lCLOCKz indicator in the SYS.SETUP menu screen in the LCD to display the clock setting screen. • Either press the ENTER button or wait three seconds for the RC3001. 1. Please check it occasionally and set the current time. Use the numeric buttons (0...• LCD (LCD setting) • BEEP (Beep sound setting) • MEM CLEAR (Initialization setting) 3. The items below can become out of the RC3001, then press the button next to the lSYS. Please reset the time after replacing the battery pack. 20 CLOCK (CLOCK SETTING) This sets the clock...

User Guide
Page 26
The time can be set the illumination time. ENGLISH BACK LIGHT (BACKLIGHT ILLUMINATION TIME SETTING) Press the LIGHT button on the RC3001 to turn on even when the LIGHT button is pressed. 21 Press the buttons (right: +, left: -) displayed next to TIME to set in the LCD ... the backlight illumination time setting screen. • Either press the ENTER button or wait three seconds for the LCD to automatically return to the SYS.SETUP menu. • Pressing the Home button returns the LCD to 0 sec is completed. 1. Note: Setting the BACK LIGHT TIMER to the MAIN MENU. 2. Press the...
The time can be set the illumination time. ENGLISH BACK LIGHT (BACKLIGHT ILLUMINATION TIME SETTING) Press the LIGHT button on the RC3001 to turn on even when the LIGHT button is pressed. 21 Press the buttons (right: +, left: -) displayed next to TIME to set in the LCD ... the backlight illumination time setting screen. • Either press the ENTER button or wait three seconds for the LCD to automatically return to the SYS.SETUP menu. • Pressing the Home button returns the LCD to 0 sec is completed. 1. Note: Setting the BACK LIGHT TIMER to the MAIN MENU. 2. Press the...
User Guide
Page 27
... Either press the ENTER button or wait three seconds for the LCD to automatically return to the SYS.SETUP menu. • Pressing the Home button returns the LCD to the lALWAYS ON` indicator. When the...MAIN MENU. ENGLISH LCD (LCD SETTING) Press the button next to the lLCDz indicator in the SYS.SETUP menu screen in 1-second intervals from 10 to 60 seconds. To leave the LCD always on . 22... is displayed. 3. LCD TIMER (LCD timer setting) This sets the time that the LCD remains on the RC3001. The LCD setting menu is turned off , this setting will turn it on the LCD to set in the...
... Either press the ENTER button or wait three seconds for the LCD to automatically return to the SYS.SETUP menu. • Pressing the Home button returns the LCD to the lALWAYS ON` indicator. When the...MAIN MENU. ENGLISH LCD (LCD SETTING) Press the button next to the lLCDz indicator in the SYS.SETUP menu screen in 1-second intervals from 10 to 60 seconds. To leave the LCD always on . 22... is displayed. 3. LCD TIMER (LCD timer setting) This sets the time that the LCD remains on the RC3001. The LCD setting menu is turned off , this setting will turn it on the LCD to set in the...

User Guide
Page 28
...buttons (right: +, left: -) to the MAIN MENU. 23 After deciding the settings, press the ENTER button. SETUP menu. • Pressing the Home button returns the LCD to adjust the contrast level. ENGLISH CONTRAST (LCD CONTRAST ...automatically completed. • Either press the ENTER button or wait three seconds for the LCD to automatically return to the SYS.SETUP menu. • Pressing the Home button returns the LCD to the MAIN MENU. • Either press the ENTER button... return to the SYS. Press the button next to the lBEEPz indicator in the SYS.SETUP menu screen in the RC3001. 1.
...buttons (right: +, left: -) to the MAIN MENU. 23 After deciding the settings, press the ENTER button. SETUP menu. • Pressing the Home button returns the LCD to adjust the contrast level. ENGLISH CONTRAST (LCD CONTRAST ...automatically completed. • Either press the ENTER button or wait three seconds for the LCD to automatically return to the SYS.SETUP menu. • Pressing the Home button returns the LCD to the MAIN MENU. • Either press the ENTER button... return to the SYS. Press the button next to the lBEEPz indicator in the SYS.SETUP menu screen in the RC3001. 1.

User Guide
Page 29
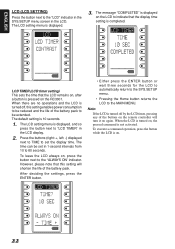
...to the lMEM CLEARz indicator in the SYS.SETUP menu screen in the RC3001 to the lNOz (Disable) or lYESz (Enable...) indicators on the LCD and completes initialization. Pressing the YES button displays lCOMPLETEDz on the LCD to either enable or disable initialization. • Either press the ENTER button or wait three seconds for the LCD to automatically return to the SYS.SETUP...MAIN MENU. 3. Note: The LEARNING and CLOCK settings are shown below. • TIMER SETUP • BACK LIGHT TIMER • LCD • BEEP 24 Press the button next to...
...to the lMEM CLEARz indicator in the SYS.SETUP menu screen in the RC3001 to the lNOz (Disable) or lYESz (Enable...) indicators on the LCD and completes initialization. Pressing the YES button displays lCOMPLETEDz on the LCD to either enable or disable initialization. • Either press the ENTER button or wait three seconds for the LCD to automatically return to the SYS.SETUP...MAIN MENU. 3. Note: The LEARNING and CLOCK settings are shown below. • TIMER SETUP • BACK LIGHT TIMER • LCD • BEEP 24 Press the button next to...