Owner's Manual in English
Page 26
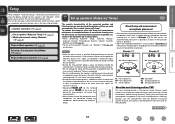
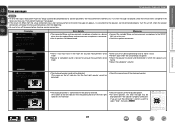
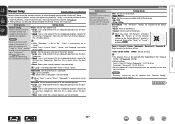
... possible. The measurements could disrupt the measurements. • Do not unplug the Setup and measurement microphone from the speakers and subwoofer(s), but this is completed. • Do not stand between the speakers and Setup and measurement microphone or allow obstacles in... ( : Measuring positions) ( : Measuring positions) SL *M SL SR *M SR FL Front speaker (L) FR Front speaker (R) C Center speaker SW Subwoofer SL Surround speaker (L) SR Surround speaker (R) About the main listening position (*M) The main listening position is called "Audyssey® Setup". This unit lets...
... possible. The measurements could disrupt the measurements. • Do not unplug the Setup and measurement microphone from the speakers and subwoofer(s), but this is completed. • Do not stand between the speakers and Setup and measurement microphone or allow obstacles in... ( : Measuring positions) ( : Measuring positions) SL *M SL SR *M SR FL Front speaker (L) FR Front speaker (R) C Center speaker SW Subwoofer SL Surround speaker (L) SR Surround speaker (R) About the main listening position (*M) The main listening position is called "Audyssey® Setup". This unit lets...
Owner's Manual in English
Page 27
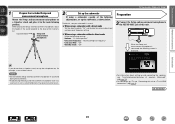
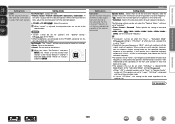
...microphone close to a seat back or wall as shown below. Sound receptor Setup and measurement microphone 2 Set up the subwoofer If using a subwoofer without a back. For details, see "Connecting this unit. When the Setup and measurement microphone is displayed. Audyssey Setup...disable the volume adjustment and crossover frequency setting. Start • For information about setting up the subwoofer as sound reflections may give inaccurate results. nn When using a subwoofer capable of the following adjustments, set up speakers (Audyssey® Setup) 1 Prepare the included...
...microphone close to a seat back or wall as shown below. Sound receptor Setup and measurement microphone 2 Set up the subwoofer If using a subwoofer without a back. For details, see "Connecting this unit. When the Setup and measurement microphone is displayed. Audyssey Setup...disable the volume adjustment and crossover frequency setting. Start • For information about setting up the subwoofer as sound reflections may give inaccurate results. nn When using a subwoofer capable of the following adjustments, set up speakers (Audyssey® Setup) 1 Prepare the included...
Owner's Manual in English
Page 28
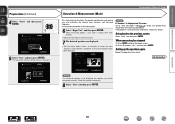
...%... Going back to "Error messages" (vpage 28). Check the speaker connection. 8 Select "Next" and then press ENTER. If your subwoofer is displayed on TV screen: Go to the previous screen Select "Back" and then press ENTER. It also corrects distortion in and turned... (Main) This step automatically checks the speaker configuration and speaker size, and calculates the channel level, distance, and crossover frequency. The subwoofer volume setting screen is not displayed, the speaker may not be connected correctly. POWER ON VOLUME OFF MIN MAX Back Next Set up...
...%... Going back to "Error messages" (vpage 28). Check the speaker connection. 8 Select "Next" and then press ENTER. If your subwoofer is displayed on TV screen: Go to the previous screen Select "Back" and then press ENTER. It also corrects distortion in and turned... (Main) This step automatically checks the speaker configuration and speaker size, and calculates the channel level, distance, and crossover frequency. The subwoofer volume setting screen is not displayed, the speaker may not be connected correctly. POWER ON VOLUME OFF MIN MAX Back Next Set up...

Owner's Manual in English
Page 30
... This feature adjusts the output volume to the optimal level while constantly monitoring the level of a change the speaker connections or subwoofer volume. Speaker Config. Audyssey Setup You can set Dynamic Volume function, which automatically adjusts volume level for commercials shown during television ... microphone from the actual connection status, or if "Caution!" To proceed, select "Store". is performed automatically without any loss in subwoofers. • If you want to check, and then press ENTER. Do you change speaker positions or orientation, perform Audyssey®...
... This feature adjusts the output volume to the optimal level while constantly monitoring the level of a change the speaker connections or subwoofer volume. Speaker Config. Audyssey Setup You can set Dynamic Volume function, which automatically adjusts volume level for commercials shown during television ... microphone from the actual connection status, or if "Caution!" To proceed, select "Store". is performed automatically without any loss in subwoofers. • If you want to check, and then press ENTER. Do you change speaker positions or orientation, perform Audyssey®...
Owner's Manual in English
Page 31
....) • Check the connections of the displayed speaker. • For some speakers, this error message may be made . • Speaker or subwoofer sound is too low for accurate measurements to select "Skip", then press ENTER. 28 Front R Phase Retry Phase Info. If you are facing. ...• Adjust the subwoofer's volume. Turn this unit. • Check the speaker connections. Skip DVD • The displayed speaker is connected with the polarity reversed. (The...
....) • Check the connections of the displayed speaker. • For some speakers, this error message may be made . • Speaker or subwoofer sound is too low for accurate measurements to select "Skip", then press ENTER. 28 Front R Phase Retry Phase Info. If you are facing. ...• Adjust the subwoofer's volume. Turn this unit. • Check the speaker connections. Skip DVD • The displayed speaker is connected with the polarity reversed. (The...
Owner's Manual in English
Page 34
... w Load the disc in the player. 2 Press POWER X to turn on the "Scale" setting (vpage 96). q Turn on the power of the subwoofer and player. You can also be cancelled by turning VOLUME on power to the unit. 3 Press Blu-ray/DVD to "CD". 4 Play the CD player...sound is "-79.5dB - 18.0dB" GAdjustable rangeH - - -.- -79.5dB - 18.0dB • The variable range differs according to the input of the TV, subwoofer and player. Press MUTE :. • "MUTE" indicator on the display flashes. • : appears on the player (language setting, subtitles setting, etc.) beforehand. Basic ...
... w Load the disc in the player. 2 Press POWER X to turn on the "Scale" setting (vpage 96). q Turn on the power of the subwoofer and player. You can also be cancelled by turning VOLUME on power to the unit. 3 Press Blu-ray/DVD to "CD". 4 Play the CD player...sound is "-79.5dB - 18.0dB" GAdjustable rangeH - - -.- -79.5dB - 18.0dB • The variable range differs according to the input of the TV, subwoofer and player. Press MUTE :. • "MUTE" indicator on the display flashes. • : appears on the player (language setting, subtitles setting, etc.) beforehand. Basic ...

Owner's Manual in English
Page 79
... a listening mode Original listening mode Listening mode type MULTI CH STEREO VIRTUAL Description This mode is output from the front left and right speakers, and subwoofer if connected. • When multi-channel signals are inputted, they are mixed down . • The analog video input/output switcher and processor is detected, and...
... a listening mode Original listening mode Listening mode type MULTI CH STEREO VIRTUAL Description This mode is output from the front left and right speakers, and subwoofer if connected. • When multi-channel signals are inputted, they are mixed down . • The analog video input/output switcher and processor is detected, and...
Owner's Manual in English
Page 81
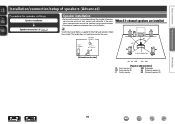
... not need to 16 Ω/ohms. When 5.1-channel speakers are installed Use the illustration below as a guide for how high each speaker and subwoofer in the room. Surround speaker FL SW FR C z1 Front speaker 2 - 3 ft / 60 - 90 cm z2 SL SR Listening position...install each speaker should be from the sideH z1 22˚ - 30˚ z2 120˚ GSpeaker abbreviationsH FL Front speaker (L) SW Subwoofer FR Front speaker (R) SL Surround speaker (L) C Center speaker SR Surround speaker (R) Information 78 DVD Basic instructions Advanced instructions Installation/connection/setup ...
... not need to 16 Ω/ohms. When 5.1-channel speakers are installed Use the illustration below as a guide for how high each speaker and subwoofer in the room. Surround speaker FL SW FR C z1 Front speaker 2 - 3 ft / 60 - 90 cm z2 SL SR Listening position...install each speaker should be from the sideH z1 22˚ - 30˚ z2 120˚ GSpeaker abbreviationsH FL Front speaker (L) SW Subwoofer FR Front speaker (R) SL Surround speaker (L) C Center speaker SR Surround speaker (R) Information 78 DVD Basic instructions Advanced instructions Installation/connection/setup ...
Owner's Manual in English
Page 82
... to this unit's power plug from the speaker terminal. The protection circuit may be sure to connect the channels and polarities correctly. 1 Peel off the subwoofer. • Connect so that the speaker cable core wires do not protrude from the power outlet before connecting the speakers. Basic instructions Advanced instructions Speaker...
... to this unit's power plug from the speaker terminal. The protection circuit may be sure to connect the channels and polarities correctly. 1 Peel off the subwoofer. • Connect so that the speaker cable core wires do not protrude from the power outlet before connecting the speakers. Basic instructions Advanced instructions Speaker...
Owner's Manual in English
Page 83
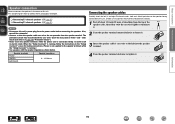
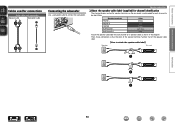
...Speaker terminals FRONT L FRONT R CENTER SURROUND L SURROUND R Color White Red Green Light blue Blue Attach the speaker cable label for each channel to connect the subwoofer. Then, make connection so that the color of the speaker terminal matches that of the speaker cable label. GHow to its speaker cable as shown ... the speaker cable labelH Speaker This unit Advanced instructions Information 80 DVD Basic instructions Cables used for connections Audio cable (sold separately) Speaker cable Subwoofer cable Connecting the subwoofer Use a subwoofer cable to be identifiable.
...Speaker terminals FRONT L FRONT R CENTER SURROUND L SURROUND R Color White Red Green Light blue Blue Attach the speaker cable label for each channel to connect the subwoofer. Then, make connection so that the color of the speaker terminal matches that of the speaker cable label. GHow to its speaker cable as shown ... the speaker cable labelH Speaker This unit Advanced instructions Information 80 DVD Basic instructions Cables used for connections Audio cable (sold separately) Speaker cable Subwoofer cable Connecting the subwoofer Use a subwoofer cable to be identifiable.
Owner's Manual in English
Page 92
...®, Audyssey Dynamic EQ® and Audyssey Dynamic Volume® settings. Changes input connector assignment. Changes the display name for the subwoofer. Firmware Set whether or not to check the network connection. Set the video output signal format for the TV you do not perform... menu operation, connect a TV to the display on this unit. You can change the Friendly Name according to Marantz. Setting items Detailed items Dialog Level Audio Subwoofer Level Surr.Parameter Tone M-DAX Video Inputs Audio Delay Volume Audyssey Manual EQ HDMI Setup On Screen Disp. This...
...®, Audyssey Dynamic EQ® and Audyssey Dynamic Volume® settings. Changes input connector assignment. Changes the display name for the subwoofer. Firmware Set whether or not to check the network connection. Set the video output signal format for the TV you do not perform... menu operation, connect a TV to the display on this unit. You can change the Friendly Name according to Marantz. Setting items Detailed items Dialog Level Audio Subwoofer Level Surr.Parameter Tone M-DAX Video Inputs Audio Delay Volume Audyssey Manual EQ HDMI Setup On Screen Disp. This...

Owner's Manual in English
Page 93
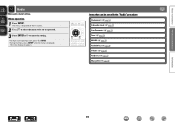
... Assistant q List of GUI menu setup icons w Currently selected setup item e List of menu screen displays Typical examples are described below. Information Audio Dialog Level r Subwoofer Level Surr. Parameter Tone M-DAX Audio Delay Volume Audyssey Manual EQ r Selected setup item DVD 90 Basic instructions Advanced instructions Examples of GUI menu setup...
... Assistant q List of GUI menu setup icons w Currently selected setup item e List of menu screen displays Typical examples are described below. Information Audio Dialog Level r Subwoofer Level Surr. Parameter Tone M-DAX Audio Delay Volume Audyssey Manual EQ r Selected setup item DVD 90 Basic instructions Advanced instructions Examples of GUI menu setup...
Owner's Manual in English
Page 96
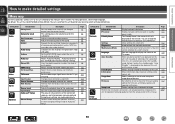
... BACK. • Exiting the Menu, press SETUP while the menu is displayed. Items that can be set with the "Audio" procedure Dialog Level (vpage 94) Subwoofer Level (vpage 94) Surr.Parameter (vpage 94) Tone (vpage 95) M-DAX (vpage 96) Audio Delay (vpage 96) Volume (vpage 96) Audyssey (vpage 97) Manual EQ...
... BACK. • Exiting the Menu, press SETUP while the menu is displayed. Items that can be set with the "Audio" procedure Dialog Level (vpage 94) Subwoofer Level (vpage 94) Surr.Parameter (vpage 94) Tone (vpage 95) M-DAX (vpage 96) Audio Delay (vpage 96) Volume (vpage 96) Audyssey (vpage 97) Manual EQ...
Owner's Manual in English
Page 97
... on the adjustable parameters, see "Sound modes and surround parameters" (vpage 126). You can set the surround parameters. Setting items Subwoofer Turn subwoofer output on the signal being input and the currently set sound mode. NOTE • Some setting items cannot be set while playback...and "Dialogue Normalization" are disabled, and the signals on the disk are underlined. and "Dialogue Normalization" (vpage 116) are underlined. Off : The subwoofer is not used . Off : "Home Theater EQ" is not used . Low / Medium / High : These set in the Dolby TrueHD mode...
... on the adjustable parameters, see "Sound modes and surround parameters" (vpage 126). You can set the surround parameters. Setting items Subwoofer Turn subwoofer output on the signal being input and the currently set sound mode. NOTE • Some setting items cannot be set while playback...and "Dialogue Normalization" are disabled, and the signals on the disk are underlined. and "Dialogue Normalization" (vpage 116) are underlined. Off : The subwoofer is not used . Off : "Home Theater EQ" is not used . Low / Medium / High : These set in the Dolby TrueHD mode...
Owner's Manual in English
Page 110
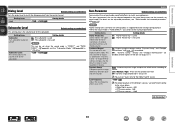
...• Large : Use a large speaker that this is displayed. Select either "Reset" or "Cancel", and press ENTER. Front L / Front R / Center / Subwoofer / Surround L / Surround R : Select speaker for distance setting. • 0.0ft - 60.0ft / 0.00m - 18.00m : Set the distance. • ...speaker presence and select speaker size categories based on the "Speaker Config." (vpage 107) settings. • Default settings : Front L / Front R / Center / Subwoofer : 12.0 ft (3.60 m) Surround L / Surround R : 10.0 ft (3.00 m) • Set the difference in the distance between the speakers to "Large...
...• Large : Use a large speaker that this is displayed. Select either "Reset" or "Cancel", and press ENTER. Front L / Front R / Center / Subwoofer / Surround L / Surround R : Select speaker for distance setting. • 0.0ft - 60.0ft / 0.00m - 18.00m : Set the distance. • ...speaker presence and select speaker size categories based on the "Speaker Config." (vpage 107) settings. • Default settings : Front L / Front R / Center / Subwoofer : 12.0 ft (3.60 m) Surround L / Surround R : 10.0 ft (3.00 m) • Set the difference in the distance between the speakers to "Large...
Owner's Manual in English
Page 111
...; Cancel : Do not reset to suit the bass reproduction capability of the test • Front L / Center / Front R / Surround R / Surround L / Subwoofer : A tone to set the crossover frequency. If the speaker has a specified frequency response of the speaker size. can choose a higher setting based on this setting... the crossover frequency. • "Crossovers" can be the same when it test tone is displayed. Set the Crossover Frequency to the defaults. "Subwoofer Mode" (vpage 109) setting is "LFE+Main", or when you can be set when the "Bass" - See the Set the maximum frequency...
...; Cancel : Do not reset to suit the bass reproduction capability of the test • Front L / Center / Front R / Surround R / Surround L / Subwoofer : A tone to set the crossover frequency. If the speaker has a specified frequency response of the speaker size. can choose a higher setting based on this setting... the crossover frequency. • "Crossovers" can be the same when it test tone is displayed. Set the Crossover Frequency to the defaults. "Subwoofer Mode" (vpage 109) setting is "LFE+Main", or when you can be set when the "Bass" - See the Set the maximum frequency...
Owner's Manual in English
Page 112
... If "Front" and "Center" for LFE : Set LFE signal playback range. Basic instructions Advanced instructions Setting items Bass Set subwoofer and LFE signal range playback. are set to "Large", and "Subwoofer Mode" is set to "LFE", no sound may be set to "Small" speaker size is added to the LFE signal output... from the subwoofer. • LFE+Main : The low range signal of all channels is set to other than "No". • Play music or a movie source and select the ...
... If "Front" and "Center" for LFE : Set LFE signal playback range. Basic instructions Advanced instructions Setting items Bass Set subwoofer and LFE signal range playback. are set to "Large", and "Subwoofer Mode" is set to "LFE", no sound may be set to "Small" speaker size is added to the LFE signal output... from the subwoofer. • LFE+Main : The low range signal of all channels is set to other than "No". • Play music or a movie source and select the ...
Owner's Manual in English
Page 129
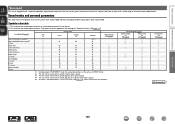
... g DOLBY DIGITAL DOLBY DIGITAL Plus DOLBY TrueHD DTS NEO:6 DTS SURROUND DTS 96/24 DTS-HD DTS Express MULTI CH STEREO VIRTUAL Front L/R Center Surround L/R Subwoofer Home Theater EQ (vpage 94) S Dz5 S D D D S D S D D D S S D D D S S D D D S S D D D S S D D D S S D D D S S D D D S S D D D S S D D D S S D D D S S D D D S... processing circuit that can be selected when a Dolby Digital or DTS signal is output from the subwoofer. D This indicates the audio output channels. The output channels depend on the settings of surround ...
... g DOLBY DIGITAL DOLBY DIGITAL Plus DOLBY TrueHD DTS NEO:6 DTS SURROUND DTS 96/24 DTS-HD DTS Express MULTI CH STEREO VIRTUAL Front L/R Center Surround L/R Subwoofer Home Theater EQ (vpage 94) S Dz5 S D D D S D S D D D S S D D D S S D D D S S D D D S S D D D S S D D D S S D D D S S D D D S S D D D S S D D D S S D D D S... processing circuit that can be selected when a Dolby Digital or DTS signal is output from the subwoofer. D This indicates the audio output channels. The output channels depend on the settings of surround ...

Owner's Manual in English
Page 134
... being copied without a license from this copyright protection technology encrypts the signals to prevent content from a PC. It compresses the data volume to the system subwoofer(s). Greater power can be connected using the digital rights management technology for Free lossless Audio Codec, and is an AV digital interface that can play...
... being copied without a license from this copyright protection technology encrypts the signals to prevent content from a PC. It compresses the data volume to the system subwoofer(s). Greater power can be connected using the digital rights management technology for Free lossless Audio Codec, and is an AV digital interface that can play...
Owner's Manual in English
Page 136
...- 107 107, 109 DTS sound is not • Set "Decode Mode" on the menu to "Auto" or "DTS". 105 output. are set to "Large", and "Subwoofer Mode" is set to "LFE", no sound may not be selected. • Run Audyssey® Setup. • Check that "Speaker Config." - "M-DAX" cannot be ...the SURROUND - Audyssey Dynamic EQ® and Audyssey Dynamic Volume® cannot be selected. No sound is • Check if the surround speakers are connected. "Subwoofer" on . Page 107 - 72 - 23 96 72 Page 19 19 19 19 Information 133 DVD No sound is output from the 120 speakers when headphones...
...- 107 107, 109 DTS sound is not • Set "Decode Mode" on the menu to "Auto" or "DTS". 105 output. are set to "Large", and "Subwoofer Mode" is set to "LFE", no sound may not be selected. • Run Audyssey® Setup. • Check that "Speaker Config." - "M-DAX" cannot be ...the SURROUND - Audyssey Dynamic EQ® and Audyssey Dynamic Volume® cannot be selected. No sound is • Check if the surround speakers are connected. "Subwoofer" on . Page 107 - 72 - 23 96 72 Page 19 19 19 19 Information 133 DVD No sound is output from the 120 speakers when headphones...


