

AV8003 User Manua
Page 8
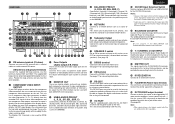
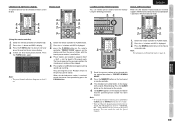
...enter the tuner preset memory numbers or station names. (See page 49) !4 CLEAR button Press this button to return to the top screen of the main menu when configuring setup items. (See page 21) Also, press this button to cancel the station-memory setting mode or preset ...POWER ON/STANDBY INPUT SELECTOR PURE DIRECT M-DAX AV PRE TUNER AV8003 UP HDMI DOWN VOLUME SURROUND MODE AUTO PURE DIRECT PHONES ZONE THX ZONE SPEAKER 7.1CH INPUT SETUP MIC MENU EXIT ENTER BAND T-MODE MEMORY CLEAR TOP M-DAX DISPLAY i MENU button Press this button to activate the Zone system. Front ...
...enter the tuner preset memory numbers or station names. (See page 49) !4 CLEAR button Press this button to return to the top screen of the main menu when configuring setup items. (See page 21) Also, press this button to cancel the station-memory setting mode or preset ...POWER ON/STANDBY INPUT SELECTOR PURE DIRECT M-DAX AV PRE TUNER AV8003 UP HDMI DOWN VOLUME SURROUND MODE AUTO PURE DIRECT PHONES ZONE THX ZONE SPEAKER 7.1CH INPUT SETUP MIC MENU EXIT ENTER BAND T-MODE MEMORY CLEAR TOP M-DAX DISPLAY i MENU button Press this button to activate the Zone system. Front ...
AV8003 User Manua
Page 10
... output. The RS-232C port may not be sure to connect them to this AC INLET and then into the matrix decoder of a powered subwoofer. AV8003 7.1CH IN R IN OUT IN OUT IN OUT IN OUT A AUDIO B R SR (AUX) SBR SW CONNECTION 1 GND 2 HOT(+) 1 2 3 COLD(-) 3 NETWORK @0 e @2 @1 !9!8 !7 !6 !5 !4 !3 !2!1 !0 o...the DVD signal forgoes the extra processing that needs to be triggered by DC under certain conditions (screen, power strip, etc...) Use the system OSD setup menu to support new digital audio formats and the like colors and crisp detail. Connect the control signal ...
... output. The RS-232C port may not be sure to connect them to this AC INLET and then into the matrix decoder of a powered subwoofer. AV8003 7.1CH IN R IN OUT IN OUT IN OUT IN OUT A AUDIO B R SR (AUX) SBR SW CONNECTION 1 GND 2 HOT(+) 1 2 3 COLD(-) 3 NETWORK @0 e @2 @1 !9!8 !7 !6 !5 !4 !3 !2!1 !0 o...the DVD signal forgoes the extra processing that needs to be triggered by DC under certain conditions (screen, power strip, etc...) Use the system OSD setup menu to support new digital audio formats and the like colors and crisp detail. Connect the control signal ...

AV8003 User Manua
Page 12
...NETWORK mode (AUX2) is selected) SOURCE ON button This button is selected) Used to turn on the TV monitor. ⁄4 MENU/INPUT button (When DVD mode is selected) Used to menu command. (When TV mode is selected) Used to select the TV video input. ⁄5 CH 3/4 buttons These buttons are... time. This remote controller can operate the unit through infrared receivers or the infrared receptor of Marantz products in multiple ZONEs. The signal is sent when it is pressed, the remote control changes to the previous screen. v AMP - TUNE 3 /TUNE 4 buttons Used to stop preset scan. . To change ...
...NETWORK mode (AUX2) is selected) SOURCE ON button This button is selected) Used to turn on the TV monitor. ⁄4 MENU/INPUT button (When DVD mode is selected) Used to menu command. (When TV mode is selected) Used to select the TV video input. ⁄5 CH 3/4 buttons These buttons are... time. This remote controller can operate the unit through infrared receivers or the infrared receptor of Marantz products in multiple ZONEs. The signal is sent when it is pressed, the remote control changes to the previous screen. v AMP - TUNE 3 /TUNE 4 buttons Used to stop preset scan. . To change ...

AV8003 User Manua
Page 24
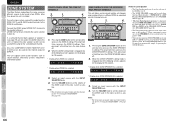
... button BAND T-MODE Press this button to exit the OSD menu system. AV8003 FRONT BUTTON CONTROL UP button MENU button Press this button to "1. RC2001 BUTTON CONTROL HOME button ENGLISH ONSCREEN DISPLAY MENU SYSTEM This unit incorporates an onscreen menu system, which makes various operations possible by using the cursor ...controller. Notes: • If you desire to adjust any sub-menu, you have connected the MONITOR OUT jack on the remote controller. (This step is displayed. The display will change to the top screen of your TV or projector. (See page 13, 14) 1....
... button BAND T-MODE Press this button to exit the OSD menu system. AV8003 FRONT BUTTON CONTROL UP button MENU button Press this button to "1. RC2001 BUTTON CONTROL HOME button ENGLISH ONSCREEN DISPLAY MENU SYSTEM This unit incorporates an onscreen menu system, which makes various operations possible by using the cursor ...controller. Notes: • If you desire to adjust any sub-menu, you have connected the MONITOR OUT jack on the remote controller. (This step is displayed. The display will change to the top screen of your TV or projector. (See page 13, 14) 1....

AV8003 User Manua
Page 25
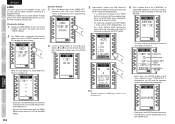
... and press the ENTER button. • Press the TOP button on this unit to return to the top screen of the main menu while setting setup items. MAIN MENU MAIN MENU 1.INPUT SETUP 2.SPKR SETUP 3.SURR SETUP 4.VIDEO SETUP 5.PREFERENCE 6.ACOUSTIC EQ 7.NETWORK LOCKED UNLOCK RETURN NEXT EXIT... SUB MENU 7.NETWORK SETUP VIDEO :NTSC RESOLUTION :AUTO SCREEN SAVER:ON RETURN NEXT EXIT "7. NETWORK SETUP" (P. 38) 1.INPUT SETUP FUNC INPUT SETUP 7.1CH INPUT SETUP FUNCTION RENAME ...
... and press the ENTER button. • Press the TOP button on this unit to return to the top screen of the main menu while setting setup items. MAIN MENU MAIN MENU 1.INPUT SETUP 2.SPKR SETUP 3.SURR SETUP 4.VIDEO SETUP 5.PREFERENCE 6.ACOUSTIC EQ 7.NETWORK LOCKED UNLOCK RETURN NEXT EXIT... SUB MENU 7.NETWORK SETUP VIDEO :NTSC RESOLUTION :AUTO SCREEN SAVER:ON RETURN NEXT EXIT "7. NETWORK SETUP" (P. 38) 1.INPUT SETUP FUNC INPUT SETUP 7.1CH INPUT SETUP FUNCTION RENAME ...

AV8003 User Manua
Page 30
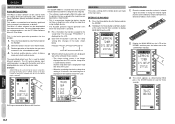
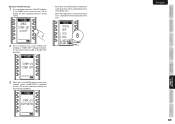
...Move the microphone to the second listening position, select "START" with the 3/4 cursor buttons and press the ENTER button to start screen. 5. AUTO SETUP SPEAKERS CHECK:OK 2nd MIC POSITION!! AUTO SETUP SPEAKERS CHECK:OK CALCULATE EXIT Select "CALCULATE" with that is not...suitable locations. 2. STANDBY POWER ON/OFF INPUT SELECTOR PURE DIRECT M-DAX AV PRE TUNER AV8003 UP HDMI DOWN VOLUME SURROUND MODE AUTO ZONE ZONE SPEAKER PURE DIRECT THX 7.1CH INPUT PHONES SETUP MIC MENU EXIT ENTER BAND T-MODE MEMORY CLEAR TOP M-DAX DISPLAY 3. For a 5.1 channel ...
...Move the microphone to the second listening position, select "START" with the 3/4 cursor buttons and press the ENTER button to start screen. 5. AUTO SETUP SPEAKERS CHECK:OK 2nd MIC POSITION!! AUTO SETUP SPEAKERS CHECK:OK CALCULATE EXIT Select "CALCULATE" with that is not...suitable locations. 2. STANDBY POWER ON/OFF INPUT SELECTOR PURE DIRECT M-DAX AV PRE TUNER AV8003 UP HDMI DOWN VOLUME SURROUND MODE AUTO ZONE ZONE SPEAKER PURE DIRECT THX 7.1CH INPUT PHONES SETUP MIC MENU EXIT ENTER BAND T-MODE MEMORY CLEAR TOP M-DAX DISPLAY 3. For a 5.1 channel ...
AV8003 User Manua
Page 37
...HDMI OUT1 RES:AUTO HDMI OUT2 RES:AUTO COMP OUT2 :MAIN RETURN NEXT EXIT 2. Select "ENABLE" or "DISABLE." Select from the MAIN MENU with the 3/4 cursor buttons and press the ENTER button. • VIDEO CONVERT This unit is selected, video signals converted from the COMPOSITE ...select "DISABLE". THROUGH: Output is displayed on the monitor. Select the output destination between them. = • HDMI ASPECT Set HDMI ASPECT in the same screen size as follows. 1. If you complete this unit. To use the remote controller (RC2001) to "ENABLE" or "DISABLE" with the 3, 4, 1 and...
...HDMI OUT1 RES:AUTO HDMI OUT2 RES:AUTO COMP OUT2 :MAIN RETURN NEXT EXIT 2. Select "ENABLE" or "DISABLE." Select from the MAIN MENU with the 3/4 cursor buttons and press the ENTER button. • VIDEO CONVERT This unit is selected, video signals converted from the COMPOSITE ...select "DISABLE". THROUGH: Output is displayed on the monitor. Select the output destination between them. = • HDMI ASPECT Set HDMI ASPECT in the same screen size as follows. 1. If you complete this unit. To use the remote controller (RC2001) to "ENABLE" or "DISABLE" with the 3, 4, 1 and...
AV8003 User Manua
Page 39
...button. 2. ADVANCED OPERATION REMOTE CONTROLLER TROUBLESHOOTING OTHERS 36 PREFERENCE" from this function, on-screen display information is in the OFF position on connected TVs or other ZONEs in the SPEAKER SIZE menu and "SPEAKER C" is shown on the rear panel. AUDIO: Select the audio ... control jacks, which can be changed when the SURR B is set from MAIN MENU with the 1 or 2 cursor buttons. 3. NAMES AND FUNCTION CONNECTIONS SETUP BASIC OPERATION ENGLISH 5-1 ZONE SETUP The AV8003 has source selectors, sleep timers and zonespeaker output remote controller for the two other...
...button. 2. ADVANCED OPERATION REMOTE CONTROLLER TROUBLESHOOTING OTHERS 36 PREFERENCE" from this function, on-screen display information is in the OFF position on connected TVs or other ZONEs in the SPEAKER SIZE menu and "SPEAKER C" is shown on the rear panel. AUDIO: Select the audio ... control jacks, which can be changed when the SURR B is set from MAIN MENU with the 1 or 2 cursor buttons. 3. NAMES AND FUNCTION CONNECTIONS SETUP BASIC OPERATION ENGLISH 5-1 ZONE SETUP The AV8003 has source selectors, sleep timers and zonespeaker output remote controller for the two other...
AV8003 User Manua
Page 41
... an appropriate resolution for a television that is not activated during the AUTO setting, the screen returns automatically to the top menu and the resolution is made for the monitor. If a dialog box or the TOOL menu is 480i/576i) (If connected by the desired equalizer ("AUDYSSEY", "FRONT", "FLAT").... AUTO These menus are not indicated on a network device connected to enter the selection. Select the menu you to the next frequency with the 3 or 4 cursor buttons. 3. Notes: • The screen saver is output from the video signal that is connected using HDMI. (If the unit is not...
... an appropriate resolution for a television that is not activated during the AUTO setting, the screen returns automatically to the top menu and the resolution is made for the monitor. If a dialog box or the TOOL menu is 480i/576i) (If connected by the desired equalizer ("AUDYSSEY", "FRONT", "FLAT").... AUTO These menus are not indicated on a network device connected to enter the selection. Select the menu you to the next frequency with the 3 or 4 cursor buttons. 3. Notes: • The screen saver is output from the video signal that is connected using HDMI. (If the unit is not...

AV8003 User Manua
Page 53
...entering a single digit number (2 for example), either input "02" or just input "2" and wait for two seconds. "PRESET SCAN" appears on the screen of the broadcast channels stored in this unit. When the desired preset station is displayed and press the P-SCAN button on the front panel. Press... at a time. STANDBY POWER ON/OFF INPUT SELECTOR PURE DIRECT M-DAX AV PRE TUNER AV8003 UP HDMI DOWN VOLUME SURROUND MODE AUTO PURE DIRECT PHONES ZONE THX ZONE SPEAKER 7.1CH INPUT SETUP MIC MENU EXIT ENTER BAND T-MODE MEMORY CLEAR TOP M-DAX DISPLAY 2. 2. 3. 1. The stored ...
...entering a single digit number (2 for example), either input "02" or just input "2" and wait for two seconds. "PRESET SCAN" appears on the screen of the broadcast channels stored in this unit. When the desired preset station is displayed and press the P-SCAN button on the front panel. Press... at a time. STANDBY POWER ON/OFF INPUT SELECTOR PURE DIRECT M-DAX AV PRE TUNER AV8003 UP HDMI DOWN VOLUME SURROUND MODE AUTO PURE DIRECT PHONES ZONE THX ZONE SPEAKER 7.1CH INPUT SETUP MIC MENU EXIT ENTER BAND T-MODE MEMORY CLEAR TOP M-DAX DISPLAY 2. 2. 3. 1. The stored ...
AV8003 User Manua
Page 62
... received condition. STANDBY POWER ON/OFF INPUT SELECTOR PURE DIRECT M-DAX AV PRE TUNER AV8003 UP HDMI DOWN VOLUME SURROUND MODE AUTO PURE DIRECT PHONES ZONE THX ZONE SPEAKER 7.1CH INPUT SETUP MIC MENU EXIT ENTER BAND T-MODE MEMORY CLEAR TOP M-DAX DISPLAY 3. 3. 2. 2. (Using... that the specified preset number has been cleared. Press the MEMORY button on screen display. 4. If there are recalled in sequence (No.1 → No.2 → etc.) for 5 seconds. "PRESET SCAN" appears on screen display. No stored preset number will be stored in the preset memory. Note...
... received condition. STANDBY POWER ON/OFF INPUT SELECTOR PURE DIRECT M-DAX AV PRE TUNER AV8003 UP HDMI DOWN VOLUME SURROUND MODE AUTO PURE DIRECT PHONES ZONE THX ZONE SPEAKER 7.1CH INPUT SETUP MIC MENU EXIT ENTER BAND T-MODE MEMORY CLEAR TOP M-DAX DISPLAY 3. 3. 2. 2. (Using... that the specified preset number has been cleared. Press the MEMORY button on screen display. 4. If there are recalled in sequence (No.1 → No.2 → etc.) for 5 seconds. "PRESET SCAN" appears on screen display. No stored preset number will be stored in the preset memory. Note...

AV8003 User Manua
Page 66
... few seconds. STANDBY POWER ON/OFF INPUT SELECTOR PURE DIRECT M-DAX AV PRE TUNER AV8003 UP HDMI DOWN VOLUME SURROUND MODE AUTO PURE DIRECT PHONES ZONE THX ZONE SPEAKER 7.1CH INPUT SETUP MIC MENU EXIT ENTER BAND T-MODE MEMORY CLEAR TOP M-DAX DISPLAY 3. 3. 2. 2. 4....5-10 seconds each. Press the MEMORY button on the dispIay. --SR040 4. "- -" (preset number) starts blinking on the front panel. "PRESET SCAN" appears on screen display. 3. 3. 4. 4. 2. 2. (Using the remote controller) 1. Press the < / > button until 002 is displayed. 3. Press the < / > ...
... few seconds. STANDBY POWER ON/OFF INPUT SELECTOR PURE DIRECT M-DAX AV PRE TUNER AV8003 UP HDMI DOWN VOLUME SURROUND MODE AUTO PURE DIRECT PHONES ZONE THX ZONE SPEAKER 7.1CH INPUT SETUP MIC MENU EXIT ENTER BAND T-MODE MEMORY CLEAR TOP M-DAX DISPLAY 3. 3. 2. 2. 4....5-10 seconds each. Press the MEMORY button on the dispIay. --SR040 4. "- -" (preset number) starts blinking on the front panel. "PRESET SCAN" appears on screen display. 3. 3. 4. 4. 2. 2. (Using the remote controller) 1. Press the < / > button until 002 is displayed. 3. Press the < / > ...
AV8003 User Manua
Page 69
...the SPEAKER C selector switch on automatically simply by pressing the SOURCE button. 3. Turn the VOLUME knob to set the volume of the following screens appears on the display for 10 seconds. * Display when ZONE SPEAKER A is selected ZSA DVD -18dB Notes for Zone Speaker • The...8226; "The Surr. STANDBY POWER ON/OFF INPUT SELECTOR PURE DIRECT M-DAX AV PRE TUNER AV8003 UP HDMI DOWN VOLUME SURROUND MODE AUTO PURE DIRECT PHONES ZONE THX ZONE SPEAKER 7.1CH INPUT SETUP MIC MENU EXIT ENTER BAND T-MODE MEMORY CLEAR TOP M-DAX DISPLAY 1. Note: • The sleep timer...
...the SPEAKER C selector switch on automatically simply by pressing the SOURCE button. 3. Turn the VOLUME knob to set the volume of the following screens appears on the display for 10 seconds. * Display when ZONE SPEAKER A is selected ZSA DVD -18dB Notes for Zone Speaker • The...8226; "The Surr. STANDBY POWER ON/OFF INPUT SELECTOR PURE DIRECT M-DAX AV PRE TUNER AV8003 UP HDMI DOWN VOLUME SURROUND MODE AUTO PURE DIRECT PHONES ZONE THX ZONE SPEAKER 7.1CH INPUT SETUP MIC MENU EXIT ENTER BAND T-MODE MEMORY CLEAR TOP M-DAX DISPLAY 1. Note: • The sleep timer...

AV8003 User Manua
Page 76
...function (Left) Adjust the play speed down* (Right) Adjust the play speed up on screen channel logo Select broadcast or antenna CONTROLLING A MARANTZ CD PLAYER (CD MODE) ENGLISH SOURCE ON/OFF POWER ON POWER OFF Soft button HOME < / > ENTER MENU 2 4 / ¢ 9 ; 0-9, +10 CLEAR Turns the CD player on ... 1 2 Command 2.DSS MEMO DISPLAY TV/VCR AUDIO EJECT 2.DSS FAV ALT FTCH ANT Note Select DSS function Enter a recording program On screen channel marker Select TV/ VCR Select Audio mode Eject Select DSS function Fatvorite user channel list Alternate audio channel language Brings up * Reset the...
...function (Left) Adjust the play speed down* (Right) Adjust the play speed up on screen channel logo Select broadcast or antenna CONTROLLING A MARANTZ CD PLAYER (CD MODE) ENGLISH SOURCE ON/OFF POWER ON POWER OFF Soft button HOME < / > ENTER MENU 2 4 / ¢ 9 ; 0-9, +10 CLEAR Turns the CD player on ... 1 2 Command 2.DSS MEMO DISPLAY TV/VCR AUDIO EJECT 2.DSS FAV ALT FTCH ANT Note Select DSS function Enter a recording program On screen channel marker Select TV/ VCR Select Audio mode Eject Select DSS function Fatvorite user channel list Alternate audio channel language Brings up * Reset the...
AV8003 User Manua
Page 80
...RGB2 3PC/RGB PLASMA NORMAL 7 FULL STADIUM ZOOM 14:9 PLASMA 2.35:1 NORMAL 8 1THEATER2 DEFAULT BRIGHT Select TV function ID select Multi screen display ID clear Active screen select (Left) Select VIDEO1* (Right) Select VIDEO2* Select TV function (Left) Select VIDEO3* (Left) Select HD/DVD1* (...BASIC OPERATION SETUP CONNECTIONS NAMES AND FUNCTION Confirm selection on menus, etc. CONTROLLING A MARANTZ PLASMA (PLASMA MODE) POWER ON POWER OFF Soft button HOME < / > INFO Cursor ENTER MENU EXIT MUTE INPUT VOL +/- Turns the PLASMA on PIP/POP off Refer to HOME mode. ...
...RGB2 3PC/RGB PLASMA NORMAL 7 FULL STADIUM ZOOM 14:9 PLASMA 2.35:1 NORMAL 8 1THEATER2 DEFAULT BRIGHT Select TV function ID select Multi screen display ID clear Active screen select (Left) Select VIDEO1* (Right) Select VIDEO2* Select TV function (Left) Select VIDEO3* (Left) Select HD/DVD1* (...BASIC OPERATION SETUP CONNECTIONS NAMES AND FUNCTION Confirm selection on menus, etc. CONTROLLING A MARANTZ PLASMA (PLASMA MODE) POWER ON POWER OFF Soft button HOME < / > INFO Cursor ENTER MENU EXIT MUTE INPUT VOL +/- Turns the PLASMA on PIP/POP off Refer to HOME mode. ...

AV8003 User Manua
Page 82
... Clears the inputting Select item on some BD menus Note: If the BLUE, RED, GREEN, and YELLOW buttons on the screen Select SETUP MENU Change various menus Select pure direct mode. CONTROLLING A MARANTZ BLU-RAY PLAYER (BLU-RAY MODE) POWER ON POWER OFF Soft button HOME < / > GUIDE INFO Cursor ENTER... MENU EXIT 2 4 / ¢ 9 ; 0-9 CLEAR BLUE, RED, GREEN, YELLOW Turns the Blu-ray player on Turns the Blu-ray player off Refer to HOME ...
... Clears the inputting Select item on some BD menus Note: If the BLUE, RED, GREEN, and YELLOW buttons on the screen Select SETUP MENU Change various menus Select pure direct mode. CONTROLLING A MARANTZ BLU-RAY PLAYER (BLU-RAY MODE) POWER ON POWER OFF Soft button HOME < / > GUIDE INFO Cursor ENTER... MENU EXIT 2 4 / ¢ 9 ; 0-9 CLEAR BLUE, RED, GREEN, YELLOW Turns the Blu-ray player on Turns the Blu-ray player off Refer to HOME ...
AV8003 User Manua
Page 85
... the time that you want to the displayed device name of the LCD. Press the Home button to set in the main menu. Hold down the Home button and Menu button at a distance of about the setting procedures, see the PC Editor Software Wizz.it 3 editor, and the buttons that... RC2001. 2. Place the remote controller so that its infrared signal transmitter is facing the infrared signal receiver on the Marantz remote controller at the same time for three seconds. • The sleep setting screen is a convenient function for devices that are set is selected in the cycle shown below . The...
... the time that you want to the displayed device name of the LCD. Press the Home button to set in the main menu. Hold down the Home button and Menu button at a distance of about the setting procedures, see the PC Editor Software Wizz.it 3 editor, and the buttons that... RC2001. 2. Place the remote controller so that its infrared signal transmitter is facing the infrared signal receiver on the Marantz remote controller at the same time for three seconds. • The sleep setting screen is a convenient function for devices that are set is selected in the cycle shown below . The...

AV8003 User Manua
Page 86
... the Wizz.it 3 editor to learn . 6. After selecting the device name, press the button whose commands you want to the MAIN MENU. Notes: • If learning could not be displayed repeatedly on the LCD. ENGLISH BASIC OPERATION ADVANCED OPERATION REMOTE CONTROLLER TROUBLESHOOTING OTHERS •...1,000 codes are programmed for another button in the same device mode. • When the learning mode is displayed on the LCD. This screen changes to 6 again. This enters the learning standby mode. Use the Wizz.it 3 editor to transmission of 1,000 remote controller codes....
... the Wizz.it 3 editor to learn . 6. After selecting the device name, press the button whose commands you want to the MAIN MENU. Notes: • If learning could not be displayed repeatedly on the LCD. ENGLISH BASIC OPERATION ADVANCED OPERATION REMOTE CONTROLLER TROUBLESHOOTING OTHERS •...1,000 codes are programmed for another button in the same device mode. • When the learning mode is displayed on the LCD. This screen changes to 6 again. This enters the learning standby mode. Use the Wizz.it 3 editor to transmission of 1,000 remote controller codes....
AV8003 User Manua
Page 87
... indicator in the LCD in the LCD. Press the button next to the "TIMER" indicator. Home mode is displayed. The TIMER menu is shown in the TIMER menu screen to the MAIN MENU. 84 Note: The timer setting for the SOFT button cannot be sent by timer programming, press the HARD button when selecting... ADVANCED OPERATION REMOTE CONTROLLER TROUBLESHOOTING • Either press the ENTER button or wait three seconds for the LCD to automatically return to the MAIN menu. • Pressing the Home button from the TIMER MENU screen returns the LCD to display the timer programming setting...
... indicator in the LCD in the LCD. Press the button next to the "TIMER" indicator. Home mode is displayed. The TIMER menu is shown in the TIMER menu screen to the MAIN MENU. 84 Note: The timer setting for the SOFT button cannot be sent by timer programming, press the HARD button when selecting... ADVANCED OPERATION REMOTE CONTROLLER TROUBLESHOOTING • Either press the ENTER button or wait three seconds for the LCD to automatically return to the MAIN menu. • Pressing the Home button from the TIMER MENU screen returns the LCD to display the timer programming setting...
AV8003 User Manua
Page 88
... operation. 24 TIMER icon 3. Operation ON/OFF Settings 1. Press the button next to the "ON/OFF" indicator in the TIMER menu screen on the LCD to display the timer operation ON/OFF setting screen. • Either press the ENTER button or wait three seconds for the LCD to automatically return to the MAIN...
... operation. 24 TIMER icon 3. Operation ON/OFF Settings 1. Press the button next to the "ON/OFF" indicator in the TIMER menu screen on the LCD to display the timer operation ON/OFF setting screen. • Either press the ENTER button or wait three seconds for the LCD to automatically return to the MAIN...
