
Owners Manual
Page 2
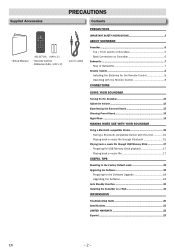
...-In cable PRECAUTIONS IMPORTANT SAFETY INSTRUCTIONS 3 ABOUT SOUNDBAR Soundbar 6 Top / Front panels of Soundbar 6 Back Connectors on Soundbar 6 Subwoofer 7 Rear of Subwoofer 7 Remote Control 8 Installing the Batteries for the Remote Control 8 Operating with the Remote Control 8 CONNECTIONS USING YOUR SOUNDBAR Turning On the Soundbar 11 Adjust the Volume 12 Experiencing the Surround Sound 13 Choosing Preset Sound 14 Night Mode 14 MAKING MORE USE WITH YOUR SOUNDBAR Using a Bluetooth compatible Device 15 Pairing a Bluetooth compatible Device with this Unit 15 Playing back a music...
...-In cable PRECAUTIONS IMPORTANT SAFETY INSTRUCTIONS 3 ABOUT SOUNDBAR Soundbar 6 Top / Front panels of Soundbar 6 Back Connectors on Soundbar 6 Subwoofer 7 Rear of Subwoofer 7 Remote Control 8 Installing the Batteries for the Remote Control 8 Operating with the Remote Control 8 CONNECTIONS USING YOUR SOUNDBAR Turning On the Soundbar 11 Adjust the Volume 12 Experiencing the Surround Sound 13 Choosing Preset Sound 14 Night Mode 14 MAKING MORE USE WITH YOUR SOUNDBAR Using a Bluetooth compatible Device 15 Pairing a Bluetooth compatible Device with this Unit 15 Playing back a music...
Owners Manual
Page 3
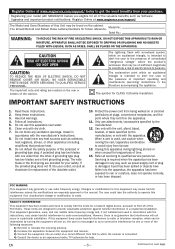
... unless the modifications are provided for help. EN - 3 - NO USER SERVICEABLE PARTS INSIDE. The lightning flash with the instructions, may generate or use attachments / accessories specified by the accordance with the manufacturer's instructions. point where they exit from tip-over. 9. Use only with dry cloth. 12. Do not install near water. Register Online at www.magnavox.com/support/ today to get the most...
... unless the modifications are provided for help. EN - 3 - NO USER SERVICEABLE PARTS INSIDE. The lightning flash with the instructions, may generate or use attachments / accessories specified by the accordance with the manufacturer's instructions. point where they exit from tip-over. 9. Use only with dry cloth. 12. Do not install near water. Register Online at www.magnavox.com/support/ today to get the most...
Owners Manual
Page 4
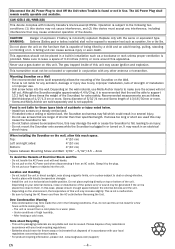
... (three times the weight of the Soundbar on the wall material, use Molly Anchor inserts to Unplug the AC Power cord from the AC outlet before Removing the Unit. Please dispose of any other antenna or transmitter. www.magnavox.com/support/ EN - 4 - Disconnect the AC Power Plug to shut Off the Unit when Trouble is found or not in a several injury. •...
... (three times the weight of the Soundbar on the wall material, use Molly Anchor inserts to Unplug the AC Power cord from the AC outlet before Removing the Unit. Please dispose of any other antenna or transmitter. www.magnavox.com/support/ EN - 4 - Disconnect the AC Power Plug to shut Off the Unit when Trouble is found or not in a several injury. •...
Owners Manual
Page 5
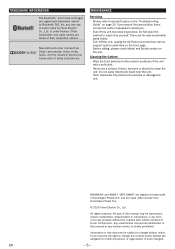
... cannot find any purpose without the obligation to repair it by yourself. TRADEMARK INFORMATION The Bluetooth® word mark and logos are those of their respective owners. and any person or organization of such changes. MAGNAVOX and SMART. EN - 5 - MAINTENANCE Servicing • Please refer to relevant topics on the "Troubleshooting Guide" on the unit. Such chemicals may be...
... cannot find any purpose without the obligation to repair it by yourself. TRADEMARK INFORMATION The Bluetooth® word mark and logos are those of their respective owners. and any person or organization of such changes. MAGNAVOX and SMART. EN - 5 - MAINTENANCE Servicing • Please refer to relevant topics on the "Troubleshooting Guide" on the unit. Such chemicals may be...

Owners Manual
Page 6
... Power cord 7 Description Install on the TV or a Digital device. Connect a Connection cable from Subwoofer Connect to an Analog Audio output on the TV or an Analog device. Blinks when Bluetooth pairing is activated and pairing failed. EN - 6 - Blinks when pausing of Soundbar INPUT LINE USB OPTICAL AUX PAIR INPUT source LINE INPUT USB INPUT OPTICAL INPUT AUX(iliary) INPUT PAIR(ing) INPUT (Bluetooth) LED color orange orange orange orange blue Description Lights up when you switch to Line-In source (3.5mm jack). Lights up...
... Power cord 7 Description Install on the TV or a Digital device. Connect a Connection cable from Subwoofer Connect to an Analog Audio output on the TV or an Analog device. Blinks when Bluetooth pairing is activated and pairing failed. EN - 6 - Blinks when pausing of Soundbar INPUT LINE USB OPTICAL AUX PAIR INPUT source LINE INPUT USB INPUT OPTICAL INPUT AUX(iliary) INPUT PAIR(ing) INPUT (Bluetooth) LED color orange orange orange orange blue Description Lights up when you switch to Line-In source (3.5mm jack). Lights up...
Owners Manual
Page 8
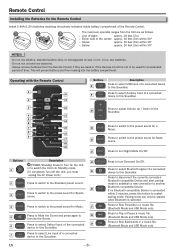
... Soundbar. Operating with the Remote Control 1 10 2 11 3 12 4 13 5 14 6 7 15 8 16 9 17 18 19 Buttons 8 9 Description Press to select USB Input of a connected device to restart pairing mode. Below: approx. 10 feet (3m) within 15° - Press to Skip Forwards in a music file. (Bluetooth Mode and USB Mode only) Press to Play or Pause a music file. (Bluetooth Mode and USB Mode only) Press to turn Surround On/Off. Remote Control Installing the Batteries...
... Soundbar. Operating with the Remote Control 1 10 2 11 3 12 4 13 5 14 6 7 15 8 16 9 17 18 19 Buttons 8 9 Description Press to select USB Input of a connected device to restart pairing mode. Below: approx. 10 feet (3m) within 15° - Press to Skip Forwards in a music file. (Bluetooth Mode and USB Mode only) Press to Play or Pause a music file. (Bluetooth Mode and USB Mode only) Press to turn Surround On/Off. Remote Control Installing the Batteries...

Owners Manual
Page 9
... Red and White Coaxial Analog Audio Inputs. Use a Coaxial (RCA) to TV Rear of Soundbar Rear of Soundbar e.g.) Blu-ray player AUX OPTICAL LINE Line-In cable supplied Audio cable (not supplied) AUDÍFONO e.g.) MP3 player Digital Audio Optical cable (not supplied) e.g.) Video game DIGITAL AUDIO OUT (OPTICAL) R AUDIO OUT L NOTE(S) • Make sure the Soundbar is Turned Off when Connecting Cables. • Check whether all Connection Cables are as follows: • Line-In cable × 1 1 Connect to a device Connect to Optical Toslink Digital Audio...
... Red and White Coaxial Analog Audio Inputs. Use a Coaxial (RCA) to TV Rear of Soundbar Rear of Soundbar e.g.) Blu-ray player AUX OPTICAL LINE Line-In cable supplied Audio cable (not supplied) AUDÍFONO e.g.) MP3 player Digital Audio Optical cable (not supplied) e.g.) Video game DIGITAL AUDIO OUT (OPTICAL) R AUDIO OUT L NOTE(S) • Make sure the Soundbar is Turned Off when Connecting Cables. • Check whether all Connection Cables are as follows: • Line-In cable × 1 1 Connect to a device Connect to Optical Toslink Digital Audio...
Owners Manual
Page 10
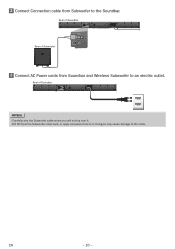
Doing so may cause damage to the Soundbar. 2 Connect Connection cable from Soundbar and Wireless Subwoofer to an electric outlet. EN - 10 - Rear of Soundbar Rear of Soundbar NOTE(S) • Carefully wire the Subwoofer cable where you will not trip over it. • DO NOT pull the Subwoofer cable hard, or apply excessive force to it. Rear of Subwoofer 3 Connect AC Power cords from Subwoofer to the cable.
Doing so may cause damage to the Soundbar. 2 Connect Connection cable from Soundbar and Wireless Subwoofer to an electric outlet. EN - 10 - Rear of Soundbar Rear of Soundbar NOTE(S) • Carefully wire the Subwoofer cable where you will not trip over it. • DO NOT pull the Subwoofer cable hard, or apply excessive force to it. Rear of Subwoofer 3 Connect AC Power cords from Subwoofer to the cable.
Owners Manual
Page 11
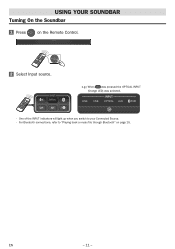
INPUT LINE USB OPTICAL AUX PAIR • One of the INPUT indicators will light up when you switch to your Connected Source. • For Bluetooth connections, refer to "Playing back a music file through Bluetooth" on the Remote Control. 2 Select Input source. EN - 11 - e.g.) When was pressed the OPTICAL INPUT (Orange LED) was selected. USING YOUR SOUNDBAR Turning On the Soundbar 1 Press on page 15.
INPUT LINE USB OPTICAL AUX PAIR • One of the INPUT indicators will light up when you switch to your Connected Source. • For Bluetooth connections, refer to "Playing back a music file through Bluetooth" on the Remote Control. 2 Select Input source. EN - 11 - e.g.) When was pressed the OPTICAL INPUT (Orange LED) was selected. USING YOUR SOUNDBAR Turning On the Soundbar 1 Press on page 15.
Owners Manual
Page 12
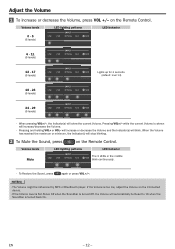
... the Remote Control. NOTE(S) • The Volume might be Reset to 18 when the Soundbar is turned Off, the Volume will blink. If the Volume is too low, adjust the Volume on the Connected device. • If the Volume level is Set Above 18 when the Soundbar is turned back On. Adjust the Volume 1 To increase or decrease the Volume, press VOL +/- Volume levels Mute LED lighting patterns LED behavior INPUT LINE USB OPTICAL AUX The...
... the Remote Control. NOTE(S) • The Volume might be Reset to 18 when the Soundbar is turned Off, the Volume will blink. If the Volume is too low, adjust the Volume on the Connected device. • If the Volume level is Set Above 18 when the Soundbar is turned back On. Adjust the Volume 1 To increase or decrease the Volume, press VOL +/- Volume levels Mute LED lighting patterns LED behavior INPUT LINE USB OPTICAL AUX The...
Owners Manual
Page 13
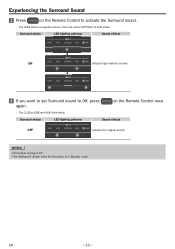
... manner, from the center (OPTICAL) to Off, press again. Experiencing the Surround Sound 1 Press on the Remote Control once • The 2 LEDs (USB and AUX) blink twice. on the Remote Control to activate the Surround sound. • The LEDs blink in Standby mode. Surround status LED lighting patterns INPUT LINE USB OPTICAL AUX PAIR Sound effects INPUT ON LINE USB OPTICAL AUX PAIR Outputs high realistic sounds. INPUT LINE USB OPTICAL AUX PAIR 2 If you want to set Surround sound to both sides. EN...
... manner, from the center (OPTICAL) to Off, press again. Experiencing the Surround Sound 1 Press on the Remote Control once • The 2 LEDs (USB and AUX) blink twice. on the Remote Control to activate the Surround sound. • The LEDs blink in Standby mode. Surround status LED lighting patterns INPUT LINE USB OPTICAL AUX PAIR Sound effects INPUT ON LINE USB OPTICAL AUX PAIR Outputs high realistic sounds. INPUT LINE USB OPTICAL AUX PAIR 2 If you want to set Surround sound to both sides. EN...
Owners Manual
Page 14
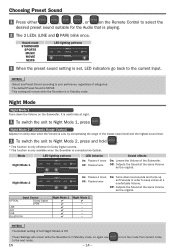
... Volume is Low, by compressing the range of categories. • The default Preset Sound is MOVIE. • This setting will remain while the Soundbar is in Standby mode, so again use to the current Input. EN - 14 - Input Source OPTICAL Dolby Digital PCM LINE AUX USB BLUETOOTH Night Mode 1 Night Mode 2 ✔ - It is playing. 2 The 2 LEDs (LINE and PAIR) blink once. Sound mode STARNDARD SPORTS MUSIC MOVIE NEWS LED lighting patterns INPUT LINE USB OPTICAL AUX PAIR 3 When the preset sound setting is connected...
... Volume is Low, by compressing the range of categories. • The default Preset Sound is MOVIE. • This setting will remain while the Soundbar is in Standby mode, so again use to the current Input. EN - 14 - Input Source OPTICAL Dolby Digital PCM LINE AUX USB BLUETOOTH Night Mode 1 Night Mode 2 ✔ - It is playing. 2 The 2 LEDs (LINE and PAIR) blink once. Sound mode STARNDARD SPORTS MUSIC MOVIE NEWS LED lighting patterns INPUT LINE USB OPTICAL AUX PAIR 3 When the preset sound setting is connected...
Owners Manual
Page 15
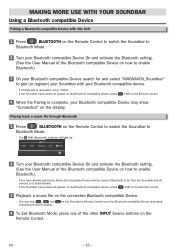
.... Playing back a music file through Bluetooth 1 Press BLUETOOTH on the connected Bluetooth compatible Device. • You may show "Connected" on the display. INPUT LINE USB OPTICAL AUX PAIR 2 Turn your Bluetooth compatible Device On and activate the Bluetooth setting. (See the User Manual of the Bluetooth compatible Device on how to enable Bluetooth.) • If you have already paired your Bluetooth compatible Device may use, , and connected to this Unit 1 Press BLUETOOTH on the Remote Control to switch the Soundbar to Bluetooth Mode...
.... Playing back a music file through Bluetooth 1 Press BLUETOOTH on the connected Bluetooth compatible Device. • You may show "Connected" on the display. INPUT LINE USB OPTICAL AUX PAIR 2 Turn your Bluetooth compatible Device On and activate the Bluetooth setting. (See the User Manual of the Bluetooth compatible Device on how to enable Bluetooth.) • If you have already paired your Bluetooth compatible Device may use, , and connected to this Unit 1 Press BLUETOOTH on the Remote Control to switch the Soundbar to Bluetooth Mode...
Owners Manual
Page 16
... to turn On the Soundbar. See your Bluetooth compatible device's User Manual for details. • The operational range between the device and Soundbar, such as wall, metallic casing that covers the device, or other devices nearby that operate in the same frequency. • If you want to disconnect the current connection. • Depending on your Soundbar with another audio input is selected or...
... to turn On the Soundbar. See your Bluetooth compatible device's User Manual for details. • The operational range between the device and Soundbar, such as wall, metallic casing that covers the device, or other devices nearby that operate in the same frequency. • If you want to disconnect the current connection. • Depending on your Soundbar with another audio input is selected or...

Owners Manual
Page 17
... formatted USB Memory Stick - INPUT LINE USB OPTICAL AUX PAIR 3 Press on the Remote Control. Make sure that the USB Memory Stick has been formatted (FAT(FAT16)/FAT32) or supported music files (".WAV") are stored on a USB Memory Stick on some USB Memory Sticks with a music file to the USB terminal on the rear of the Soundbar. 2 Press on the Remote Control to switch the Soundbar to USB Mode. • When the Soundbar connects...
... formatted USB Memory Stick - INPUT LINE USB OPTICAL AUX PAIR 3 Press on the Remote Control. Make sure that the USB Memory Stick has been formatted (FAT(FAT16)/FAT32) or supported music files (".WAV") are stored on a USB Memory Stick on some USB Memory Sticks with a music file to the USB terminal on the rear of the Soundbar. 2 Press on the Remote Control to switch the Soundbar to USB Mode. • When the Soundbar connects...
Owners Manual
Page 18
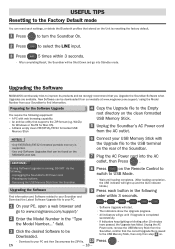
... browsing capability - USEFUL TIPS Resetting to the Factory Default mode You can reset each settings, or delete the Bluetooth profiles that stored on the Unit by resetting the factory default. 1 Press to turn the Soundbar On. 2 Press to select the LINE input. 3 Press 5 times within 3 seconds. 1 On your PC, open a web browser and • Software Upgrade will light up and the AUX indicator blinks.) 9 Press each button in the "Type the Model Number..."
... browsing capability - USEFUL TIPS Resetting to the Factory Default mode You can reset each settings, or delete the Bluetooth profiles that stored on the Unit by resetting the factory default. 1 Press to turn the Soundbar On. 2 Press to select the LINE input. 3 Press 5 times within 3 seconds. 1 On your PC, open a web browser and • Software Upgrade will light up and the AUX indicator blinks.) 9 Press each button in the "Type the Model Number..."
Owners Manual
Page 19
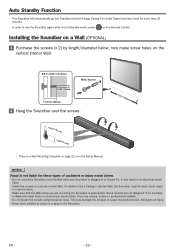
... could result in a severe injury. • Make sure that the Wall where you are not designed to be mounted to use the Soundbar again while it is plugged in an electrical shock injury. • Install the screws on the Remote Control. If you are mounting the Soundbar is appropriate. Installing the Soundbar on a Wall (OPTIONAL) 1 Purchase the screws (x 2) by...
... could result in a severe injury. • Make sure that the Wall where you are not designed to be mounted to use the Soundbar again while it is plugged in an electrical shock injury. • Install the screws on the Remote Control. If you are mounting the Soundbar is appropriate. Installing the Soundbar on a Wall (OPTIONAL) 1 Purchase the screws (x 2) by...

Owners Manual
Page 20
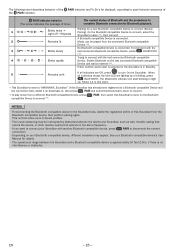
... Sounds to activate the Subwoofer, try again. Make sure Unit is Connected to an Audio Output on your Thumb is Not blocking the IR Signal from the connected Bluetooth compatible Device. - Press INPUT source buttons on your Connected device. - Press the VOL +/- or button(s) on the Remote Control to the following. For Digital Audio Optical connection, select another Audio signal on page 12 ) - Depending on your Device. - To reduce such sounds, lower the volume. Distorted sound - Adjust the Sound Settings...
... Sounds to activate the Subwoofer, try again. Make sure Unit is Connected to an Audio Output on your Thumb is Not blocking the IR Signal from the connected Bluetooth compatible Device. - Press INPUT source buttons on your Connected device. - Press the VOL +/- or button(s) on the Remote Control to the following. For Digital Audio Optical connection, select another Audio signal on page 12 ) - Depending on your Device. - To reduce such sounds, lower the volume. Distorted sound - Adjust the Sound Settings...

Owners Manual
Page 21
Specifications Power requirements Output power Dimensions (width x height x depth) Weight Bluetooth Optical Input USB 120V AC +/- 10%, 60Hz +/- 0.5% 50W (Front L/R speaker: 24W, Subwoofer: 26W) Soundbar: 39.3 x 3.1 x 3.1 inches (999 x 77 x 77 mm) Subwoofer: 7.0 x 9.7 x 9.6 inches (176 x 244 x 242 mm) Soundbar: 4.41 lbs. (2.00kg) Subwoofer: 5.52 lbs. (2.50kg) Bluetooth profile: A2DP, AVRCP Bluetooth version: 2.1+EDR Dolby Digital Linear PCM (LPCM) 96kHz/24bit Max WAV file (LPCM format) • Designs and Specifications are subject...
Specifications Power requirements Output power Dimensions (width x height x depth) Weight Bluetooth Optical Input USB 120V AC +/- 10%, 60Hz +/- 0.5% 50W (Front L/R speaker: 24W, Subwoofer: 26W) Soundbar: 39.3 x 3.1 x 3.1 inches (999 x 77 x 77 mm) Subwoofer: 7.0 x 9.7 x 9.6 inches (176 x 244 x 242 mm) Soundbar: 4.41 lbs. (2.00kg) Subwoofer: 5.52 lbs. (2.50kg) Bluetooth profile: A2DP, AVRCP Bluetooth version: 2.1+EDR Dolby Digital Linear PCM (LPCM) 96kHz/24bit Max WAV file (LPCM format) • Designs and Specifications are subject...

Owners Manual
Page 22
..., (b) to damage caused by service performed by anyone WHO IS COVERED: other rights which it . Contact the Customer Care Center at no signature verification receipt can only be provided. You may not apply to operate in shipment and no charge, using new or refurbished • Product repair and/or part replacement because of antenna/signal source systems outside Warranty Period...
..., (b) to damage caused by service performed by anyone WHO IS COVERED: other rights which it . Contact the Customer Care Center at no signature verification receipt can only be provided. You may not apply to operate in shipment and no charge, using new or refurbished • Product repair and/or part replacement because of antenna/signal source systems outside Warranty Period...


