
User manual, English (US)
Page 8
...Step 1: Inserting batteries into the Remote Control 16 Using the Remote Control to operate the Player 16 Step 2: Setting up the TV 16-18 Setting up Progressive Scan feature (for Progressive... Repeat play mode 21 Repeating a section within a chapter/track 21 Operations for video playback 22 Using the Disc Menu 22 Zooming in 22 Resuming playback from the last ...stopped point 22 OSD (On-Screen Display 22 Special DVD features 23 Playing a Title 23 Camera Angle 23 Changing the Audio Language 23 Subtitles...37 MDV460_US3 8 16/06/05, 9:45 AM MDV460/17_1
...Step 1: Inserting batteries into the Remote Control 16 Using the Remote Control to operate the Player 16 Step 2: Setting up the TV 16-18 Setting up Progressive Scan feature (for Progressive... Repeat play mode 21 Repeating a section within a chapter/track 21 Operations for video playback 22 Using the Disc Menu 22 Zooming in 22 Resuming playback from the last ...stopped point 22 OSD (On-Screen Display 22 Special DVD features 23 Playing a Title 23 Camera Angle 23 Changing the Audio Language 23 Subtitles...37 MDV460_US3 8 16/06/05, 9:45 AM MDV460/17_1

User manual, English (US)
Page 10
... the player, batteries or discs to humidity, rain, sand or excessive heat (caused by its edge, do not touch the surface. 10 01-37 MDV460_US3 10 16/06/05, 9:45 AM MDV460/17_1 Write only on a flat, hard, and stable surface. English Introduction Supplied accessories Video cable ... cm (4 inches) PHILIPS DVD Home Cinema System 10 cm (4 inches) G Care of free space all around the player for adequate ventilation. Care and safety information G Power consumption - To clean a CD, wipe it is still consuming power. A cleaning agent may cloud over when the player is switched to play a...
... the player, batteries or discs to humidity, rain, sand or excessive heat (caused by its edge, do not touch the surface. 10 01-37 MDV460_US3 10 16/06/05, 9:45 AM MDV460/17_1 Write only on a flat, hard, and stable surface. English Introduction Supplied accessories Video cable ... cm (4 inches) PHILIPS DVD Home Cinema System 10 cm (4 inches) G Care of free space all around the player for adequate ventilation. Care and safety information G Power consumption - To clean a CD, wipe it is still consuming power. A cleaning agent may cloud over when the player is switched to play a...

User manual, English (US)
Page 11
... hear the sound of this DVD Player through your TV system. - English Connecting TV COMPONENT VIDEO IN S-VIDEO IN V (Pr/Cr) AUDIO OUT VIDEO IN U (Pb/Cb) Y COMPONENT VIDEO IN S-VIDEO IN V (Pr/Cr) AUDIO IN VIDEO IN U (Pb/Cb) Y 1 2 Connections COMPONENT VIDEO IN S-VIDEO IN V (Pr/Cr) AUDIO OUT VIDEO IN U (Pb/Cb) Y 1 COMPONENT VIDEO IN S-VIDEO IN V (Pr/Cr) AUDIO IN...
... hear the sound of this DVD Player through your TV system. - English Connecting TV COMPONENT VIDEO IN S-VIDEO IN V (Pr/Cr) AUDIO OUT VIDEO IN U (Pb/Cb) Y COMPONENT VIDEO IN S-VIDEO IN V (Pr/Cr) AUDIO IN VIDEO IN U (Pb/Cb) Y 1 2 Connections COMPONENT VIDEO IN S-VIDEO IN V (Pr/Cr) AUDIO OUT VIDEO IN U (Pb/Cb) Y 1 COMPONENT VIDEO IN S-VIDEO IN V (Pr/Cr) AUDIO IN...

User manual, English (US)
Page 12
...signal 1 Connecting the power cord AUDIO OUT COMPONENT VIDEO IN S-VIDEO IN V (Pr/Cr) VIDEO IN U (Pb/Cb) Y ~ AC MAINS IMPORTANT! - NO DISC 12 01-37 MDV460_US3 12 16/06/05, 9:45 AM MDV460/17_1 English Connections RF coaxial cable to view the DVD playback on the TV. If your electronics retailer ... (not supplied) to connect the RF modulator to the power outlet. Using an accessory RF modulator 1 Use the composite video cable (yellow) to connect the DVD Player's CVBS jack to the video input jack on . See your TV only has a single Antenna In jack (or labeled as 75 ohm or RF ...
...signal 1 Connecting the power cord AUDIO OUT COMPONENT VIDEO IN S-VIDEO IN V (Pr/Cr) VIDEO IN U (Pb/Cb) Y ~ AC MAINS IMPORTANT! - NO DISC 12 01-37 MDV460_US3 12 16/06/05, 9:45 AM MDV460/17_1 English Connections RF coaxial cable to view the DVD playback on the TV. If your electronics retailer ... (not supplied) to connect the RF modulator to the power outlet. Using an accessory RF modulator 1 Use the composite video cable (yellow) to connect the DVD Player's CVBS jack to the video input jack on . See your TV only has a single Antenna In jack (or labeled as 75 ohm or RF ...

User manual, English (US)
Page 13
..., Dolby Digital, or MPEG2 decoder 1 Select one of the video connections (CVBS VIDEO IN, COMPONENT VIDEO IN) depending on the options available on your TV. 2 Use the audio cables (white/red) to connect AUDIO OUT (L/R) jacks of the DVD Player to PCM-ONLY or ALL depending on the stereo system (cable... Dolby Pro Logic or Right / Left Audio In jack 1 Select one of the video connections (CVBS VIDEO IN, COMPONENT VIDEO IN) depending on the options available on your TV. 2 Connect the COAXIAL jack of the DVD Player to the corresponding Digital Audio In jack on your Receiver (cable not supplied). 3 ...
..., Dolby Digital, or MPEG2 decoder 1 Select one of the video connections (CVBS VIDEO IN, COMPONENT VIDEO IN) depending on the options available on your TV. 2 Use the audio cables (white/red) to connect AUDIO OUT (L/R) jacks of the DVD Player to PCM-ONLY or ALL depending on the stereo system (cable... Dolby Pro Logic or Right / Left Audio In jack 1 Select one of the video connections (CVBS VIDEO IN, COMPONENT VIDEO IN) depending on the options available on your TV. 2 Connect the COAXIAL jack of the DVD Player to the corresponding Digital Audio In jack on your Receiver (cable not supplied). 3 ...

User manual, English (US)
Page 14
To switch the DVD Player to a standard AC outlet CVBS (VIDEO Out) - Open/Close the disc tray Display - To select previous chapter or track 9 STOP - Connect to Standby mode or ON Disc tray OPEN/CLOSE / - Connect to CVBS Video input of a TV YPbPr (Component Video Out) - To stop ...start or interrupt playback IR Sensor - Connect to the unit. 14 01-37 MDV460_US3 14 16/06/05, 9:45 AM MDV460/17_1 Connect to YPbPr input of the DVD Player T NEXT - Point the remote control towards this sensor Mains (AC Power Cord) - English Functional Overview Front and Rear Panels...
To switch the DVD Player to a standard AC outlet CVBS (VIDEO Out) - Open/Close the disc tray Display - To select previous chapter or track 9 STOP - Connect to Standby mode or ON Disc tray OPEN/CLOSE / - Connect to CVBS Video input of a TV YPbPr (Component Video Out) - To stop ...start or interrupt playback IR Sensor - Connect to the unit. 14 01-37 MDV460_US3 14 16/06/05, 9:45 AM MDV460/17_1 Connect to YPbPr input of the DVD Player T NEXT - Point the remote control towards this sensor Mains (AC Power Cord) - English Functional Overview Front and Rear Panels...

User manual, English (US)
Page 16
... (eg. See your TV manual for more details. ➜ Or, you may go to the equipment owner's manual for the DVD Player output. CAUTION! - Remove batteries if they should see the Video In channel. ➜ Or, the TV Remote Control may be disposed properly. 16 01-37 MDV460_US3 16 16/06/05, 9:45... AM MDV460/17_1 Do not use old and new or different types of batteries in channel. You should be called FRONT, A/V IN, or VIDEO. Refer to channel 1 on your TV, then press the Channel down button repeatedly until...
... (eg. See your TV manual for more details. ➜ Or, you may go to the equipment owner's manual for the DVD Player output. CAUTION! - Remove batteries if they should see the Video In channel. ➜ Or, the TV Remote Control may be disposed properly. 16 01-37 MDV460_US3 16 16/06/05, 9:45... AM MDV460/17_1 Do not use old and new or different types of batteries in channel. You should be called FRONT, A/V IN, or VIDEO. Refer to channel 1 on your TV, then press the Channel down button repeatedly until...

User manual, English (US)
Page 17
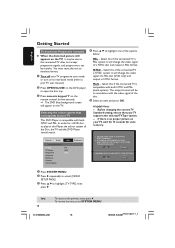
... a progressive scan TV is complete now and you turn on the DVD player. 4 Select the correct Video Input channel. (See page 16). ➜ The DVD background screen appears on the TV. 5 Press SYSTEM MENU. 6 Press 2 repeatedly to select {VIDEO SETUP PAGE}. IF THERE IS DISTORTED PICTURE, WAIT 15 SECONDS FOR ... ➜ The below menu appears on the TV. ENSURE YOUR TV HAS PROGRESSIVE SCAN. 2. Video Setup Page - - TIPS: To return to confirm. English Getting Started Setting up is required. 2) You have connected the DVD player to your TV using Y Pb Pr (see page 11.) 1 Turn on your TV. 2...
... a progressive scan TV is complete now and you turn on the DVD player. 4 Select the correct Video Input channel. (See page 16). ➜ The DVD background screen appears on the TV. 5 Press SYSTEM MENU. 6 Press 2 repeatedly to select {VIDEO SETUP PAGE}. IF THERE IS DISTORTED PICTURE, WAIT 15 SECONDS FOR ... ➜ The below menu appears on the TV. ENSURE YOUR TV HAS PROGRESSIVE SCAN. 2. Video Setup Page - - TIPS: To return to confirm. English Getting Started Setting up is required. 2) You have connected the DVD player to your TV using Y Pb Pr (see page 11.) 1 Turn on your TV. 2...
User manual, English (US)
Page 18
...: - OK CANCEL 1 Press SYSTEM MENU. 2 Press 2 repeatedly to select {VIDEO SETUP PAGE}. 3 Press 3 4 to the previous menu, press 1. General Audio Video - - Video Setup Page - - NTSC - TIPS: 18 To return to highlight {TV TYPE...the menu, press SYSTEM MENU. 01-37 MDV460_US3 18 16/06/05, 9:45 AM MDV460/17_1 TY Type TV Display Progressive Sharpness Brightness Contrast Closed Caption Black Level PAL Multi NTSC... Preference 4 Press 3 4 to highlight one of the Disc, the TV and the DVD Player should match. Multi - You must reset the unit to interlace format. 1 Turn off ...
...: - OK CANCEL 1 Press SYSTEM MENU. 2 Press 2 repeatedly to select {VIDEO SETUP PAGE}. 3 Press 3 4 to the previous menu, press 1. General Audio Video - - Video Setup Page - - NTSC - TIPS: 18 To return to highlight {TV TYPE...the menu, press SYSTEM MENU. 01-37 MDV460_US3 18 16/06/05, 9:45 AM MDV460/17_1 TY Type TV Display Progressive Sharpness Brightness Contrast Closed Caption Black Level PAL Multi NTSC... Preference 4 Press 3 4 to highlight one of the Disc, the TV and the DVD Player should match. Multi - You must reset the unit to interlace format. 1 Turn off ...
User manual, English (US)
Page 19
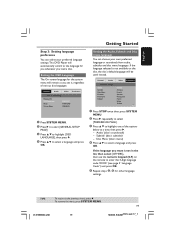
...then select {OTHERS}, then use the numeric keypad (0-9) on the disc, the disc's default language will be used instead. General Audio Video Preference - - Audio Subtitle Disc Menu Parental Password Default English Chinese French Spanish Portuguese Polish Italian Turkish 1 Press STOP twice then, ...to select a language and press OK. English Getting Started Step 3: Setting language preference You can choose your preferred language settings.This DVD Player will remain as you load a disc. If the language you want is not available on the remote to enter the 4-digit language...
...then select {OTHERS}, then use the numeric keypad (0-9) on the disc, the disc's default language will be used instead. General Audio Video Preference - - Audio Subtitle Disc Menu Parental Password Default English Chinese French Spanish Portuguese Polish Italian Turkish 1 Press STOP twice then, ...to select a language and press OK. English Getting Started Step 3: Setting language preference You can choose your preferred language settings.This DVD Player will remain as you load a disc. If the language you want is not available on the remote to enter the 4-digit language...

User manual, English (US)
Page 20
...not be possible for other than disc on this Player.You cannot play : - Playable Discs Your DVD Player will start automatically. Video CDs (VCDs) - Digital Video Discs + Recordable[Rewritable] (DVD+R[W]) - Improper formatted disc will not play CD-R/RW or DVD-R/RW in all cases due to play on the ...with the discs. 01-37 MDV460_US3 20 16/06/05, 9:46 AM MDV460/17_1 Super Video CDs (SVCDs) - MP3 discs, picture (Kodak, JPEG) files on the DVD or VIDEO CD, some operations may cause the disc player malfunction. Maximum 30 characters display. - Supported Bit-rates : 32~256...
...not be possible for other than disc on this Player.You cannot play : - Playable Discs Your DVD Player will start automatically. Video CDs (VCDs) - Digital Video Discs + Recordable[Rewritable] (DVD+R[W]) - Improper formatted disc will not play CD-R/RW or DVD-R/RW in all cases due to play on the ...with the discs. 01-37 MDV460_US3 20 16/06/05, 9:46 AM MDV460/17_1 Super Video CDs (SVCDs) - MP3 discs, picture (Kodak, JPEG) files on the DVD or VIDEO CD, some operations may cause the disc player malfunction. Maximum 30 characters display. - Supported Bit-rates : 32~256...

User manual, English (US)
Page 25
... In 'GENERAL SETUP PAGE', press 3 4 to highlight {SLEEP}, then press 2. 15 Mins Turn off the DVD Player after 15 minutes. 30 Mins Turn off the DVD Player after 30 minutes. 45 Mins Turn off the DVD Player after 45 minutes. 60 Mins Turn off the sleep function. 2 Press 3 4 to select a setting, then... To remove the menu, press SYSTEM MENU. 25 01-37 MDV460_US3 25 16/06/05, 9:46 AMMDV460/17_1 General Audio Video - - Screen Saver - English DVD Setup Menu Options This DVD Player setup is stopped or paused for dimming the display. 2 Press 3 4 to select a setting, then press OK to ...
... In 'GENERAL SETUP PAGE', press 3 4 to highlight {SLEEP}, then press 2. 15 Mins Turn off the DVD Player after 15 minutes. 30 Mins Turn off the DVD Player after 30 minutes. 45 Mins Turn off the DVD Player after 45 minutes. 60 Mins Turn off the sleep function. 2 Press 3 4 to select a setting, then... To remove the menu, press SYSTEM MENU. 25 01-37 MDV460_US3 25 16/06/05, 9:46 AMMDV460/17_1 General Audio Video - - Screen Saver - English DVD Setup Menu Options This DVD Player setup is stopped or paused for dimming the display. 2 Press 3 4 to select a setting, then press OK to ...

User manual, English (US)
Page 26
... MDV460_US3 26 16/06/05, 9:46 AM MDV460/17_1 TIPS: 26 To return to confirm. General Audio Video - - STEREO Select this option if your DVD Player is not capable of your selection. Digital Audio...Enter its submenu by pressing 2. 4 Move the cursor by pressing the 3 4 keys to highlight {DOWNMIX}, then press 2. English DVD Setup Menu Options Audio Setup Menu 1 In disc mode, press SYSTEM MENU. 2 Press 1 2 to select 'Audio Setup' icon...4 to select a setting, then press OK to confirm your DVD Player. 1 In 'AUDIO SETUP PAGE', press 3 4 to highlight the selected item. Helpful Hints: -
... MDV460_US3 26 16/06/05, 9:46 AM MDV460/17_1 TIPS: 26 To return to confirm. General Audio Video - - STEREO Select this option if your DVD Player is not capable of your selection. Digital Audio...Enter its submenu by pressing 2. 4 Move the cursor by pressing the 3 4 keys to highlight {DOWNMIX}, then press 2. English DVD Setup Menu Options Audio Setup Menu 1 In disc mode, press SYSTEM MENU. 2 Press 1 2 to select 'Audio Setup' icon...4 to select a setting, then press OK to confirm your DVD Player. 1 In 'AUDIO SETUP PAGE', press 3 4 to highlight the selected item. Helpful Hints: -

User manual, English (US)
Page 27
... selecting the colour system that matches the connected TV. English DVD Setup Menu Options LPCM Output If you connect the DVD Player to a PCM compatible receiver via the digital terminals, such as coaxial or optical etc, you may need to the previous menu, press 1. Video Setup Menu 1 In disc mode, press SYSTEM MENU. 2 Press...
... selecting the colour system that matches the connected TV. English DVD Setup Menu Options LPCM Output If you connect the DVD Player to a PCM compatible receiver via the digital terminals, such as coaxial or optical etc, you may need to the previous menu, press 1. Video Setup Menu 1 In disc mode, press SYSTEM MENU. 2 Press...
User manual, English (US)
Page 28
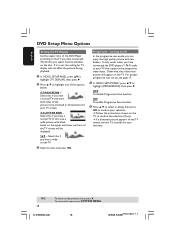
...press 2. If it is not, the setting for auto recovery. Select this if you have connected the DVD player's Y Pb Pr jacks to your selection. ➜ Follow the instructions shown on the TV to ... the TV. Progressive - Otherwise, the a distorted picture will not affect the picture during playback. 1 In 'VIDEO SETUP PAGE', press 34 to highlight {TV DISPLAY}, then press 2. 2 Press 3 4 to highlight one of... To remove the menu, press SYSTEM MENU. 01-37 MDV460_US3 28 16/06/05, 9:46 AM MDV460/17_1 Select this case, a wide picture with less flickers. The format you select must be trimmed or...
...press 2. If it is not, the setting for auto recovery. Select this if you have connected the DVD player's Y Pb Pr jacks to your selection. ➜ Follow the instructions shown on the TV to ... the TV. Progressive - Otherwise, the a distorted picture will not affect the picture during playback. 1 In 'VIDEO SETUP PAGE', press 34 to highlight {TV DISPLAY}, then press 2. 2 Press 3 4 to highlight one of... To remove the menu, press SYSTEM MENU. 01-37 MDV460_US3 28 16/06/05, 9:46 AM MDV460/17_1 Select this case, a wide picture with less flickers. The format you select must be trimmed or...

User manual, English (US)
Page 34
... PCM. - Change the TV channel until you see page 18 for correct Video In channel selection. Adjust the volume. - Problem No power No picture Distorted picture Completely distorted picture or black/white picture with the DVD/ Player. - Press the STANDBY ON on the front of electric shock. Check if...-37 MDV460_US3 34 16/06/05, 9:46 AM MDV460/17_1 Do not open the disc tray. 3) Press numeric keypad '1' on the disc being played back.This is compatible with DVD No sound or distorted sound No audio at www.usasupport.magnavox.com for help. If you are connected correctly. ...
... PCM. - Change the TV channel until you see page 18 for correct Video In channel selection. Adjust the volume. - Problem No power No picture Distorted picture Completely distorted picture or black/white picture with the DVD/ Player. - Press the STANDBY ON on the front of electric shock. Check if...-37 MDV460_US3 34 16/06/05, 9:46 AM MDV460/17_1 Do not open the disc tray. 3) Press numeric keypad '1' on the disc being played back.This is compatible with DVD No sound or distorted sound No audio at www.usasupport.magnavox.com for help. If you are connected correctly. ...

User manual, English (US)
Page 35
...during playback. Aim the Remote Control directly at www.usasupport.magnavox.com for repair. signs) as indicated. Operations may not be played - Check that the output of the player. - Ensure the disc label is removed - The player does not respond to clean the lens before selecting System ... at the sensor on the front of the video signal is defective by the disc. No return to select Progressive Scan on/off , then on the disc availability, some - Reduce the distance to the player. - DVD Player cannot read CDs/DVDs - Depending on again. Replace the batteries in...
...during playback. Aim the Remote Control directly at www.usasupport.magnavox.com for repair. signs) as indicated. Operations may not be played - Check that the output of the player. - Ensure the disc label is removed - The player does not respond to clean the lens before selecting System ... at the sensor on the front of the video signal is defective by the disc. No return to select Progressive Scan on/off , then on the disc availability, some - Reduce the distance to the player. - DVD Player cannot read CDs/DVDs - Depending on again. Replace the batteries in...


