
User manual, English (US)
Page 2
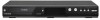
...to radio communications. REFER SERVICING TO QUALIFIED SERVICE PERSONNEL. The wide blade or the third prong are expressly approved in the manual. Protect the power cord from being walked on the rear or bottom of the cabinet. Unplug this apparatus during lightning storms or when unused for future reference.... and can be determined by turning the equipment off when find trouble or not in use this apparatus near any heat sources such as power-supply cord or plug is damaged, liquid has been spilled or objects have fallen into the apparatus, the apparatus has been exposed to rain...
...to radio communications. REFER SERVICING TO QUALIFIED SERVICE PERSONNEL. The wide blade or the third prong are expressly approved in the manual. Protect the power cord from being walked on the rear or bottom of the cabinet. Unplug this apparatus during lightning storms or when unused for future reference.... and can be determined by turning the equipment off when find trouble or not in use this apparatus near any heat sources such as power-supply cord or plug is damaged, liquid has been spilled or objects have fallen into the apparatus, the apparatus has been exposed to rain...
User manual, English (US)
Page 3
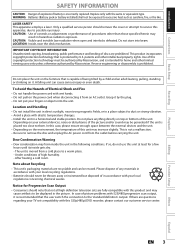
...uses only unless otherwise authorized by Macrovision, and is recommended that the user switch the connection to possible eye injury. Depending on the power cord when disconnecting it is intended for home and other than those specified herein may form inside gets dry. - Notice for a ...customer service center. Dew Condensation Warning • Dew condensation may result in a place subject to remove the disc and unplug the AC power cord from an AC outlet. EN 3 Editing Function Setup Others Español patents and other intellectual property rights. The unit is ...
...uses only unless otherwise authorized by Macrovision, and is recommended that the user switch the connection to possible eye injury. Depending on the power cord when disconnecting it is intended for home and other than those specified herein may form inside gets dry. - Notice for a ...customer service center. Dew Condensation Warning • Dew condensation may result in a place subject to remove the disc and unplug the AC power cord from an AC outlet. EN 3 Editing Function Setup Others Español patents and other intellectual property rights. The unit is ...
User manual, English (US)
Page 4
... the discs so that rotation has stopped and then move the unit without subjecting it to vibration or strong impact or pull out the power plug. RF coaxial cable (WPZ0901TM002 / WPZ0901TM005) RCA audio/video cables (WPZ0102TM018/WPZ0102LTE01) owner's manual (EN/FR) (1VMN29193/1VMN29194) quick... agents or antistatic spray intended for inspection and cleaning of malfunction. With a digital camera (including built-in operation. And if a power failure occurs, the content of the recording / replaying program may discolor the surface or damage the unit. Such chemicals may be available...
... the discs so that rotation has stopped and then move the unit without subjecting it to vibration or strong impact or pull out the power plug. RF coaxial cable (WPZ0901TM002 / WPZ0901TM005) RCA audio/video cables (WPZ0102TM018/WPZ0102LTE01) owner's manual (EN/FR) (1VMN29193/1VMN29194) quick... agents or antistatic spray intended for inspection and cleaning of malfunction. With a digital camera (including built-in operation. And if a power failure occurs, the content of the recording / replaying program may discolor the surface or damage the unit. Such chemicals may be available...
User manual, English (US)
Page 10
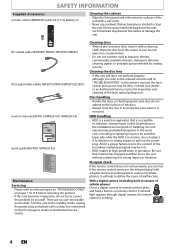
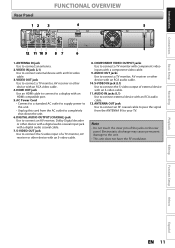
... Front Panel 1 2 3* 4 5 6 7 8* 9 10 15 14 13 12 11 (*) The unit can control the unit from your remote control so that you must unplug the AC power cord) 2. CSTOP button Press to start a recording. Infrared sensor window Receive signals from a distance. 10 EN Disc tray Place a disc when opening the disc tray...
... Front Panel 1 2 3* 4 5 6 7 8* 9 10 15 14 13 12 11 (*) The unit can control the unit from your remote control so that you must unplug the AC power cord) 2. CSTOP button Press to start a recording. Infrared sensor window Receive signals from a distance. 10 EN Disc tray Place a disc when opening the disc tray...
User manual, English (US)
Page 11
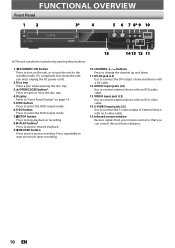
... S-video cable. 8. VIDEO IN jack (L1) Use to connect the S-video output of the jacks on the rear panel. AC Power Cord • Connect to a standard AC outlet to supply power to this unit. • Unplug this cord from the ANTENNA IN to connect the S-video input of a TV monitor, AV receiver...
... S-video cable. 8. VIDEO IN jack (L1) Use to connect the S-video output of the jacks on the rear panel. AC Power Cord • Connect to a standard AC outlet to supply power to this unit. • Unplug this cord from the ANTENNA IN to connect the S-video input of a TV monitor, AV receiver...
User manual, English (US)
Page 13
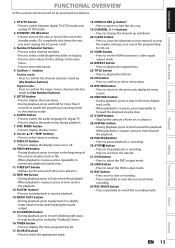
.... Number/Character buttons • Press to select channel numbers. • Press to change the channel up and down the unit, you must unplug the AC power cord) 3. REC button • Press once to start a recording. • Press repeatedly to display the disc menu. 8. CHANNEL / buttons • Press to select a title/chapter...
.... Number/Character buttons • Press to select channel numbers. • Press to change the channel up and down the unit, you must unplug the AC power cord) 3. REC button • Press once to start a recording. • Press repeatedly to display the disc menu. 8. CHANNEL / buttons • Press to select a title/chapter...
User manual, English (US)
Page 15
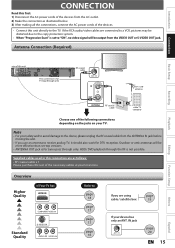
... is for TV loop through only. If the RCA audio/video cables are as illustrated below. 3) After making all the connections, connect the AC power cords of the devices. • Connect this connection are connected to the copy protection system. • When "Progressive Scan" is not possible. ...; If you are using cable / satellite box page 19 If your device has only an ANT. Introduction CONNECTION Read this first: 1) Disconnect the AC power cords of the devices from the AC outlet. 2) Make the connection as follows: • RF coaxial cable x 1 Please purchase the rest of the...
... is for TV loop through only. If the RCA audio/video cables are as illustrated below. 3) After making all the connections, connect the AC power cords of the devices. • Connect this connection are connected to the copy protection system. • When "Progressive Scan" is not possible. ...; If you are using cable / satellite box page 19 If your device has only an ANT. Introduction CONNECTION Read this first: 1) Disconnect the AC power cords of the devices from the AC outlet. 2) Make the connection as follows: • RF coaxial cable x 1 Please purchase the rest of the...
User manual, English (US)
Page 18
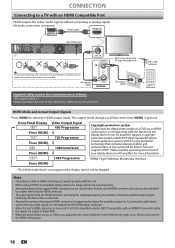
... of channels and bit length) may not operate properly with an HDMI-DVI converter cable, the signals are output in digital RGB. • When the power failure occurs, or when you unplug the unit, some devices can control other devices via an HDMI connection, it into the HDMI jack, and make...
... of channels and bit length) may not operate properly with an HDMI-DVI converter cable, the signals are output in digital RGB. • When the power failure occurs, or when you unplug the unit, some devices can control other devices via an HDMI connection, it into the HDMI jack, and make...
User manual, English (US)
Page 32
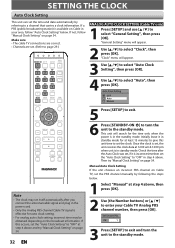
... standby mode. Check the time after you connect the antenna/cable signal and plug in the power cord. • Only the Analog PBS channel Cable TV signal is effective for the time only when the power is set the "Auto Clock Setting" to "OFF" in step 4 above , then press [OK]. 2 Use [the...
... standby mode. Check the time after you connect the antenna/cable signal and plug in the power cord. • Only the Analog PBS channel Cable TV signal is effective for the time only when the power is set the "Auto Clock Setting" to "OFF" in step 4 above , then press [OK]. 2 Use [the...
User manual, English (US)
Page 33
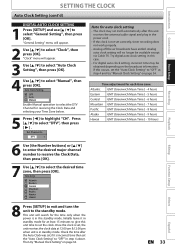
... use [K / L] to highlight "CH". Auto Clock Setting OFF Auto Manual Enable Manual operation to select the DTV Channel for the time only when the power is incorrect time then set the "Auto Clock Setting" to select "Manual", then press [OK]. Once the clock is set, the unit receives the clock... data at step 4 and try "Manual Clock Setting" on the broadcast information. If this unit receives the antenna/cable signal and plug in the power cord. • If the clock is in step 4 above. Check the time after this occurs, set the "Auto Clock Setting" to select "Clock", ...
... use [K / L] to highlight "CH". Auto Clock Setting OFF Auto Manual Enable Manual operation to select the DTV Channel for the time only when the power is incorrect time then set the "Auto Clock Setting" to select "Manual", then press [OK]. Once the clock is set, the unit receives the clock... data at step 4 and try "Manual Clock Setting" on the broadcast information. If this unit receives the antenna/cable signal and plug in the power cord. • If the clock is in step 4 above. Check the time after this occurs, set the "Auto Clock Setting" to select "Clock", ...
User manual, English (US)
Page 34
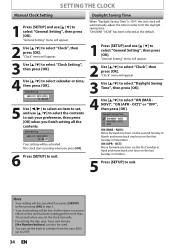
... Clock Setting 1 Press [SETUP] and use [K / L] to select "General Setting", then press [OK]. OCT) OFF ON (MAR - Daylight Saving Time When "Daylight Saving Time" is a power failure or this unit has been unplugged for more than 30 seconds when you set the clock manually. • For setting the day, year, hour...
... Clock Setting 1 Press [SETUP] and use [K / L] to select "General Setting", then press [OK]. OCT) OFF ON (MAR - Daylight Saving Time When "Daylight Saving Time" is a power failure or this unit has been unplugged for more than 30 seconds when you set the clock manually. • For setting the day, year, hour...
User manual, English (US)
Page 45
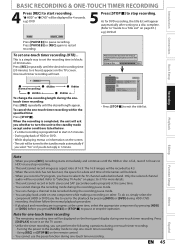
... one -touch timer recording. Only the selected channel audio will be recorded. Note for more details. • This unit cannot record in 1 minute. Turning the power to the standby mode to select the TV channel audio beforehand. If a timer recording is completed before you stop the operation. Press [DISPLAY] to start...
... one -touch timer recording. Only the selected channel audio will be recorded. Note for more details. • This unit cannot record in 1 minute. Turning the power to the standby mode to select the TV channel audio beforehand. If a timer recording is completed before you stop the operation. Press [DISPLAY] to start...
User manual, English (US)
Page 46
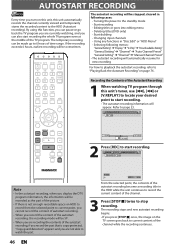
... recording become a recording title in "Disc Edit" or "HDD Menu" - appears and you are recording the contents of the TV program. Start recording - Turning the power to watch the part. The recording stops and new autostart recording begins. • If you press [STOP C] once, the image on page 76. GHI JKL...
... recording become a recording title in "Disc Edit" or "HDD Menu" - appears and you are recording the contents of the TV program. Start recording - Turning the power to watch the part. The recording stops and new autostart recording begins. • If you press [STOP C] once, the image on page 76. GHI JKL...
User manual, English (US)
Page 49
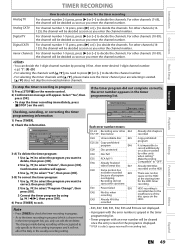
... For channel number 2-6 press, press [B] or [ • ] to decide the channels. Checking, canceling, or correcting the timer programming information 1) Press [TIMER]. 2) Check the information. E41 Power failed E50 E42 No disc when recording E43 Already 49 titles recorded Already 254 chapters recorded Copy prohibited program It is shown in red in...
... For channel number 2-6 press, press [B] or [ • ] to decide the channels. Checking, canceling, or correcting the timer programming information 1) Press [TIMER]. 2) Check the information. E41 Power failed E50 E42 No disc when recording E43 Already 49 titles recorded Already 254 chapters recorded Copy prohibited program It is shown in red in...
User manual, English (US)
Page 50
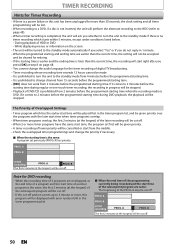
... be cleared for redoing. • If the starting time when the recording media is DVD. TIMER RECORDING Hints for Timer Recording • If there is a power failure or this program will be displayed with the later start time when timer programs overlap. • When timer programs overlap, the first 2 minutes (at...
... be cleared for redoing. • If the starting time when the recording media is DVD. TIMER RECORDING Hints for Timer Recording • If there is a power failure or this program will be displayed with the later start time when timer programs overlap. • When timer programs overlap, the first 2 minutes (at...
User manual, English (US)
Page 63
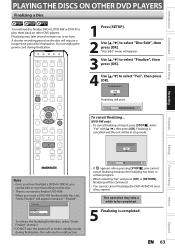
Do not unplug the power cord during finalization, this unit, "Undo Finalize" will appear instead of "Finalize". OPEN/ STANDBY-ON DTV/TV SOURCE CLOSE .@/: ABC DEF GHI JKL MNO CHANNEL ... take several minutes up to an hour. Finalizing 90% To cancel finalizing... (DVD-RW only) • To cancel finalizing at step 3. * DO NOT turn the power off or to the standby mode during finalization. PLAYING THE DISCS ON OTHER DVD PLAYERS Finalizing a Disc Introduction Connections Basic Setup Recording Playback You will...
Do not unplug the power cord during finalization, this unit, "Undo Finalize" will appear instead of "Finalize". OPEN/ STANDBY-ON DTV/TV SOURCE CLOSE .@/: ABC DEF GHI JKL MNO CHANNEL ... take several minutes up to an hour. Finalizing 90% To cancel finalizing... (DVD-RW only) • To cancel finalizing at step 3. * DO NOT turn the power off or to the standby mode during finalization. PLAYING THE DISCS ON OTHER DVD PLAYERS Finalizing a Disc Introduction Connections Basic Setup Recording Playback You will...

User manual, English (US)
Page 102
Set the unit to each setting stays on even when the power is off. • An item which is not currently available is the default) V-Chip Downloadable Rating Block Setting Clear Downloadable Rating Change Password Video Progressive ...
Set the unit to each setting stays on even when the power is off. • An item which is not currently available is the default) V-Chip Downloadable Rating Block Setting Clear Downloadable Rating Change Password Video Progressive ...
User manual, English (US)
Page 108
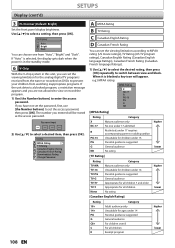
... the standby mode. 6 V-Chip With the V-chip system in this unit, you entered will appear. If "Auto" is selected, the display gets dark when the power is blocked a key icon will be stored as the access password. under 17 requires accompanying parent or adult guardian Unsuitable for children under 13 Parental...
... the standby mode. 6 V-Chip With the V-chip system in this unit, you entered will appear. If "Auto" is selected, the display gets dark when the power is blocked a key icon will be stored as the access password. under 17 requires accompanying parent or adult guardian Unsuitable for children under 13 Parental...
User manual, English (US)
Page 112
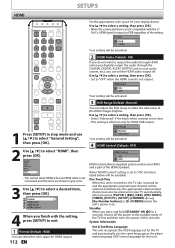
...part of the HDMI images brighter. Use [K / L] to select a setting, then press [OK]. • When the connected device is turned on . DUBBING] when the unit's power is effective only for 2 seconds, it turns off . Standby When you press [PLAY B], [G], [H,], [DISC MENU], [TIMER], [DTV/TV], [SETUP], [CHANNEL / ], [the ... of this unit is turned on your display device. The appropriate external input channel can set the HDMI audio output off the power to your audio system, etc.), you digitally output the audio through the COAXIAL DIGITAL AUDIO OUTPUT jack to the standby mode of...
...part of the HDMI images brighter. Use [K / L] to select a setting, then press [OK]. • When the connected device is turned on . DUBBING] when the unit's power is effective only for 2 seconds, it turns off . Standby When you press [PLAY B], [G], [H,], [DISC MENU], [TIMER], [DTV/TV], [SETUP], [CHANNEL / ], [the ... of this unit is turned on your display device. The appropriate external input channel can set the HDMI audio output off the power to your audio system, etc.), you digitally output the audio through the COAXIAL DIGITAL AUDIO OUTPUT jack to the standby mode of...
User manual, English (US)
Page 114
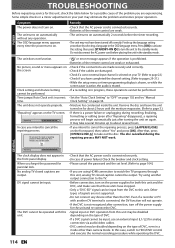
...the DV function will begin automatically just after connection, turn on the TV screen. the front panel display. • (In case of power failure) Check the breaker and clock setting. Other types of signals are made securely and correctly. The OSD language menu appears every time the...you intend to cancel the repairing process, press [AOPEN/CLOSE] on automatically without any device other than the DVC. After that the AC power cord is a power failure or unplugging during the repairing process MAY NOT work. DV signal cannot be input. • Before connection, turn the unit to...
...the DV function will begin automatically just after connection, turn on the TV screen. the front panel display. • (In case of power failure) Check the breaker and clock setting. Other types of signals are made securely and correctly. The OSD language menu appears every time the...you intend to cancel the repairing process, press [AOPEN/CLOSE] on automatically without any device other than the DVC. After that the AC power cord is a power failure or unplugging during the repairing process MAY NOT work. DV signal cannot be input. • Before connection, turn the unit to...


