
User manual, English (US)
Page 2
.... Keep these instructions. 2. Do not block any heat sources such as power-supply cord or plug is encouraged to try to correct the interference by turning the equipment off when find trouble or not in accordance with the limits for a Class B digital device, pursuant to rain or moisture, does not operate...
.... Keep these instructions. 2. Do not block any heat sources such as power-supply cord or plug is encouraged to try to correct the interference by turning the equipment off when find trouble or not in accordance with the limits for a Class B digital device, pursuant to rain or moisture, does not operate...
User manual, English (US)
Page 4
... the worst case, recording or replaying may be lost. • HDD rotates at high speed when in motion, do not subject it with a cleaning cloth. Turn the unit to the standby mode, unplug the power plug and please call our help to vibration or strong impact or pull out the power...
... the worst case, recording or replaying may be lost. • HDD rotates at high speed when in motion, do not subject it with a cleaning cloth. Turn the unit to the standby mode, unplug the power plug and please call our help to vibration or strong impact or pull out the power...
User manual, English (US)
Page 8
... you set is reached or the disc is "copy-once" program and prohibited to complete the recording - Auto recording mode dubbing: When dubbing, if you turn on this unit, this unit.
... you set is reached or the disc is "copy-once" program and prohibited to complete the recording - Auto recording mode dubbing: When dubbing, if you turn on this unit, this unit.
User manual, English (US)
Page 10
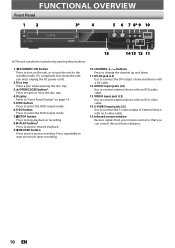
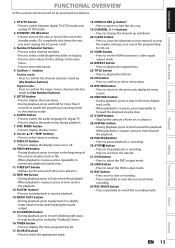
... once to connect external device with a DV cable. 12. CSTOP button Press to change the channel up and down the unit, you can also be turned on by pressing these buttons. 1. AUDIO input jacks (L2) Use to start or resume playback. 9. VIDEO input jack (L2) Use to start ... device with an S-video cable. 15. Press repeatedly to select the DVD output mode. 7. Display Refer to "Front Panel Display" on the unit, or to turn on page 14. 5. S-VIDEO input jack (L2) Use to the standby mode. (To completely shut down . 11. FUNCTIONAL OVERVIEW Front Panel 1 2 3* 4 5 6 7 8* 9...
... once to connect external device with a DV cable. 12. CSTOP button Press to change the channel up and down the unit, you can also be turned on by pressing these buttons. 1. AUDIO input jacks (L2) Use to start or resume playback. 9. VIDEO input jack (L2) Use to start ... device with an S-video cable. 15. Press repeatedly to select the DVD output mode. 7. Display Refer to "Front Panel Display" on the unit, or to turn on page 14. 5. S-VIDEO input jack (L2) Use to the standby mode. (To completely shut down . 11. FUNCTIONAL OVERVIEW Front Panel 1 2 3* 4 5 6 7 8* 9...
User manual, English (US)
Page 13
FUNCTIONAL OVERVIEW (*) The unit can also be turned on the unit, or to turn on by pressing these buttons. AUDIO button • Press to switch the audio language for more than 3 seconds to switch the progressive scanning mode to ... output. 15. DVD button • Press to the interlace mode. 6. EN 13 Editing Function Setup Others Español STANDBY-ON y button • Press to turn the unit to select a title/chapter/track/file on or off. 10. Number/Character buttons • Press to select channel numbers. • Press to the...
FUNCTIONAL OVERVIEW (*) The unit can also be turned on the unit, or to turn on by pressing these buttons. AUDIO button • Press to switch the audio language for more than 3 seconds to switch the progressive scanning mode to ... output. 15. DVD button • Press to the interlace mode. 6. EN 13 Editing Function Setup Others Español STANDBY-ON y button • Press to turn the unit to select a title/chapter/track/file on or off. 10. Number/Character buttons • Press to select channel numbers. • Press to the...
User manual, English (US)
Page 19
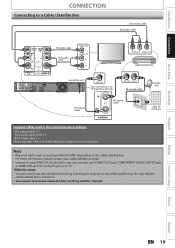
... also use S-VIDEO OUT jack, COMPONENT VIDEO OUTPUT jack or HDMI OUT jack for TV loop through only ANT.OUT ANT. IN This connection is turned on the cable/satellite box.
... also use S-VIDEO OUT jack, COMPONENT VIDEO OUTPUT jack or HDMI OUT jack for TV loop through only ANT.OUT ANT. IN This connection is turned on the cable/satellite box.
User manual, English (US)
Page 22
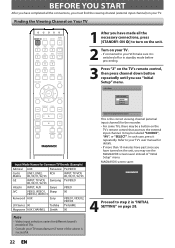
... DISPLAY RETURN V.REPLAY V.SKIP 1 After you have made all the connections, you must find the viewing channel (external input channel) on page 28. MAGNAVOX screen saver: 4 Proceed to step 2 in standby mode before proceeding. 3 Press "2" on the TV's remote control, then press channel down button ...the above is successful. 22 EN BEFORE YOU START After you have completed all the necessary connections, press [STANDBY-ON y] to turn on the unit. 2 Turn on the TV's remote control that accesses the external input channel. Note • Video input selection varies for different brand's ...
... DISPLAY RETURN V.REPLAY V.SKIP 1 After you have made all the connections, you must find the viewing channel (external input channel) on page 28. MAGNAVOX screen saver: 4 Proceed to step 2 in standby mode before proceeding. 3 Press "2" on the TV's remote control, then press channel down button ...the above is successful. 22 EN BEFORE YOU START After you have completed all the necessary connections, press [STANDBY-ON y] to turn on the unit. 2 Turn on the TV's remote control that accesses the external input channel. Note • Video input selection varies for different brand's ...
User manual, English (US)
Page 27
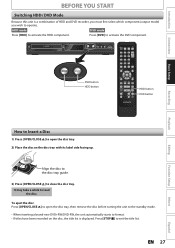
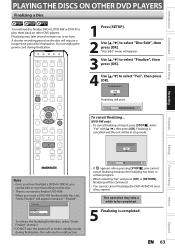
... button Basic Setup Recording Playback Editing Function Setup How to Insert a Disc 1) Press [OPEN/CLOSE A] to open the disc tray, then remove the disc before turning the unit to the standby mode. • When inserting a brand-new DVD+RW/DVD-RW, the unit automatically starts to open the disc tray. 2) Place...
... button Basic Setup Recording Playback Editing Function Setup How to Insert a Disc 1) Press [OPEN/CLOSE A] to open the disc tray, then remove the disc before turning the unit to the standby mode. • When inserting a brand-new DVD+RW/DVD-RW, the unit automatically starts to open the disc tray. 2) Place...
User manual, English (US)
Page 28
... D.DUBBING TIMER HDD DVD REC MODE REC Auto Preset will be displayed following the channel preset procedure. Press [RETURN] to follow these steps when you turn on page 34. 28 EN CH 1 Auto Presetting Now 4 If a PBS (public broadcasting station) is not available in "Manual Clock Setting" on this unit for...
... D.DUBBING TIMER HDD DVD REC MODE REC Auto Preset will be displayed following the channel preset procedure. Press [RETURN] to follow these steps when you turn on page 34. 28 EN CH 1 Auto Presetting Now 4 If a PBS (public broadcasting station) is not available in "Manual Clock Setting" on this unit for...
User manual, English (US)
Page 32
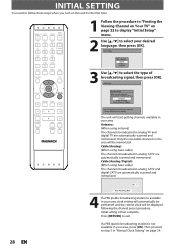
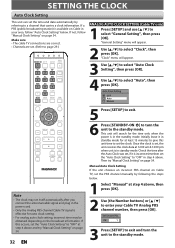
... Clock Setting" to select "Clock", then press [OK]. Auto Clock Setting OFF Auto Manual 5 Press [SETUP] to exit. 6 Press [STANDBY-ON y] to turn the unit to the standby mode. Initially leave it is effective for auto clock setting. • For analog auto clock setting, incorrect time may set... 4 above , then press [OK]. 2 Use [the Number buttons] or [K / L] to select "General Setting", then press [OK]. CH 1 3 Press [SETUP] to exit and turn the unit to the standby mode. SETTING THE CLOCK Auto Clock Setting This unit can set the time and date automatically by following the steps...
... Clock Setting" to select "Clock", then press [OK]. Auto Clock Setting OFF Auto Manual 5 Press [SETUP] to exit. 6 Press [STANDBY-ON y] to turn the unit to the standby mode. Initially leave it is effective for auto clock setting. • For analog auto clock setting, incorrect time may set... 4 above , then press [OK]. 2 Use [the Number buttons] or [K / L] to select "General Setting", then press [OK]. CH 1 3 Press [SETUP] to exit and turn the unit to the standby mode. SETTING THE CLOCK Auto Clock Setting This unit can set the time and date automatically by following the steps...
User manual, English (US)
Page 33
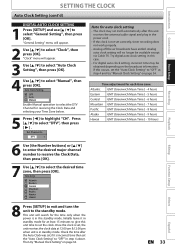
... GMT (Greenwich Mean Time ) - 9 hours Hawaii GMT (Greenwich Mean Time ) - 10 hours Playback Editing Function Setup Others Español 8 Press [SETUP] to exit and turn the unit to select the desired time zone, then press [OK]. Once the clock is in step 4 above. "Clock" menu will appear. 2 Use [K / L] to "OFF...
... GMT (Greenwich Mean Time ) - 9 hours Hawaii GMT (Greenwich Mean Time ) - 10 hours Playback Editing Function Setup Others Español 8 Press [SETUP] to exit and turn the unit to select the desired time zone, then press [OK]. Once the clock is in step 4 above. "Clock" menu will appear. 2 Use [K / L] to "OFF...
User manual, English (US)
Page 45
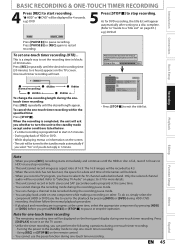
... back a title on one component while making a recording on pages 36-37 for more details. • This unit cannot record in 5 minutes. - Turning the power to the standby mode to pause recording. EN 45 Español This is completed, the unit will appear automatically after writing to... a disc complete. (Refer to "Guide to a Title List" on the screen. • The unit will be turned to the standby mode except under conditions listed below. - I DVD SP(2Hr) 2h00m 5 Press [STOP C] to exit the title list. When the recording is ...
... back a title on one component while making a recording on pages 36-37 for more details. • This unit cannot record in 5 minutes. - Turning the power to the standby mode to pause recording. EN 45 Español This is completed, the unit will appear automatically after writing to... a disc complete. (Refer to "Guide to a Title List" on the screen. • The unit will be turned to the standby mode except under conditions listed below. - I DVD SP(2Hr) 2h00m 5 Press [STOP C] to exit the title list. When the recording is ...
User manual, English (US)
Page 46
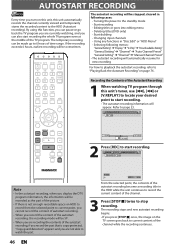
... recording mode will be recorded as the part of the picture. • If there is copy-protected, "Copy guard detected." AUTOSTART RECORDING Every time you turn on the TV screen goes back to current content of the channel while the recording continues. 46 EN If the recording exceeds 6 hours, earliest recording..., and you can pause or go back the TV program you are not able to the standby mode - Editing titles or goes into editing menu - Turning the power to watch the part. Start recording - Deleting titles (DVD only) -
... recording mode will be recorded as the part of the picture. • If there is copy-protected, "Copy guard detected." AUTOSTART RECORDING Every time you turn on the TV screen goes back to current content of the channel while the recording continues. 46 EN If the recording exceeds 6 hours, earliest recording..., and you can pause or go back the TV program you are not able to the standby mode - Editing titles or goes into editing menu - Turning the power to watch the part. Start recording - Deleting titles (DVD only) -
User manual, English (US)
Page 50
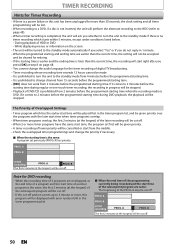
... 2 minutes before the programmed starting time when the recording media is later than the current time, the recording will start right after you whether to turn the unit to the standby mode from 2 minutes before the starting time is the same: A program set first will be given priority. • A ...automatically if you select "Yes" or if you do not reply in the timer programming list. B may be made. • It is prohibited to turn the unit to 2 minutes before the programmed starting and ending time are earlier than 30 seconds, the clock setting and all timer programming will be...
... 2 minutes before the programmed starting time when the recording media is later than the current time, the recording will start right after you whether to turn the unit to the standby mode from 2 minutes before the starting time is the same: A program set first will be given priority. • A ...automatically if you select "Yes" or if you do not reply in the timer programming list. B may be made. • It is prohibited to turn the unit to 2 minutes before the programmed starting and ending time are earlier than 30 seconds, the clock setting and all timer programming will be...
User manual, English (US)
Page 63
... unplug the power cord during finalization, this unit, "Undo Finalize" will require a longer time period for the disc, select "Undo Finalize" at step 3. * DO NOT turn the power off or to select "Disc Edit", then press [OK]. "Disc Edit" menu will start. Yes No Finalizing 5% • If appears when pressing [STOP...
... unplug the power cord during finalization, this unit, "Undo Finalize" will require a longer time period for the disc, select "Undo Finalize" at step 3. * DO NOT turn the power off or to select "Disc Edit", then press [OK]. "Disc Edit" menu will start. Yes No Finalizing 5% • If appears when pressing [STOP...
User manual, English (US)
Page 66
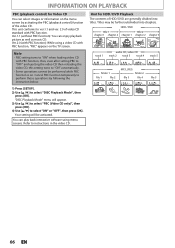
... CD, video CD track 2 track 3 track 4 track 5 folder 1 file 1 file 2 MP3, JPEG folder 2 file 3 file 4 file 5 66 EN Note • PBC setting turns to "ON" when loading video CD with PBC function, thus, even after setting PBC to "OFF" and ejecting the video CD then reloading the video... CD, this setting turns to "ON" automatically. • Some operations cannot be activated. Ver.2.0 (with PBC function): While using menu screens. INFORMATION ON PLAYBACK PBC (...
... CD, video CD track 2 track 3 track 4 track 5 folder 1 file 1 file 2 MP3, JPEG folder 2 file 3 file 4 file 5 66 EN Note • PBC setting turns to "ON" when loading video CD with PBC function, thus, even after setting PBC to "OFF" and ejecting the video CD then reloading the video... CD, this setting turns to "ON" automatically. • Some operations cannot be activated. Ver.2.0 (with PBC function): While using menu screens. INFORMATION ON PLAYBACK PBC (...

User manual, English (US)
Page 71
...; [TITLE] or [DISC MENU] will appear when inserting a disc. 3) Press [STOP C] to stop playback. • Press [TITLE] to "Field" in "Playback" menu if pictures in turn. Notes on the TV set "Still Mode" to display the thumbnail again. For details of Kodak Picture CD, contact a shop that provides developing service of...
...; [TITLE] or [DISC MENU] will appear when inserting a disc. 3) Press [STOP C] to stop playback. • Press [TITLE] to "Field" in "Playback" menu if pictures in turn. Notes on the TV set "Still Mode" to display the thumbnail again. For details of Kodak Picture CD, contact a shop that provides developing service of...
User manual, English (US)
Page 72
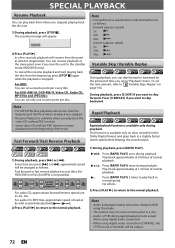
.... Plays back approximately at 1.3 times of normal playback. To cancel the resume playback and start playing back the disc from the beginning of time you turn the unit to " 8 Variable Skip / Replay" on discs recorded in the Dolby Digital format, and plays back in normal speed. To set only one resume...
.... Plays back approximately at 1.3 times of normal playback. To cancel the resume playback and start playing back the disc from the beginning of time you turn the unit to " 8 Variable Skip / Replay" on discs recorded in the Dolby Digital format, and plays back in normal speed. To set only one resume...
User manual, English (US)
Page 74
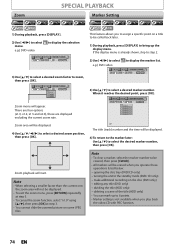
.... 4) To return to the marker later: Use [K / L] to zoom, then press [OK]. 1/ 5 1/ 5 0:01:00 / 1:23:45 DVD Video × 1.2 × 1.5 × 2.0 Zoom menu will start. turning the unit to select menu. If the display menu is not available when you operate these are displayed excluding the current zoom rate. e.g.) DVD-video...
.... 4) To return to the marker later: Use [K / L] to zoom, then press [OK]. 1/ 5 1/ 5 0:01:00 / 1:23:45 DVD Video × 1.2 × 1.5 × 2.0 Zoom menu will start. turning the unit to select menu. If the display menu is not available when you operate these are displayed excluding the current zoom rate. e.g.) DVD-video...

User manual, English (US)
Page 76
... playback. DISC Playback Mode Program Play 09 04 10 06 Total 0:31:07 Program playback will be switched to the standby mode automatically when you turn the unit to the standby mode or open the disc tray. • You may also select a desired track using [the Number buttons] at step 4. •... DTV audio language. • If you change to "Autostart Recording Information" on the TV screen. • Program information will be stopped. • When this unit turns on page 46.
... playback. DISC Playback Mode Program Play 09 04 10 06 Total 0:31:07 Program playback will be switched to the standby mode automatically when you turn the unit to the standby mode or open the disc tray. • You may also select a desired track using [the Number buttons] at step 4. •... DTV audio language. • If you change to "Autostart Recording Information" on the TV screen. • Program information will be stopped. • When this unit turns on page 46.


