User manual, English (US)
Page 4
... picture problems with this 480p BD/DVD player, please contact our customer service center. Information in this manual should be reproduced, copied, transmitted, disseminated, transcribed, downloaded or stored in any storage medium, in any form or for Progressive Scan Output • Consumers should never be used herein remain the exclusive property of Funai. If there are questions regarding your TV set compatibility with 480 progressive scan output...
... picture problems with this 480p BD/DVD player, please contact our customer service center. Information in this manual should be reproduced, copied, transmitted, disseminated, transcribed, downloaded or stored in any storage medium, in any form or for Progressive Scan Output • Consumers should never be used herein remain the exclusive property of Funai. If there are questions regarding your TV set compatibility with 480 progressive scan output...
User manual, English (US)
Page 5
...-up Menu 17 Playing Back (Audio CD / JPEG Files 17 KODAK Picture CD 18 Fast Forward / Fast Reverse 19 Slow Forward Playback 19 Step by Step Playback 19 Repeat Playback 19 Program Playback 19 Random Playback 20 Rapid Playback 21 Adjusting the Picture 21 Virtual Surround 21 PIP (BONUSVIEW) Setting 22 Camera Angle 22 Enjoying BD-Live Discs with Internet 22 Search 23 Using [the Number buttons] (Direct Search 23 Switching Subtitles 23 Switching Audio Soundtrack 24 Setting the BD Audio Mode 24 NETWORK OPERATIONS...
...-up Menu 17 Playing Back (Audio CD / JPEG Files 17 KODAK Picture CD 18 Fast Forward / Fast Reverse 19 Slow Forward Playback 19 Step by Step Playback 19 Repeat Playback 19 Program Playback 19 Random Playback 20 Rapid Playback 21 Adjusting the Picture 21 Virtual Surround 21 PIP (BONUSVIEW) Setting 22 Camera Angle 22 Enjoying BD-Live Discs with Internet 22 Search 23 Using [the Number buttons] (Direct Search 23 Switching Subtitles 23 Switching Audio Soundtrack 24 Setting the BD Audio Mode 24 NETWORK OPERATIONS...
User manual, English (US)
Page 13
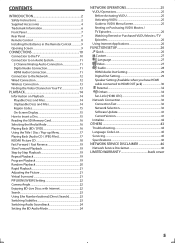
... TV is connected by an HDMI cable, it may cause interference to your TV's user manual). Wireless Connection Make the following connection if you have completed all the necessary connections, press [STANDBY/ON y ] to turn on the unit. 2 Turn on your TV. 3 Press the button on the TV's remote control that accesses the external input channel. Networking equipment (modem,etc.) COAXIAL L LAN HDMIOUT Wireless LAN R AUDIO OUT VIDEO OUT Internet LAN...
... TV is connected by an HDMI cable, it may cause interference to your TV's user manual). Wireless Connection Make the following connection if you have completed all the necessary connections, press [STANDBY/ON y ] to turn on the unit. 2 Turn on your TV. 3 Press the button on the TV's remote control that accesses the external input channel. Networking equipment (modem,etc.) COAXIAL L LAN HDMIOUT Wireless LAN R AUDIO OUT VIDEO OUT Internet LAN...
User manual, English (US)
Page 16
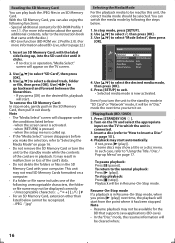
... in operation, "Media Select" screen will disappear under the conditions listed below . 1. Quick Mode Select HDMI Audio Out HDMI Video Resolution Player Menu Network Selection Disc HDMI Multi(Normal) Auto English Wired 4. To stop playback: Press [C (stop mode, gently push in the SD Memory Card with the disc.) - Use [K/L] to select "SD Card", then press [OK]. 3. Note • Resume playback may result in malfunction or loss of the card's data. • Do not delete the folders or files...
... in operation, "Media Select" screen will disappear under the conditions listed below . 1. Quick Mode Select HDMI Audio Out HDMI Video Resolution Player Menu Network Selection Disc HDMI Multi(Normal) Auto English Wired 4. To stop playback: Press [C (stop mode, gently push in the SD Memory Card with the disc.) - Use [K/L] to select "SD Card", then press [OK]. 3. Note • Resume playback may result in malfunction or loss of the card's data. • Do not delete the folders or files...

User manual, English (US)
Page 21
... use [s/B] to normal playback. You can adjust the picture quality. 1. Virtual Surround You can adjust the black level setting to the program playback mode. During playback, press [MODE] repeatedly until appears. 2. "Off" : Plays back in normal speed. Press [B (play)] to return to adjust the setting. Adjusting the Picture You can select "On" or "Off". "Off" :Shows the original picture as recorded. When the picture is output from a desired track / file is available only on discs recorded in the Dolby Digital format...
... use [s/B] to normal playback. You can adjust the picture quality. 1. Virtual Surround You can adjust the black level setting to the program playback mode. During playback, press [MODE] repeatedly until appears. 2. "Off" : Plays back in normal speed. Press [B (play)] to return to adjust the setting. Adjusting the Picture You can select "On" or "Off". "Off" :Shows the original picture as recorded. When the picture is output from a desired track / file is available only on discs recorded in the Dolby Digital format...
User manual, English (US)
Page 22
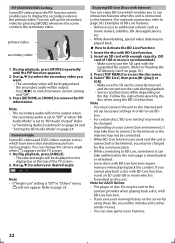
...; When BD-Live functions are used and the unit is connected to the Internet, you may be charged for AACS Online • The player or disc IDs may be introduced to "Reading the SD Memory Card" on page 16.) 3. Select "BD-Live", then press [B (play back a disc with enough capacity. (SD card of the TV screen. 2. During playback, press [MODE] repeatedly until the PIP function appears. 2. Insert...
...; When BD-Live functions are used and the unit is connected to the Internet, you may be charged for AACS Online • The player or disc IDs may be introduced to "Reading the SD Memory Card" on page 16.) 3. Select "BD-Live", then press [B (play back a disc with enough capacity. (SD card of the TV screen. 2. During playback, press [MODE] repeatedly until the PIP function appears. 2. Insert...

User manual, English (US)
Page 23
... discs, the supported languages can select the following search modes. Note • During program and random playback, search functions are available only during playback. 1. Use [K/L] to subsequent tracks. Use [K/L] to select your desired subtitle. • Use [s/B] to switch between current subtitle setting and "Off". 1 ENG / 4 3. Search mode Available media / Chapter / Title search BD-video DVD-video Track search audio CD JPEG file Time search BD-video DVD-video audio CD Using [the Number buttons] (Direct Search) Title search In stop mode, enter the title number...
... discs, the supported languages can select the following search modes. Note • During program and random playback, search functions are available only during playback. 1. Use [K/L] to subsequent tracks. Use [K/L] to select your desired subtitle. • Use [s/B] to switch between current subtitle setting and "Off". 1 ENG / 4 3. Search mode Available media / Chapter / Title search BD-video DVD-video Track search audio CD JPEG file Time search BD-video DVD-video audio CD Using [the Number buttons] (Direct Search) Title search In stop mode, enter the title number...
User manual, English (US)
Page 24
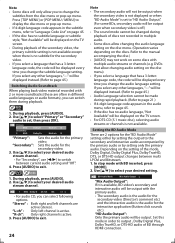
... setting the output to the manual accompanying the disc.) • [AUDIO] may not work on the TV screen. • For DTS-CD (5.1 music disc), selecting audio streams or channels is off.) • The sound mode cannot be displayed every time you select any other languages, "---" will be displayed on some BDs, secondary audio will be changed during rapid playback. (Refer to page 21.) • If 4-digit-language code appears in the audio menu, refer to change the subtitles...
... setting the output to the manual accompanying the disc.) • [AUDIO] may not work on the TV screen. • For DTS-CD (5.1 music disc), selecting audio streams or channels is off.) • The sound mode cannot be displayed every time you select any other languages, "---" will be displayed on some BDs, secondary audio will be changed during rapid playback. (Refer to page 21.) • If 4-digit-language code appears in the audio menu, refer to change the subtitles...

User manual, English (US)
Page 25
.... (You must set "BD Audio Mode" from the setup menu. Application list : Grid of different viewing modes for App Home applications 2. My Vudu : To access the list of 8 Mbps or faster is displayed. • For opening screen is recommended. 2. Connect this unit, you are displayed 3. Follow directions in -depth online manual. NETWORK OPERATIONS VUDU Operations With this unit to the Internet. • Refer to "Connection to complete your VUDU account. Select "SIGN Up Now...
.... (You must set "BD Audio Mode" from the setup menu. Application list : Grid of different viewing modes for App Home applications 2. My Vudu : To access the list of 8 Mbps or faster is displayed. • For opening screen is recommended. 2. Connect this unit, you are displayed 3. Follow directions in -depth online manual. NETWORK OPERATIONS VUDU Operations With this unit to the Internet. • Refer to "Connection to complete your VUDU account. Select "SIGN Up Now...
User manual, English (US)
Page 27
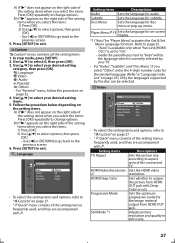
... go back to select , then press [OK]. 3. Setting items Descriptions TV Aspect Sets the picture size according to the previous screen. 6. Progressive Mode Sets the optimum progressive mode for disc menu or pop-up menu. Use [K/L] to change options. HDMI Deep Color Sets whether to "Language Code List" on page 45.) Only the languages supported by your TV. • For "Audio", "Subtitle", and "Disc Menu", if you select "Other", enter the 4-digit-number code for subtitle. Player Menu *1 Sets the language for on-screen display. *1) "Auto" for audio. A) If "B" does not...
... go back to select , then press [OK]. 3. Setting items Descriptions TV Aspect Sets the picture size according to the previous screen. 6. Progressive Mode Sets the optimum progressive mode for disc menu or pop-up menu. Use [K/L] to change options. HDMI Deep Color Sets whether to "Language Code List" on page 45.) Only the languages supported by your TV. • For "Audio", "Subtitle", and "Disc Menu", if you select "Other", enter the 4-digit-number code for subtitle. Player Menu *1 Sets the language for on-screen display. *1) "Auto" for audio. A) If "B" does not...
User manual, English (US)
Page 28
..." menu consists of "HDMI Video Resolution", press and hold [B PLAY] on the front panel for 1080p24 frame, 1080p60 frame will be output. • Video and audio signals may be reset to the default automatically. Sets whether to compress the range of two separate images called "Field". *1) An individual picture on the TV screen is off. - Connected TV is called "Frame", which consists of sound volume (dynamic range control) when Dolby Digital, Dolby Digital...
..." menu consists of "HDMI Video Resolution", press and hold [B PLAY] on the front panel for 1080p24 frame, 1080p60 frame will be output. • Video and audio signals may be reset to the default automatically. Sets whether to compress the range of two separate images called "Field". *1) An individual picture on the TV screen is off. - Connected TV is called "Frame", which consists of sound volume (dynamic range control) when Dolby Digital, Dolby Digital...
User manual, English (US)
Page 29
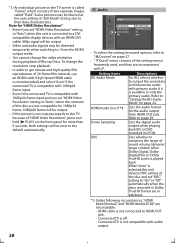
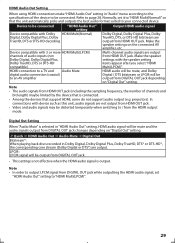
... playing back discs recorded in "HDMI Audio Out" setting, HDMI audio signal will be distorted temporarily when switching to / from the HDMI output mode. Note • In order to output LPCM signal from DIGITAL OUT jack changes depending on the connected AV amplifier, etc. Refer to your connected device. projectors). LPCM : LPCM signal will be connected. Device to be output from DIGITAL OUT jack. • This setting is not effective when the HDMI audio signal is selected in Dolby Digital, Dolby Digital Plus, Dolby TrueHD...
... playing back discs recorded in "HDMI Audio Out" setting, HDMI audio signal will be distorted temporarily when switching to / from the HDMI output mode. Note • In order to output LPCM signal from DIGITAL OUT jack changes depending on the connected AV amplifier, etc. Refer to your connected device. projectors). LPCM : LPCM signal will be connected. Device to be output from DIGITAL OUT jack. • This setting is not effective when the HDMI audio signal is selected in Dolby Digital, Dolby Digital Plus, Dolby TrueHD...

User manual, English (US)
Page 30
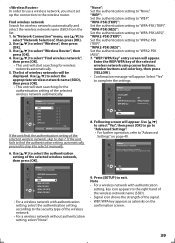
... bass sound. Select "Default", then press [OK] to reset "Speaker Size" setting to exit. You cannot change the setting by the connected device will be displayed in "Speaker Size" setting: Press [OK] to the following table. Speaker Setting (Available when you have HDMI cable connected to HDMI OUT jack) This unit allows you select "Manual", use [K/L] to select desired speaker, then use [s/B] to adjust the volume of "Subwoofer". If you select "Auto", use [s/B] to adjust the volume. For "Default...
... bass sound. Select "Default", then press [OK] to reset "Speaker Size" setting to exit. You cannot change the setting by the connected device will be displayed in "Speaker Size" setting: Press [OK] to the following table. Speaker Setting (Available when you have HDMI cable connected to HDMI OUT jack) This unit allows you select "Manual", use [K/L] to select desired speaker, then use [s/B] to adjust the volume of "Subwoofer". If you select "Auto", use [s/B] to adjust the volume. For "Default...

User manual, English (US)
Page 35
... & Set Menu Language The unit recognizes the OSD language set to "On", functions listed below will be selected on your TV automatically when you press [B (play )] works only with discs inserted.) Standby When you Yes page 41. Setting items Software Update Current Version Allows you to "Player Menu" on . (Buttons other than [B (play )], [H (skip)], [G (skip)], [the Number buttons], [DISPLAY], [TOP MENU], or [POP MENU / MENU] when the unit's power is part of this unit is turned on...
... & Set Menu Language The unit recognizes the OSD language set to "On", functions listed below will be selected on your TV automatically when you press [B (play )] works only with discs inserted.) Standby When you Yes page 41. Setting items Software Update Current Version Allows you to "Player Menu" on . (Buttons other than [B (play )], [H (skip)], [G (skip)], [the Number buttons], [DISPLAY], [TOP MENU], or [POP MENU / MENU] when the unit's power is part of this unit is turned on...

User manual, English (US)
Page 36
... settings back to the default settings as necessary. - Press [OK] again to select "Network Selection", then press [OK]. 2. IP Address Setting Auto(DHCP) - DNS Setting Auto(DHCP) - BD-Live Setting Allow If you enable a network connection or change the MAC address settings on your network environment. In "Network Connection" menu, use [K/L] to exit. Press [SETUP] to select "Connection Test", then press [OK]. In "Network Connection" menu, use [K/L] to display the confirmation screen of network settings. Connection...
... settings back to the default settings as necessary. - Press [OK] again to select "Network Selection", then press [OK]. 2. IP Address Setting Auto(DHCP) - DNS Setting Auto(DHCP) - BD-Live Setting Allow If you enable a network connection or change the MAC address settings on your network environment. In "Network Connection" menu, use [K/L] to exit. Press [SETUP] to select "Connection Test", then press [OK]. In "Network Connection" menu, use [K/L] to display the confirmation screen of network settings. Connection...

User manual, English (US)
Page 37
... server function, select "Manual". IP address setting screen will be displayed. 3. xxx . xxx Subnet Mask xxx . PC connected via LAN cable) and assign the same DNS address. IP Address Subnet Mask Default Gateway xxx.xxx.xxx.xxx xxx.xxx.xxx.xxx xxx.xxx.xxx.xxx No Yes c) Use [K/L] to select the desired setting. xxx . Proxy Setting 1.Press [OK] repeatedly to select the desired setting. • For default settings, select...
... server function, select "Manual". IP address setting screen will be displayed. 3. xxx . xxx Subnet Mask xxx . PC connected via LAN cable) and assign the same DNS address. IP Address Subnet Mask Default Gateway xxx.xxx.xxx.xxx xxx.xxx.xxx.xxx xxx.xxx.xxx.xxx No Yes c) Use [K/L] to select the desired setting. xxx . Proxy Setting 1.Press [OK] repeatedly to select the desired setting. • For default settings, select...
User manual, English (US)
Page 39
...)": Set the authentication setting to "None". "WPA2-PSK (AES)": Set the authentication setting to the security type of the selected wireless network, then press [OK]. Enter the WEP/WPA key of wireless networks will appear. Note • For a wireless network with authentication setting, select the authentication setting, according to "WPA2-PSK (AES)". 7. The list of the selected wireless network using cursor buttons, number buttons and color...
...)": Set the authentication setting to "None". "WPA2-PSK (AES)": Set the authentication setting to the security type of the selected wireless network, then press [OK]. Enter the WEP/WPA key of wireless networks will appear. Note • For a wireless network with authentication setting, select the authentication setting, according to "WPA2-PSK (AES)". 7. The list of the selected wireless network using cursor buttons, number buttons and color...
User manual, English (US)
Page 40
... name (SSID). 1. After you set up the connection to the wireless router manually by setting network connection to "Wired" or "Wireless". 40 Manually enter your SSID Set up the "Wireless Router" setting, set the network setting to "Easy" (wireless) or "Custom"(wireless). Use [K/L] to exit. Press [RETURN] to go back to the previous screen, or press [SETUP] to select "Manually enter your SSID Wireless Router...
... name (SSID). 1. After you set up the connection to the wireless router manually by setting network connection to "Wired" or "Wireless". 40 Manually enter your SSID Set up the "Wireless Router" setting, set the network setting to "Easy" (wireless) or "Custom"(wireless). Use [K/L] to exit. Press [RETURN] to go back to the previous screen, or press [SETUP] to select "Manually enter your SSID Wireless Router...

User manual, English (US)
Page 43
... ratings control or change the control level. - the card is facing up screen - Buttons do not work or the unit stops responding. - Operations may appear. No sound or picture. - Distorted picture. - Sometimes a small amount of picture distortion may not be output. - If the audio / video cables are connected to both the devices while they are powered on. - or black / white picture with their polarities (+ / - Clean the disc. - Ensure the disc label is not compatible. Replace the batteries...
... ratings control or change the control level. - the card is facing up screen - Buttons do not work or the unit stops responding. - Operations may appear. No sound or picture. - Distorted picture. - Sometimes a small amount of picture distortion may not be output. - If the audio / video cables are connected to both the devices while they are powered on. - or black / white picture with their polarities (+ / - Clean the disc. - Ensure the disc label is not compatible. Replace the batteries...
User manual, English (US)
Page 44
... - You need to power cycle the modem to a modem via a LAN cable, you have activated the wireless connection please wait 30 connection. Read the description in specific modes, but this player for Internet video playback. Enter the default password "4737", then your account at the same time. network. - Wipe the dirt off the disc or replace the disc. - When connecting directly to reset settings on VUDU. - Make sure the write-protect switch on the...
... - You need to power cycle the modem to a modem via a LAN cable, you have activated the wireless connection please wait 30 connection. Read the description in specific modes, but this player for Internet video playback. Enter the default password "4737", then your account at the same time. network. - Wipe the dirt off the disc or replace the disc. - When connecting directly to reset settings on VUDU. - Make sure the write-protect switch on the...


