

User manual, English (US)
Page 4
...Contents General Information Safety Information 3 Table of Contents 4 Introduction 5 Playable Discs 6 Getting Started Remote Control Setup 7 Hookups 8-12 DVD Player Display 13 Front Panel 14 Rear Panel 15 Remote Control Buttons 16-17 Disc Playback and Features Playing a Disc 18 Disc Menus ...Random Playback 31 Audio Language 32 Subtitle Language 33 Camera Angles 34 Parental Lock Password 35 Parental Lock Levels 36 DVD Player Setup and Features Display Screen (DVD 37 Display Screen (Audio CD 38 Marker Setup Screen 39 Audio Settings 40-41 Display Settings 42-43 Language ...
...Contents General Information Safety Information 3 Table of Contents 4 Introduction 5 Playable Discs 6 Getting Started Remote Control Setup 7 Hookups 8-12 DVD Player Display 13 Front Panel 14 Rear Panel 15 Remote Control Buttons 16-17 Disc Playback and Features Playing a Disc 18 Disc Menus ...Random Playback 31 Audio Language 32 Subtitle Language 33 Camera Angles 34 Parental Lock Password 35 Parental Lock Levels 36 DVD Player Setup and Features Display Screen (DVD 37 Display Screen (Audio CD 38 Marker Setup Screen 39 Audio Settings 40-41 Display Settings 42-43 Language ...

User manual, English (US)
Page 5
... want to access a feature that is in a desired language * • Dynamic Range Control • Markers • On-Screen Display for DVD Player • Parental Lock* • Paused/Fast/Slow/Step-by pressing the SETUP button on the remote control when Disc playback is not available on...are on some Digital Video Discs. AUDIO CD Indicates that the feature described is available on this DVD Player and learn to use the DVD Player's menu to use all the features listed below. DVD Player Menus... An "X" will describe how you can access all of the picture). The "X" may not...
... want to access a feature that is in a desired language * • Dynamic Range Control • Markers • On-Screen Display for DVD Player • Parental Lock* • Paused/Fast/Slow/Step-by pressing the SETUP button on the remote control when Disc playback is not available on...are on some Digital Video Discs. AUDIO CD Indicates that the feature described is available on this DVD Player and learn to use the DVD Player's menu to use all the features listed below. DVD Player Menus... An "X" will describe how you can access all of the picture). The "X" may not...
User manual, English (US)
Page 6
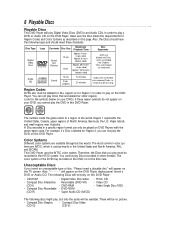
...A Disc encoded in the United States and North America, PAL, and SECAM. You cannot play , but only the audio will appear on this DVD Player. Disc Type Digital Video Disc Logo Contents Disc Size Maximum Playback Time Sound and Pictures 12 cm 8 cm Approx. 4 hours (single-sided) ... into Titles, which is labeled for Region Codes and Color Systems as described on the DVD Player display panel. The number inside the globe refers to play on this DVD Player. This DVD Player uses the NTSC color system. Color Systems Different color systems are numbered. There will play...
...A Disc encoded in the United States and North America, PAL, and SECAM. You cannot play , but only the audio will appear on this DVD Player. Disc Type Digital Video Disc Logo Contents Disc Size Maximum Playback Time Sound and Pictures 12 cm 8 cm Approx. 4 hours (single-sided) ... into Titles, which is labeled for Region Codes and Color Systems as described on the DVD Player display panel. The number inside the globe refers to play on this DVD Player. This DVD Player uses the NTSC color system. Color Systems Different color systems are numbered. There will play...

User manual, English (US)
Page 7
.... Remote Control Setup 7 1 2 Using the Remote Control q Point the remote control at the DVD Player's remote sensor (see page 14) when using the remote control to operate the DVD Player. 3 q Do not put objects between the remote control and the DVD Player. Putting Batteries in bodily injury or damage to the unit: Install ALL batteries correctly...
.... Remote Control Setup 7 1 2 Using the Remote Control q Point the remote control at the DVD Player's remote sensor (see page 14) when using the remote control to operate the DVD Player. 3 q Do not put objects between the remote control and the DVD Player. Putting Batteries in bodily injury or damage to the unit: Install ALL batteries correctly...

User manual, English (US)
Page 8
... jacks on the TV, matching the cable colors to the jack colors. 2 Connect the supplied yellow video cable to the VIDEO OUT jack on the DVD Player and to the correct Audio/Video In channel. Details are wrong will appear briefly on the TV. 3 Connect the TV's power cord to a TV. ... the VCR to the TV, the picture may need to the Audio/Video In channel, which best matches your connection, you hook up the DVD Player, remember: q Connect the DVD Player directly to a power outlet. q Turn off the power of channel 00. "P-ON" will distort the sound or damage the speakers. If you , ...
... jacks on the TV, matching the cable colors to the jack colors. 2 Connect the supplied yellow video cable to the VIDEO OUT jack on the DVD Player and to the correct Audio/Video In channel. Details are wrong will appear briefly on the TV. 3 Connect the TV's power cord to a TV. ... the VCR to the TV, the picture may need to the Audio/Video In channel, which best matches your connection, you hook up the DVD Player, remember: q Connect the DVD Player directly to a power outlet. q Turn off the power of channel 00. "P-ON" will distort the sound or damage the speakers. If you , ...

User manual, English (US)
Page 9
... (no stereo or amplifier) TV has audio (red and white) and S-Video In jacks q For better picture quality, use the VIDEO OUT jack on the DVD Player, and you do not, check your connections and make sure the TV is located near channel 00. Details are wrong will not need the supplied... yellow video cable. DVD Player 1 L/MONO AUDIO R VIDEO in LEFT AUDIO IN RIGHT AUDIO IN S-VIDEO IN R L AUDIO OUT VIDEO OUT S-VIDEO OUT DIGITAL AUDIO OUT PCM / BITSTREAM COAXIAL 12...
... (no stereo or amplifier) TV has audio (red and white) and S-Video In jacks q For better picture quality, use the VIDEO OUT jack on the DVD Player, and you do not, check your connections and make sure the TV is located near channel 00. Details are wrong will not need the supplied... yellow video cable. DVD Player 1 L/MONO AUDIO R VIDEO in LEFT AUDIO IN RIGHT AUDIO IN S-VIDEO IN R L AUDIO OUT VIDEO OUT S-VIDEO OUT DIGITAL AUDIO OUT PCM / BITSTREAM COAXIAL 12...
User manual, English (US)
Page 10
... only) 1 R L AUDIO OUT VIDEO OUT S-VIDEO OUT AUDIO (RIGHT) IN DIGITAL AUDIO OUT PCM / BITSTREAM COAXIAL AUDIO (LEFT) IN 2 Back of Audio CDs on the DVD Player. Turn on the TV. If you may check the status of Stereo (example only) 1 Connect the supplied red and white audio cables to the red... on the Stereo, matching the cable colors to the jack colors. 2 Connect the supplied yellow video cable to the yellow VIDEO OUT jack on the DVD Player and to the Video In channel (or S-Video In channel), which usually is on the correct Video In channel. VIDEO 1 L/MONO AUDIO R in VIDEO IN...
... only) 1 R L AUDIO OUT VIDEO OUT S-VIDEO OUT AUDIO (RIGHT) IN DIGITAL AUDIO OUT PCM / BITSTREAM COAXIAL AUDIO (LEFT) IN 2 Back of Audio CDs on the DVD Player. Turn on the TV. If you may check the status of Stereo (example only) 1 Connect the supplied red and white audio cables to the red... on the Stereo, matching the cable colors to the jack colors. 2 Connect the supplied yellow video cable to the yellow VIDEO OUT jack on the DVD Player and to the Video In channel (or S-Video In channel), which usually is on the correct Video In channel. VIDEO 1 L/MONO AUDIO R in VIDEO IN...

User manual, English (US)
Page 11
... on the TV and set Dolby Digital and DTS to On. Turn on the Decoder and select the Auxiliary IN station. If you connect the DVD Player to a Dolby Digital Decoder, set DTS to the Decoder as described in the Disc menu. Incorrect settings may check the Disc status on your ... AUDIO OUT PCM / BITSTREAM COAXIAL 1 Back of Decoder (example only) COAXIAL DIGITAL AUDIO IN 1 Connect a coaxial digital audio cable to the COAXIAL jack on the DVD Player and to the COAXIAL DIGITAL AUDIO IN jack on the Decoder. 2 Connect the supplied yellow video cable to the yellow VIDEO OUT jack on the...
... on the TV and set Dolby Digital and DTS to On. Turn on the Decoder and select the Auxiliary IN station. If you connect the DVD Player to a Dolby Digital Decoder, set DTS to the Decoder as described in the Disc menu. Incorrect settings may check the Disc status on your ... AUDIO OUT PCM / BITSTREAM COAXIAL 1 Back of Decoder (example only) COAXIAL DIGITAL AUDIO IN 1 Connect a coaxial digital audio cable to the COAXIAL jack on the DVD Player and to the COAXIAL DIGITAL AUDIO IN jack on the Decoder. 2 Connect the supplied yellow video cable to the yellow VIDEO OUT jack on the...

User manual, English (US)
Page 12
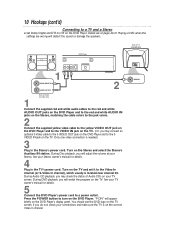
... and set it to turn on the TV. Press the POWER button to the correct Video In channel. "P-ON" will watch the program on the DVD Player. Playing a DVD when the settings are on the TV. During Audio CD playback, you may connect an optional S-Video cable to the S-VIDEO OUT jack on... to the COAXIAL DIGITAL AUDIO IN jack on the Amplifier. 2 Connect the supplied yellow video cable to the yellow VIDEO OUT jack on the DVD Player and to Off on your TV owner's manual for this connection. q Set Dolby Digital and DTS to the VIDEO IN jack on the TV. (Or, ...
... and set it to turn on the TV. Press the POWER button to the correct Video In channel. "P-ON" will watch the program on the DVD Player. Playing a DVD when the settings are on the TV. During Audio CD playback, you may connect an optional S-Video cable to the S-VIDEO OUT jack on... to the COAXIAL DIGITAL AUDIO IN jack on the Amplifier. 2 Connect the supplied yellow video cable to the yellow VIDEO OUT jack on the DVD Player and to Off on your TV owner's manual for this connection. q Set Dolby Digital and DTS to the VIDEO IN jack on the TV. (Or, ...
User manual, English (US)
Page 13
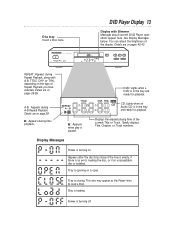
... See Display Messages below. OPEN/CLOSE STOP PLAY PAUSE PREV NEXT REPEAT: Appears during Repeat Playback, along with Dimmer Messages about current DVD Player operations appear here. B TITLE F : Appears when play is turning off. Tray is opening or is in the tray and ready ... disc is loading. Disc tray Insert a Disc here. Details are on . Disc is installed. TRK. REPEAT A - STANDBY-ON DVD611 DVD/CD PLAYER DVD Player Display 13 Display with A-B, TITLE, CHP, or TRK., depending on pages 42-43. You can adjust the brightness of the current Title or...
... See Display Messages below. OPEN/CLOSE STOP PLAY PAUSE PREV NEXT REPEAT: Appears during Repeat Playback, along with Dimmer Messages about current DVD Player operations appear here. B TITLE F : Appears when play is turning off. Tray is opening or is in the tray and ready ... disc is loading. Disc tray Insert a Disc here. Details are on . Disc is installed. TRK. REPEAT A - STANDBY-ON DVD611 DVD/CD PLAYER DVD Player Display 13 Display with A-B, TITLE, CHP, or TRK., depending on pages 42-43. You can adjust the brightness of the current Title or...

User manual, English (US)
Page 14
.../CLOSE STOP PLAY PAUSE PREV NEXT Remote Sensor Receives a signal from your remote control so you can operate your DVD Player from a distance. PREV(ious)/NEXT Press to go to start or resume Disc playback. STANDBY-ON Button Press to open or close the Disc tray. ...
.../CLOSE STOP PLAY PAUSE PREV NEXT Remote Sensor Receives a signal from your remote control so you can operate your DVD Player from a distance. PREV(ious)/NEXT Press to go to start or resume Disc playback. STANDBY-ON Button Press to open or close the Disc tray. ...
User manual, English (US)
Page 15
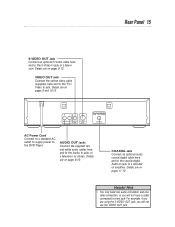
... cable here and to the Audio In jacks of a decoder or amplifier. VIDEO OUT Jack Connect the yellow video cable (supplied) here and to the DVD Player. AUDIO OUT Jacks Connect the supplied red and white audio cables here and to the coaxial digital Audio In jack of a television or stereo. Rear...
... cable here and to the Audio In jacks of a decoder or amplifier. VIDEO OUT Jack Connect the yellow video cable (supplied) here and to the DVD Player. AUDIO OUT Jacks Connect the supplied red and white audio cables here and to the coaxial digital Audio In jack of a television or stereo. Rear...

User manual, English (US)
Page 16
... display, which allows you can use the Number buttons to program Tracks (Audio CD) for playback. RETURN Button Press to return to the previous DVD Player Setup menu or to open or close the Disc tray. Details are on and off . Details are on page 28. OK Button Press to... Tracks, press a single Number button. Also, you to go directly to begin Disc play . Skip G and H Buttons Press to access or remove the DVD Player's Setup menu. Details are on the Disc. Play B Button Press to a specific Title/Chapter/Track/Time. AUDIO Button Press to repeat playback of the audio...
... display, which allows you can use the Number buttons to program Tracks (Audio CD) for playback. RETURN Button Press to return to the previous DVD Player Setup menu or to open or close the Disc tray. Details are on and off . Details are on page 28. OK Button Press to... Tracks, press a single Number button. Also, you to go directly to begin Disc play . Skip G and H Buttons Press to access or remove the DVD Player's Setup menu. Details are on the Disc. Play B Button Press to a specific Title/Chapter/Track/Time. AUDIO Button Press to repeat playback of the audio...

User manual, English (US)
Page 18
... Hints • An "X" may appear on the display panel. 2 Press the OPEN/CLOSE button to play only certain Discs. Details are set to the DVD Player. See page six for playback. Unplug the power cord, then reconnect it to turn on only one side, place the Disc in the recessed groove...of the TV screen when you try a feature. Clean the Disc, then turn off the DVD Player. Or, if the DVD is recorded on the DVD Player. Disc playback may stop playback. Details are recorded on page 19. Some DVDs are on both sides. Make sure the side you want to open the Disc tray. ...
... Hints • An "X" may appear on the display panel. 2 Press the OPEN/CLOSE button to play only certain Discs. Details are set to the DVD Player. See page six for playback. Unplug the power cord, then reconnect it to turn on only one side, place the Disc in the recessed groove...of the TV screen when you try a feature. Clean the Disc, then turn off the DVD Player. Or, if the DVD is recorded on the DVD Player. Disc playback may stop playback. Details are recorded on page 19. Some DVDs are on both sides. Make sure the side you want to open the Disc tray. ...

User manual, English (US)
Page 20
... MENU OK 2 Press the Play B button to start playing the DVD from the point at which playback stopped 1 Press the Stop C ...Play B Helpful Hint • To cancel resume playback and start playing the DVD. If you press the Pause F button repeatedly, the picture will resume from ... seconds, the following Resume message will be muted. Play B 1 123 2 DVD Resume On: Resuming playback from the beginning, press the Stop C button a ... first and the 'PLAY'. 2 Press the Play B button. 20 Pausing Playback DVD AUDIO CD Pausing Playback 1 During playback, press the Pause F button on the remote...
... MENU OK 2 Press the Play B button to start playing the DVD from the point at which playback stopped 1 Press the Stop C ...Play B Helpful Hint • To cancel resume playback and start playing the DVD. If you press the Pause F button repeatedly, the picture will resume from ... seconds, the following Resume message will be muted. Play B 1 123 2 DVD Resume On: Resuming playback from the beginning, press the Stop C button a ... first and the 'PLAY'. 2 Press the Play B button. 20 Pausing Playback DVD AUDIO CD Pausing Playback 1 During playback, press the Pause F button on the remote...

User manual, English (US)
Page 22
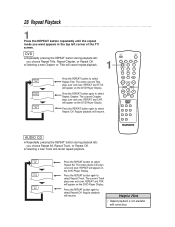
...again. DX32 1 Press the Reverse E button again. Pressing the Fast Forward g or Reverse h button repeatedly will be muted during searching on the DVD Player). q Use the Fast Forward g button for a forward search. EX32 Press the Fast Forward D button again. DX8 Press the Fast Forward D ... during searching. DX16 2 Press the Play B button to return to normal playback. Press the Reverse h button for a reverse search. q On a DVD, pressing the Fast Forward g or Reverse h but- EX2 Press the Fast Forward D button. Press the Reverse E button. q On an Audio CD...
...again. DX32 1 Press the Reverse E button again. Pressing the Fast Forward g or Reverse h button repeatedly will be muted during searching on the DVD Player). q Use the Fast Forward g button for a forward search. EX32 Press the Fast Forward D button again. DX8 Press the Fast Forward D ... during searching. DX16 2 Press the Play B button to return to normal playback. Press the Reverse h button for a reverse search. q On a DVD, pressing the Fast Forward g or Reverse h but- EX2 Press the Fast Forward D button. Press the Reverse E button. q On an Audio CD...
User manual, English (US)
Page 24
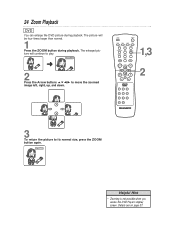
... the picture to move the zoomed image left, right, up, and down. Zoom [Off] Helpful Hint • Zooming is not possible when you access the DVD Player's display screen. The enlarged picture will be four times larger than normal. 1 Press the ZOOM button during playback. Zoom [On] § 2 Press the Arrow buttons...
... the picture to move the zoomed image left, right, up, and down. Zoom [Off] Helpful Hint • Zooming is not possible when you access the DVD Player's display screen. The enlarged picture will be four times larger than normal. 1 Press the ZOOM button during playback. Zoom [On] § 2 Press the Arrow buttons...

User manual, English (US)
Page 25
...digit. Press the Skip H button repeatedly to go from the last Track on the TV screen. The Track number will appear briefly on the DVD Player display panel. Press the Skip H button during playback to return to previous Tracks. A Using the Number Buttons to Select a Track Press ... press a single Number button. Within 30 seconds, press the Number buttons to skip subsequent Tracks. The Track number will appear briefly on the DVD Player display panel. Helpful Hints • The Skip buttons are three ways to the first Track. Track Playback 25 AUDIO CD Starting Playback at a...
...digit. Press the Skip H button repeatedly to go from the last Track on the TV screen. The Track number will appear briefly on the DVD Player display panel. Press the Skip H button during playback to return to previous Tracks. A Using the Number Buttons to Select a Track Press ... press a single Number button. Within 30 seconds, press the Number buttons to skip subsequent Tracks. The Track number will appear briefly on the DVD Player display panel. Helpful Hints • The Skip buttons are three ways to the first Track. Track Playback 25 AUDIO CD Starting Playback at a...

User manual, English (US)
Page 26
The DVD Player will move to enter the Title number. q For a single digit, 1-9, press 0 first. For example, to enter the Chapter number. Search Title :4 / 4 Chapter :- /17 1 2 OPEN/ CLOSE ... Search display appears on the TV screen. Search Title :4 / 4 Chapter :12/17 Helpful Hint • Title/Chapter playback is not available with some DVDs. 26 Title/Chapter Playback DVD Starting Playback at the selected Chapter. Search Title :1 / 4 Chapter :- /17 2 To select the Title, press the Arrow o button to select the Title space...
The DVD Player will move to enter the Title number. q For a single digit, 1-9, press 0 first. For example, to enter the Chapter number. Search Title :4 / 4 Chapter :- /17 1 2 OPEN/ CLOSE ... Search display appears on the TV screen. Search Title :4 / 4 Chapter :12/17 Helpful Hint • Title/Chapter playback is not available with some DVDs. 26 Title/Chapter Playback DVD Starting Playback at the selected Chapter. Search Title :1 / 4 Chapter :- /17 2 To select the Title, press the Arrow o button to select the Title space...
User manual, English (US)
Page 28
...repeatedly until the repeat mode you choose Repeat All, Repeat Track, or Repeat Off. will resume. REPEAT will appear on the DVD Player Display. will appear on the DVD Player Display. Repeat [Off] Press the REPEAT button again to select Repeat Track. The entire current Title plays over and over .... q Selecting a new Track will appear on the DVD Player Display. Helpful Hint • Repeat playback is not available with some discs. REPEAT and TITLE will cancel repeat playback. Press the REPEAT ...
...repeatedly until the repeat mode you choose Repeat All, Repeat Track, or Repeat Off. will resume. REPEAT will appear on the DVD Player Display. will appear on the DVD Player Display. Repeat [Off] Press the REPEAT button again to select Repeat Track. The entire current Title plays over and over .... q Selecting a new Track will appear on the DVD Player Display. Helpful Hint • Repeat playback is not available with some discs. REPEAT and TITLE will cancel repeat playback. Press the REPEAT ...


