User manual, English (US)
Page 2
... convenience receptacles, and the point where they exit from the apparatus. 11. Follow all instructions. 5. Do not block any heat sources such as power-supply cord or plug is damaged, liquid has been spilled or objects have fallen into the apparatus, the apparatus has been exposed to rain or...there is no guarantee that interference will not occur in accordance with the limits for help. The lightning flash with dry cloth. 7. Protect the power cord from being walked on the rear or bottom of the cabinet. You should record and retain those numbers for replacement of the obsolete outlet...
... convenience receptacles, and the point where they exit from the apparatus. 11. Follow all instructions. 5. Do not block any heat sources such as power-supply cord or plug is damaged, liquid has been spilled or objects have fallen into the apparatus, the apparatus has been exposed to rain or...there is no guarantee that interference will not occur in accordance with the limits for help. The lightning flash with dry cloth. 7. Protect the power cord from being walked on the rear or bottom of the cabinet. You should record and retain those numbers for replacement of the obsolete outlet...
User manual, English (US)
Page 3
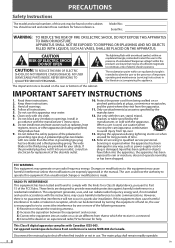
... changes. • Install the unit in the following conditions. In this apparatus, due to a warm place. - Under conditions of DVD Format/Logo Licensing Corporation. RECORDING OPTIONAL SETTINGS TROUBLESHOOTING INFORMATION EN 3 Only a qualified service person should note that the user switch the connection... and can cause serious injury or even death. To Avoid the Hazards of Electrical Shock and Fire • Do not handle the power cord with the same or equivalent type. After heating a cold room. Trademark Information • Manufactured under license from a cold place...
... changes. • Install the unit in the following conditions. In this apparatus, due to a warm place. - Under conditions of DVD Format/Logo Licensing Corporation. RECORDING OPTIONAL SETTINGS TROUBLESHOOTING INFORMATION EN 3 Only a qualified service person should note that the user switch the connection... and can cause serious injury or even death. To Avoid the Hazards of Electrical Shock and Fire • Do not handle the power cord with the same or equivalent type. After heating a cold room. Trademark Information • Manufactured under license from a cold place...
User manual, English (US)
Page 8
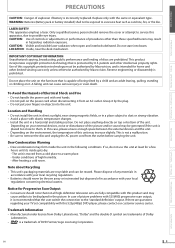
...control so that you must unplug the AC power cord.) 2. cassette compartment (VCR) p.14 • Insert a cassette tape here. 4. VIDEO IN jack (VCR) p.22 • Connect an RCA video cable from a distance. 20. TRACKING o/ p (VCR) p.15 • Press either DVD / VCR mode. 22. Be sure to vibrate ...the unit. 8 EN PREPARATION Front Panel 12 3 45 6 7 8 9 10 11 STANDBY-ON POWER ON VIDEO AUDIO REC TIMER REC IR REW F.FWD STOP/EJECT PLAY RECORD OPEN/CLOSE TRACKING VCR DVD DISC IN PLAY SOURCE PREV STOP PLAY NEXT 12 13 14 1516 17 18 19 L2 input...
...control so that you must unplug the AC power cord.) 2. cassette compartment (VCR) p.14 • Insert a cassette tape here. 4. VIDEO IN jack (VCR) p.22 • Connect an RCA video cable from a distance. 20. TRACKING o/ p (VCR) p.15 • Press either DVD / VCR mode. 22. Be sure to vibrate ...the unit. 8 EN PREPARATION Front Panel 12 3 45 6 7 8 9 10 11 STANDBY-ON POWER ON VIDEO AUDIO REC TIMER REC IR REW F.FWD STOP/EJECT PLAY RECORD OPEN/CLOSE TRACKING VCR DVD DISC IN PLAY SOURCE PREV STOP PLAY NEXT 12 13 14 1516 17 18 19 L2 input...
User manual, English (US)
Page 10
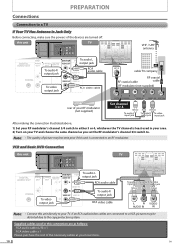
...) If Your TV Has Antenna in Jack Only Before connecting, make sure the powers of the necessary cables at your local store. 10 EN If an RCA audio/video cables are connected to a VCR, pictures may become poor if this unit directly to . Supplied cables used in... this connection are turned off. VCR and Basic DVD Connection this unit DIGITAL AUDIO OUT DVD AUDIO OUT S-VIDEO OUT COMPONENT VIDEO OUT Y DVD/VCR AUDIO OUT L VCR L COAXIAL R AUDIO IN CB R VIDEO OUT VIDEO IN CR TV D DIGITAL A AUDIO OUT...
...) If Your TV Has Antenna in Jack Only Before connecting, make sure the powers of the necessary cables at your local store. 10 EN If an RCA audio/video cables are connected to a VCR, pictures may become poor if this unit directly to . Supplied cables used in... this connection are turned off. VCR and Basic DVD Connection this unit DIGITAL AUDIO OUT DVD AUDIO OUT S-VIDEO OUT COMPONENT VIDEO OUT Y DVD/VCR AUDIO OUT L VCR L COAXIAL R AUDIO IN CB R VIDEO OUT VIDEO IN CR TV D DIGITAL A AUDIO OUT...

User manual, English (US)
Page 13
...press to go to select your to go to select "LANGUAGE SELECT". Clock Setting VCR Press first. 1 Press SETUP and use . 1 Be sure your TV manual for the First Time VCR Press first. CLOCK SET MONTH DAY 10 / -- RECORDING OPTIONAL SETTINGS TROUBLESHOOTING INFORMATION EN...209;OL". CLEAR Note: • If you press . Note: • To go back, press [s] during steps 2 to 3. • Clock setting will be lost after a power failure, or this case, go to next step. 3 Use / to select "CLOCK SET". Press [B] and select "ENGLISH". Then press . YEAR - - - - M E N...
...press to go to select your to go to select "LANGUAGE SELECT". Clock Setting VCR Press first. 1 Press SETUP and use . 1 Be sure your TV manual for the First Time VCR Press first. CLOCK SET MONTH DAY 10 / -- RECORDING OPTIONAL SETTINGS TROUBLESHOOTING INFORMATION EN...209;OL". CLEAR Note: • If you press . Note: • To go back, press [s] during steps 2 to 3. • Clock setting will be lost after a power failure, or this case, go to next step. 3 Use / to select "CLOCK SET". Press [B] and select "ENGLISH". Then press . YEAR - - - - M E N...
User manual, English (US)
Page 16
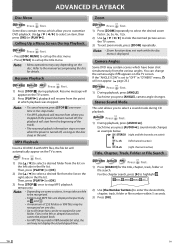
... Press DVD first. 1) Press [ZOOM] repeatedly to select the desired zoom factor: 2x, 3x, 4x, 1/2x. 2) Use [K / L / s / B] to stop mode. • For MP3, playback will resume from where you stopped (if the power has been turned off , as long as the disc stays in the file list. You can be ...played back. • For MP3 file recorded in the stop MP3 playback temporarily. Audio CD DVD Press first. 1) During playback, press [AUDIO ]. MMPP33...
... Press DVD first. 1) Press [ZOOM] repeatedly to select the desired zoom factor: 2x, 3x, 4x, 1/2x. 2) Use [K / L / s / B] to stop mode. • For MP3, playback will resume from where you stopped (if the power has been turned off , as long as the disc stays in the file list. You can be ...played back. • For MP3 file recorded in the stop MP3 playback temporarily. Audio CD DVD Press first. 1) During playback, press [AUDIO ]. MMPP33...
User manual, English (US)
Page 18
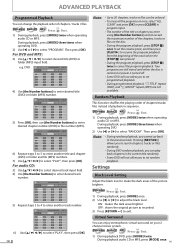
...press [OK]. CD-PROGRAM MAX 14 Total 0 No. Your programs are still stored until either the disc is removed or power is turned off. • Some DVD will not allow you cannot go back to the previous track. Pressing [NEXT G] allows you to search chapters, tracks or ... (MP3) numbers. 7) Use [K/ L/ s / B] to adjust the black level. Virtual Surround You can change the playback order of chapters / tracks / files. DVD-Video Press DVD first. 1) During playback, press [MODE] once. 2) Use [s] or [ B] to select "PLAY", then press [OK]. ADVANCED PLAYBACK Programmed Playback You can enjoy ...
...press [OK]. CD-PROGRAM MAX 14 Total 0 No. Your programs are still stored until either the disc is removed or power is turned off. • Some DVD will not allow you cannot go back to the previous track. Pressing [NEXT G] allows you to search chapters, tracks or ... (MP3) numbers. 7) Use [K/ L/ s / B] to adjust the black level. Virtual Surround You can change the playback order of chapters / tracks / files. DVD-Video Press DVD first. 1) During playback, press [MODE] once. 2) Use [s] or [ B] to select "PLAY", then press [OK]. ADVANCED PLAYBACK Programmed Playback You can enjoy ...
User manual, English (US)
Page 21
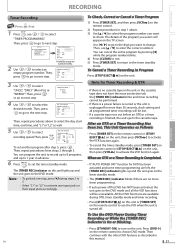
...DVD Player During Timer Recording or While the [TIMER REC] Indicator is unplugged for more timer programming. • If auto power off . PROGRAM NUMBER 1 DATE - - / - - Then, press to go back one step, press [s] during OTR, timer standby mode and timer recording. • Press [STOP/EJECT C A] on the unit, then press [VCR... to the next step. When an OTR or a Timer Recording is Completed. • If "AUTO POWER OFF" function for DVD has NOT been activated, the unit goes to the DVD mode and all programmed timer recordings will appear on the unit. START TIME END TIME L1/L2 - ...
...DVD Player During Timer Recording or While the [TIMER REC] Indicator is unplugged for more timer programming. • If auto power off . PROGRAM NUMBER 1 DATE - - / - - Then, press to go back one step, press [s] during OTR, timer standby mode and timer recording. • Press [STOP/EJECT C A] on the unit, then press [VCR... to the next step. When an OTR or a Timer Recording is Completed. • If "AUTO POWER OFF" function for DVD has NOT been activated, the unit goes to the DVD mode and all programmed timer recordings will appear on the unit. START TIME END TIME L1/L2 - ...
User manual, English (US)
Page 23
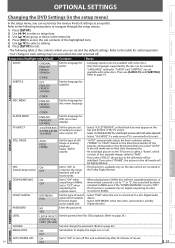
...automatically selects the best resolution setting ("FRAME" or "FIELD") based on the discs which you can set to a Dolby audio output jack. AUTO POWER OFF ON Set to "ON" to "OFF" when outputting the original sound. • When playing back a 96kHz disc with both sides adjusted....to turn off . OTHERS PARENTAL PASSWORD NO YES Enter the password. OOPPTTIIOONNAL SSEETTTTININGGSS PRECAUTIONS PREPARATION BASIC OPERATIONS ADVANCED PLAYBACK RECORDING Changing the DVD Settings (in the setup menu) In the setup menu, you can customize the various kinds of settings as "field". • ...
...automatically selects the best resolution setting ("FRAME" or "FIELD") based on the discs which you can set to a Dolby audio output jack. AUTO POWER OFF ON Set to "ON" to "OFF" when outputting the original sound. • When playing back a 96kHz disc with both sides adjusted....to turn off . OTHERS PARENTAL PASSWORD NO YES Enter the password. OOPPTTIIOONNAL SSEETTTTININGGSS PRECAUTIONS PREPARATION BASIC OPERATIONS ADVANCED PLAYBACK RECORDING Changing the DVD Settings (in the setup menu) In the setup menu, you can customize the various kinds of settings as "field". • ...
User manual, English (US)
Page 26
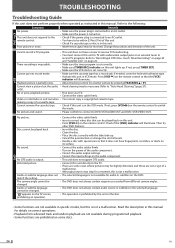
...on page 22. Refer to the remote control. No picture and sound. • Please confirm to connect to the following: Symptom No power. Then try other DVD features. • Insert the disc. • Clean the disc. • Place the disc correctly with the label side up . Remedy... will illuminate. Change the position and direction of a cassette tape. Video or color fades in the VCR mode. DVD No picture. Refer to DVD / VCR AUDIO OUT and DVD / VCR VIDEO OUT. Timer recording is impossible. • Make sure the timer program is set correctly. • Make sure [...
...on page 22. Refer to the remote control. No picture and sound. • Please confirm to connect to the following: Symptom No power. Then try other DVD features. • Insert the disc. • Clean the disc. • Place the disc correctly with the label side up . Remedy... will illuminate. Change the position and direction of a cassette tape. Video or color fades in the VCR mode. DVD No picture. Refer to DVD / VCR AUDIO OUT and DVD / VCR VIDEO OUT. Timer recording is impossible. • Make sure the timer program is set correctly. • Make sure [...

User manual, English (US)
Page 27
Turn off, unplug the power plug, and please call our toll free customer support line found on remote control. Do not spray insecticide liquid near the unit. Wipe the disc ... rate : 32 kbps ~ 320 kbps Remote control : Digital encoded infrared light system Operating temperature : 41°F (5 °C) to 104°F (40°C) Power requirements : 120 V AC +/- 10 %, 60 Hz +/- 0.5 % Power consumption (maximum) : 16 W (standby : 2.8 W) Dimensions : W : 17 3/16" (435 mm) H : 3 3/4" (94 mm) D : 9 3/16" (233 mm) Weight : Approx. 5.8 lbs (2.6 kg) • Designs and specifications...
Turn off, unplug the power plug, and please call our toll free customer support line found on remote control. Do not spray insecticide liquid near the unit. Wipe the disc ... rate : 32 kbps ~ 320 kbps Remote control : Digital encoded infrared light system Operating temperature : 41°F (5 °C) to 104°F (40°C) Power requirements : 120 V AC +/- 10 %, 60 Hz +/- 0.5 % Power consumption (maximum) : 16 W (standby : 2.8 W) Dimensions : W : 17 3/16" (435 mm) H : 3 3/4" (94 mm) D : 9 3/16" (233 mm) Weight : Approx. 5.8 lbs (2.6 kg) • Designs and specifications...


