User manual, English (US)
Page 3
...install the unit in hazardous radiation exposure. This is prohibited. PRECAUTIONS PREPARATION BASIC OPERATIONS ADVANCED PLAYBACK PRECAUTIONS CAUTION: Danger of DVD Format/Logo Licensing Corporation. A falling unit can be generated if the unit is intended for home and other limited ... from an AC outlet. "Dolby" and the double-D symbol are prohibited. Under conditions of the unit. RECORDING OPTIONAL SETTINGS TROUBLESHOOTING INFORMATION EN 3 Replace only with this unit may cause artifacts to possible eye injury. This product incorporates copyright protection...
...install the unit in hazardous radiation exposure. This is prohibited. PRECAUTIONS PREPARATION BASIC OPERATIONS ADVANCED PLAYBACK PRECAUTIONS CAUTION: Danger of DVD Format/Logo Licensing Corporation. A falling unit can be generated if the unit is intended for home and other limited ... from an AC outlet. "Dolby" and the double-D symbol are prohibited. Under conditions of the unit. RECORDING OPTIONAL SETTINGS TROUBLESHOOTING INFORMATION EN 3 Replace only with this unit may cause artifacts to possible eye injury. This product incorporates copyright protection...
User manual, English (US)
Page 4
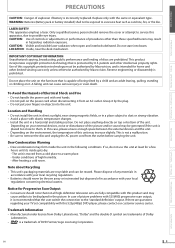
... or stored in any storage medium, in any form or for Timer Recording & OTR 21 Satellite Link 22 Dubbing a Cassette Tape 22 OPTIONAL SETTINGS Changing the DVD Settings (in this manual may not be construed as granting, by -step Playback 15 Slow Forward Playback 15 To Skip the Titles, Chapters, Tracks,... Connection to a TV 10 Connection to an Audio System 12 Initial Setups 13 Turning on Unit for the First Time 13 Clock Setting 13 BASIC OPERATIONS For VCR Playback 14 For Disc Playback 14 Hint for Disc Playback 15 Fast Forward / Fast Reverse Playback 15 Still Mode / Step-by ...
... or stored in any storage medium, in any form or for Timer Recording & OTR 21 Satellite Link 22 Dubbing a Cassette Tape 22 OPTIONAL SETTINGS Changing the DVD Settings (in this manual may not be construed as granting, by -step Playback 15 Slow Forward Playback 15 To Skip the Titles, Chapters, Tracks,... Connection to a TV 10 Connection to an Audio System 12 Initial Setups 13 Turning on Unit for the First Time 13 Clock Setting 13 BASIC OPERATIONS For VCR Playback 14 For Disc Playback 14 Hint for Disc Playback 15 Fast Forward / Fast Reverse Playback 15 Still Mode / Step-by ...
User manual, English (US)
Page 5
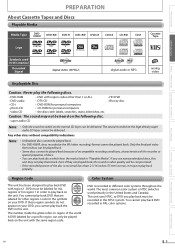
... play back DVD that are played back, the sound or video quality will be played back. Region Code This unit has been designed to region of the disc is recorded in PAL color systems. RECORDING OPTIONAL SETTINGS TROUBLESHOOTING INFORMATION EN 5 Look for other discs... without compatibility indications Note: • Unfinalized discs cannot be played back. • For DVD-RW/R, discs recorded in the VR (video recording) format cannot be...
... play back DVD that are played back, the sound or video quality will be played back. Region Code This unit has been designed to region of the disc is recorded in PAL color systems. RECORDING OPTIONAL SETTINGS TROUBLESHOOTING INFORMATION EN 5 Look for other discs... without compatibility indications Note: • Unfinalized discs cannot be played back. • For DVD-RW/R, discs recorded in the VR (video recording) format cannot be...
User manual, English (US)
Page 8
...tape playback. 21. TRACKING o/ p (VCR) p.15 • Press either DVD / VCR mode. 22. PREV H (DVD) p.15 • Press to go back to view the picture rapidly in the DVD mode. 9. EJECT A: • Press to begin fast forward search. PLAY B (DVD) p.14 • Press to...set. • Blinks when a timer recording or OTR (One-touch Timer Recording) has been finished or if the unit could not complete the recording due to activate an OTR (One-touch Timer Recording). 19. PLAY B (VCR) p.14 • Press to start / resume playback. 25. DVD output indicator (DVD...
...tape playback. 21. TRACKING o/ p (VCR) p.15 • Press either DVD / VCR mode. 22. PREV H (DVD) p.15 • Press to go back to view the picture rapidly in the DVD mode. 9. EJECT A: • Press to begin fast forward search. PLAY B (DVD) p.14 • Press to...set. • Blinks when a timer recording or OTR (One-touch Timer Recording) has been finished or if the unit could not complete the recording due to activate an OTR (One-touch Timer Recording). 19. PLAY B (VCR) p.14 • Press to start / resume playback. 25. DVD output indicator (DVD...
User manual, English (US)
Page 9
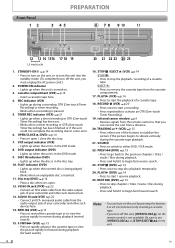
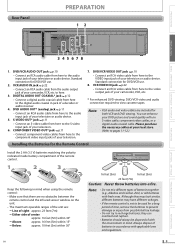
... enhance your television. 7. PRECAUTIONS Rear Panel PREPARATION 12 PREPARATION DIGITAL AUDIO OUT DVD AUDIO OUT S-VIDEO OUT COMPONENT VIDEO OUT Y DVD/VCR AUDIO OUT L VCR L COAXIAL R AUDIO IN CB R VIDEO OUT VIDEO IN CR L1 345678 BASIC OPERATIONS ADVANCED PLAYBACK RECORDING OPTIONAL SETTINGS TROUBLESHOOTING 1. to view cassette tapes. Note: • RCA audio and video cables...
... enhance your television. 7. PRECAUTIONS Rear Panel PREPARATION 12 PREPARATION DIGITAL AUDIO OUT DVD AUDIO OUT S-VIDEO OUT COMPONENT VIDEO OUT Y DVD/VCR AUDIO OUT L VCR L COAXIAL R AUDIO IN CB R VIDEO OUT VIDEO IN CR L1 345678 BASIC OPERATIONS ADVANCED PLAYBACK RECORDING OPTIONAL SETTINGS TROUBLESHOOTING 1. to view cassette tapes. Note: • RCA audio and video cables...
User manual, English (US)
Page 10
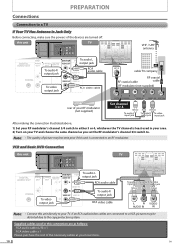
...input jack After making the connection illustrated above; 1) Set your RF modulator (not supplied) or ANT. VCR and Basic DVD Connection this unit DIGITAL AUDIO OUT DVD AUDIO OUT S-VIDEO OUT COMPONENT VIDEO OUT Y DVD/VCR AUDIO OUT L VCR L COAXIAL R AUDIO IN CB R VIDEO OUT VIDEO...Note: • Connect this unit DIGITAL AUDIO OUT DVD AUDIO OUT S-VIDEO OUT COMPONENT VIDEO OUT Y DVD/VCR AUDIO OUT L VCR L COAXIAL R AUDIO IN CB R VIDEO OUT VIDEO IN CR TV VHF / UHF antenna D DIGITAL A AUDIO OUT L COAXIAL R DVD/VCR VCR To audio L AUDIO OUT output jack To audio ...
...input jack After making the connection illustrated above; 1) Set your RF modulator (not supplied) or ANT. VCR and Basic DVD Connection this unit DIGITAL AUDIO OUT DVD AUDIO OUT S-VIDEO OUT COMPONENT VIDEO OUT Y DVD/VCR AUDIO OUT L VCR L COAXIAL R AUDIO IN CB R VIDEO OUT VIDEO...Note: • Connect this unit DIGITAL AUDIO OUT DVD AUDIO OUT S-VIDEO OUT COMPONENT VIDEO OUT Y DVD/VCR AUDIO OUT L VCR L COAXIAL R AUDIO IN CB R VIDEO OUT VIDEO IN CR TV VHF / UHF antenna D DIGITAL A AUDIO OUT L COAXIAL R DVD/VCR VCR To audio L AUDIO OUT output jack To audio ...
User manual, English (US)
Page 11
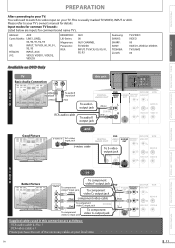
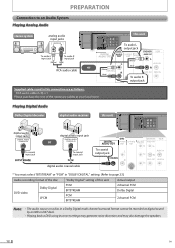
...SETTINGS TROUBLESHOOTING TV Basic Audio Connection L R AUDIO IN A U To audio L input jack To audio R input jack D I (White) (Red) O RCA audio cable this unit DIGITAL AUDIO OUT DVD AUDIO OUT To audio L L output jack (White) To audio R COAXIAL (Red) R output jack DIGITAL AUDIO OUT DVD AUDIO OUT S-VIDEO OUT COMPONENT VIDEO OUT Y DVD/VCR AUDIO OUT L VCR... HITACHI: INPUT, AUX JVC: VIDEO, VIDEO1, VIDEO2, VIDEO3 KENWOOD: LXI-Series: Magnavox: Panasonic: RCA: AUX 00 AUX CHANNEL TV/VIDEO INPUT, TV/VCR, 00, 90, 91, 92, 93 Samsung: SANYO: SHARP: SONY: TOSHIBA: Zenith...
...SETTINGS TROUBLESHOOTING TV Basic Audio Connection L R AUDIO IN A U To audio L input jack To audio R input jack D I (White) (Red) O RCA audio cable this unit DIGITAL AUDIO OUT DVD AUDIO OUT To audio L L output jack (White) To audio R COAXIAL (Red) R output jack DIGITAL AUDIO OUT DVD AUDIO OUT S-VIDEO OUT COMPONENT VIDEO OUT Y DVD/VCR AUDIO OUT L VCR... HITACHI: INPUT, AUX JVC: VIDEO, VIDEO1, VIDEO2, VIDEO3 KENWOOD: LXI-Series: Magnavox: Panasonic: RCA: AUX 00 AUX CHANNEL TV/VIDEO INPUT, TV/VCR, 00, 90, 91, 92, 93 Samsung: SANYO: SHARP: SONY: TOSHIBA: Zenith...
User manual, English (US)
Page 12
... IN To coaxial input jack PCM digital audio coaxial cable DVD DIGITAL AUDIO OUT OUT OUT To coaxial output jack L COAXIAL R DVD/VCR NT T AUDIO OUT Y L VCR AUDIO IN CB R VIDEO OUT VIDEO IN CR * You must select "BITSTREAM" or "PCM" in "DOLBY DIGITAL" setting. (Refer to an Audio System Playing Analog Audio stereo system...
... IN To coaxial input jack PCM digital audio coaxial cable DVD DIGITAL AUDIO OUT OUT OUT To coaxial output jack L COAXIAL R DVD/VCR NT T AUDIO OUT Y L VCR AUDIO IN CB R VIDEO OUT VIDEO IN CR * You must select "BITSTREAM" or "PCM" in "DOLBY DIGITAL" setting. (Refer to an Audio System Playing Analog Audio stereo system...

User manual, English (US)
Page 13
.../ to the next item. Press [B] and select "ENGLISH". AM/PM - - 3 Use / to continue. See your on Unit for more than 30 seconds. Clock Setting VCR Press first. 1 Press SETUP and use . 1 Be sure your to go to step 2 in this unit has been unplugged for the First Time... VCR Press first. TIMER PROGRAMMING SATELLITE LINK AUTO REPEAT [OFF] B CLOCK SET LANGUAGE SELECT • If the clock is set yet, the "CLOCK SET" menu SETUP appears when you accidentally select Spanish or French and need English: Press ...
.../ to the next item. Press [B] and select "ENGLISH". AM/PM - - 3 Use / to continue. See your on Unit for more than 30 seconds. Clock Setting VCR Press first. 1 Press SETUP and use . 1 Be sure your to go to step 2 in this unit has been unplugged for the First Time... VCR Press first. TIMER PROGRAMMING SATELLITE LINK AUTO REPEAT [OFF] B CLOCK SET LANGUAGE SELECT • If the clock is set yet, the "CLOCK SET" menu SETUP appears when you accidentally select Spanish or French and need English: Press ...
User manual, English (US)
Page 15
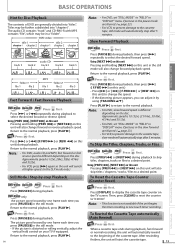
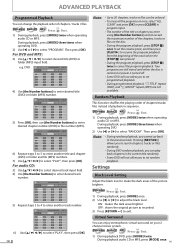
... 4(1/4x) and 5(1/2x). • For DVD, set "STILL MODE" to "FIELD" in "DISPLAY" menu if pictures in a "folder". Return to select the desired forward or reverse speed. Return to the normal playback. Slow Forward Playback DVD-Video Press DVD first. VCR VHS Press first. Press [PLAY B] to ...Mode / Step-by one -touch timer recording. Note: • For DVD, slow forward speed is 1(2x), 2(4x), 3(8x), 4(16x) and 5(32x). • For VCR, press [g] again so the unit will eject the cassette tape. 15 OPTIONAL SETTINGS TROUBLESHOOTING INFORMATION Using [PREV H], [NEXT G] on this unit Pressing [...
... 4(1/4x) and 5(1/2x). • For DVD, set "STILL MODE" to "FIELD" in "DISPLAY" menu if pictures in a "folder". Return to select the desired forward or reverse speed. Return to the normal playback. Slow Forward Playback DVD-Video Press DVD first. VCR VHS Press first. Press [PLAY B] to ...Mode / Step-by one -touch timer recording. Note: • For DVD, slow forward speed is 1(2x), 2(4x), 3(8x), 4(16x) and 5(32x). • For VCR, press [g] again so the unit will eject the cassette tape. 15 OPTIONAL SETTINGS TROUBLESHOOTING INFORMATION Using [PREV H], [NEXT G] on this unit Pressing [...
User manual, English (US)
Page 16
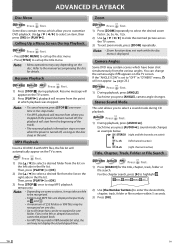
...rate), the unit may vary depending on the left channel is active) R-ch (right channel is set to be recognized in "OTHERS" menu, will not appear. ( page 23.) DVD-Video Press DVD first. 1) During playback, press [ANGLE]. Each time you press [ANGLE], camera angle changes.... L] to 8 hierarchies can change the camera angle if appears on one more time in the stop MP3 playback temporarily. AADDVVAANNCCED PPLLAAYYBBAACCKK Disc Menu DVD-Video Press DVD first. Each time you press [AUDIO ], sound mode changes as the disc stays in the file list. Then, press [PLAY B] or ...
...rate), the unit may vary depending on the left channel is active) R-ch (right channel is set to be recognized in "OTHERS" menu, will not appear. ( page 23.) DVD-Video Press DVD first. 1) During playback, press [ANGLE]. Each time you press [ANGLE], camera angle changes.... L] to 8 hierarchies can change the camera angle if appears on one more time in the stop MP3 playback temporarily. AADDVVAANNCCED PPLLAAYYBBAACCKK Disc Menu DVD-Video Press DVD first. Each time you press [AUDIO ], sound mode changes as the disc stays in the file list. Then, press [PLAY B] or ...
User manual, English (US)
Page 17
...3) Press [ B] to "AUTO REPEAT" to set to the manual accompanying the disc. • For DVD and audio CD, title, chapter or track search is not available with [the Number buttons]. VHS VCR Press first. 1) In stop the search. • For VCR, if a cassette tape ends during recording of ...the cassette tape. RECORDING OPTIONAL SETTINGS TROUBLESHOOTING INFORMATION EN 17...
...3) Press [ B] to "AUTO REPEAT" to set to the manual accompanying the disc. • For DVD and audio CD, title, chapter or track search is not available with [the Number buttons]. VHS VCR Press first. 1) In stop the search. • For VCR, if a cassette tape ends during recording of ...the cassette tape. RECORDING OPTIONAL SETTINGS TROUBLESHOOTING INFORMATION EN 17...
User manual, English (US)
Page 18
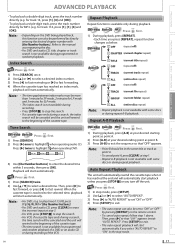
... of chapters/tracks/ files instead of the picture brighter. Note: • During random playback, you to set programmed playback. • During programmed playback, " TITLE" repeat (DVD), and " GROUP" repeat (MP3) are not available. Pressing [NEXT G] allows you to search chapters... press [OK] or press [CLEAR] in program input. • The number of the title or chapter you to set random playback. Then press [OK]. ON: makes the dark areas brighter. e.g. DVD-Video Press DVD first. 1) During playback, press [MODE] once. 2) Use [s] or [ B] to select "PROGRAM". TRACK P ...
... of chapters/tracks/ files instead of the picture brighter. Note: • During random playback, you to set programmed playback. • During programmed playback, " TITLE" repeat (DVD), and " GROUP" repeat (MP3) are not available. Pressing [NEXT G] allows you to search chapters... press [OK] or press [CLEAR] in program input. • The number of the title or chapter you to set random playback. Then press [OK]. ON: makes the dark areas brighter. e.g. DVD-Video Press DVD first. 1) During playback, press [MODE] once. 2) Use [s] or [ B] to select "PROGRAM". TRACK P ...
User manual, English (US)
Page 19
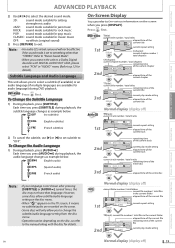
... BASIC OPERATIONS ADVANCED PLAYBACK ADVANCED PLAYBACK 2) Use [s / B] to select the desired sound mode. 3D: sound mode suitable for setting stereophonic audio JAZZ: sound mode suitable for jazz music ROCK: sound mode suitable for rock music POP: sound mode suitable for pop...folder1 2. folder1 2. To Change the Subtitle Language 1) During playback, press [SUBTITLE]. Press DVD first. folder2 DISPLAY 3 1. folder2 DISPLAY file name1 3 1. DVD-Video Press DVD first. file name2 current repeat setting TR(track): current file number / total files in the current folder 001/013 00:00...
... BASIC OPERATIONS ADVANCED PLAYBACK ADVANCED PLAYBACK 2) Use [s / B] to select the desired sound mode. 3D: sound mode suitable for setting stereophonic audio JAZZ: sound mode suitable for jazz music ROCK: sound mode suitable for rock music POP: sound mode suitable for pop...folder1 2. folder1 2. To Change the Subtitle Language 1) During playback, press [SUBTITLE]. Press DVD first. folder2 DISPLAY 3 1. folder2 DISPLAY file name1 3 1. DVD-Video Press DVD first. file name2 current repeat setting TR(track): current file number / total files in the current folder 001/013 00:00...
User manual, English (US)
Page 20
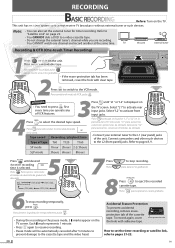
RREECCORDDIINNGG ASICRECORDING Before: Turn on page 22. • You CANNOT dub a DVD to a video cassette tape. • Do not change the external tuner's channel while you operate any of tape T60 T120 T160 to the L2 (front ... REMEMBER VCR • You need to stop recording temporarily, PAUSE press . OPEN/CLOSE Pulse para expulsar el casete grabado. tape. Select "L2" to activate front input jacks. 4 SPEED Press to eject the recorded cassette tape. OTR (8:00) OTR (7:30) 6To stop recording. Note: • You can also set the timer recording or...
RREECCORDDIINNGG ASICRECORDING Before: Turn on page 22. • You CANNOT dub a DVD to a video cassette tape. • Do not change the external tuner's channel while you operate any of tape T60 T120 T160 to the L2 (front ... REMEMBER VCR • You need to stop recording temporarily, PAUSE press . OPEN/CLOSE Pulse para expulsar el casete grabado. tape. Select "L2" to activate front input jacks. 4 SPEED Press to eject the recorded cassette tape. OTR (8:00) OTR (7:30) 6To stop recording. Note: • You can also set the timer recording or...
User manual, English (US)
Page 21
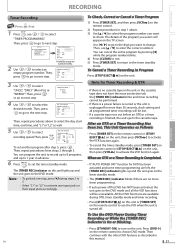
...: • To go to the digit you select will appear on the remote control to choose DVD mode. Note for Timer Recording & OTR • If there is no more than 30 seconds, clock setting and all the VCR functions will be unavailable. Then, press to go to next step. Available program number blinks...
...: • To go to the digit you select will appear on the remote control to choose DVD mode. Note for Timer Recording & OTR • If there is no more than 30 seconds, clock setting and all the VCR functions will be unavailable. Then, press to go to next step. Available program number blinks...
User manual, English (US)
Page 22
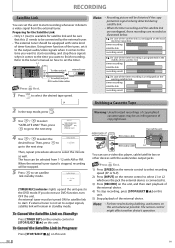
...set it to the output audio/video signals when it comes to the time you do not use DVD function, turn OFF the unit. Using timer function of copyrighted cassette tapes may be turned ON for satellite link to start. L1 VCR DIGITAL AUDIO OUT DVD AUDIO OUT S-VIDEO OUT COMPONENT VIDEO OUT Y DVD/VCR... AUDIO OUT L VCR L COAXIAL R AUDIO IN CB R VIDEO OUT VIDEO IN CR AUDIO IN To video out jack VIDEO ...
...set it to the output audio/video signals when it comes to the time you do not use DVD function, turn OFF the unit. Using timer function of copyrighted cassette tapes may be turned ON for satellite link to start. L1 VCR DIGITAL AUDIO OUT DVD AUDIO OUT S-VIDEO OUT COMPONENT VIDEO OUT Y DVD/VCR... AUDIO OUT L VCR L COAXIAL R AUDIO IN CB R VIDEO OUT VIDEO IN CR AUDIO IN To video out jack VIDEO ...
User manual, English (US)
Page 23
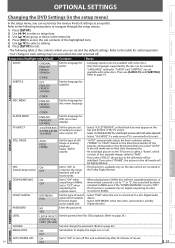
... top and bottom of the TV screen. • Select "4:3 PAN & SCAN" for DVD playback. (Refer to page 24.) LEVEL7 [NC-17] to LEVEL1 [KID SAFE] CHANGE Set and change to each setting stays on even when the unit is connected to a 2ch digital audio signal which consists...to the table for OSD (on-screen display). OOPPTTIIOONNAL SSEETTTTININGGSS PRECAUTIONS PREPARATION BASIC OPERATIONS ADVANCED PLAYBACK RECORDING Changing the DVD Settings (in the setup menu) In the setup menu, you can set to "OFF". • This function is available only on digital outputting of a disc recorded in 96kHz. ...
... top and bottom of the TV screen. • Select "4:3 PAN & SCAN" for DVD playback. (Refer to page 24.) LEVEL7 [NC-17] to LEVEL1 [KID SAFE] CHANGE Set and change to each setting stays on even when the unit is connected to a 2ch digital audio signal which consists...to the table for OSD (on-screen display). OOPPTTIIOONNAL SSEETTTTININGGSS PRECAUTIONS PREPARATION BASIC OPERATIONS ADVANCED PLAYBACK RECORDING Changing the DVD Settings (in the setup menu) In the setup menu, you can set to "OFF". • This function is available only on digital outputting of a disc recorded in 96kHz. ...

User manual, English (US)
Page 24
...except for children, with your new password. PARENTAL Setting Parental setting will be played back. • Levels 7 to 2: only DVD software intended for general use [the Number buttons] to select "YES". CONTROL LEVELS • Level 8: DVD software of any grades (adult/ general/children)... for the first time, use prohibited. Then, re-enter the new password. TIPS FOR LEVELS • 8 [ADULT]: DVD software of any grades (adult/ general/children) can be set . Playback will be played back. • 7 [NC-17]: no one under 13 • 3 [PG]: parental...
...except for children, with your new password. PARENTAL Setting Parental setting will be played back. • Levels 7 to 2: only DVD software intended for general use [the Number buttons] to select "YES". CONTROL LEVELS • Level 8: DVD software of any grades (adult/ general/children)... for the first time, use prohibited. Then, re-enter the new password. TIPS FOR LEVELS • 8 [ADULT]: DVD software of any grades (adult/ general/children) can be set . Playback will be played back. • 7 [NC-17]: no one under 13 • 3 [PG]: parental...

User manual, English (US)
Page 25
SELECT MENU LANGUAGE 1 ENGLISH 2 FRANÇAIS 3 ESPAÑOL The next time you operate, the player menu language will be the one you have selected. BASIC OPERATIONS ADVANCED PLAYBACK RECORDING OPTIONAL SETTINGS TROUBLESHOOTING INFORMATION EN 25 OK to select the desired language. INITIALIZE_INITIALIZE INITIALIZE YES 4 Press 1 , 2 or 3 to select "YES", then press . PRECAUTIONS PREPARATION OPTIONAL SETTINGS INITIALIZE Reset the settings to factory default. 1 SETUP Press to call up the setup menu. 2 Use 3 Press OK / to select , then press .
SELECT MENU LANGUAGE 1 ENGLISH 2 FRANÇAIS 3 ESPAÑOL The next time you operate, the player menu language will be the one you have selected. BASIC OPERATIONS ADVANCED PLAYBACK RECORDING OPTIONAL SETTINGS TROUBLESHOOTING INFORMATION EN 25 OK to select the desired language. INITIALIZE_INITIALIZE INITIALIZE YES 4 Press 1 , 2 or 3 to select "YES", then press . PRECAUTIONS PREPARATION OPTIONAL SETTINGS INITIALIZE Reset the settings to factory default. 1 SETUP Press to call up the setup menu. 2 Use 3 Press OK / to select , then press .


