User manual, English (US)
Page 5
... void the user's authority to provide reasonable protection against harmful interference in accordance with the limits for help. Consult the dealer or an experienced radio/TV technician for a Class B digital device, pursuant to part 15 of the FCC Rules. These limits are designed to operated the equipment under FCC rules. If...
... void the user's authority to provide reasonable protection against harmful interference in accordance with the limits for help. Consult the dealer or an experienced radio/TV technician for a Class B digital device, pursuant to part 15 of the FCC Rules. These limits are designed to operated the equipment under FCC rules. If...
User manual, English (US)
Page 6
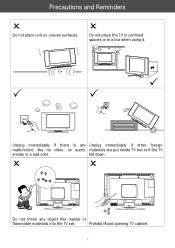
fell down. 2 2 Do not throw any Unplug immediately if other foreign malfunction, like metals or flammable materials into the TV set. Prohibit/Avoid opening TV cabinet 3 Precautions and Reminders 2 Do not place unit on uneven surfaces. 2 Do not place the TV in confined spaces or in a box when using it. 3 3 3 Unplug immediately if there is any object like no video, no audio, materials are put inside TV box or if the TV smoke or a bad odor.
fell down. 2 2 Do not throw any Unplug immediately if other foreign malfunction, like metals or flammable materials into the TV set. Prohibit/Avoid opening TV cabinet 3 Precautions and Reminders 2 Do not place unit on uneven surfaces. 2 Do not place the TV in confined spaces or in a box when using it. 3 3 3 Unplug immediately if there is any object like no video, no audio, materials are put inside TV box or if the TV smoke or a bad odor.
User manual, English (US)
Page 7
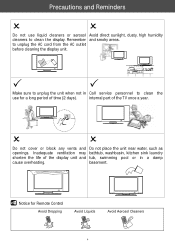
... or aerosol Avoid direct sunlight, dusty, high humidity cleaners to unplug the unit when not in a damp cause overheating. Notice for a long period of the TV once a year. 2 2 Do not cover or block any vents and Do not place the unit near water, such as openings. internal part of time (2 days...
... or aerosol Avoid direct sunlight, dusty, high humidity cleaners to unplug the unit when not in a damp cause overheating. Notice for a long period of the TV once a year. 2 2 Do not cover or block any vents and Do not place the unit near water, such as openings. internal part of time (2 days...
User manual, English (US)
Page 8
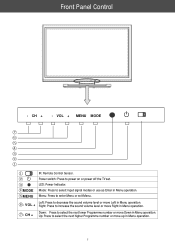
... + Down: Press to select the next lower Programme number or move Right in Menu operation. ⑦- Mode: Press to power on or power off the TV set. Front Panel Control - VOL + MENU MODE MODE ⑤MENU IR: Remote Control Sensor. Power switch: Press to select input signal modes or use as...
... + Down: Press to select the next lower Programme number or move Right in Menu operation. ⑦- Mode: Press to power on or power off the TV set. Front Panel Control - VOL + MENU MODE MODE ⑤MENU IR: Remote Control Sensor. Power switch: Press to select input signal modes or use as...
User manual, English (US)
Page 9
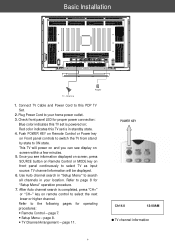
... information will power on and you see display on remote control to the following pages for "Setup Menu" operation procedure. 7. This TV will be displayed. 6. After Auto channel search is completed, press "CH+" or "CH-" key on screen within a few minutes. 5. y ...continuously to search all channels in your home power outlet. 3. page 7. y TV Channel Arrangement - POWER KEY Ch14.0 12:00AM TV channel information 6 Red color indicates this TV set is in "Setup Menu" to select TV as input source. Use Auto channel search in standby state. 4. page 11...
... information will power on and you see display on remote control to the following pages for "Setup Menu" operation procedure. 7. This TV will be displayed. 6. After Auto channel search is completed, press "CH+" or "CH-" key on screen within a few minutes. 5. y ...continuously to search all channels in your home power outlet. 3. page 7. y TV Channel Arrangement - POWER KEY Ch14.0 12:00AM TV channel information 6 Red color indicates this TV set is in "Setup Menu" to select TV as input source. Use Auto channel search in standby state. 4. page 11...
User manual, English (US)
Page 10
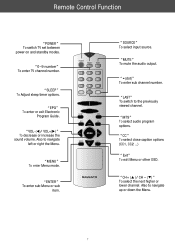
... enter sub Menu or sub item. "LAST" To switch to navigate up or down the Menu. 7 Also to the previously viewed channel. "0~9 number" To enter TV channel number. "VOL- ( )/ VOL+( )" To decrease or increase the sound volume. "MUTE" To mute the audio output. "SLEEP" To Adjust sleep timer options. Also to...
... enter sub Menu or sub item. "LAST" To switch to navigate up or down the Menu. 7 Also to the previously viewed channel. "0~9 number" To enter TV channel number. "VOL- ( )/ VOL+( )" To decrease or increase the sound volume. "MUTE" To mute the audio output. "SLEEP" To Adjust sleep timer options. Also to...
User manual, English (US)
Page 11
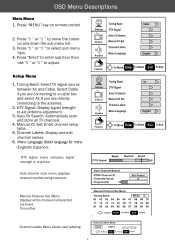
..." to enter sub-item then use " " or " " to the antenna. 2. Press " " or " " to aid antenna adjustment. 3. Setup Menu 1. Manual Channel Set Menu Displays all TV channels. 4. Press "MENU" key on remote control or front panel controls to bring up and down the sub menu list. 3. Tuning Band: Select... TV signal source between Air and Cable. Menu Language: Select language for menu (English Español). OSD Menu Descriptions Main Menu 1. Auto Ch Search:...
..." to enter sub-item then use " " or " " to the antenna. 2. Press " " or " " to aid antenna adjustment. 3. Setup Menu 1. Manual Channel Set Menu Displays all TV channels. 4. Press "MENU" key on remote control or front panel controls to bring up and down the sub menu list. 3. Tuning Band: Select... TV signal source between Air and Cable. Menu Language: Select language for menu (English Español). OSD Menu Descriptions Main Menu 1. Auto Ch Search:...
User manual, English (US)
Page 13
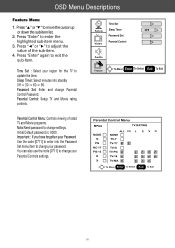
...Password. Press " " or " " to move the cursor up or down the sub-item list. 2. Password Set: Enter and change your region for the TV to enter the highlighted sub-item menu. 3. Initial Default password is: 0000. Press "Enter" again to change settings. You can also use the code [...exit the sub-item. OSD Menu Descriptions Feature Menu 1. Press "Enter" to update the time. Time Set : Select your password. Parental Control: Setup TV and Movie rating controls. Sleep Timer: Select minutes into the Password Set menu item to change your Password Use the code [0711] to enter into...
...Password. Press " " or " " to move the cursor up or down the sub-item list. 2. Password Set: Enter and change your region for the TV to enter the highlighted sub-item menu. 3. Initial Default password is: 0000. Press "Enter" again to change settings. You can also use the code [...exit the sub-item. OSD Menu Descriptions Feature Menu 1. Press "Enter" to update the time. Time Set : Select your password. Parental Control: Setup TV and Movie rating controls. Sleep Timer: Select minutes into the Password Set menu item to change your Password Use the code [0711] to enter into...
User manual, English (US)
Page 14
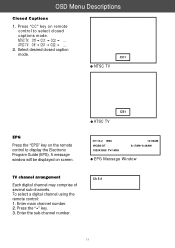
... select closed caption mode. Ch 5.4 11 To select a digital channel using the remote control: 1. Select desired closed captions mode. ATSC TV: Off CS1 CS2 ... 2. Press "CC" key on remote control to display the Electronic Program Guide (EPG). CS1 ATSC... TV EPG Message Window TV channel arrangement Each digital channel may comprise of several sub-channels. Enter the sub-channel number. CC1 NTSC TV EPG Press the "EPG" key on screen. Enter main channel number. ...
... select closed caption mode. Ch 5.4 11 To select a digital channel using the remote control: 1. Select desired closed captions mode. ATSC TV: Off CS1 CS2 ... 2. Press "CC" key on remote control to display the Electronic Program Guide (EPG). CS1 ATSC... TV EPG Message Window TV channel arrangement Each digital channel may comprise of several sub-channels. Enter the sub-channel number. CC1 NTSC TV EPG Press the "EPG" key on screen. Enter main channel number. ...
User manual, English (US)
Page 15
...mV(rms) Video/Audio Output: Wall Mouting : Optional VIDEO: 1 V(p-p), 75 ohm, negative sync AUDIO: 150 mV(rms) NOTE: This TV does not provide ATSC TV/S-VIDEO/HD/VGA/DVI Output. 12 Television System: Component INPUT: NTSC standard Rear Component include 2 Groups: ATSC standard (8VSB) Y :... 480p, 480i, 720p Channel Coverage: DVI Terminals: VHF: 2 through 13 DVI INPUT: UHF: 14 through 69 Rear DVI include 1 DVI-D Input Cable TV: Mid band (A-8 through A-1, A through I) HDCP compliant Super band (J through W) E-EDID compliant Hyper band (AA through ZZ, AAA, BBB) Suggested scan...
...mV(rms) Video/Audio Output: Wall Mouting : Optional VIDEO: 1 V(p-p), 75 ohm, negative sync AUDIO: 150 mV(rms) NOTE: This TV does not provide ATSC TV/S-VIDEO/HD/VGA/DVI Output. 12 Television System: Component INPUT: NTSC standard Rear Component include 2 Groups: ATSC standard (8VSB) Y :... 480p, 480i, 720p Channel Coverage: DVI Terminals: VHF: 2 through 13 DVI INPUT: UHF: 14 through 69 Rear DVI include 1 DVI-D Input Cable TV: Mid band (A-8 through A-1, A through I) HDCP compliant Super band (J through W) E-EDID compliant Hyper band (AA through ZZ, AAA, BBB) Suggested scan...

User manual, English (US)
Page 16
... the screen do not light up After-images appear DVD •Check the power cord and power outlet. •Check whether the TV power switch is on the Plasma TV resulting from fixed image use is not an operating defect and as such is not covered by the Warranty. No Picture, No...;Check whether colour setting is at minimum. •Adjust video menu picture settings or reset to default. •Check audio input connections. •Check whether TV audio is manufactured using an extremely high level of precision technology, however, sometimes some parts of time. 13 The plasma...
... the screen do not light up After-images appear DVD •Check the power cord and power outlet. •Check whether the TV power switch is on the Plasma TV resulting from fixed image use is not an operating defect and as such is not covered by the Warranty. No Picture, No...;Check whether colour setting is at minimum. •Adjust video menu picture settings or reset to default. •Check audio input connections. •Check whether TV audio is manufactured using an extremely high level of precision technology, however, sometimes some parts of time. 13 The plasma...


