User manual, English (US)
Page 3
... Product Registration Card at once. Know these safety symbols Dear MAGNAVOX product owner: Thank you 're entitled to come. We'll do not remove product covering. P.S. This "bolt of lightning" indicates uninsulated material within your purchase. directly from your unit may cause an electrical shock.For the safety of the best-built,best-backed products available tody. service. You...
... Product Registration Card at once. Know these safety symbols Dear MAGNAVOX product owner: Thank you 're entitled to come. We'll do not remove product covering. P.S. This "bolt of lightning" indicates uninsulated material within your purchase. directly from your unit may cause an electrical shock.For the safety of the best-built,best-backed products available tody. service. You...
User manual, English (US)
Page 4
... power-supply cord or plug is not used , use attachments/accessories specified by the manufacturer. 16. If an outside antenna is connected to provide protection against voltage surges and built up of the ventilation openings. 5. Wall or Ceiling Mounting- Damage Requiring Service -The appliance should be serviced by the manufacturer, or sold with a dry cloth. 6. Do not install near water. 3. Refer all instructions. 2. Outdoor Antenna...
... power-supply cord or plug is not used , use attachments/accessories specified by the manufacturer. 16. If an outside antenna is connected to provide protection against voltage surges and built up of the ventilation openings. 5. Wall or Ceiling Mounting- Damage Requiring Service -The appliance should be serviced by the manufacturer, or sold with a dry cloth. 6. Do not install near water. 3. Refer all instructions. 2. Outdoor Antenna...
User manual, English (US)
Page 5
... B digital device, pursuant to operated the equipment under FCC rules. Modifications not expressly approved by the manufacturer could void the user's authority to part 15 of the FCC Rules. However, there is connected. 4. Increase the separation between the equipment and receiver. 3. This device complies with the instructions, may cause harmful interference to correct the interference by turning...
... B digital device, pursuant to operated the equipment under FCC rules. Modifications not expressly approved by the manufacturer could void the user's authority to part 15 of the FCC Rules. However, there is connected. 4. Increase the separation between the equipment and receiver. 3. This device complies with the instructions, may cause harmful interference to correct the interference by turning...
User manual, English (US)
Page 6
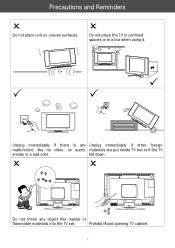
Precautions and Reminders 2 Do not place unit on uneven surfaces. 2 Do not place the TV in confined spaces or in a box when using it. 3 3 3 Unplug immediately if there is any object like no video, no audio, materials are put inside TV box or if the TV smoke or a bad odor. Prohibit/Avoid opening TV cabinet 3 fell down. 2 2 Do not throw any Unplug immediately if other foreign malfunction, like metals or flammable materials into the TV set.
Precautions and Reminders 2 Do not place unit on uneven surfaces. 2 Do not place the TV in confined spaces or in a box when using it. 3 3 3 Unplug immediately if there is any object like no video, no audio, materials are put inside TV box or if the TV smoke or a bad odor. Prohibit/Avoid opening TV cabinet 3 fell down. 2 2 Do not throw any Unplug immediately if other foreign malfunction, like metals or flammable materials into the TV set.
User manual, English (US)
Page 7
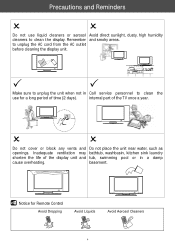
...basement. internal part of time (2 days). Remember and smoky areas. Inadequate ventilation may bathtub, washbasin, kitchen sink laundry shorten the life of the display unit and tub, swimming pool or in Call service personnel to clean the use liquid cleaners...direct sunlight, dusty, high humidity cleaners to clean the display. Notice for a long period of the TV once a year. 2 2 Do not cover or block any vents and Do not place the unit near water, such as openings. Precautions and Reminders 2 2 Do not use for Remote Control Avoid Dropping Avoid Dropping 3 2 1 6 5 4...
...basement. internal part of time (2 days). Remember and smoky areas. Inadequate ventilation may bathtub, washbasin, kitchen sink laundry shorten the life of the display unit and tub, swimming pool or in Call service personnel to clean the use liquid cleaners...direct sunlight, dusty, high humidity cleaners to clean the display. Notice for a long period of the TV once a year. 2 2 Do not cover or block any vents and Do not place the unit near water, such as openings. Precautions and Reminders 2 2 Do not use for Remote Control Avoid Dropping Avoid Dropping 3 2 1 6 5 4...
User manual, English (US)
Page 8
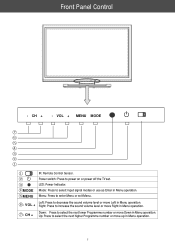
... Right in Menu operation. Menu: Press to power on or power off the TV set. Up: Press to select the next lower Programme number or move Left in Menu operation. ⑦- LED: Power Indicator. Right: Press to select input signal modes or use as Enter in Menu operation. 5 CH + - VOL + MENU MODE MODE ⑤MENU IR: Remote Control Sensor. Mode: Press to increase the sound volume level or move up in Menu operation. Front Panel Control -
... Right in Menu operation. Menu: Press to power on or power off the TV set. Up: Press to select the next lower Programme number or move Left in Menu operation. ⑦- LED: Power Indicator. Right: Press to select input signal modes or use as Enter in Menu operation. 5 CH + - VOL + MENU MODE MODE ⑤MENU IR: Remote Control Sensor. Mode: Press to increase the sound volume level or move up in Menu operation. Front Panel Control -
User manual, English (US)
Page 9
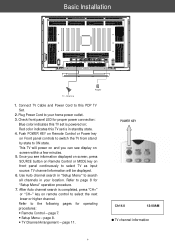
... proper power connection: Blue color indicates this TV set is completed, press "CH+" or "CH-" key on remote control to select TV as input source. y TV Channel Arrangement - TV channel information will power on and you see display on ; page 11. After Auto channel search is in standby state. 4. Red color indicates this PDP TV Set. 2. Connect TV Cable and Power Cord to search all channels in "Setup Menu" to this TV set is powered on screen within a few minutes. 5. Use Auto channel...
... proper power connection: Blue color indicates this TV set is completed, press "CH+" or "CH-" key on remote control to select TV as input source. y TV Channel Arrangement - TV channel information will power on and you see display on ; page 11. After Auto channel search is in standby state. 4. Red color indicates this PDP TV Set. 2. Connect TV Cable and Power Cord to search all channels in "Setup Menu" to this TV set is powered on screen within a few minutes. 5. Use Auto channel...
User manual, English (US)
Page 10
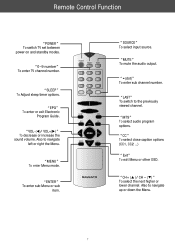
... exit Electronic Program Guide. Also to navigate left or right the Menu. "VOL- ( )/ VOL+( )" To decrease or increase the sound volume. "ENTER" To enter sub Menu or sub item. "•(dot)" To enter sub channel number. "MENU" To enter Menu mode. "LAST" To switch to the previously viewed channel. "0~9 number" To enter TV channel number. Remote Control Function "POWER" To switch TV set between power on and standby modes. "SLEEP" To Adjust sleep timer options. "SOURCE" To select input source.
... exit Electronic Program Guide. Also to navigate left or right the Menu. "VOL- ( )/ VOL+( )" To decrease or increase the sound volume. "ENTER" To enter sub Menu or sub item. "•(dot)" To enter sub channel number. "MENU" To enter Menu mode. "LAST" To switch to the previously viewed channel. "0~9 number" To enter TV channel number. Remote Control Function "POWER" To switch TV set between power on and standby modes. "SLEEP" To Adjust sleep timer options. "SOURCE" To select input source.
User manual, English (US)
Page 11
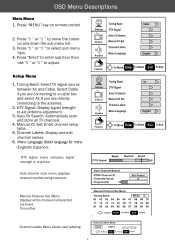
... Menu allows user labeling. 8 Tuning Band: Select TV signal source between Air and Cable. Manual Channel Set Menu Displays all TV channels. 4. Press " " or " " to move the cursor up Main Menu. 2. Auto channel scan menu displays channel number being scanned. Select Cable if you are connecting to a cable box and select Air if you are found. Manual Ch Set: Enter channel setup table. 5. OSD Menu Descriptions Main Menu 1. Press "MENU" key on remote control or front panel controls to adjust. Press "Enter" to enter sub-item then use...
... Menu allows user labeling. 8 Tuning Band: Select TV signal source between Air and Cable. Manual Channel Set Menu Displays all TV channels. 4. Press " " or " " to move the cursor up Main Menu. 2. Auto channel scan menu displays channel number being scanned. Select Cable if you are connecting to a cable box and select Air if you are found. Manual Ch Set: Enter channel setup table. 5. OSD Menu Descriptions Main Menu 1. Press "MENU" key on remote control or front panel controls to adjust. Press "Enter" to enter sub-item then use...
User manual, English (US)
Page 12
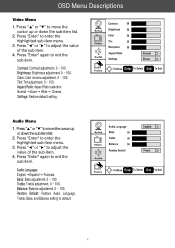
..." again to enter the highlighted sub-item menu. 3. Audio Language: English Español Français. Normal Zoom Wide Cinema. Contrast: Contrast adjustment, 0 ~ 100. Press " " or " " to default. 9 Balance: Balance adjustment, 0 ~ 100. Color: Color chroma adjustment, 0 ~ 100. Press "Enter" to exit the sub-item. Restore Default: Restore Audio Language, Treble, Base, and Balance setting to adjust the value of the sub-item. 4.
..." again to enter the highlighted sub-item menu. 3. Audio Language: English Español Français. Normal Zoom Wide Cinema. Contrast: Contrast adjustment, 0 ~ 100. Press " " or " " to default. 9 Balance: Balance adjustment, 0 ~ 100. Color: Color chroma adjustment, 0 ~ 100. Press "Enter" to exit the sub-item. Restore Default: Restore Audio Language, Treble, Base, and Balance setting to adjust the value of the sub-item. 4.
User manual, English (US)
Page 13
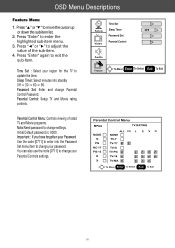
... change your password. Important : If you have forgotten your Password Use the code [0711] to update the time. Press " " or " " to change your region for the TV to enter into standby Off 30 60 90. Press "Enter" again to enter the highlighted sub-item menu. 3. Sleep Timer: Select minutes into the Password Set menu item to adjust the value of rated TV and Movie programs. Note:Need password...
... change your password. Important : If you have forgotten your Password Use the code [0711] to update the time. Press " " or " " to change your region for the TV to enter into standby Off 30 60 90. Press "Enter" again to enter the highlighted sub-item menu. 3. Sleep Timer: Select minutes into the Password Set menu item to adjust the value of rated TV and Movie programs. Note:Need password...
User manual, English (US)
Page 14
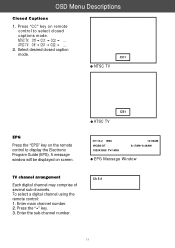
... desired closed captions mode. CS1 ATSC TV EPG Message Window TV channel arrangement Each digital channel may comprise of several sub-channels. A message window will be displayed on remote control to display the Electronic Program Guide (EPG). Ch 5.4 11 To select a digital channel using the remote control: 1. Enter main channel number. 2. Press "CC" key on screen. CC1 NTSC TV EPG Press the "EPG" key on the remote control to select closed caption mode...
... desired closed captions mode. CS1 ATSC TV EPG Message Window TV channel arrangement Each digital channel may comprise of several sub-channels. A message window will be displayed on remote control to display the Electronic Program Guide (EPG). Ch 5.4 11 To select a digital channel using the remote control: 1. Enter main channel number. 2. Press "CC" key on screen. CC1 NTSC TV EPG Press the "EPG" key on the remote control to select closed caption mode...
User manual, English (US)
Page 15
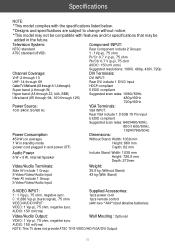
... 1 W in standby mode Height: 660 mm (power cord plugged in and power OFF) Depth: 82 mm Audio Power 5 W + 5 W, Internal Speaker Include Stand: Width: 1038 mm Height: 726.5 mm Depth: 270mm Video/Audio Terminals: Side AV include 1 Group: S-Video/Video/Audio Input Rear AV include 1 Group: S-Video/Video/Audio Input Weight: 35.5 kg (Without Stand) 43 kg (With Stand) S-VIDEO INPUT: Supplied Accessories: Y : 1 V(p-p), 75 ohm, negative sync. 1pcs power cord C : 0.286 V(p-p) (burst signal), 75 ohm 1pcs remote control VIDEO/AUDIO INPUT: (with features and/or specifications that may...
... 1 W in standby mode Height: 660 mm (power cord plugged in and power OFF) Depth: 82 mm Audio Power 5 W + 5 W, Internal Speaker Include Stand: Width: 1038 mm Height: 726.5 mm Depth: 270mm Video/Audio Terminals: Side AV include 1 Group: S-Video/Video/Audio Input Rear AV include 1 Group: S-Video/Video/Audio Input Weight: 35.5 kg (Without Stand) 43 kg (With Stand) S-VIDEO INPUT: Supplied Accessories: Y : 1 V(p-p), 75 ohm, negative sync. 1pcs power cord C : 0.286 V(p-p) (burst signal), 75 ohm 1pcs remote control VIDEO/AUDIO INPUT: (with features and/or specifications that may...

User manual, English (US)
Page 16
... technology, however, sometimes some parts of the screen do not light up After-images appear DVD •Check the power cord and power outlet. •Check whether the TV power switch is on. •Verify the front panel LED is showing blue color. •Check connections for the selected input source. •Verify that external signal for the selected input is active. •Check Video/Audio settings. •Check antenna connection, aerial location, and direction. •...
... technology, however, sometimes some parts of the screen do not light up After-images appear DVD •Check the power cord and power outlet. •Check whether the TV power switch is on. •Verify the front panel LED is showing blue color. •Check connections for the selected input source. •Verify that external signal for the selected input is active. •Check Video/Audio settings. •Check antenna connection, aerial location, and direction. •...
User manual, English (US)
Page 17
... installation or setup of the product, adjustment of customer controls on the product, and installation or repair of antenna systems outside of the product. ·Product repair and/or part replacement because of improper installation, connections to improper voltage supply, abuse, neglect, misuse, accident, unauthorized repair or other cause not within ninety (90) days of the date of purchase to any Magnavox authorized service center. Magnavox authorized service...
... installation or setup of the product, adjustment of customer controls on the product, and installation or repair of antenna systems outside of the product. ·Product repair and/or part replacement because of improper installation, connections to improper voltage supply, abuse, neglect, misuse, accident, unauthorized repair or other cause not within ninety (90) days of the date of purchase to any Magnavox authorized service center. Magnavox authorized service...


