
User Manual
Page 3
... ANTENNA LEAD IN WIRE ANTENNA DISCHARGE UNIT (NEC SECTION 810-20) GROUNDING CONDUCTORS (NEC SECTION 810-21) GROUND CLAMPS ELECTRIC SERVICE EQUIPMENT POWER SERVICE GROUNDING ELECTRODE SYSTEM (NEC ART 250, PART H) 3 EN Keep these instructions. 2. Clean only with a cart, stand, tripod, bracket, or table specified by applying excessive pull force to operate normally or exhibits a marked change in particular, specifies that the cable...
... ANTENNA LEAD IN WIRE ANTENNA DISCHARGE UNIT (NEC SECTION 810-20) GROUNDING CONDUCTORS (NEC SECTION 810-21) GROUND CLAMPS ELECTRIC SERVICE EQUIPMENT POWER SERVICE GROUNDING ELECTRODE SYSTEM (NEC ART 250, PART H) 3 EN Keep these instructions. 2. Clean only with a cart, stand, tripod, bracket, or table specified by applying excessive pull force to operate normally or exhibits a marked change in particular, specifies that the cable...
User Manual
Page 4
... not install the unit in direct sunlight, near strong magnetic fields, or in accordance with the same or equivalent type. Make sure to radio or television reception, which the receiver is connected. 4) Consult the dealer or an experienced radio/TV technician for a Class B digital device, pursuant to radio communications. Replace only with the instructions, may cause harmful interference to Part...
... not install the unit in direct sunlight, near strong magnetic fields, or in accordance with the same or equivalent type. Make sure to radio or television reception, which the receiver is connected. 4) Consult the dealer or an experienced radio/TV technician for a Class B digital device, pursuant to radio communications. Replace only with the instructions, may cause harmful interference to Part...
User Manual
Page 5
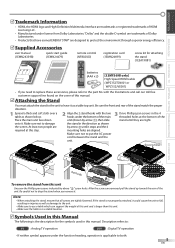
... to the unit. • Make sure to use a table which can support the weight of the main threaded holes at this Manual The following is applicable to the part No. the screen. If the stand is not properly attached, it . INTRODUCTION PREPARATION WATCHING TV OPTIONAL SETTING TROUBLESHOOTING INFORMATION Trademark Information • HDMI, the HDMI logo and High-Definition Multimedia Interface are trademarks...
... to the unit. • Make sure to use a table which can support the weight of the main threaded holes at this Manual The following is applicable to the part No. the screen. If the stand is not properly attached, it . INTRODUCTION PREPARATION WATCHING TV OPTIONAL SETTING TROUBLESHOOTING INFORMATION Trademark Information • HDMI, the HDMI logo and High-Definition Multimedia Interface are trademarks...
User Manual
Page 6
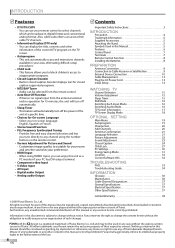
... Box 9 External Device Connection 10 Cable Management 13 Plug the AC Power Cord 13 Initial Setup 14 WATCHING TV Channel Selection 15 Volume Adjustment 15 Sleep Timer 15 Still Mode 16 Switching Each Input Mode 16 Switching Audio Mode 16 TV Screen Information 17 TV Screen Display Mode 18 OPTIONAL SETTING Main Menu 19 Autoprogram 19 Channel List 20 Add Channels 20 Antenna Confirmation 21 Language Selection 21 Picture Adjustment 22 Sound Adjustment 23 Closed Caption 24 Child Lock 27 PC Settings 30 Energy Saving Mode 31 Location 32 Current Software Info 32 TROUBLESHOOTING...
... Box 9 External Device Connection 10 Cable Management 13 Plug the AC Power Cord 13 Initial Setup 14 WATCHING TV Channel Selection 15 Volume Adjustment 15 Sleep Timer 15 Still Mode 16 Switching Each Input Mode 16 Switching Audio Mode 16 TV Screen Information 17 TV Screen Display Mode 18 OPTIONAL SETTING Main Menu 19 Autoprogram 19 Channel List 20 Add Channels 20 Antenna Confirmation 21 Language Selection 21 Picture Adjustment 22 Sound Adjustment 23 Closed Caption 24 Child Lock 27 PC Settings 30 Energy Saving Mode 31 Location 32 Current Software Info 32 TROUBLESHOOTING...
User Manual
Page 7
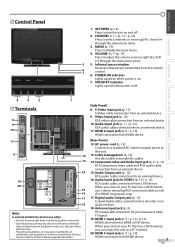
... RCA audio cable connection from HDMI device. [Rear Panel] 12. HDMI 2 Input jack (p. 9 / p. 10) HDMI connection from an external device. 11. Cable management (p. 13) Use this terminal only when a software update is necessary. • User should not connect any devices to the service terminal such as a PC monitor. 20. HDMI 3 Input jack (p. 9 / p. 10) HDMI connection from an external device. 9. INTRODUCTION PREPARATION WATCHING TV OPTIONAL SETTING TROUBLESHOOTING INFORMATION Control Panel - yPOWER (p. 14) Press to display the main menu. 4. STAND BY indicator Lights...
... RCA audio cable connection from HDMI device. [Rear Panel] 12. HDMI 2 Input jack (p. 9 / p. 10) HDMI connection from an external device. 11. Cable management (p. 13) Use this terminal only when a software update is necessary. • User should not connect any devices to the service terminal such as a PC monitor. 20. HDMI 3 Input jack (p. 9 / p. 10) HDMI connection from an external device. 9. INTRODUCTION PREPARATION WATCHING TV OPTIONAL SETTING TROUBLESHOOTING INFORMATION Control Panel - yPOWER (p. 14) Press to display the main menu. 4. STAND BY indicator Lights...

User Manual
Page 8
... main menu is not to operate this unit. • Make sure the component code on your remote control for the TV screen. 12. y(power) (p. 14) Press to turn the unit on and off . 2. MUTE (p. 15) Press to turn the sound on and off . 9. Analog mode (TV) • Press to select channels and the external input modes. PREV CH (p. 15) Press to return to display the channel information, signal type and TV setting. INFO (p. 17) Digital mode (DTV...
... main menu is not to operate this unit. • Make sure the component code on your remote control for the TV screen. 12. y(power) (p. 14) Press to turn the unit on and off . 2. MUTE (p. 15) Press to turn the sound on and off . 9. Analog mode (TV) • Press to select channels and the external input modes. PREV CH (p. 15) Press to return to display the channel information, signal type and TV setting. INFO (p. 17) Digital mode (DTV...
User Manual
Page 9
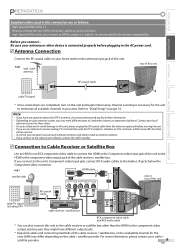
... box (green) (blue) (red) RCA component video cable and RCA audio cable * You can also connect this unit, please unplug the RF coaxial cable from the antenna input jack before plugging in the AC power cord. Antenna Connection Connect the RF coaxial cable on your home outlet to the Audio L/R jacks below the Component video connector. INTRODUCTION PREPARATION WATCHING TV OPTIONAL SETTING TROUBLESHOOTING INFORMATION PREPARATION Supplied cables used in this unit RF coaxial cable or cable TV signal * Once connections are as HDMI...
... box (green) (blue) (red) RCA component video cable and RCA audio cable * You can also connect this unit, please unplug the RF coaxial cable from the antenna input jack before plugging in the AC power cord. Antenna Connection Connect the RF coaxial cable on your home outlet to the Audio L/R jacks below the Component video connector. INTRODUCTION PREPARATION WATCHING TV OPTIONAL SETTING TROUBLESHOOTING INFORMATION PREPARATION Supplied cables used in this unit RF coaxial cable or cable TV signal * Once connections are as HDMI...
User Manual
Page 11
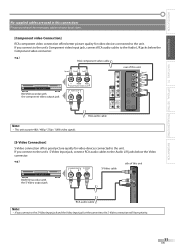
.... [Component video Connection] RCA component video connection offers better picture quality for video devices connected to the Audio L/R jacks below the Component video connector. e.g.) RCA component video cable (green) (blue) (red) TITLE 5 CHAPTER 15 REPEAT A-B BD/DVD recorder with the component video output jack Y Pb/Cb Pr/Cr COMPONENT VIDEO OUT AUDIO OUT L R rear of this unit (green) (blue) (red) Note: • This unit accepts 480i / 480p / 720p / 1080i video signals. If you connect to the unit's S-Video Input jack, connect RCA audio cables to...
.... [Component video Connection] RCA component video connection offers better picture quality for video devices connected to the Audio L/R jacks below the Component video connector. e.g.) RCA component video cable (green) (blue) (red) TITLE 5 CHAPTER 15 REPEAT A-B BD/DVD recorder with the component video output jack Y Pb/Cb Pr/Cr COMPONENT VIDEO OUT AUDIO OUT L R rear of this unit (green) (blue) (red) Note: • This unit accepts 480i / 480p / 720p / 1080i video signals. If you connect to the unit's S-Video Input jack, connect RCA audio cables to...
User Manual
Page 14
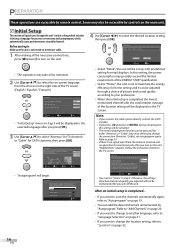
... BACK Back MENU Skip • "Autoprogram" will not be displayed on the unit. • This operation may also be executed for your signal source. Initial Setup No channel is connected to antenna or cable. 1 After making all the necessary connections, press [y (power)] to turn on the TV screen. Initial Setup Select "Retail" or "Home" for either "Antenna" or "Cable" only once. Verify that you want to scan the channels automatically...
... BACK Back MENU Skip • "Autoprogram" will not be displayed on the unit. • This operation may also be executed for your signal source. Initial Setup No channel is connected to antenna or cable. 1 After making all the necessary connections, press [y (power)] to turn on the TV screen. Initial Setup Select "Retail" or "Home" for either "Antenna" or "Cable" only once. Verify that you want to scan the channels automatically...
User Manual
Page 15
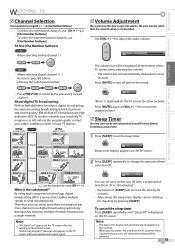
... [the Number buttons]. • To select the memorized channels, use [CH + / -] or [the Number buttons]. • To select the non-memorized channels, use [the Number buttons]. INTRODUCTION PREPARATION WATCHING TV OPTIONAL SETTING TROUBLESHOOTING INFORMATION WATCHING TV Channel Selection Select channels by a single network. To Use [the Number buttons] TV - The volume bar will be changed by using [CH + / -]. NTSC Air time (analog mode) CH4 (Soccer) 6:00pm ATSC (digital mode) CH4-1 (Soccer) Mute "Mute" is over. • "Audio only program" message...
... [the Number buttons]. • To select the memorized channels, use [CH + / -] or [the Number buttons]. • To select the non-memorized channels, use [the Number buttons]. INTRODUCTION PREPARATION WATCHING TV OPTIONAL SETTING TROUBLESHOOTING INFORMATION WATCHING TV Channel Selection Select channels by a single network. To Use [the Number buttons] TV - The volume bar will be changed by using [CH + / -]. NTSC Air time (analog mode) CH4 (Soccer) 6:00pm ATSC (digital mode) CH4-1 (Soccer) Mute "Mute" is over. • "Audio only program" message...
User Manual
Page 17
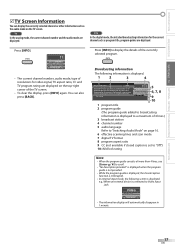
... Video Input jack. e.g.) When an external device is displayed; Video 448800ii SSDD TV-PG DLSV CCCC • The information display will automatically disappear in 1 minute. 17 EN TV In the analog mode, the current channel number and the audio mode are displayed. INTRODUCTION PREPARATION WATCHING TV OPTIONAL SETTING TROUBLESHOOTING INFORMATION TV Screen Information You can also press [BACK]. is displayed when the program guide is not provided. • While the program guide is displayed, the closed caption...
... Video Input jack. e.g.) When an external device is displayed; Video 448800ii SSDD TV-PG DLSV CCCC • The information display will automatically disappear in 1 minute. 17 EN TV In the analog mode, the current channel number and the audio mode are displayed. INTRODUCTION PREPARATION WATCHING TV OPTIONAL SETTING TROUBLESHOOTING INFORMATION TV Screen Information You can also press [BACK]. is displayed when the program guide is not provided. • While the program guide is displayed, the closed caption...
User Manual
Page 19
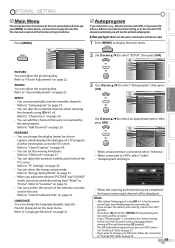
.... PICTURE SOUND SETUP FEATURES LANGUAGE Autoprogram Channel List Add Channels Antenna 3 Use [Cursor K/L] to "Picture Adjustment" on page 22. PICTURE SOUND SETUP FEATURES LANGUAGE Autoprogram will be displayed. Auto programming will take up to 20 minutes to "Location" on the remote control skips unavailable programs automatically. • If you connect the cable system directly, contact the CATV installer. • If you set the viewing limitations. For more details, see the reference page for closed caption, which displays the...
.... PICTURE SOUND SETUP FEATURES LANGUAGE Autoprogram Channel List Add Channels Antenna 3 Use [Cursor K/L] to "Picture Adjustment" on page 22. PICTURE SOUND SETUP FEATURES LANGUAGE Autoprogram will be displayed. Auto programming will take up to 20 minutes to "Location" on the remote control skips unavailable programs automatically. • If you connect the cable system directly, contact the CATV installer. • If you set the viewing limitations. For more details, see the reference page for closed caption, which displays the...
User Manual
Page 23
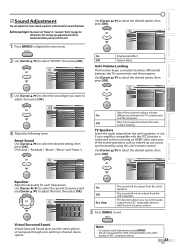
... [OK]. PICTURE SOUND SETUP FEATURES LANGUAGE On Off Auto Volume Leveling reduces volume differences between the TV commercials and the programs. Off Select if you begin: You must set "Home" in the user manual. If your existing 2-channel stereo system. "Off": Sound will not be output from CEC-compatible devices with the unit's remote control. 5 Press [MENU] to exit. PICTURE SOUND SETUP FEATURES LANGUAGE On Off This selects the modes for each...
... [OK]. PICTURE SOUND SETUP FEATURES LANGUAGE On Off Auto Volume Leveling reduces volume differences between the TV commercials and the programs. Off Select if you begin: You must set "Home" in the user manual. If your existing 2-channel stereo system. "Off": Sound will not be output from CEC-compatible devices with the unit's remote control. 5 Press [MENU] to exit. PICTURE SOUND SETUP FEATURES LANGUAGE On Off This selects the modes for each...
User Manual
Page 25
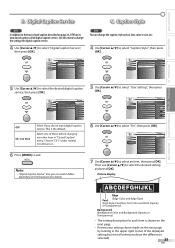
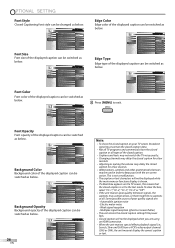
... default. Use this menu to change the caption style such as font, color or size, etc. 4 Use [Cursor K/L] to select the desired setting and press [OK]. This is shown on the next page. • Review your setting choice made on the next page by looking in "Closed Caption" menu. PICTURE User Setting On SOUND Font Style Off SETUP Font Size FEATURES Font Color LANGUAGE Font Opacity Background Color Background Opacity Edge Color Edge Type 7 Use...
... default. Use this menu to change the caption style such as font, color or size, etc. 4 Use [Cursor K/L] to select the desired setting and press [OK]. This is shown on the next page. • Review your setting choice made on the next page by looking in "Closed Caption" menu. PICTURE User Setting On SOUND Font Style Off SETUP Font Size FEATURES Font Color LANGUAGE Font Opacity Background Color Background Opacity Edge Color Edge Type 7 Use...
User Manual
Page 26
... not display the correct caption or text. Weak signal reception - Shadow R.Shadow 8 Press [MENU] to the text mode. PICTURE SOUND SETUP FEATURES LANGUAGE User Setting Font Style Font Size Font Color Font Opacity Background Color Background Opacity Edge Color Edge Type Closed Caption White Black Red Green Blue Yellow Magenta Cyan Edge Type Edge type of poor quality signals are using an HDMI connection. • When the unit receives special effects playback signal (i.e., Search, Slow and Still) from a VCR's video output channel...
... not display the correct caption or text. Weak signal reception - Shadow R.Shadow 8 Press [MENU] to the text mode. PICTURE SOUND SETUP FEATURES LANGUAGE User Setting Font Style Font Size Font Color Font Opacity Background Color Background Opacity Edge Color Edge Type Closed Caption White Black Red Green Blue Yellow Magenta Cyan Edge Type Edge type of poor quality signals are using an HDMI connection. • When the unit receives special effects playback signal (i.e., Search, Slow and Still) from a VCR's video output channel...
User Manual
Page 33
... set the clock ? INTRODUCTION PREPARATION WATCHING TV OPTIONAL SETTING TROUBLESHOOTING INFORMATION TROUBLESHOOTING FAQ Question My remote control does not work. Or, captions are captions not displayed entirely? Refer to "IR Signal Check" on page 36. • Aim the remote control directly at the infrared sensor window on the unit. • Many digital channels have alternate channel numbers. Most captioning production companies can I set up -to be viewed by pressing [SOURCE] or using the Component Video Connection...
... set the clock ? INTRODUCTION PREPARATION WATCHING TV OPTIONAL SETTING TROUBLESHOOTING INFORMATION TROUBLESHOOTING FAQ Question My remote control does not work. Or, captions are captions not displayed entirely? Refer to "IR Signal Check" on page 36. • Aim the remote control directly at the infrared sensor window on the unit. • Many digital channels have alternate channel numbers. Most captioning production companies can I set up -to be viewed by pressing [SOURCE] or using the Component Video Connection...
User Manual
Page 34
... connected to the correct output jack of the digital broadcasting, the signal will be limited to the broadcasting station. • For the best picture quality, watch "standard definition" programs instead. • View other TV channels. No picture or sound No color • Check if the power is on the keyboard to the broadcasting station. • Turn off the unit. If so, use [VOL + / -] to page 32. The problem...
... connected to the correct output jack of the digital broadcasting, the signal will be limited to the broadcasting station. • For the best picture quality, watch "standard definition" programs instead. • View other TV channels. No picture or sound No color • Check if the power is on the keyboard to the broadcasting station. • Turn off the unit. If so, use [VOL + / -] to page 32. The problem...
User Manual
Page 35
... LCD panel is higher or lower, then the loudness will memorize the viewing mode from the last time you are using the Video, S-Video, Component video or HDMI with 480i Input, press [FORMAT] repeatedly to insert advertisement. input modes. Read the description in "PC Settings" are set correctly. • If you are displayed as a fixed point of blue, green or red. Occasionally a few non active pixels may shorten the program to switch various screen modes. Black box...
... LCD panel is higher or lower, then the loudness will memorize the viewing mode from the last time you are using the Video, S-Video, Component video or HDMI with 480i Input, press [FORMAT] repeatedly to insert advertisement. input modes. Read the description in "PC Settings" are set correctly. • If you are displayed as a fixed point of blue, green or red. Occasionally a few non active pixels may shorten the program to switch various screen modes. Black box...

User Manual
Page 36
... each signal, color (c) and luminance (y) independently of each of 3 principal colors of light (red, blue and green) through the camera display. Servicing Should your unit become inoperative, do not guarantee 100% interoperability with a soft cloth. widescreen models are several signal formats, including Y / Pb / Pr and Y / Cb / Cr. HDTV (High Definition TV) Ultimate digital format that supports all uncompressed, digital audio/video formats including set-top box, BD/DVD recorder or digital television, over a single cable. CEC...
... each signal, color (c) and luminance (y) independently of each of 3 principal colors of light (red, blue and green) through the camera display. Servicing Should your unit become inoperative, do not guarantee 100% interoperability with a soft cloth. widescreen models are several signal formats, including Y / Pb / Pr and Y / Cb / Cr. HDTV (High Definition TV) Ultimate digital format that supports all uncompressed, digital audio/video formats including set-top box, BD/DVD recorder or digital television, over a single cable. CEC...
Product Spec Sheet
Page 2
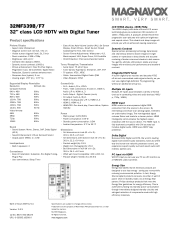
...-in digital tuner receives and decodes ATSC off-air and unscrambled cable signals directly, so you can use your TV as a PC monitor via HDMI With PC input you with the source device. HDMI input HDMI makes an uncompressed digital RGB connection from the source to use of Installation: Autostore, PLL Digital Tuning, Plug & Play • User convenience: Sleep Timer Connectivity • AV 1: Audio L/R in, YPbPr • Front / Side connections: S-video in, CVBS in, Audio L/R in standby mode. HDMI intelligently communicates the highest output resolution...
...-in digital tuner receives and decodes ATSC off-air and unscrambled cable signals directly, so you can use your TV as a PC monitor via HDMI With PC input you with the source device. HDMI input HDMI makes an uncompressed digital RGB connection from the source to use of Installation: Autostore, PLL Digital Tuning, Plug & Play • User convenience: Sleep Timer Connectivity • AV 1: Audio L/R in, YPbPr • Front / Side connections: S-video in, CVBS in, Audio L/R in standby mode. HDMI intelligently communicates the highest output resolution...


