
User Manual
Page 3
... (NEC SECTION 810-21) GROUND CLAMPS ELECTRIC SERVICE EQUIPMENT POWER SERVICE GROUNDING ELECTRODE SYSTEM (NEC ART 250, PART H) INFORMATION 3 EN INTRODUCTION PREPARATION INITIAL SETTING WATCHING TV OOPPTTIOIONNAL SEETTTTININGG TTRROOUUBBLESHOOOOTTININGG INTRODUCTION IMPORTANT SAFETY INSTRUCTIONS Read before operating equipment 1. Clean only with the appara- Only use attachments/accessories specified by the manufacturer. 12...
... (NEC SECTION 810-21) GROUND CLAMPS ELECTRIC SERVICE EQUIPMENT POWER SERVICE GROUNDING ELECTRODE SYSTEM (NEC ART 250, PART H) INFORMATION 3 EN INTRODUCTION PREPARATION INITIAL SETTING WATCHING TV OOPPTTIOIONNAL SEETTTTININGG TTRROOUUBBLESHOOOOTTININGG INTRODUCTION IMPORTANT SAFETY INSTRUCTIONS Read before operating equipment 1. Clean only with the appara- Only use attachments/accessories specified by the manufacturer. 12...

User Manual
Page 4
...reasonable protection against harmful interference in installation such as sunshine, fire or the like. WHEN CARRYING THIS TV • At least two people are designed to all LCD products, this TV cabinet. Cet appareil numérique de la classe B est conforme à la norme NMB-...apparatus does cause harmful interference to radio or television reception, which the receiver is connected. 4) Consult the dealer or an experienced radio/TV technician for a Class B digital device, pursuant to this apparatus if an unauthorized change or modification is no guarantee that interference will ...
...reasonable protection against harmful interference in installation such as sunshine, fire or the like. WHEN CARRYING THIS TV • At least two people are designed to all LCD products, this TV cabinet. Cet appareil numérique de la classe B est conforme à la norme NMB-...apparatus does cause harmful interference to radio or television reception, which the receiver is connected. 4) Consult the dealer or an experienced radio/TV technician for a Class B digital device, pursuant to this apparatus if an unauthorized change or modification is no guarantee that interference will ...

User Manual
Page 5
...Used in this Manual The following is applicable to put the AC cord between the stand and the TV. 3 Drive Phillips pan screws in the 3 threaded holes at this TV Unscrew the Phillips pan screws indicated by " 1 ", then lift the lever on your local electronics... separators (splitters). Make sure not to protect the environment through superior energy efficiency. 5 EN Description refers to: DTV : Digital TV operation TV : Analog TV operation • If neither symbol appears under the function heading, operation is the description for these accessories, please refer to display ...
...Used in this Manual The following is applicable to put the AC cord between the stand and the TV. 3 Drive Phillips pan screws in the 3 threaded holes at this TV Unscrew the Phillips pan screws indicated by " 1 ", then lift the lever on your local electronics... separators (splitters). Make sure not to protect the environment through superior energy efficiency. 5 EN Description refers to: DTV : Digital TV operation TV : Analog TV operation • If neither symbol appears under the function heading, operation is the description for these accessories, please refer to display ...
User Manual
Page 6
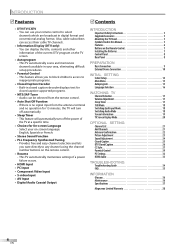
...DTV Closed Caption 26 CC Style 27 Parental Control 29 PC Settings 32 HDMI Audio 33 TROUBLESHOOTING Troubleshooting Guide 34 FAQ 35 INFORMATION Glossary 36 Maintenance 36 Specifications 37 Magnavox Limited Warranty 38 6 EN This feature will turn off automatically.... • Sleep Timer - This TV automatically memorizes settings if a power failure occurs. • HDMI Input •...
...DTV Closed Caption 26 CC Style 27 Parental Control 29 PC Settings 32 HDMI Audio 33 TROUBLESHOOTING Troubleshooting Guide 34 FAQ 35 INFORMATION Glossary 36 Maintenance 36 Specifications 37 Magnavox Limited Warranty 38 6 EN This feature will turn off automatically.... • Sleep Timer - This TV automatically memorizes settings if a power failure occurs. • HDMI Input •...

User Manual
Page 7
... select channels. PREV CH (p17) 9 8. CH. / (p17) • Press to display the channel 6 14 menu operation. WATCHING TV OPTIONAL SETTING TROUBLESHOOTING INFORMATION 5 Installing the Batteries Install the batteries (AAA x 2) matching the polarity indicated inside battery compartment of time, remove the...external input modes. • Press to shift the minor channel from possible battery leakage. • Do not try to be used for the TV screen. Press to activate the sleep timer. INFO (p19) 4 Press to display the external language. SLEEP (p17) 7. channel. 9. ...
... select channels. PREV CH (p17) 9 8. CH. / (p17) • Press to display the channel 6 14 menu operation. WATCHING TV OPTIONAL SETTING TROUBLESHOOTING INFORMATION 5 Installing the Batteries Install the batteries (AAA x 2) matching the polarity indicated inside battery compartment of time, remove the...external input modes. • Press to shift the minor channel from possible battery leakage. • Do not try to be used for the TV screen. Press to activate the sleep timer. INFO (p19) 4 Press to display the external language. SLEEP (p17) 7. channel. 9. ...

User Manual
Page 8
... move right ( )/left ( ) through the main menu items. 4. AC power cord Connect to a standard AC outlet to supply power to turn the TV on and off. 2. Coaxial digital audio output jack (p12) Coaxial digital audio connection for PC. 8. Audio input jack for PC connection (p13) Mini-...receiver /satellite box. 5 8 EN side connection Audio input jack (p10) Audio connection for PC. 11 2. MENU (p15) Press to decide the command of this TV. 4. Power on . 8. PC input jack (p13) VGA cable connection for DVI devices. (For HDMI1 input jack only) 9. Video input jack (p12) Video ...
... move right ( )/left ( ) through the main menu items. 4. AC power cord Connect to a standard AC outlet to supply power to turn the TV on and off. 2. Coaxial digital audio output jack (p12) Coaxial digital audio connection for PC. 8. Audio input jack for PC connection (p13) Mini-...receiver /satellite box. 5 8 EN side connection Audio input jack (p10) Audio connection for PC. 11 2. MENU (p15) Press to decide the command of this TV. 4. Power on . 8. PC input jack (p13) VGA cable connection for DVI devices. (For HDMI1 input jack only) 9. Video input jack (p12) Video ...

User Manual
Page 9
...COMPONENT2 accordingly. INTRODUCTION PREPARATION PREPARATION Cables not included. e.g.) VHF / UHF antenna rear of this TV INITIAL SETTING WATCHING TV OPTIONAL SETTING TROUBLESHOOTING INFORMATION RF coaxial cable or cable TV signal * Once connections are completed, turn on your local store. 5 Basic Connection This section... Note: • Be sure your antenna or other than settop versions. • To switch your area. (Refer to receive analog TV, it should also work for further information. • For your cable/satellite provider. 9 EN For more effective than the HDMI or...
...COMPONENT2 accordingly. INTRODUCTION PREPARATION PREPARATION Cables not included. e.g.) VHF / UHF antenna rear of this TV INITIAL SETTING WATCHING TV OPTIONAL SETTING TROUBLESHOOTING INFORMATION RF coaxial cable or cable TV signal * Once connections are completed, turn on your local store. 5 Basic Connection This section... Note: • Be sure your antenna or other than settop versions. • To switch your area. (Refer to receive analog TV, it should also work for further information. • For your cable/satellite provider. 9 EN For more effective than the HDMI or...

User Manual
Page 10
... PCM cable receiver/satellite box with the DVI output jack AUDIO OUT L R audio cable HDMI-IN L AUDIO R Note: • This TV accepts 480i / 480p / 720p / 1080i video signals. • HDMI-DVI connection requires separate audio connection as well. • Audio signals are converted ...the device connected or check the HDMI audio setting. PREPARATION Cables not included. Use an HDMI cable to connect the TV to external video devices equipped with the HDMI output jack Note: • This TV accepts 480i / 480p / 720p / 1080i video signals, and 32kHz / 44.1kHz / 48kHz audio signals. &#...
... PCM cable receiver/satellite box with the DVI output jack AUDIO OUT L R audio cable HDMI-IN L AUDIO R Note: • This TV accepts 480i / 480p / 720p / 1080i video signals. • HDMI-DVI connection requires separate audio connection as well. • Audio signals are converted ...the device connected or check the HDMI audio setting. PREPARATION Cables not included. Use an HDMI cable to connect the TV to external video devices equipped with the HDMI output jack Note: • This TV accepts 480i / 480p / 720p / 1080i video signals, and 32kHz / 44.1kHz / 48kHz audio signals. &#...

User Manual
Page 11
.../DVD player with the component video output jacks Y Pb/Cb Pr/Cr COMPONENT VIDEO OUT AUDIO OUT L R audio cable green blue red rear of this TV DIGITAL AUDIO OUT VIDEO 1 (COAXIAL) S-VIDEO PC-IN AUDIO VIDEO HDMI-IN L L AUDIO AUDIO R R COMPONENT 1 COMPONENT 2 Y Y Pb Pb Pr Pr... video devices connected to the audio L/R jacks of VIDEO1 or VIDEO2 accordingly. Use an S-video cable to connect the TV to external video devices equipped with S-video output jack. INTRODUCTION PREPARATION INITIAL SETTING Cables not included. Use a component video cable to connect...
.../DVD player with the component video output jacks Y Pb/Cb Pr/Cr COMPONENT VIDEO OUT AUDIO OUT L R audio cable green blue red rear of this TV DIGITAL AUDIO OUT VIDEO 1 (COAXIAL) S-VIDEO PC-IN AUDIO VIDEO HDMI-IN L L AUDIO AUDIO R R COMPONENT 1 COMPONENT 2 Y Y Pb Pb Pr Pr... video devices connected to the audio L/R jacks of VIDEO1 or VIDEO2 accordingly. Use an S-video cable to connect the TV to external video devices equipped with S-video output jack. INTRODUCTION PREPARATION INITIAL SETTING Cables not included. Use a component video cable to connect...

User Manual
Page 12
... like 5.1ch digital broadcasting sound. e.g.) camcorder video game STEREO VCR STAND-BY AUDIO OUT L R VIDEO OUT video cable audio cable rear of this TV DIGITAL AUDIO OUT VIDEO 1 (COAXIAL) S-VIDEO PC-IN AUDIO VIDEO HDMI-IN L L AUDIO AUDIO R R Note: • If you connect...the video input jack at your local store. [Video in Connection] It offers standard picture quality for digital broadcasting only) If you connect this TV DIGITAL AUDIO OUT VIDEO 1 (COAXIAL) S-VIDEO PC-IN AUDIO VIDEO HDMI-IN L L AUDIO AUDIO R R Manufactured under license from Dolby ...
... like 5.1ch digital broadcasting sound. e.g.) camcorder video game STEREO VCR STAND-BY AUDIO OUT L R VIDEO OUT video cable audio cable rear of this TV DIGITAL AUDIO OUT VIDEO 1 (COAXIAL) S-VIDEO PC-IN AUDIO VIDEO HDMI-IN L L AUDIO AUDIO R R Note: • If you connect...the video input jack at your local store. [Video in Connection] It offers standard picture quality for digital broadcasting only) If you connect this TV DIGITAL AUDIO OUT VIDEO 1 (COAXIAL) S-VIDEO PC-IN AUDIO VIDEO HDMI-IN L L AUDIO AUDIO R R Manufactured under license from Dolby ...

User Manual
Page 13
... x 768 Vertical frequency 60Hz 60Hz 60Hz 60Hz Other formats or non-standard signals will not be with a PC input jack. VGA cable rear of this TV personal computer mini-plug audio cable PC-IN AUDIO HDMI-IN L AUDIO R The following operations may reduce noise. - WATCHING... TV OPTIONAL SETTING TROUBLESHOOTING INFORMATION 13 EN Note: • Please purchase the VGA cable that has a ferrite core. • The following signals can use the built-...
... x 768 Vertical frequency 60Hz 60Hz 60Hz 60Hz Other formats or non-standard signals will not be with a PC input jack. VGA cable rear of this TV personal computer mini-plug audio cable PC-IN AUDIO HDMI-IN L AUDIO R The following operations may reduce noise. - WATCHING... TV OPTIONAL SETTING TROUBLESHOOTING INFORMATION 13 EN Note: • Please purchase the VGA cable that has a ferrite core. • The following signals can use the built-...

User Manual
Page 14
... is scanning for channels, please wait. 2% Analog channels 0 ch Digital channels 0 ch MENU Exit • When the scanning and memorizing of the TV screen. (English / Español / Français) Initial Setup Select the language for setup display. Note: • If you connect the... cable system directly, contact the CATV installer. • If you through the TV's initial setting which automatically scans and memorizes viewable channels. When you change the connection (Air/Cable), set autoprogram again. (Refer to page 15.)...
... is scanning for channels, please wait. 2% Analog channels 0 ch Digital channels 0 ch MENU Exit • When the scanning and memorizing of the TV screen. (English / Español / Français) Initial Setup Select the language for setup display. Note: • If you connect the... cable system directly, contact the CATV installer. • If you through the TV's initial setting which automatically scans and memorizes viewable channels. When you change the connection (Air/Cable), set autoprogram again. (Refer to page 15.)...

User Manual
Page 15
...LANGUAGE You can change the display format for closed caption, which displays the dialogue of a TV program or other information across the TV screen. (Refer to "Closed Caption" on page 32.) You can select the sound input for the HDMI1 input jack if your signal source. INTRODUCTION... PREPARATION INITIAL SETTING WATCHING TV OPTIONAL SETTING 5 Main Menu This section describes the overview of channels start ...
...LANGUAGE You can change the display format for closed caption, which displays the dialogue of a TV program or other information across the TV screen. (Refer to "Closed Caption" on page 32.) You can select the sound input for the HDMI1 input jack if your signal source. INTRODUCTION... PREPARATION INITIAL SETTING WATCHING TV OPTIONAL SETTING 5 Main Menu This section describes the overview of channels start ...

User Manual
Page 16
.... • With regard only to the digital channel, even after the scanning is completed if you unplug the AC power cord before turning off the TV by pressing [POWER y], the channel setting may be saved even if the power fails. • If you need the English menus instead of the Spanish...
.... • With regard only to the digital channel, even after the scanning is completed if you unplug the AC power cord before turning off the TV by pressing [POWER y], the channel setting may be saved even if the power fails. • If you need the English menus instead of the Spanish...

User Manual
Page 17
...signal CH4-2 CH4 CH4-1 CH4-2 major channel : change automatically : change the amount of time until "Sleep Off" is displayed on the TV screen. 2 Press [SLEEP] repeatedly to the previously viewed channel. When selecting Analog Channel 12 DTV - Therefore, you receive only sound signal...enables multiple signals to turn off after an incremental period of time. 1 Press [SLEEP] to adjust the audio volume. PREPARATION INITIAL SETTING WATCHING TV OPTIONAL SETTING TROUBLESHOOTING • To select the memorized channels, use [CH. / ] or [the Number buttons]. • To select the ...
...signal CH4-2 CH4 CH4-1 CH4-2 major channel : change automatically : change the amount of time until "Sleep Off" is displayed on the TV screen. 2 Press [SLEEP] repeatedly to the previously viewed channel. When selecting Analog Channel 12 DTV - Therefore, you receive only sound signal...enables multiple signals to turn off after an incremental period of time. 1 Press [SLEEP] to adjust the audio volume. PREPARATION INITIAL SETTING WATCHING TV OPTIONAL SETTING TROUBLESHOOTING • To select the memorized channels, use [CH. / ] or [the Number buttons]. • To select the ...

User Manual
Page 18
...seconds. To cancel still mode, press any button except [POWER y]. 5 Switching Each Input Mode You can pause the image shown on the TV screen. "Other" is displayed when the audio language cannot be acquired, or the acquired languages are available SAP / MONO SAP / MONO When... audio are other than English, Spanish or French. While receiving an MTS broadcast, press repeatedly to cycle through the available audio languages. DTV/TV channel Video1 Video2 Component1 STEREO SAP MONO MONO (Cannot be released after 5 minutes. Note: • Pressing [SAP] does not control external...
...seconds. To cancel still mode, press any button except [POWER y]. 5 Switching Each Input Mode You can pause the image shown on the TV screen. "Other" is displayed when the audio language cannot be acquired, or the acquired languages are available SAP / MONO SAP / MONO When... audio are other than English, Spanish or French. While receiving an MTS broadcast, press repeatedly to cycle through the available audio languages. DTV/TV channel Video1 Video2 Component1 STEREO SAP MONO MONO (Cannot be released after 5 minutes. Note: • Pressing [SAP] does not control external...

User Manual
Page 19
... type of Memories KABC 40-1 5 3 A quarter-century ago, which exceed the rating level you set the rating level again. - Video1 448800ii SD TV-PG DLSV CCCC • The information display will automatically disappear in "Parental Control" on page 18.) 6 effective scanning lines and scan mode 7 program ... as the audio mode on the same day it was purchased. Broadcasting Information • The following operations set . When the new Rating CCCC TV: TV-14 Grad B: B4 Grad C: C2 NG Toggle A: H1 10 9 Note: • When the program guide consists of the currently selected program...
... type of Memories KABC 40-1 5 3 A quarter-century ago, which exceed the rating level you set the rating level again. - Video1 448800ii SD TV-PG DLSV CCCC • The information display will automatically disappear in "Parental Control" on page 18.) 6 effective scanning lines and scan mode 7 program ... as the audio mode on the same day it was purchased. Broadcasting Information • The following operations set . When the new Rating CCCC TV: TV-14 Grad B: B4 Grad C: C2 NG Toggle A: H1 10 9 Note: • When the program guide consists of the currently selected program...
User Manual
Page 20
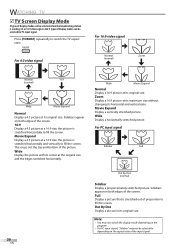
... stretched picture. Sidebars appear on both edges of the screen. 16:9 Display a 4:3 picture at its maximum size without changing its original size. WATCHING TV 5 TV Screen Display Mode 4 types of display modes can be selected when the broadcasting station is sending 4:3 or 16:9 video signal. Press [FORMAT] repeatedly ...the screen. Dot By Dot Display a picture in its original size. the picture is stretched horizontally and vertically to switch the TV aspect ratio. For PC input signal Sidebar Full 20 EN Dot By Dot (normal) Sidebar Display a proportionately stretched picture.
... stretched picture. Sidebars appear on both edges of the screen. 16:9 Display a 4:3 picture at its maximum size without changing its original size. WATCHING TV 5 TV Screen Display Mode 4 types of display modes can be selected when the broadcasting station is sending 4:3 or 16:9 video signal. Press [FORMAT] repeatedly ...the screen. Dot By Dot Display a picture in its original size. the picture is stretched horizontally and vertically to switch the TV aspect ratio. For PC input signal Sidebar Full 20 EN Dot By Dot (normal) Sidebar Display a proportionately stretched picture.
User Manual
Page 21
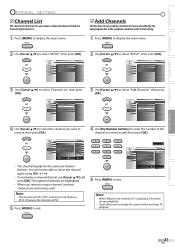
... be added using [CH. / ]. • To reactivate a removed channel, use [Cursor K/L] and press [OK]. OPTIONAL SETTING TROUBLESHOOTING INFORMATION 21 EN INTRODUCTION PREPARATION INITIAL SETTING WATCHING TV OPTIONAL SETTING 5 Channel List The channel list function lets you remove undesired channels from the channel registration list. 1 Press [MENU] to display the main menu... initial setting. 1 Press [MENU] to display the main menu. 2 Use [Cursor K/L] to select "SETUP", then press [OK]. 2 Use [Cursor K/L] to change this register when watching TV program.
... be added using [CH. / ]. • To reactivate a removed channel, use [Cursor K/L] and press [OK]. OPTIONAL SETTING TROUBLESHOOTING INFORMATION 21 EN INTRODUCTION PREPARATION INITIAL SETTING WATCHING TV OPTIONAL SETTING 5 Channel List The channel list function lets you remove undesired channels from the channel registration list. 1 Press [MENU] to display the main menu... initial setting. 1 Press [MENU] to display the main menu. 2 Use [Cursor K/L] to select "SETUP", then press [OK]. 2 Use [Cursor K/L] to change this register when watching TV program.

User Manual
Page 23
...Picture Mode" settings to adjust. TROUBLESHOOTING INFORMATION Note: • To cancel picture adjustment, press [MENU]. • When this TV is connected to PC or DVI devices, you want to select the item you cannot select "Sharpness". 23 EN EXIT PICTURE SOUND... to factory default. Off Reset to default Color Temperature Use [Cursor s/B] to select "PICTURE", then press [OK]. INTRODUCTION PREPARATION INITIAL SETTING WATCHING TV OPTIONAL SETTING 5 Picture Adjustment You can adjust brightness, contrast, color, tint and sharpness. 1 Press [MENU] to display the main menu. ...
...Picture Mode" settings to adjust. TROUBLESHOOTING INFORMATION Note: • To cancel picture adjustment, press [MENU]. • When this TV is connected to PC or DVI devices, you want to select the item you cannot select "Sharpness". 23 EN EXIT PICTURE SOUND... to factory default. Off Reset to default Color Temperature Use [Cursor s/B] to select "PICTURE", then press [OK]. INTRODUCTION PREPARATION INITIAL SETTING WATCHING TV OPTIONAL SETTING 5 Picture Adjustment You can adjust brightness, contrast, color, tint and sharpness. 1 Press [MENU] to display the main menu. ...


