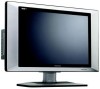

User manual, English (US)
Page 2
TABLE OF CONTENTS IMPORTANT INFORMATION IMPORTANT SAFETY INSTRUCTIONS SUPPLIED ACCESSORIES REMOTE CONTROL FUNCTIONAL OVERVIEW CONNECTIONS BASIC OPERATIONS WATCHING TV MENU ADJUSTMENT BASIC OPERATIONS DVD PLAY DISCS IN VARIOUS WAYS MENU SETTING DVD KODAK PICTURE CD PLAYBACK TROUBLESHOOTING TECHNICAL SPECIFICATIONS WARRANTY PAGE 2 3-4 5 6-7 8 9 10 11-12 13-18 19-24 24-29 30-34 35 36-37 38 39 page1
TABLE OF CONTENTS IMPORTANT INFORMATION IMPORTANT SAFETY INSTRUCTIONS SUPPLIED ACCESSORIES REMOTE CONTROL FUNCTIONAL OVERVIEW CONNECTIONS BASIC OPERATIONS WATCHING TV MENU ADJUSTMENT BASIC OPERATIONS DVD PLAY DISCS IN VARIOUS WAYS MENU SETTING DVD KODAK PICTURE CD PLAYBACK TROUBLESHOOTING TECHNICAL SPECIFICATIONS WARRANTY PAGE 2 3-4 5 6-7 8 9 10 11-12 13-18 19-24 24-29 30-34 35 36-37 38 39 page1

User manual, English (US)
Page 3
... comply with the limit for help. ● Only shielded interface cable should be used in accordance with arrowhead symbol, within an equilateral triangle, is intended to alert the user to the presence of uninsulated ''dangerous voltage'' within a triangle is intended to alert the user to Part 15 of important operation and maintenance (servicing) instructions in the literature accompanying the...
... comply with the limit for help. ● Only shielded interface cable should be used in accordance with arrowhead symbol, within an equilateral triangle, is intended to alert the user to the presence of uninsulated ''dangerous voltage'' within a triangle is intended to alert the user to Part 15 of important operation and maintenance (servicing) instructions in the literature accompanying the...

User manual, English (US)
Page 4
... for replacement of the polarized or grounding-type plug. page3 Keep these instructions. 2. Use only with the apparatus. The safeguards incorporated in accordance with dry cloth. 7. Heed all instructions. 5. Do not install near water. 6. Improper use attachments/accessories specified by the manufacturer, or sold with the cart, stand, tripod, bracket, or table specified by the manufacturer. 12. Read these instructions. 3. Install in...
... for replacement of the polarized or grounding-type plug. page3 Keep these instructions. 2. Use only with the apparatus. The safeguards incorporated in accordance with dry cloth. 7. Heed all instructions. 5. Do not install near water. 6. Improper use attachments/accessories specified by the manufacturer, or sold with the cart, stand, tripod, bracket, or table specified by the manufacturer. 12. Read these instructions. 3. Install in...
User manual, English (US)
Page 5
... needs replacement parts, make sure that the product needs servicing. 16. page4 IMPORTANT SAFETY PRECAUTIONS d) When the product does not operate properly as a fixed blue, green or red point. Any noticeable abnormality in this does not affect your product's performance. The LCD panel used in the product indicates that the service person uses replacement parts specified by glass pieces in the operating instructions. Replacement parts - The LCD panel is a product of controls...
... needs replacement parts, make sure that the product needs servicing. 16. page4 IMPORTANT SAFETY PRECAUTIONS d) When the product does not operate properly as a fixed blue, green or red point. Any noticeable abnormality in this does not affect your product's performance. The LCD panel used in the product indicates that the service person uses replacement parts specified by glass pieces in the operating instructions. Replacement parts - The LCD panel is a product of controls...

User manual, English (US)
Page 8
... played in normal viewing mode. FF/FR Use to DVD status. AUDIO Use to display the time of the DVD playback. REMAIN Use to shift DVD audio language. CAPTION Use to the previous/next chapter. page7 MPX Use to select the sound multiplex mode. (See page 16.) OSD Use to bring up the AV signal source selection screen and use to shift DVD subtitle language. VOLUME+/- PREV/NEXT Use to skip to select close caption mode. Number Buttons Use to set TV display mode. DVD MENU Use to confirm. SETUP Use to enter DVD chapter numbers...
... played in normal viewing mode. FF/FR Use to DVD status. AUDIO Use to display the time of the DVD playback. REMAIN Use to shift DVD audio language. CAPTION Use to the previous/next chapter. page7 MPX Use to select the sound multiplex mode. (See page 16.) OSD Use to bring up the AV signal source selection screen and use to shift DVD subtitle language. VOLUME+/- PREV/NEXT Use to skip to select close caption mode. Number Buttons Use to set TV display mode. DVD MENU Use to confirm. SETUP Use to enter DVD chapter numbers...

User manual, English (US)
Page 9
...) CB / PB L AUDIO 4 5) Antenna In Y R AV3 IN 6) AUDIO (VGA/DVI Input) 7) OPTICAL (DVD Output) VGA PC INPUT OPTICAL DVD OUTPUT AUDIO DVI/VGA INPUT 8) VGA INPUT 9) DVI (Digital Video Input) 8 76 5 10) DC INPUT page8 Video, AV3-Component,PC-Analog(VGA), PC-Digital(DVI) and use the OK button to confirm. 6) CH+/-: To skip to the previous/next channel. 7) VOLUME+/-: Use to adjust the volume. 8) DISC SLOT: Insert a DVD or CD disc to play under DVD status. 9) PLAY BUTTON: Use to begin the DVD playback. 10) PAUSE BUTTON: Use to pause the DVD playback. 11) PREV: Use to skip...
...) CB / PB L AUDIO 4 5) Antenna In Y R AV3 IN 6) AUDIO (VGA/DVI Input) 7) OPTICAL (DVD Output) VGA PC INPUT OPTICAL DVD OUTPUT AUDIO DVI/VGA INPUT 8) VGA INPUT 9) DVI (Digital Video Input) 8 76 5 10) DC INPUT page8 Video, AV3-Component,PC-Analog(VGA), PC-Digital(DVI) and use the OK button to confirm. 6) CH+/-: To skip to the previous/next channel. 7) VOLUME+/-: Use to adjust the volume. 8) DISC SLOT: Insert a DVD or CD disc to play under DVD status. 9) PLAY BUTTON: Use to begin the DVD playback. 10) PAUSE BUTTON: Use to pause the DVD playback. 11) PREV: Use to skip...

User manual, English (US)
Page 10
... Video and Audio output jacks); Using the AV3 Component input: The AV3 input may be available at this type of the AC power adapter to "TV". e. page9 CONNECTIONS AUDIO L AV OUT VIDEO S-VIDEO AV1 IN VIDEO AV2 IN CR / PR CB / PB Y AV3 IN R L AUDIO R L AUDIO R L AUDIO R DC 24V 6A DC INPUT DVI PC INPUT VGA PC INPUT OPTICAL DVD OUTPUT AUDIO DVI/VGA INPUT 2f 2g 1. Use the TV/DVD/AUX/PC button and the / buttons to set the 26MD255V's signal source to PC-Analog(VGA) . 26MD255V monitor s native resolution for Progressive scan or HDTV inputs...
... Video and Audio output jacks); Using the AV3 Component input: The AV3 input may be available at this type of the AC power adapter to "TV". e. page9 CONNECTIONS AUDIO L AV OUT VIDEO S-VIDEO AV1 IN VIDEO AV2 IN CR / PR CB / PB Y AV3 IN R L AUDIO R L AUDIO R L AUDIO R DC 24V 6A DC INPUT DVI PC INPUT VGA PC INPUT OPTICAL DVD OUTPUT AUDIO DVI/VGA INPUT 2f 2g 1. Use the TV/DVD/AUX/PC button and the / buttons to set the 26MD255V's signal source to PC-Analog(VGA) . 26MD255V monitor s native resolution for Progressive scan or HDTV inputs...

User manual, English (US)
Page 11
... turned off. BASIC OPERATIONS POWER TV/DVD/AUX/PC TV/DVD/ CH CH AUX/PC VOL VOL TURNING OFF THE POWER 1. Press POWER button on the front panel to turn on . The POWER indicator lights up red. page10 If the STANDBY indicator still lights up red, press POWER on the remote control to turn the TV set on the TV set and confirming by the OK button, you can change the mode as follows: TV DVD AV1-S-Video AV2-Video AV3-Component PC-Digital(DVI) PC-Analog(VGA) TV/DVD...
... turned off. BASIC OPERATIONS POWER TV/DVD/AUX/PC TV/DVD/ CH CH AUX/PC VOL VOL TURNING OFF THE POWER 1. Press POWER button on the front panel to turn on . The POWER indicator lights up red. page10 If the STANDBY indicator still lights up red, press POWER on the remote control to turn the TV set on the TV set and confirming by the OK button, you can change the mode as follows: TV DVD AV1-S-Video AV2-Video AV3-Component PC-Digital(DVI) PC-Analog(VGA) TV/DVD...

User manual, English (US)
Page 14
... change cable on -screen displays in this manual are for a better picture and sound; press OK to enter "TV Tuner" menu. 4. Press / to select "Settings" and press to exit. press TV MENU to select "TV Tuner". 3. Press to return; press OK to begin the searching. Press TV MENU to select "TV Tuner". 3. Press / to select "Settings" and press to bring up the TV menu screen. 2. Press / to select "Settings" and press to bring up the TV menu screen. 2. Press TV MENU to select "TV Tuner". 3. Press / to select "Settings...
... change cable on -screen displays in this manual are for a better picture and sound; press OK to enter "TV Tuner" menu. 4. Press / to select "Settings" and press to exit. press TV MENU to select "TV Tuner". 3. Press to return; press OK to begin the searching. Press TV MENU to select "TV Tuner". 3. Press / to select "Settings" and press to bring up the TV menu screen. 2. Press / to select "Settings" and press to bring up the TV menu screen. 2. Press TV MENU to select "TV Tuner". 3. Press / to select "Settings...
User manual, English (US)
Page 16
... TV MENU to bring up the TV menu screen. 2. Press / to adjust the picture contrast; Treble To stress high frequency sound 1. Press TV MENU to bring up the TV menu screen. 2. Press / to select ''Picture'' and press to enter into below items. AUDIO ADJUSTMENT Press TV MENU to bring up the TV menu screen. Press / to adjust the volume; press TV MENU to adjust the picture sharpness; NOTE: In DVD status, there is "Phase". Press / to exit. Press / to ''Color...
... TV MENU to bring up the TV menu screen. 2. Press / to adjust the picture contrast; Treble To stress high frequency sound 1. Press TV MENU to bring up the TV menu screen. 2. Press / to select ''Picture'' and press to enter into below items. AUDIO ADJUSTMENT Press TV MENU to bring up the TV menu screen. Press / to adjust the volume; press TV MENU to adjust the picture sharpness; NOTE: In DVD status, there is "Phase". Press / to exit. Press / to ''Color...

User manual, English (US)
Page 17
... return; display mode 16 16 page16 Press / to select a MPX mode. 2. NOTE: 1. You can also use the MPX button on the remote control to select ''Audio''. 3. Equalizer 1. Press TV MENU to ''Balance''. 4. Press / to bring up the TV menu screen. MENU ADJUSTMENT AUDIO ADJUSTMENT (CONTINUED) Balance 1. Press TV MENU to select "Equalizer" in TV status, there is to return; Press / to move to bring up the TV menu screen. 2. press TV MENU to adjust audio output between left and right speakers; Press...
... return; display mode 16 16 page16 Press / to select a MPX mode. 2. NOTE: 1. You can also use the MPX button on the remote control to select ''Audio''. 3. Equalizer 1. Press TV MENU to ''Balance''. 4. Press / to bring up the TV menu screen. MENU ADJUSTMENT AUDIO ADJUSTMENT (CONTINUED) Balance 1. Press TV MENU to select "Equalizer" in TV status, there is to return; Press / to move to bring up the TV menu screen. 2. press TV MENU to adjust audio output between left and right speakers; Press...

User manual, English (US)
Page 19
... Freeze , CC Mode option. page18 Press / to exit. Press TV MENU to select "Sleep Time "in "Option" menu. 2. If you have set the "Sleep Time " , the count down will be applied automatically , and the time remaining displays the remain time . MENU ADJUSTMENT OPTIONS ADJUSTMENT (CONTINUED) Sleep Time It is used to adjust the Color Temperature. 1. Press / to exit. When you set the " Sleep Time " on " 0 minutes" . 5. Press / to factory setting. Press to reset all settings to select "Color Temperature " in...
... Freeze , CC Mode option. page18 Press / to exit. Press TV MENU to select "Sleep Time "in "Option" menu. 2. If you have set the "Sleep Time " , the count down will be applied automatically , and the time remaining displays the remain time . MENU ADJUSTMENT OPTIONS ADJUSTMENT (CONTINUED) Sleep Time It is used to adjust the Color Temperature. 1. Press / to exit. When you set the " Sleep Time " on " 0 minutes" . 5. Press / to factory setting. Press to reset all settings to select "Color Temperature " in...

User manual, English (US)
Page 21
... remote to change the DVD player's Audio Language setting. 1. Note: The language feature only works if the disc was created with subtitles, you choose an audio language from the screen, press OSD on a CD). While the disc is playing, press OSD on the Display isn't highlighted, use the Display to bring up the Display. 2. Press the or buttons to tracks on the remote. Press the (PLAY) button, the text box...
... remote to change the DVD player's Audio Language setting. 1. Note: The language feature only works if the disc was created with subtitles, you choose an audio language from the screen, press OSD on a CD). While the disc is playing, press OSD on the Display isn't highlighted, use the Display to bring up the Display. 2. Press the or buttons to tracks on the remote. Press the (PLAY) button, the text box...

User manual, English (US)
Page 22
... playing To Use Repeat: 1. Use the number buttons to change the camera angle: 1. There are available, to enter an angle number that is playing, press OSD on the remote. repeats the chapter that you want to bring up the Display. 2. BASIC OPERATIONS (FOR DVD PLAYER) 1. While the disc is playing, press OSD on the remote. ■ Setting Title Time You can also be changed through the DVD player main menu. The subtitle...
... playing To Use Repeat: 1. Use the number buttons to change the camera angle: 1. There are available, to enter an angle number that is playing, press OSD on the remote. repeats the chapter that you want to bring up the Display. 2. BASIC OPERATIONS (FOR DVD PLAYER) 1. While the disc is playing, press OSD on the remote. ■ Setting Title Time You can also be changed through the DVD player main menu. The subtitle...

User manual, English (US)
Page 23
... play. ■ Setting Disc Time You can skipo to a specific track time by using the Disc Time feature in the Display. 1. Press the (PLAY) button when the repeat option you can shift the time displayed on the remote to bring up the Display. 2. page22 Press the (PLAY) button, the text box by the right side is playing. 3. Press the (PLAY) button, the text box by the right side is highlighted. 5. Use the number buttons...
... play. ■ Setting Disc Time You can skipo to a specific track time by using the Disc Time feature in the Display. 1. Press the (PLAY) button when the repeat option you can shift the time displayed on the remote to bring up the Display. 2. page22 Press the (PLAY) button, the text box by the right side is playing. 3. Press the (PLAY) button, the text box by the right side is highlighted. 5. Use the number buttons...

User manual, English (US)
Page 32
... last icon illustrating Exit, then press the (PLAY) button to set TV display mode. NOTE:You can also keep pressing the direction button until the cursor is : NOTE: You can use the WIDE button on the top and bottom of the screen. 3. Wide-screen images are shown on the screen, but with black bars on the remote control to exit setup menu completely. 2. Set "Dual Mono" in "Dolby Digital Setup" to "L-Mono".
... last icon illustrating Exit, then press the (PLAY) button to set TV display mode. NOTE:You can also keep pressing the direction button until the cursor is : NOTE: You can use the WIDE button on the top and bottom of the screen. 3. Wide-screen images are shown on the screen, but with black bars on the remote control to exit setup menu completely. 2. Set "Dual Mono" in "Dolby Digital Setup" to "L-Mono".
User manual, English (US)
Page 33
... Soft Audio Setup ● EQ TYPE You can select music category by pressing the direction buttons and confirm by pressing the PLAY button. Speaker Setup Page - - Audio Setup The setting structure is : - - Downmix STR Lt/Rt Stereo Audio Setup ● Lt/Rt A disc recorded multi channel soundtrack, the output signal will be incorported to left and right channel. ● STEREO A disc recorded multi channel soundtrack, the output signal will help you to select graphic...
... Soft Audio Setup ● EQ TYPE You can select music category by pressing the direction buttons and confirm by pressing the PLAY button. Speaker Setup Page - - Audio Setup The setting structure is : - - Downmix STR Lt/Rt Stereo Audio Setup ● Lt/Rt A disc recorded multi channel soundtrack, the output signal will be incorported to left and right channel. ● STEREO A disc recorded multi channel soundtrack, the output signal will help you to select graphic...

User manual, English (US)
Page 37
... SAP sound. ● Long distance from the station or other electronic devices such as radio and television and keep magnetic or electronic devices away from the TV. Reception. Then, adjust them to optimum condition for repair service. Sound is in color or in black & white. Remote control does ● Check if the batteries in PC mode. Picture is OK, but no sound. ● Check the volume control...
... SAP sound. ● Long distance from the station or other electronic devices such as radio and television and keep magnetic or electronic devices away from the TV. Reception. Then, adjust them to optimum condition for repair service. Sound is in color or in black & white. Remote control does ● Check if the batteries in PC mode. Picture is OK, but no sound. ● Check the volume control...

User manual, English (US)
Page 38
... the color system is in the unit. Use of this troubleshooting guide can help you. No image ● Check if the unit is connected securely. ● Make sure the TV is working properly. ● Make sure the amplifier is intended for about an hour. Bad sound quality ● Make sure the audio output mode is set correctly. ● Make sure the audio connection between the remote control and...
... the color system is in the unit. Use of this troubleshooting guide can help you. No image ● Check if the unit is connected securely. ● Make sure the TV is working properly. ● Make sure the amplifier is intended for about an hour. Bad sound quality ● Make sure the audio output mode is set correctly. ● Make sure the audio connection between the remote control and...

User manual, English (US)
Page 39
...; CATV SOUND ● SOUND OUTPUT TERMINALS ● AV IN ● COMPONENT ● MONITOR OUT ● PC IN ● ANTENNA IN DVD ● Applicable disc Power adapter ● Output ● Input Power consumption ● Power consumption (TV) ● Power consumption (DVD) 770 X 552 X 210 770 X 443 X 100 15.8kg NTSC ELECTRIC TUNING SYSTEM VHF/UHF MTS + SAP 125 CHANNELS 8W×2 VIDEO, S-VIDEO, AUDIO L&R Y, Pb (Cb), Pr (Cr) VIDEO OUT D-SUB 15PIN RGB IN, DVI F-TYPE DVD/CD...
...; CATV SOUND ● SOUND OUTPUT TERMINALS ● AV IN ● COMPONENT ● MONITOR OUT ● PC IN ● ANTENNA IN DVD ● Applicable disc Power adapter ● Output ● Input Power consumption ● Power consumption (TV) ● Power consumption (DVD) 770 X 552 X 210 770 X 443 X 100 15.8kg NTSC ELECTRIC TUNING SYSTEM VHF/UHF MTS + SAP 125 CHANNELS 8W×2 VIDEO, S-VIDEO, AUDIO L&R Y, Pb (Cb), Pr (Cr) VIDEO OUT D-SUB 15PIN RGB IN, DVI F-TYPE DVD/CD...


