User manual, English (US)
Page 2
... Benefits Registering your confidence in a MAGNAVOX product. For Customer Use Enter below , so don't miss out. Dear MAGNAVOX product owner: Thank you for investing in MAGNAVOX.You've selected one of the cabinet. As a member of the MAGNAVOX "family," you can count on the rear of the most comprehensive warranties and outstanding service networks in our power to keep you should not...
... Benefits Registering your confidence in a MAGNAVOX product. For Customer Use Enter below , so don't miss out. Dear MAGNAVOX product owner: Thank you for investing in MAGNAVOX.You've selected one of the cabinet. As a member of the MAGNAVOX "family," you can count on the rear of the most comprehensive warranties and outstanding service networks in our power to keep you should not...
User manual, English (US)
Page 3
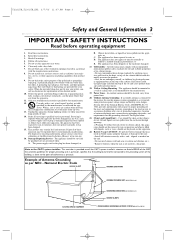
... POWER SERVICE GROUNDING ELECTRODE SYSTEM (NEC ART 250, PART H) Read these instructions. 3. Do not defeat the safety purpose of the National Electric Code, ANSI/NFPA No. 701984, provides information with liquids, such as practical. The wide blade or third prong are not spilled into your outlet, consult an electrician for a long time. Use only with a cart, stand, tripod, bracket...
... POWER SERVICE GROUNDING ELECTRODE SYSTEM (NEC ART 250, PART H) Read these instructions. 3. Do not defeat the safety purpose of the National Electric Code, ANSI/NFPA No. 701984, provides information with liquids, such as practical. The wide blade or third prong are not spilled into your outlet, consult an electrician for a long time. Use only with a cart, stand, tripod, bracket...
User manual, English (US)
Page 5
... of Contents 5 Introduction 6 Playable Discs and Videotapes 7 Initial Setup and Use Before Using the TV/VCR/DVD 8 Hooking Up the TV/VCR/DVD 9-10 Optional Connections 11 Watching TV 12 Playing a Videotape 13 Playing a Disc 14 Description of Controls Remote Control Buttons 15-16 Front Panel 17 Rear Panel 18 TV Settings Menu Language, Auto Channel Programming .19 Adding/Deleting Channels 20 Setting the Clock 21-24 Daylight-Savings Time 25 Status Displays, Picture Controls 26 Recording Videotape Recording 27 One-Touch Recording...
... of Contents 5 Introduction 6 Playable Discs and Videotapes 7 Initial Setup and Use Before Using the TV/VCR/DVD 8 Hooking Up the TV/VCR/DVD 9-10 Optional Connections 11 Watching TV 12 Playing a Videotape 13 Playing a Disc 14 Description of Controls Remote Control Buttons 15-16 Front Panel 17 Rear Panel 18 TV Settings Menu Language, Auto Channel Programming .19 Adding/Deleting Channels 20 Setting the Clock 21-24 Daylight-Savings Time 25 Status Displays, Picture Controls 26 Recording Videotape Recording 27 One-Touch Recording...
User manual, English (US)
Page 6
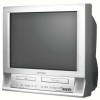
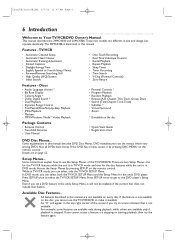
... manual. Press SET-UP twice to get to select the TV/VCR SETUP Menu. Features - Discs • Audio Language choices * • Bit Rate Display • Camera Angle * • Dolby Digital Sound * • Dual Playback • Dynamic Range Control • Fast/Paused/Slow/Step-by pressing SET-UP on the disc Package Contents • Remote Control • Two AAA batteries • User Manual • Quick Start Guide • Registration Card DVD...
... manual. Press SET-UP twice to get to select the TV/VCR SETUP Menu. Features - Discs • Audio Language choices * • Bit Rate Display • Camera Angle * • Dolby Digital Sound * • Dual Playback • Dynamic Range Control • Fast/Paused/Slow/Step-by pressing SET-UP on the disc Package Contents • Remote Control • Two AAA batteries • User Manual • Quick Start Guide • Registration Card DVD...

User manual, English (US)
Page 11
..., set DOLBY DIGITAL to a Stereo that has a Mini-Disc or Digital Audio Tape deck. 1 Connect the antenna/Cable TV signal. AUDIO OUT COAXIAL AUDIO OUT COAXIAL To Stereo's COAXIAL DIGITAL AUDIO IN jack Helpful Hints • You cannot use the Digital Stereo hookup. • To see if your Stereo. Or, refer to the AUDIO OUT COAXIAL jack on pages 9-10. 2 Connect a digital audio coaxial cable (not supplied) to the Stereo owner's manual. Details are on TV/VCR/DVD ANT...
..., set DOLBY DIGITAL to a Stereo that has a Mini-Disc or Digital Audio Tape deck. 1 Connect the antenna/Cable TV signal. AUDIO OUT COAXIAL AUDIO OUT COAXIAL To Stereo's COAXIAL DIGITAL AUDIO IN jack Helpful Hints • You cannot use the Digital Stereo hookup. • To see if your Stereo. Or, refer to the AUDIO OUT COAXIAL jack on pages 9-10. 2 Connect a digital audio coaxial cable (not supplied) to the Stereo owner's manual. Details are on TV/VCR/DVD ANT...

User manual, English (US)
Page 14
... down by pressing OPEN/CLOSE A. 6 Press STOP C to a power failure, it will be in TV/VCR mode.The red VCR/TV light will turn it on again. • An ''X" will appear on the screen when you try a different one. • Pressing OPEN/CLOSE A (DVD) or PLAY B (DVD) will play MP3, Windows MediaTM Audio or JPEG files, see page 52. If playback is not available. Remove the disc and try...
... down by pressing OPEN/CLOSE A. 6 Press STOP C to a power failure, it will be in TV/VCR mode.The red VCR/TV light will turn it on again. • An ''X" will appear on the screen when you try a different one. • Pressing OPEN/CLOSE A (DVD) or PLAY B (DVD) will play MP3, Windows MediaTM Audio or JPEG files, see page 52. If playback is not available. Remove the disc and try...

User manual, English (US)
Page 15
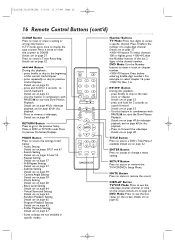
... off the TV/VCR/DVD. T2221UB_T1201UB_EN1 3/7/06 11:07 AM Page 15 Remote Control Buttons 15 STANDBY-ONy Button Press to set the Sleep Timer. PICTURE/SLEEP Button Press to turn on pages 40 and 56. Press again to select memorized TV channels. Details are on page 14. CH. (channel) K/L Buttons Press to resume recording. Arrow Buttons Use the Arrow buttons to select or adjust menu items. DISC MENU Button Press to access the picture controls. Press to access DVD Disc Menus...
... off the TV/VCR/DVD. T2221UB_T1201UB_EN1 3/7/06 11:07 AM Page 15 Remote Control Buttons 15 STANDBY-ONy Button Press to set the Sleep Timer. PICTURE/SLEEP Button Press to turn on pages 40 and 56. Press again to select memorized TV channels. Details are on page 14. CH. (channel) K/L Buttons Press to resume recording. Arrow Buttons Use the Arrow buttons to select or adjust menu items. DISC MENU Button Press to access the picture controls. Press to access DVD Disc Menus...
User manual, English (US)
Page 16
... previous Setup Menu in combination with PAUSE k to search backward. Subtitle Setting Details are on page 40 for videotape playback, and on the screen. STANDBY-ON OPEN/CLOSE 1 2 3 4 5 6 7 8 CLEAR 0 REC MODE 9 +100 +10 REC H PLAY G STOP SLOW PAUSE RETURN TITLE ENTER DISC SET-UP MENU PICTURE /SLEEP CH. SELECT MODE DISPLAY MUTE Number Buttons TV Mode: Press two digits to mute or restore the sound. press briefly to skip to access a DVD's Title Menu if...
... previous Setup Menu in combination with PAUSE k to search backward. Subtitle Setting Details are on page 40 for videotape playback, and on the screen. STANDBY-ON OPEN/CLOSE 1 2 3 4 5 6 7 8 CLEAR 0 REC MODE 9 +100 +10 REC H PLAY G STOP SLOW PAUSE RETURN TITLE ENTER DISC SET-UP MENU PICTURE /SLEEP CH. SELECT MODE DISPLAY MUTE Number Buttons TV Mode: Press two digits to mute or restore the sound. press briefly to skip to access a DVD's Title Menu if...

User manual, English (US)
Page 17
..., DVD player or VCR.This lets you choose AUX at the TV/VCR/DVD. HEADPHONE jack Connect headphones (not supplied) here for a Timer Recording. If you can operate the TV/VCR/DVD from a distance. Details are on page 27. VIDEO and AUDIO L/R (left/right) In jacks Use audio and video cables to connect these jacks to start a One-Touch Recording. Cassette Compartment Insert a videotape here. REC/OTR light (red) This light flashes during playback. It lights when the TV/VCR/DVD is in DVD mode...
..., DVD player or VCR.This lets you choose AUX at the TV/VCR/DVD. HEADPHONE jack Connect headphones (not supplied) here for a Timer Recording. If you can operate the TV/VCR/DVD from a distance. Details are on page 27. VIDEO and AUDIO L/R (left/right) In jacks Use audio and video cables to connect these jacks to start a One-Touch Recording. Cassette Compartment Insert a videotape here. REC/OTR light (red) This light flashes during playback. It lights when the TV/VCR/DVD is in DVD mode...
User manual, English (US)
Page 19
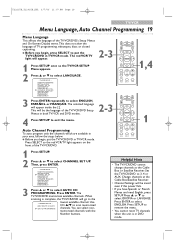
... need English, press SET-UP. SELECT MODE DISPLAY MUTE 1 1 Press SET-UP. 2 Press ▲ or ▼ to select AUTO CH PROGRAMMING. The red VCR/TV light will appear inside the [ ]. TIMER PROGRAMMING SETTING CLOCK B CHANNEL SET UP USER'S SET UP V-CHIP SET UP LANGUAGE [ENGLISH] CAPTION [OFF] ZERO RETURN TIME SEARCH INDEX SEARCH 3 Press ▲ or ▼ to select CHANNEL SET UP. CHANNEL SET UP - VOL. This will go to exit the menu. TV/VCR SETUP - Use CH. ▲/▼ to remove the menu. • You cannot reset TV channels...
... need English, press SET-UP. SELECT MODE DISPLAY MUTE 1 1 Press SET-UP. 2 Press ▲ or ▼ to select AUTO CH PROGRAMMING. The red VCR/TV light will appear inside the [ ]. TIMER PROGRAMMING SETTING CLOCK B CHANNEL SET UP USER'S SET UP V-CHIP SET UP LANGUAGE [ENGLISH] CAPTION [OFF] ZERO RETURN TIME SEARCH INDEX SEARCH 3 Press ▲ or ▼ to select CHANNEL SET UP. CHANNEL SET UP - VOL. This will go to exit the menu. TV/VCR SETUP - Use CH. ▲/▼ to remove the menu. • You cannot reset TV channels...
User manual, English (US)
Page 20
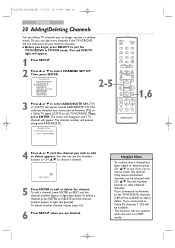
... TV/VCR 20 Adding/Deleting Channels You can delete TV channels you connected an Antenna (TV) or a Cable TV signal (CATV) to the TV/VCR/DVD. Then, press ENTER. B ADD / DELETE CH (CATV) AUTO CH PROGRAMMING STANDBY-ON OPEN/CLOSE 1 2 3 4 5 6 7 8 CLEAR 0 REC MODE 9 +100 +10 REC H PLAY G STOP SLOW PAUSE RETURN TITLE ENTER DISC SET-UP MENU 1,6 PICTURE /SLEEP CH. To add a channel, press ENTER so ADD and the channel number appear in light red (purple). To delete a channel...
... TV/VCR 20 Adding/Deleting Channels You can delete TV channels you connected an Antenna (TV) or a Cable TV signal (CATV) to the TV/VCR/DVD. Then, press ENTER. B ADD / DELETE CH (CATV) AUTO CH PROGRAMMING STANDBY-ON OPEN/CLOSE 1 2 3 4 5 6 7 8 CLEAR 0 REC MODE 9 +100 +10 REC H PLAY G STOP SLOW PAUSE RETURN TITLE ENTER DISC SET-UP MENU 1,6 PICTURE /SLEEP CH. To add a channel, press ENTER so ADD and the channel number appear in light red (purple). To delete a channel...

User manual, English (US)
Page 22
.../CLOSE 1 2 3 4 5 6 7 8 CLEAR 0 REC MODE 9 +100 +10 REC H PLAY G STOP SLOW PAUSE RETURN TITLE ENTER DISC SET-UP MENU PICTURE /SLEEP CH. T2221UB_T1201UB_EN1 3/7/06 11:07 AM Page 22 TV/VCR 22 Setting the Clock (cont'd) Instructions continued from 0 when you are finished. SELECT MODE DISPLAY MUTE 9 8 While the MINUTE space is flashing, press ▲ or ▼ until the correct day appears. MANUAL CLOCK SET - MANUAL CLOCK SET - MANUAL CLOCK SET - Press SET...
.../CLOSE 1 2 3 4 5 6 7 8 CLEAR 0 REC MODE 9 +100 +10 REC H PLAY G STOP SLOW PAUSE RETURN TITLE ENTER DISC SET-UP MENU PICTURE /SLEEP CH. T2221UB_T1201UB_EN1 3/7/06 11:07 AM Page 22 TV/VCR 22 Setting the Clock (cont'd) Instructions continued from 0 when you are finished. SELECT MODE DISPLAY MUTE 9 8 While the MINUTE space is flashing, press ▲ or ▼ until the correct day appears. MANUAL CLOCK SET - MANUAL CLOCK SET - MANUAL CLOCK SET - Press SET...
User manual, English (US)
Page 23
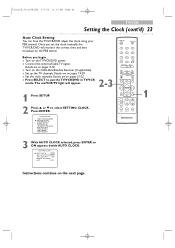
... the TV/VCR/DVD in TV/VCR mode. VOL. The red VCR/TV light will monitor the correct time and date broadcast by the PBS station. T2221UB_T1201UB_EN1 3/7/06 11:07 AM Page 23 TV/VCR Setting the Clock (cont'd) 23 Auto Clock Setting You can have the TV/VCR/DVD adjust the clock using your PBS channel. Once you begin... ● Turn on the TV/VCR/DVD power. ● Connect the antenna/Cable TV signal. Press ENTER. - TIMER PROGRAMMING B SETTING CLOCK CHANNEL SET UP USER'S SET UP V-CHIP SET UP LANGUAGE [ENGLISH] CAPTION...
... the TV/VCR/DVD in TV/VCR mode. VOL. The red VCR/TV light will monitor the correct time and date broadcast by the PBS station. T2221UB_T1201UB_EN1 3/7/06 11:07 AM Page 23 TV/VCR Setting the Clock (cont'd) 23 Auto Clock Setting You can have the TV/VCR/DVD adjust the clock using your PBS channel. Once you begin... ● Turn on the TV/VCR/DVD power. ● Connect the antenna/Cable TV signal. Press ENTER. - TIMER PROGRAMMING B SETTING CLOCK CHANNEL SET UP USER'S SET UP V-CHIP SET UP LANGUAGE [ENGLISH] CAPTION...
User manual, English (US)
Page 24
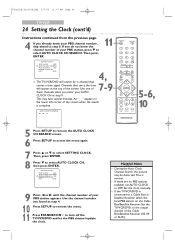
... Cable Box/Satellite Receiver. Use the channel number you enter your AUTO CLOCK CH at step 9. AUTO CLOCK CH SEARCH - 08 10 13 STANDBY-ON OPEN/CLOSE 1 2 3 4 5 6 7 8 CLEAR 0 REC MODE 9 +100 +10 REC H PLAY G STOP SLOW PAUSE RETURN TITLE ENTER DISC SET-UP MENU PICTURE /SLEEP CH. This may be distorted. SELECT MODE DISPLAY MUTE 5-6, 10 - - 5 Press SET-UP to remove the AUTO CLOCK CH SEARCH screen. 6 Press SET-UP to access the menu...
... Cable Box/Satellite Receiver. Use the channel number you enter your AUTO CLOCK CH at step 9. AUTO CLOCK CH SEARCH - 08 10 13 STANDBY-ON OPEN/CLOSE 1 2 3 4 5 6 7 8 CLEAR 0 REC MODE 9 +100 +10 REC H PLAY G STOP SLOW PAUSE RETURN TITLE ENTER DISC SET-UP MENU PICTURE /SLEEP CH. This may be distorted. SELECT MODE DISPLAY MUTE 5-6, 10 - - 5 Press SET-UP to remove the AUTO CLOCK CH SEARCH screen. 6 Press SET-UP to access the menu...
User manual, English (US)
Page 32
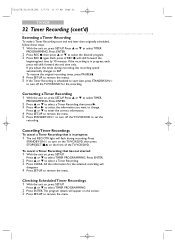
...: 1 The red REC/OTR light will flash during recording, the recording speed automatically changes to turn off the TV/VCR/DVD for the selected recording will appear on , press SET-UP. Press ▲ or ▼ to select a Timer Recording. 3 Press CLEAR. Checking Scheduled Timer Recordings 1 With the unit on , press SET-UP. Press ▲ or ▼ to select TIMER PROGRAMMING. Press ▲ or ▼ to select TIMER PROGRAMMING. Press ENTER...
...: 1 The red REC/OTR light will flash during recording, the recording speed automatically changes to turn off the TV/VCR/DVD for the selected recording will appear on , press SET-UP. Press ▲ or ▼ to select a Timer Recording. 3 Press CLEAR. Checking Scheduled Timer Recordings 1 With the unit on , press SET-UP. Press ▲ or ▼ to select TIMER PROGRAMMING. Press ▲ or ▼ to select TIMER PROGRAMMING. Press ENTER...
User manual, English (US)
Page 43
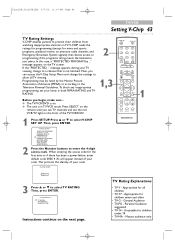
..., a "PROTECTED PROGRAM by the Motion Picture Association of the TV/VCR/DVD. 1 Press SET-UP. message appears during your code. Programming may be rated by ..." Press SELECT on the remote until you see TV channels and see the red VCR/TV light on premium cable channels, and Emergency Broadcast System signals), then denies access to programming if the program's rating meets the limitations you select. TV/VCR SETUP - When entering the access code for the first time or if...
..., a "PROTECTED PROGRAM by the Motion Picture Association of the TV/VCR/DVD. 1 Press SET-UP. message appears during your code. Programming may be rated by ..." Press SELECT on the remote until you see TV channels and see the red VCR/TV light on premium cable channels, and Emergency Broadcast System signals), then denies access to programming if the program's rating meets the limitations you select. TV/VCR SETUP - When entering the access code for the first time or if...
User manual, English (US)
Page 61
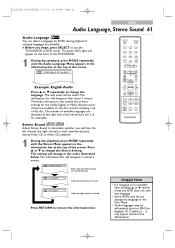
... H PLAY G STOP SLOW PAUSE RETURN TITLE Example: English Audio Press ▲ or ▼ repeatedly to put the TV/VCR/DVD in DVD mode. Only the right channel is heard. Helpful Hints • If a language is not available after about 1 minute. The information bar will change the Stereo Setting. Stereo Sound Adjust Stereo Sound to remove the information bar. The setting will disappear after pressing K or L several times, the DVD...
... H PLAY G STOP SLOW PAUSE RETURN TITLE Example: English Audio Press ▲ or ▼ repeatedly to put the TV/VCR/DVD in DVD mode. Only the right channel is heard. Helpful Hints • If a language is not available after about 1 minute. The information bar will change the Stereo Setting. Stereo Sound Adjust Stereo Sound to remove the information bar. The setting will disappear after pressing K or L several times, the DVD...

User manual, English (US)
Page 68
...-ON OPEN/CLOSE 1 2 3 4 5 6 7 8 CLEAR 0 REC MODE 9 +100 +10 REC H PLAY G STOP SLOW PAUSE RETURN TITLE ENTER DISC SET-UP MENU 1-2 PICTURE /SLEEP CH. Then, press ENTER. ENTER LANGUAGE SUBTITLE OFF ENGLISH FRENCH SPANISH GERMAN ITALIAN SWEDISH SUBTITLE: Subtitles appear in the selected language. The green DVD light will play. The QUICK SETUP Screen appears. QUICK SETUP TV MODE DOLBY DIGITAL 4:3 LETTER BOX BITSTREAM ENTER 3 Press s or B to select CUSTOM at the top of the DVD Audio will...
...-ON OPEN/CLOSE 1 2 3 4 5 6 7 8 CLEAR 0 REC MODE 9 +100 +10 REC H PLAY G STOP SLOW PAUSE RETURN TITLE ENTER DISC SET-UP MENU 1-2 PICTURE /SLEEP CH. Then, press ENTER. ENTER LANGUAGE SUBTITLE OFF ENGLISH FRENCH SPANISH GERMAN ITALIAN SWEDISH SUBTITLE: Subtitles appear in the selected language. The green DVD light will play. The QUICK SETUP Screen appears. QUICK SETUP TV MODE DOLBY DIGITAL 4:3 LETTER BOX BITSTREAM ENTER 3 Press s or B to select CUSTOM at the top of the DVD Audio will...

User manual, English (US)
Page 72
... the TV/VCR SETUP Menu appears. - With QUICK selected, press ENTER. TV/VCR SETUP - DOWN SAMPLING is available only when the unit is OFF. Press SET-UP to 48 kHz. B TIMER PROGRAMMING SETTING CLOCK USER'S SET UP LANGUAGE [ENGLISH] ZERO RETURN 2 While playback is available only on discs recorded in DVD mode. DRC is stopped, press SET-UP again. These settings only affect the Audio from the DVD player of volume by suppressing loud sounds...
... the TV/VCR SETUP Menu appears. - With QUICK selected, press ENTER. TV/VCR SETUP - DOWN SAMPLING is available only when the unit is OFF. Press SET-UP to 48 kHz. B TIMER PROGRAMMING SETTING CLOCK USER'S SET UP LANGUAGE [ENGLISH] ZERO RETURN 2 While playback is available only on discs recorded in DVD mode. DRC is stopped, press SET-UP again. These settings only affect the Audio from the DVD player of volume by suppressing loud sounds...
User manual, English (US)
Page 80
... for DVD mode. If using an antenna and do not play . • Insert a playable disc. Details are on page 7. X/Y to see what features are on the TV/VCR/DVD power, then eject the tape. Press MUTE to restore the volume. • Check the Audio Settings for Region 1 or ALL regions and is off the TV/VCR/DVD power for the Timer Recording. • Unplug the TV/VCR/DVD power cord for the program...
... for DVD mode. If using an antenna and do not play . • Insert a playable disc. Details are on page 7. X/Y to see what features are on the TV/VCR/DVD power, then eject the tape. Press MUTE to restore the volume. • Check the Audio Settings for Region 1 or ALL regions and is off the TV/VCR/DVD power for the Timer Recording. • Unplug the TV/VCR/DVD power cord for the program...


