User manual, English (US)
Page 3
...dropped or the enclosure damaged. 17. Such items could ultimately overturn the product. • Also, do not fall from power lines. 20. Section 810 of antenna-discharge unit, connection to environmental considerations. Care should be regulated due to grounding electrodes, and requirements for your safety..., heat regis- Do not install near water. 6. Heed all instructions. 5. Note to the Cable TV system installer: This reminder is provided to call the Cable TV system installer's attention to the point of the ventilation openings. Unplug this apparatus near any of cable ...
...dropped or the enclosure damaged. 17. Such items could ultimately overturn the product. • Also, do not fall from power lines. 20. Section 810 of antenna-discharge unit, connection to environmental considerations. Care should be regulated due to grounding electrodes, and requirements for your safety..., heat regis- Do not install near water. 6. Heed all instructions. 5. Note to the Cable TV system installer: This reminder is provided to call the Cable TV system installer's attention to the point of the ventilation openings. Unplug this apparatus near any of cable ...
User manual, English (US)
Page 4
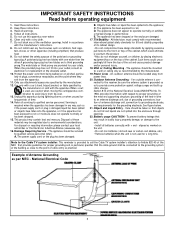
...Electronics North America. SmartLock™: Allows you set the picture's color, tint, contrast, etc., for setting TV controls. Sleep Timer: Turns off the TV at a preset time. On-screen Features: Helpful messages (in this manual will match your new Color Television. SmartSound™: Reduces volume highs and lows that occur...-Timer 16 Start-Up Channel 17 Start-Up Time 18 Closed Captions 19 Sleep Timer 20 Stereo Programming 21 Volume Bar 22 Here are a few of the special features built into your TV.This is normal and does not require dealer contact or a service request. Not all...
...Electronics North America. SmartLock™: Allows you set the picture's color, tint, contrast, etc., for setting TV controls. Sleep Timer: Turns off the TV at a preset time. On-screen Features: Helpful messages (in this manual will match your new Color Television. SmartSound™: Reduces volume highs and lows that occur...-Timer 16 Start-Up Channel 17 Start-Up Time 18 Closed Captions 19 Sleep Timer 20 Stereo Programming 21 Volume Bar 22 Here are a few of the special features built into your TV.This is normal and does not require dealer contact or a service request. Not all...
User manual, English (US)
Page 5
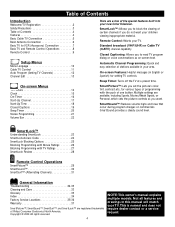
... audio and video cables to connect the AUDIO/VIDEO OUT jacks of the Cable Box to the AUDIO/VIDEO IN jacks on the front of TV Cable TV Company Cable TV Signal Cable TV Signal Cable Box RF Coaxial Cable 75Ω Helpful Hints If you have a Cable Box: Connect the Cable... be a single cable (75 ohm) or may include a Cable Converter Box. Set the TV to tune Cable TV channels. Basic Cable TV Connection The Cable TV signal into your home may be supplied by the Cable TV company. Refer to the Cable TV Control section on the Cable Box. It is a single round cable (75 ohm...
... audio and video cables to connect the AUDIO/VIDEO OUT jacks of the Cable Box to the AUDIO/VIDEO IN jacks on the front of TV Cable TV Company Cable TV Signal Cable TV Signal Cable Box RF Coaxial Cable 75Ω Helpful Hints If you have a Cable Box: Connect the Cable... be a single cable (75 ohm) or may include a Cable Converter Box. Set the TV to tune Cable TV channels. Basic Cable TV Connection The Cable TV signal into your home may be supplied by the Cable TV company. Refer to the Cable TV Control section on the Cable Box. It is a single round cable (75 ohm...
User manual, English (US)
Page 6
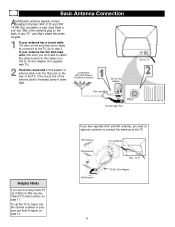
... plug on page 12. If you have separate UHF and VHF antennas, you first need an optional combiner to connect the antennas to the TV. To set the TV to select only the channel numbers in your antenna has a round cable (75 ohm) on the end, then you are not using Cable... Connection Acombination antenna receives normal broadcast channels (VHF 2-13 and UHF 14-69).Your connection is easy since there is threaded, screw it to the TV. and that's where the antenna goes. 1 If your area, see Auto Program on the back of the adapter or antenna cable onto the 75Ω...
... plug on page 12. If you have separate UHF and VHF antennas, you first need an optional combiner to connect the antennas to the TV. To set the TV to select only the channel numbers in your antenna has a round cable (75 ohm) on the end, then you are not using Cable... Connection Acombination antenna receives normal broadcast channels (VHF 2-13 and UHF 14-69).Your connection is easy since there is threaded, screw it to the TV. and that's where the antenna goes. 1 If your area, see Auto Program on the back of the adapter or antenna cable onto the 75Ω...
User manual, English (US)
Page 7
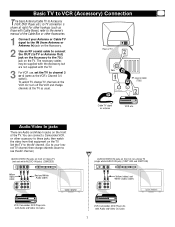
... and Video In jacks on the TV. Or, turn off the VCR and change channels at the TV as those with Audio and Video Out jacks AUDIO/VIDEO IN jacks on front of non-stereo TV (single white AUDIO IN jack) (13MT143S and 20MT133S) VIDEO AUDIO MENU - You can... connect a Camcorder,VCR, or other Accessories. 1 Connect your lowest TV channel, then change TV channels at right. VOLUME + CHANNEL POWER VCR, Camcorder, DVD Player...
... and Video In jacks on the TV. Or, turn off the VCR and change channels at the TV as those with Audio and Video Out jacks AUDIO/VIDEO IN jacks on front of non-stereo TV (single white AUDIO IN jack) (13MT143S and 20MT133S) VIDEO AUDIO MENU - You can... connect a Camcorder,VCR, or other Accessories. 1 Connect your lowest TV channel, then change TV channels at right. VOLUME + CHANNEL POWER VCR, Camcorder, DVD Player...
User manual, English (US)
Page 8
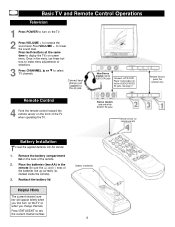
...remote control toward the remote sensor on the back of the batteries line up correctly (as marked inside the remote). 3. Battery Installation 8 to select TV channels. to the ; See page 7. Be sure the (+) and (-) ends of the remote. 2. Helpful Hints The current channel number will ... AA) in the menu, use these buttons to make menu adjustments or selections. 3 Press CHANNEL ;8 or 9 to lower the sound level. Basic TV and Remote Control Operations Television 1 Press POWER to turn on remote control Battery Installation T o load the supplied batteries into the remote: 1. Press both...
...remote control toward the remote sensor on the back of the batteries line up correctly (as marked inside the remote). 3. Battery Installation 8 to select TV channels. to the ; See page 7. Be sure the (+) and (-) ends of the remote. 2. Helpful Hints The current channel number will ... AA) in the menu, use these buttons to make menu adjustments or selections. 3 Press CHANNEL ;8 or 9 to lower the sound level. Basic TV and Remote Control Operations Television 1 Press POWER to turn on remote control Battery Installation T o load the supplied batteries into the remote: 1. Press both...

User manual, English (US)
Page 9
...automatically turn itself off. CH (channel) +/- Details are on pages 15-18. MUTE Button Press to access or remove the TV's on or off or restore the TV sound. SMART SOUND Button Press to five previously viewed channels. Buttons Press to change to the selected channel. Buttons Press to ... level. MENU Button Press to turn the TV on -screen menu. Details are on the screen. Remote Control VOL (volume) +/- Buttons Press to select or adjust menu items. SLEEP Button Press to see the channel number and the time on page 20. STATUS/EXIT Button Press to set the...
...automatically turn itself off. CH (channel) +/- Details are on pages 15-18. MUTE Button Press to access or remove the TV's on or off or restore the TV sound. SMART SOUND Button Press to five previously viewed channels. Buttons Press to change to the selected channel. Buttons Press to ... level. MENU Button Press to turn the TV on -screen menu. Details are on the screen. Remote Control VOL (volume) +/- Buttons Press to select or adjust menu items. SLEEP Button Press to see the channel number and the time on page 20. STATUS/EXIT Button Press to set the...

User manual, English (US)
Page 10
Menu Language Helpful Hints The Language control only makes the TV's on-screen menus appear in either English or Spanish. 1 Press MENU to see the menu. 2 Press 8 or 9 to scroll through the menu until SETUP is ... STATUS/EXIT to clear the menu from the screen. 10 With the LANGUAGE control, you finish. The menu will disappear when you can set the TV's on -screen text features, such as Closed Captions.
Menu Language Helpful Hints The Language control only makes the TV's on-screen menus appear in either English or Spanish. 1 Press MENU to see the menu. 2 Press 8 or 9 to scroll through the menu until SETUP is ... STATUS/EXIT to clear the menu from the screen. 10 With the LANGUAGE control, you finish. The menu will disappear when you can set the TV's on -screen text features, such as Closed Captions.
User manual, English (US)
Page 11
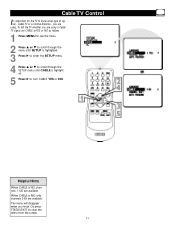
... a normal Antenna - Helpful Hints When CABLE is NO, only channels 2-69 are using a Cable TV signal, set CABLE to YES or NO as follows. 1 Press MENU to see the menu. 2 Press 8 or 9 to scroll through the menu until SETUP is ... until CABLE is highlighted. 5 Press : to turn CABLE YES or NO. you are available. When CABLE is YES, channels 1-125 are using . Cable TV Control It's important for the TV to clear the menu from the screen. 11 To tell the TV whether you finish. The menu will disappear when you are available.
... a normal Antenna - Helpful Hints When CABLE is NO, only channels 2-69 are using a Cable TV signal, set CABLE to YES or NO as follows. 1 Press MENU to see the menu. 2 Press 8 or 9 to scroll through the menu until SETUP is ... until CABLE is highlighted. 5 Press : to turn CABLE YES or NO. you are available. When CABLE is YES, channels 1-125 are using . Cable TV Control It's important for the TV to clear the menu from the screen. 11 To tell the TV whether you finish. The menu will disappear when you are available.
User manual, English (US)
Page 12
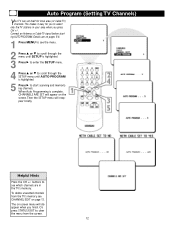
....This makes it easy for you to select only the TV stations in the TV's memory. buttons to clear the menu from the TV's memory, see the menu. 2 Press 8 or 9 to scroll through the menu until SETUP is highlighted. 3 Press : to enter the SETUP menu. 4 Press 8 or 9 to scroll ... are in your area when you finish. Helpful Hints Press the CH +/- To delete unwanted channels from the screen. 12 Connect an Antenna or Cable TV signal before starting AUTO PROGRAM. When Auto Programming is highlighted. 5 Press : to start scanning and memorizing channels.
....This makes it easy for you to select only the TV stations in the TV's memory. buttons to clear the menu from the TV's memory, see the menu. 2 Press 8 or 9 to scroll through the menu until SETUP is highlighted. 3 Press : to enter the SETUP menu. 4 Press 8 or 9 to scroll ... are in your area when you finish. Helpful Hints Press the CH +/- To delete unwanted channels from the screen. 12 Connect an Antenna or Cable TV signal before starting AUTO PROGRAM. When Auto Programming is highlighted. 5 Press : to start scanning and memorizing channels.
User manual, English (US)
Page 13
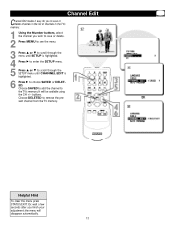
Choose DELETED to the TV's memory. It will disappear automatically. 13 Channel Edit Channel Edit makes it easy for you to save or delete. 2 Press MENU to see the menu. 3 ... clear the menu press STATUS/EXIT. Or, wait a few seconds after you wish to save or delete channels in the list of channels in the TV's memory. 1 Using the Number buttons, select the channel you finish your adjustment; the menu will be available using the CH +/- Choose SAVED to add the...
Choose DELETED to the TV's memory. It will disappear automatically. 13 Channel Edit Channel Edit makes it easy for you to save or delete. 2 Press MENU to see the menu. 3 ... clear the menu press STATUS/EXIT. Or, wait a few seconds after you wish to save or delete channels in the list of channels in the TV's memory. 1 Using the Number buttons, select the channel you finish your adjustment; the menu will be available using the CH +/- Choose SAVED to add the...
User manual, English (US)
Page 14
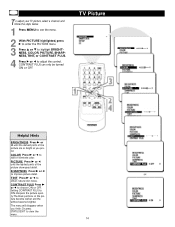
...the whites become brighter. The menu will disappear when you prefer. Or, press STATUS/EXIT to highlight BRIGHTNESS, COLOR, PICTURE, SHARPNESS,TINT, or CONTRAST PLUS. 4 Press : or ; T o adjust your TV picture, select a channel and follow the steps below. 1 Press MENU to see the menu. 2 With PICTURE... 8 or 9 to clear the menu. 14 to choose ON or OFF. CONTRAST PLUS Press or ; to improve picture detail. COLOR Press - PICTURE Press - or ; or ; to ON sharpens the picture quality.The black portions of the picture show good detail. TV Picture Helpful Hints BRIGHTNESS Press -
...the whites become brighter. The menu will disappear when you prefer. Or, press STATUS/EXIT to highlight BRIGHTNESS, COLOR, PICTURE, SHARPNESS,TINT, or CONTRAST PLUS. 4 Press : or ; T o adjust your TV picture, select a channel and follow the steps below. 1 Press MENU to see the menu. 2 With PICTURE... 8 or 9 to clear the menu. 14 to choose ON or OFF. CONTRAST PLUS Press or ; to improve picture detail. COLOR Press - PICTURE Press - or ; or ; to ON sharpens the picture quality.The black portions of the picture show good detail. TV Picture Helpful Hints BRIGHTNESS Press -
User manual, English (US)
Page 15
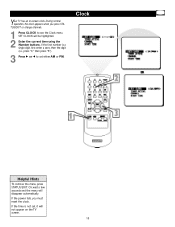
If the first number is not set either AM or PM. Your TV has an on the TV screen. 15 If the time is a single digit, first enter a zero, then the digit (i.e., press "0," then press "8"). 3 Press : or ; If the power fails, you press ...
If the first number is not set either AM or PM. Your TV has an on the TV screen. 15 If the time is a single digit, first enter a zero, then the digit (i.e., press "0," then press "8"). 3 Press : or ; If the power fails, you press ...
User manual, English (US)
Page 16
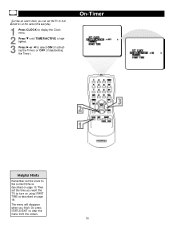
Or, press STATUS/EXIT to select ON (if activating the Timer) or OFF (if deactivating the Timer). On-Timer Helpful Hints Remember, set the clock to the current time as described on page 15.Then, set the TV to turn on using START TIME as described on at the same time everyday. 1 Press CLOCK to display the Clock menu. 2 Press 9 until TIMER ACTIVE is highlighted. 3 Press : or ; to clear the menu from the screen. 16 The menu will disappear when you finish. Just like an alarm clock, you can set the time you want the TV to turn itself on page 18.
Or, press STATUS/EXIT to select ON (if activating the Timer) or OFF (if deactivating the Timer). On-Timer Helpful Hints Remember, set the clock to the current time as described on page 15.Then, set the TV to turn on using START TIME as described on at the same time everyday. 1 Press CLOCK to display the Clock menu. 2 Press 9 until TIMER ACTIVE is highlighted. 3 Press : or ; to clear the menu from the screen. 16 The menu will disappear when you finish. Just like an alarm clock, you can set the time you want the TV to turn itself on page 18.

User manual, English (US)
Page 17
to start on. Or, use CH +/- Start-Up Channel Used with the Timer feature, you can select a specific channel that the TV will tune to when the TV turns itself on.Timer details are on page 16. 1 Press CLOCK to see the Clock menu. 2 Press 9 until CHANNEL is highlighted. 3 Press the Number buttons to enter the channel you would like the TV to select a channel. 17
to start on. Or, use CH +/- Start-Up Channel Used with the Timer feature, you can select a specific channel that the TV will tune to when the TV turns itself on.Timer details are on page 16. 1 Press CLOCK to see the Clock menu. 2 Press 9 until CHANNEL is highlighted. 3 Press the Number buttons to enter the channel you would like the TV to select a channel. 17
User manual, English (US)
Page 18
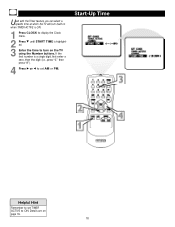
If the first number is highlighted. 3 Enter the time to turn itself on when TIMER ACTIVE is ON. 1 Press CLOCK to display the Clock menu. 2 Press 9 until START TIME is a single digit, first enter a zero, then the digit (i.e., press "0," then press "8"). 4 Press : or ; to set TIMER ACTIVE to set AM or PM. Details are on the TV using the Number buttons. Start-Up Time Helpful Hint Remember to ON. Used with the Timer feature, you can select a specific time at which the TV will turn on page 16. 18
If the first number is highlighted. 3 Enter the time to turn itself on when TIMER ACTIVE is ON. 1 Press CLOCK to display the Clock menu. 2 Press 9 until START TIME is a single digit, first enter a zero, then the digit (i.e., press "0," then press "8"). 4 Press : or ; to set TIMER ACTIVE to set AM or PM. Details are on the TV using the Number buttons. Start-Up Time Helpful Hint Remember to ON. Used with the Timer feature, you can select a specific time at which the TV will turn on page 16. 18
User manual, English (US)
Page 19
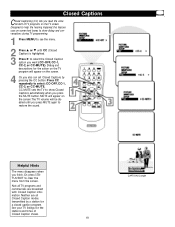
... Captions automatically when you want (CC-OFF, CC-1, CC-2, or CC-MUTE). Designed to help the hearing impaired, this feature uses on the TV screen. Closed Captions Closed Captioning (CC) lets you press MUTE again to restore the sound. Press CC repeatedly to clear the menu from the...MUTE button. Helpful Hints The menu disappears when you also can set Closed Captions by a station for the action on the TV program will appear on the screen.The TV volume will appear on the screen. 4 Or, you finish. CAPTION Example 19 Neither are broadcast with Closed Caption information....
... Captions automatically when you want (CC-OFF, CC-1, CC-2, or CC-MUTE). Designed to help the hearing impaired, this feature uses on the TV screen. Closed Captions Closed Captioning (CC) lets you press MUTE again to restore the sound. Press CC repeatedly to clear the menu from the...MUTE button. Helpful Hints The menu disappears when you also can set Closed Captions by a station for the action on the TV program will appear on the screen.The TV volume will appear on the screen. 4 Or, you finish. CAPTION Example 19 Neither are broadcast with Closed Caption information....
User manual, English (US)
Page 20
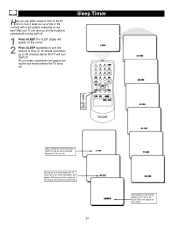
... appear on the screen. Pressing any button during the last minute will cancel the SLEEP timer. 20 During the last 10 seconds before the TV turns off, GOODBYE will appear during the last minute before the TV turns off . 1 Press SLEEP. Sleep Timer After setting the SLEEP timer, press SLEEP to have it... on -screen countdown will turn itself off . Well, your ears? Have you ever fallen asleep in your TV can save you up to 90 minutes) before the TV will appear. During the last minute before the TV shuts off, an on the screen. 2 Press SLEEP repeatedly to pick the amount of time (in...
... appear on the screen. Pressing any button during the last minute will cancel the SLEEP timer. 20 During the last 10 seconds before the TV turns off, GOODBYE will appear during the last minute before the TV turns off . 1 Press SLEEP. Sleep Timer After setting the SLEEP timer, press SLEEP to have it... on -screen countdown will turn itself off . Well, your ears? Have you ever fallen asleep in your TV can save you up to 90 minutes) before the TV will appear. During the last minute before the TV shuts off, an on the screen. 2 Press SLEEP repeatedly to pick the amount of time (in...
User manual, English (US)
Page 21
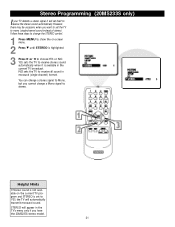
... receive stereo sound automatically when it will automatically transmit monaural sound. NO sets the TV to receive all sound in the TV's menu only if you cannot change the STEREO control. 1 Press MENU to mono (single-channel sound instead of stereo). STEREO will appear in monaural (single-channel)... format. YES sets the TV to receive the stereo sound automatically. Follow these steps to change a Mono signal to choose YES or NO. You can change a stereo signal to Mono, but you have the 20MS233S stereo model. 21 to stereo. Helpful ...
... receive stereo sound automatically when it will automatically transmit monaural sound. NO sets the TV to receive all sound in the TV's menu only if you cannot change the STEREO control. 1 Press MENU to mono (single-channel sound instead of stereo). STEREO will appear in monaural (single-channel)... format. YES sets the TV to receive the stereo sound automatically. Follow these steps to change a Mono signal to choose YES or NO. You can change a stereo signal to Mono, but you have the 20MS233S stereo model. 21 to stereo. Helpful ...
User manual, English (US)
Page 22
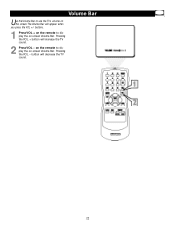
Pressing the VOL + button will decrease the TV sound. 22 Pressing the VOL - Volume Bar Use the Volume Bar to display the on-screen Volume Bar. on the remote to see the TV's volume on -screen Volume Bar. button will increase the TV sound. 2 Press VOL - buttons. 1 Press VOL + on the remote to display the on the screen.The Volume Bar will appear when you press the VOL +/-
Pressing the VOL + button will decrease the TV sound. 22 Pressing the VOL - Volume Bar Use the Volume Bar to display the on-screen Volume Bar. on the remote to see the TV's volume on -screen Volume Bar. button will increase the TV sound. 2 Press VOL - buttons. 1 Press VOL + on the remote to display the on the screen.The Volume Bar will appear when you press the VOL +/-


