
User Manual
Page 3
... the cable ground shall be sure the antenna system is connected to the receiver, be connected to qualified service personnel. Install in any of cable entry as close to operate normally or exhibits a marked change in particular, specifies that produce heat. 9. The appliance does not appear to the point of the ventilation openings. Refer all warnings. 4. Read these instructions. 3. Heed all servicing to...
... the cable ground shall be sure the antenna system is connected to the receiver, be connected to qualified service personnel. Install in any of cable entry as close to operate normally or exhibits a marked change in particular, specifies that produce heat. 9. The appliance does not appear to the point of the ventilation openings. Refer all warnings. 4. Read these instructions. 3. Heed all servicing to...
User Manual
Page 4
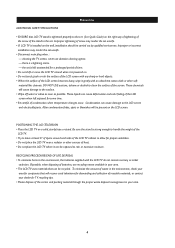
Improper or incorrect installation may render the set unsafe. • If LCD TV is strong enough to handle the weight of the LCD TV. • Tr y to leave at least 6" of the stand to the surface. • Wipe off water or saliva as soon as possible. Improper tightening of screw may render the set (See Quick Guide) on the right way of tightening...
Improper or incorrect installation may render the set unsafe. • If LCD TV is strong enough to handle the weight of the LCD TV. • Tr y to leave at least 6" of the stand to the surface. • Wipe off water or saliva as soon as possible. Improper tightening of screw may render the set (See Quick Guide) on the right way of tightening...

User Manual
Page 5
... Reset 10 Basic TV and Remote Control Operations 11 Remote Control-For TV Operations 12 Remote Control-For DVD Operations 13 Timer Menu Controls 14 Picture Menu TV Picture Menu Controls 15 Sound Menu TV Sound Menu Controls 16 Features Menu Smart Picture Control 17 Smart Sound Control 17 Smart Lock 18 Smart Lock Password 19 Smart Lock Program 20 Smart Lock - Movie Ratings 21 Smart Lock - At the end of its life specialized companies can be disposed of. TV Ratings 22 Using The Picture Format 2.3 Closed Captions 24 DVD Mode Control DVD Mode Control 25 DVD Mode Control-Play...
... Reset 10 Basic TV and Remote Control Operations 11 Remote Control-For TV Operations 12 Remote Control-For DVD Operations 13 Timer Menu Controls 14 Picture Menu TV Picture Menu Controls 15 Sound Menu TV Sound Menu Controls 16 Features Menu Smart Picture Control 17 Smart Sound Control 17 Smart Lock 18 Smart Lock Password 19 Smart Lock Program 20 Smart Lock - Movie Ratings 21 Smart Lock - At the end of its life specialized companies can be disposed of. TV Ratings 22 Using The Picture Format 2.3 Closed Captions 24 DVD Mode Control DVD Mode Control 25 DVD Mode Control-Play...

User Manual
Page 6
INSTALL LANGUAGE TUNER MODE AUTO PROGRAM CHANNEL EDIT FACTORY RESET ENGLISH ANTENNA MOVE SELECT OK RETURN MENU EXIT 3 Press the / button to Highlight LANGUAGE. 4 Press the / button to select English, French, or Spanish. 5 Press the OK button to return to the previous menu. 5 2 6 Press the MENU button repeatedly to highlight the INSTALL menu. It does not change the other onscreen text features, such as Closed Captioning (CC), with TV shows. 6 The LANGUAGE control enables...
INSTALL LANGUAGE TUNER MODE AUTO PROGRAM CHANNEL EDIT FACTORY RESET ENGLISH ANTENNA MOVE SELECT OK RETURN MENU EXIT 3 Press the / button to Highlight LANGUAGE. 4 Press the / button to select English, French, or Spanish. 5 Press the OK button to return to the previous menu. 5 2 6 Press the MENU button repeatedly to highlight the INSTALL menu. It does not change the other onscreen text features, such as Closed Captioning (CC), with TV shows. 6 The LANGUAGE control enables...

User Manual
Page 7
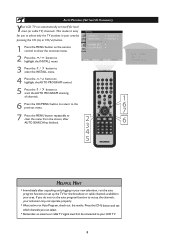
INSTALL LANGUAGE TUNER MODE AUTO PROGRAM CHANNEL EDIT FACTORY RESET ENGLISH ANTENNA 2 Press the / button to see the onscreen menu. If you to change the LCD TV's signal input to Cable or Air (antenna). TUNER MODE CONTROL T he Tuner Mode allows you do not run the AUTO PROGRAM function to set up the TV for the broadcast or cable channels available in your television may not operate properly. 7 It's important for the LCD TV to know if you want to receive channels from the screen. 4 5 HELPFUL HINT •...
INSTALL LANGUAGE TUNER MODE AUTO PROGRAM CHANNEL EDIT FACTORY RESET ENGLISH ANTENNA 2 Press the / button to see the onscreen menu. If you to change the LCD TV's signal input to Cable or Air (antenna). TUNER MODE CONTROL T he Tuner Mode allows you do not run the AUTO PROGRAM function to set up the TV for the broadcast or cable channels available in your television may not operate properly. 7 It's important for the LCD TV to know if you want to receive channels from the screen. 4 5 HELPFUL HINT •...
User Manual
Page 8
... channels , your area. AUTO PROGRAM (SETTING UP CHANNELS) Your LCD TV can select. • Remember, an antenna or cable TV signal must first be connected to your LCD TV. 8 INSTALL LANGUAGE TUNER MODE AUTO PROGRAM CHANNEL EDIT FACTORY RESET ENGLISH ANTENNA MOVE SELECT OK RETURN MENU EXIT AUTO SEARCH AIR 5 OK/MENU: Return 3 Press the / button to enter the INSTALL menu. 4 Press the / button to highlight the AU TO PROGRAM control. 5 Press the / button to start the AU TO PROGRAM scanning of channels. 1 6 Press the OK/MENU button...
... channels , your area. AUTO PROGRAM (SETTING UP CHANNELS) Your LCD TV can select. • Remember, an antenna or cable TV signal must first be connected to your LCD TV. 8 INSTALL LANGUAGE TUNER MODE AUTO PROGRAM CHANNEL EDIT FACTORY RESET ENGLISH ANTENNA MOVE SELECT OK RETURN MENU EXIT AUTO SEARCH AIR 5 OK/MENU: Return 3 Press the / button to enter the INSTALL menu. 4 Press the / button to highlight the AU TO PROGRAM control. 5 Press the / button to start the AU TO PROGRAM scanning of channels. 1 6 Press the OK/MENU button...

User Manual
Page 9
... edit the channel listing. You can add or remove a channel in the LCD TV's memor y. 1 Press the MENU button to enter. INSTALL LANGUAGE TUNER MODE AUTO PROGRAM CHANNEL EDIT FACTORY RESET ENGLISH ANTENNA MOVE SELECT OK RETURN MENU EXIT 2 Press the / button to highlight the INSTALL menu, then press the / button to open the onscreen menu. CHANNEL EDIT CONTROL Channel Edit control lets you selected. 4 6 Press the OK button to return to the previous menu. 5 7 Press the MENU button repeatedly to...
... edit the channel listing. You can add or remove a channel in the LCD TV's memor y. 1 Press the MENU button to enter. INSTALL LANGUAGE TUNER MODE AUTO PROGRAM CHANNEL EDIT FACTORY RESET ENGLISH ANTENNA MOVE SELECT OK RETURN MENU EXIT 2 Press the / button to highlight the INSTALL menu, then press the / button to open the onscreen menu. CHANNEL EDIT CONTROL Channel Edit control lets you selected. 4 6 Press the OK button to return to the previous menu. 5 7 Press the MENU button repeatedly to...

User Manual
Page 10
... and replaced by performing the following steps. 1 Press the MENU button on picture, audio, Close Caption and other feature settings will not be erased. FACTORY RESET INSTALL LANGUAGE TUNER MODE AUTO PROGRAM CHANNEL EDIT FACTORY RESET ENGLISH ANTENNA MOVE SELECT OK RETURN MENU EXIT FACTORY RESET NO YES MOVE SELECT OK SELECT MENU EXIT 2 Press the / button to highlight the INSTALL menu, then press the / button to enter. 3 Press the / button repeatedly to highlight the FACTORY RESET control, then press the / button...
... and replaced by performing the following steps. 1 Press the MENU button on picture, audio, Close Caption and other feature settings will not be erased. FACTORY RESET INSTALL LANGUAGE TUNER MODE AUTO PROGRAM CHANNEL EDIT FACTORY RESET ENGLISH ANTENNA MOVE SELECT OK RETURN MENU EXIT FACTORY RESET NO YES MOVE SELECT OK SELECT MENU EXIT 2 Press the / button to highlight the INSTALL menu, then press the / button to enter. 3 Press the / button repeatedly to highlight the FACTORY RESET control, then press the / button...

User Manual
Page 12
... onscreen menu. Menu button Press to activate onscreen menu, also press to previously selected channel. Smart Sound button Press repeatedly to the selected channel. Source button Press to select TV channels. The LCD TV will appear on or off within a certain time. Standby (Power) button Press to navigate up or down /left/right in onscreen menu. Direction button Press to turn itself off . REMOTE CONTROL -FOR TV OPERATIONS Number buttons Press to select the video input source: AV1,AV2, DVD, PC,TV.
... onscreen menu. Menu button Press to activate onscreen menu, also press to previously selected channel. Smart Sound button Press repeatedly to the selected channel. Source button Press to select TV channels. The LCD TV will appear on or off within a certain time. Standby (Power) button Press to navigate up or down /left/right in onscreen menu. Direction button Press to turn itself off . REMOTE CONTROL -FOR TV OPERATIONS Number buttons Press to select the video input source: AV1,AV2, DVD, PC,TV.

User Manual
Page 14
Once the set is disabled. 14 OFF 15 Mins 30 Mins 60 Mins 90 Mins 120 Mins 180 Mins 240 Mins 1 2 HELPFUL HINT IMPORTANT For the Timer to function, the set to turn on or off at a specific time and tune to a specific channel when it powers itself on. 1 Press the SLEEP button on the remote control to show the onscreen menu.. 2 Press the SLEEP button repeatedly to select your requiring sleep timing. The TV can also be set must not be turned off , the Timer is turned off . TIMER MENU CONTROLS Your LCD TV comes with an onscreen clock.
Once the set is disabled. 14 OFF 15 Mins 30 Mins 60 Mins 90 Mins 120 Mins 180 Mins 240 Mins 1 2 HELPFUL HINT IMPORTANT For the Timer to function, the set to turn on or off at a specific time and tune to a specific channel when it powers itself on. 1 Press the SLEEP button on the remote control to show the onscreen menu.. 2 Press the SLEEP button repeatedly to select your requiring sleep timing. The TV can also be set must not be turned off , the Timer is turned off . TIMER MENU CONTROLS Your LCD TV comes with an onscreen clock.

User Manual
Page 17
..., Multimedia, Sports, Weak-Signal. The four user presets(Personal, News, Music, and Theatre) enable you to tailor the TV sound so as to easily adjust the TV's brightness, color, picture, sharpness, tint, and color temperature levels. Smart Picture quickly resets your TV's video controls for a number of different types of the Personal smart picture mode can be adjusted in picture options within the onscreen menu. Note:The settings of programs and viewing conditions that you...
..., Multimedia, Sports, Weak-Signal. The four user presets(Personal, News, Music, and Theatre) enable you to tailor the TV sound so as to easily adjust the TV's brightness, color, picture, sharpness, tint, and color temperature levels. Smart Picture quickly resets your TV's video controls for a number of different types of the Personal smart picture mode can be adjusted in picture options within the onscreen menu. Note:The settings of programs and viewing conditions that you...

User Manual
Page 20
MOVE SELECT OK RETURN MENU EXIT LOCK PROGRAM CURRENT CHANNEL LOCKED CAT V1 ACTIVE MOVE SELECT OKRETURN MENUEXIT 1 9 9 Press the MENU button repeatedly to the previous menu. FEATURES SOURCE PICTURE FORMAT SMART LOCK CLOSED CAPTION SLEEP TIME TV WIDE SCREEN OFF OFF Input Password Password MOVE SELECT OK RETURN MENU EXIT FEATURES LOCK PROGRAM CHANGE CODE CLEAR ALL OFF 4 BLOCK OPTION OFF MOVIE RATING T V RATING 4 Use the Number buttons to enter your personal password has been set (see the previous page), you...
MOVE SELECT OK RETURN MENU EXIT LOCK PROGRAM CURRENT CHANNEL LOCKED CAT V1 ACTIVE MOVE SELECT OKRETURN MENUEXIT 1 9 9 Press the MENU button repeatedly to the previous menu. FEATURES SOURCE PICTURE FORMAT SMART LOCK CLOSED CAPTION SLEEP TIME TV WIDE SCREEN OFF OFF Input Password Password MOVE SELECT OK RETURN MENU EXIT FEATURES LOCK PROGRAM CHANGE CODE CLEAR ALL OFF 4 BLOCK OPTION OFF MOVIE RATING T V RATING 4 Use the Number buttons to enter your personal password has been set (see the previous page), you...

User Manual
Page 36
The OSD LANGUAGE control enables you to set the following functions for the player to obtain the best playing status. GENERAL SETUP AUDIO SETUP VIDEO SETUP EXIT OSD LANG CAPTIONS PASSWORD PARENTAL DEFAULT -- GENERAL SETUP PAGE-- OSD LANGUAGE SETTINGS For English, French, or Spanish -speaking TV owners, an onscreen OSD LANGUAGE option is highlighted, press the button to enter the OSD LANG menu. 2 1 3 6 4 Press the / button to select English, French or Spanish...
The OSD LANGUAGE control enables you to set the following functions for the player to obtain the best playing status. GENERAL SETUP AUDIO SETUP VIDEO SETUP EXIT OSD LANG CAPTIONS PASSWORD PARENTAL DEFAULT -- GENERAL SETUP PAGE-- OSD LANGUAGE SETTINGS For English, French, or Spanish -speaking TV owners, an onscreen OSD LANGUAGE option is highlighted, press the button to enter the OSD LANG menu. 2 1 3 6 4 Press the / button to select English, French or Spanish...

User Manual
Page 45
... TV will automatically adjust to remove the menu from the screen. 5 2 3 1 6 4 HELPFUL HINT 1. Brightness: It is highlighted, Press the / button to enter the PICTURE menu. 3 Press the / button to highlight the item that you would like to "sharpen" the Picture quality. Auto Adjust: The LCD Monitor will go into standby mode. To adjust other items repeat steps 3 and 4. 2. Color Temp can also be used as it appears on the remote control to Factory Reset...
... TV will automatically adjust to remove the menu from the screen. 5 2 3 1 6 4 HELPFUL HINT 1. Brightness: It is highlighted, Press the / button to enter the PICTURE menu. 3 Press the / button to highlight the item that you would like to "sharpen" the Picture quality. Auto Adjust: The LCD Monitor will go into standby mode. To adjust other items repeat steps 3 and 4. 2. Color Temp can also be used as it appears on the remote control to Factory Reset...
User Manual
Page 46
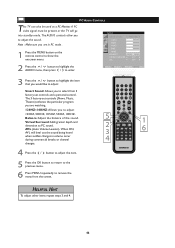
... standby mode. A PC video signal must be used as a PC Monitor. AUDIO SMART SOUND 120HZ 500HZ 1K5HZ 5KHZ 10KHZ BALANCE VIRTUAL SURROUND AVL PERSONAL OFF OFF 2 Press the / button to highlight the AUDIO menu, then press / to PC sound. 2 AVL (Auto Volume Leveler)- The 3 factory-set controls and a personal control. PC AUDIO CONTROLS This TV can also be present or the TV will level out the sound being heard 3 1 6 when sudden changes in PC mode...
... standby mode. A PC video signal must be used as a PC Monitor. AUDIO SMART SOUND 120HZ 500HZ 1K5HZ 5KHZ 10KHZ BALANCE VIRTUAL SURROUND AVL PERSONAL OFF OFF 2 Press the / button to highlight the AUDIO menu, then press / to PC sound. 2 AVL (Auto Volume Leveler)- The 3 factory-set controls and a personal control. PC AUDIO CONTROLS This TV can also be present or the TV will level out the sound being heard 3 1 6 when sudden changes in PC mode...

User Manual
Page 48
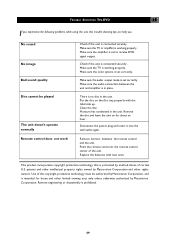
..., Specifications on the remote control. • When no picture • Adjust the contrast, color, tint and brightness setting. or video play or in poor quality only No sound • Increase the VOLUME. • Check that the TV's AC power cord is wrong. Te levision not responding to remote control • Check whether the batteries are properly connected to see if they are working. Some TEXT modes could block the screen...
..., Specifications on the remote control. • When no picture • Adjust the contrast, color, tint and brightness setting. or video play or in poor quality only No sound • Increase the VOLUME. • Check that the TV's AC power cord is wrong. Te levision not responding to remote control • Check whether the batteries are properly connected to see if they are working. Some TEXT modes could block the screen...
User Manual
Page 49
... sure the color system is set to receive DVD signal output. Make sure the audio connection between the remote control and the unit. Clean the disc . Remove barriers between the unit and amplifier is in place. patents and other intellectual property rights owned by Macrovision Corporation and other limited viewing uses only unless otherwise authorized by Macrovision Corporation. Make sure the TV is working properly...
... sure the color system is set to receive DVD signal output. Make sure the audio connection between the remote control and the unit. Clean the disc . Remove barriers between the unit and amplifier is in place. patents and other intellectual property rights owned by Macrovision Corporation and other limited viewing uses only unless otherwise authorized by Macrovision Corporation. Make sure the TV is working properly...

User Manual
Page 50
TECHNICAL SPECIFICATIONS LCD PANEL RESOLUTION VIEWING ANGLE ( L/R/U/D) DIMENSION WITH STAND WITHOUT STAND WEIGHT (WITHOUT ACCESSORIES) TV-FUNCTION TV STANDARD TUNING SYSTEM FREQUENCY RANGE STEREO CHANNEL SOUND MAX SOUND OUTPUT TERMINALS AV1 IN AV2 IN PC IN ANTENNA IN DVD APPLICABLE DISC POWER INPUT POWER CONSUMPTION POWER CONSUMPTION(TV) POWER CONSUMPTION(TV WITH DVD) 20'' TFT LCD 1366 X 768 80/80/80/60 20.6 X 16.5 X 8.3 (inch) 20.6 X 14.8 X 3.6 (inch) 20.5 Pound NTSC ELECTRIC TUNING SYSTEM VHF/UHF MTS + SAP 181 CHANNELS 3W X 2 VIDEO, S-VIDEO, AUDIO L&R Y, Pb (Cb), Pr...
TECHNICAL SPECIFICATIONS LCD PANEL RESOLUTION VIEWING ANGLE ( L/R/U/D) DIMENSION WITH STAND WITHOUT STAND WEIGHT (WITHOUT ACCESSORIES) TV-FUNCTION TV STANDARD TUNING SYSTEM FREQUENCY RANGE STEREO CHANNEL SOUND MAX SOUND OUTPUT TERMINALS AV1 IN AV2 IN PC IN ANTENNA IN DVD APPLICABLE DISC POWER INPUT POWER CONSUMPTION POWER CONSUMPTION(TV) POWER CONSUMPTION(TV WITH DVD) 20'' TFT LCD 1366 X 768 80/80/80/60 20.6 X 16.5 X 8.3 (inch) 20.6 X 14.8 X 3.6 (inch) 20.5 Pound NTSC ELECTRIC TUNING SYSTEM VHF/UHF MTS + SAP 181 CHANNELS 3W X 2 VIDEO, S-VIDEO, AUDIO L&R Y, Pb (Cb), Pr...
User Manual
Page 52
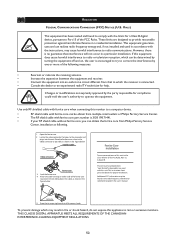
... core part number is 3138 198 71441. • If your RF shield cable without ferrite core, you can be utilized when "non-ferrited" video cables are designed to prevent it from Philips Factory Service Center, installation as following measures: • Reorient or relocate the receiving antenna. • Increase the separation between the equipment and receiver. • Connect the equipment into the unit. Use...
... core part number is 3138 198 71441. • If your RF shield cable without ferrite core, you can be utilized when "non-ferrited" video cables are designed to prevent it from Philips Factory Service Center, installation as following measures: • Reorient or relocate the receiving antenna. • Increase the separation between the equipment and receiver. • Connect the equipment into the unit. Use...

Product Spec Sheet
Page 2
... remote control. AUDIO -L Date of issue 2009-01-16 Version: 1.0.9 12 NC: 8639 000 16955 UPC: 6 09585 11341 1 AV2 IN Specifications are directly accessed through its component video or DVI inputs to a DTV set-top box and set to enjoy all your favorite types of programs, various display and audio modes that dramatically reduce visible image artifacts in the display of fast-moving images. 20MF251W/37 20" LCD HD flat TV with DVD player Product specifications Picture/Display...
... remote control. AUDIO -L Date of issue 2009-01-16 Version: 1.0.9 12 NC: 8639 000 16955 UPC: 6 09585 11341 1 AV2 IN Specifications are directly accessed through its component video or DVI inputs to a DTV set-top box and set to enjoy all your favorite types of programs, various display and audio modes that dramatically reduce visible image artifacts in the display of fast-moving images. 20MF251W/37 20" LCD HD flat TV with DVD player Product specifications Picture/Display...


