User manual, English (US)
Page 1
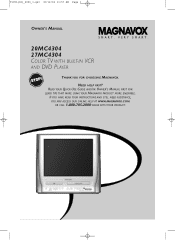
T1056(06)_2006_1.qx3 10/12/04 11:57 AM Page 1 OWNER'S MANUAL 20MC4304 27MC4304 COLOR TV WITH BUILT-IN VCR AND DVD PLAYER THANK YOU FOR CHOOSING MAGNAVOX. NEED HELP FAST? READ YOUR QUICK-USE GUIDE AND/OR OWNER'S MANUAL FIRST FOR QUICK TIPS THAT MAKE USING YOUR MAGNAVOX PRODUCT MORE ENJOYABLE. IF YOU HAVE READ YOUR INSTRUCTIONS AND STILL NEED ASSISTANCE, YOU MAY ACCESS OUR ONLINE HELP AT WWW.MAGNAVOX.COM OR CALL 1-800-705-2000 WHILE WITH YOUR PRODUCT.
T1056(06)_2006_1.qx3 10/12/04 11:57 AM Page 1 OWNER'S MANUAL 20MC4304 27MC4304 COLOR TV WITH BUILT-IN VCR AND DVD PLAYER THANK YOU FOR CHOOSING MAGNAVOX. NEED HELP FAST? READ YOUR QUICK-USE GUIDE AND/OR OWNER'S MANUAL FIRST FOR QUICK TIPS THAT MAKE USING YOUR MAGNAVOX PRODUCT MORE ENJOYABLE. IF YOU HAVE READ YOUR INSTRUCTIONS AND STILL NEED ASSISTANCE, YOU MAY ACCESS OUR ONLINE HELP AT WWW.MAGNAVOX.COM OR CALL 1-800-705-2000 WHILE WITH YOUR PRODUCT.

User manual, English (US)
Page 3
... 820-40 of this copyright protection technology must be authorized by Macrovision Corporation and is connected. 4) Consult the dealer or an experienced radio/TV technician for proper grounding - This equipment generates, uses, and can be determined by turning the equipment off and on a circuit different from... All rights reserved. However, there is encouraged to try to correct the interference by one or more of Conformity Model Number: 20MC4304 27MC4304 Trade Name: Magnavox Responsible Party: Philips Consumer Electronics North America P.O. in a residential installation.
... 820-40 of this copyright protection technology must be authorized by Macrovision Corporation and is connected. 4) Consult the dealer or an experienced radio/TV technician for proper grounding - This equipment generates, uses, and can be determined by turning the equipment off and on a circuit different from... All rights reserved. However, there is encouraged to try to correct the interference by one or more of Conformity Model Number: 20MC4304 27MC4304 Trade Name: Magnavox Responsible Party: Philips Consumer Electronics North America P.O. in a residential installation.
User manual, English (US)
Page 4
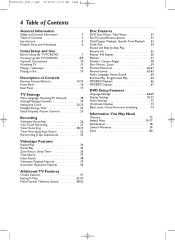
... 3 Table of Contents 4 Introduction 5 Playable Discs and Videotapes 6 Initial Setup and Use Before Using the TV/VCR/DVD 7 Hooking Up the TV/VCR/DVD 8-9 Optional Connections 10 Watching TV 11 Playing a Videotape 12 Playing a Disc 13 Description of Controls Remote Control Buttons 14-15 Front Panel ...16 Rear Panel 17 TV Settings Menu Language, ResettingTV Channels 18 Adding/Deleting Channels 19 Setting the Clock...
... 3 Table of Contents 4 Introduction 5 Playable Discs and Videotapes 6 Initial Setup and Use Before Using the TV/VCR/DVD 7 Hooking Up the TV/VCR/DVD 8-9 Optional Connections 10 Watching TV 11 Playing a Videotape 12 Playing a Disc 13 Description of Controls Remote Control Buttons 14-15 Front Panel ...16 Rear Panel 17 TV Settings Menu Language, ResettingTV Channels 18 Adding/Deleting Channels 19 Setting the Clock...
User manual, English (US)
Page 5
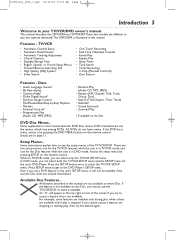
...; Virtual Surround • Zoomed Play * If available on page 51. This manual describes the 20MC4304 and 27MC4304.These two models are on the Disc DVD Disc Menus... DVD manufacturers set a DVD feature in TV/VCR mode, you try the feature again. Details are different in size, but operate identically.The... 20MC4304 is illustrated in the top right corner of the TV/VCR/DVD. An "X" will not be ...
...; Virtual Surround • Zoomed Play * If available on page 51. This manual describes the 20MC4304 and 27MC4304.These two models are on the Disc DVD Disc Menus... DVD manufacturers set a DVD feature in TV/VCR mode, you try the feature again. Details are different in size, but operate identically.The... 20MC4304 is illustrated in the top right corner of the TV/VCR/DVD. An "X" will not be ...
User manual, English (US)
Page 6
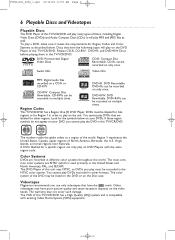
... Video Home System (VHS) equipment. The VCR of this TV/VCR/DVD has a High Quality (HQ) system and is used primarily in this TV/VCR/DVD. DVD+R: DVD Recordable. The number inside the globe refers to play on the unit. Color Systems DVDs are NTSC (which is compatible with the same region code. Videotapes Magnavox recommends you use only videotapes that...
... Video Home System (VHS) equipment. The VCR of this TV/VCR/DVD has a High Quality (HQ) system and is used primarily in this TV/VCR/DVD. DVD+R: DVD Recordable. The number inside the globe refers to play on the unit. Color Systems DVDs are NTSC (which is compatible with the same region code. Videotapes Magnavox recommends you use only videotapes that...
User manual, English (US)
Page 7
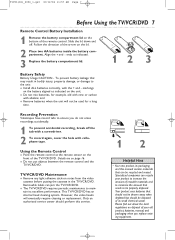
.... 2 To record again, cover the hole with cellophane tape. To prevent battery leakage that may result in the TV/VCR/DVD. Removable labels can jam the TV/VCR/DVD. ● The TV/VCR/DVD requires periodic maintenance to be thrown away when depleted but should perform this service. 12 Helpful Hint • Your new... the battery compartment lid on page 16. ● Do not put objects between the remote control and the TV/VCR/DVD. Details are on the bottom of the TV/VCR/DVD. However, the video heads will not be disposed of the arrow on notes from the video cassette before putting...
.... 2 To record again, cover the hole with cellophane tape. To prevent battery leakage that may result in the TV/VCR/DVD. Removable labels can jam the TV/VCR/DVD. ● The TV/VCR/DVD requires periodic maintenance to be thrown away when depleted but should perform this service. 12 Helpful Hint • Your new... the battery compartment lid on page 16. ● Do not put objects between the remote control and the TV/VCR/DVD. Details are on the bottom of the TV/VCR/DVD. However, the video heads will not be disposed of the arrow on notes from the video cassette before putting...
User manual, English (US)
Page 8
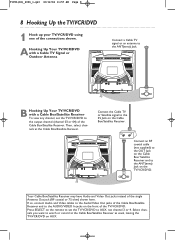
.../Video Out jacks of the Cable Box/Satellite Receiver and to the output channel (channel 03 or 04) of the TV/VCR/DVD. B Hooking Up Your TV/VCR/DVD with a Cable TV Signal or Outdoor Antenna Connect a Cable TV signal or an antenna to the IN Jack on the Cable Box/ Satellite Receiver and to AUX, not channel... the front of the Cable Box/Satellite Receiver. ANT. T1056(06)_2006_1.qx3 10/12/04 11:57 AM Page 8 8 Hooking Up the TV/VCR/DVD 1 Hook up your TV/VCR/DVD using one of the single Antenna Out jack (RF coaxial or 75 ohm) shown here. ANT. Select channels you want to watch or record...
.../Video Out jacks of the Cable Box/Satellite Receiver and to the output channel (channel 03 or 04) of the TV/VCR/DVD. B Hooking Up Your TV/VCR/DVD with a Cable TV Signal or Outdoor Antenna Connect a Cable TV signal or an antenna to the IN Jack on the Cable Box/ Satellite Receiver and to AUX, not channel... the front of the Cable Box/Satellite Receiver. ANT. T1056(06)_2006_1.qx3 10/12/04 11:57 AM Page 8 8 Hooking Up the TV/VCR/DVD 1 Hook up your TV/VCR/DVD using one of the single Antenna Out jack (RF coaxial or 75 ohm) shown here. ANT. Select channels you want to watch or record...
User manual, English (US)
Page 9
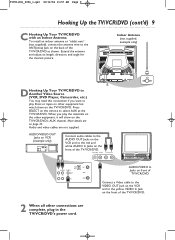
...you play Discs or tapes on other equipment but watch them on the TV/VCR/DVD's AUX channel. More details are not supplied. HEADPHONE VIDEO L AUDIO R STANDBY-ON VOLUME PREV PLAY NEXT SEARCH STOP OPEN/CLOSE SOURCE CHANNEL DVD VCR/TV REC/OTR REW PLAY F.FWD STOP/EJECT HEADPHONE VIDEO L AUDIO R AUDIO... yellow VIDEO In Jack on page 33. T1056(06)_2006_1.qx3 10/12/04 11:57 AM Page 9 Hooking Up the TV/VCR/DVD (cont'd) 9 C Hooking Up Your TV/VCR/DVD with an Indoor Antenna To install an indoor antenna or "rabbit ears" (not supplied), connect the antenna wire to the ANT...
...you play Discs or tapes on other equipment but watch them on the TV/VCR/DVD's AUX channel. More details are not supplied. HEADPHONE VIDEO L AUDIO R STANDBY-ON VOLUME PREV PLAY NEXT SEARCH STOP OPEN/CLOSE SOURCE CHANNEL DVD VCR/TV REC/OTR REW PLAY F.FWD STOP/EJECT HEADPHONE VIDEO L AUDIO R AUDIO... yellow VIDEO In Jack on page 33. T1056(06)_2006_1.qx3 10/12/04 11:57 AM Page 9 Hooking Up the TV/VCR/DVD (cont'd) 9 C Hooking Up Your TV/VCR/DVD with an Indoor Antenna To install an indoor antenna or "rabbit ears" (not supplied), connect the antenna wire to the ANT...

User manual, English (US)
Page 10
... In jack. Or, refer to ON. Details are on pages eight-nine. 2 Connect a digital audio coaxial cable (not supplied) to hear the TV/VCR/DVD sound through the Stereo instead. An incorrect setting causes noise distortion and damages speakers. AUDIO OUT COAXIAL AUDIO OUT COAXIAL To Stereo's COAXIAL DIGITAL AUDIO... You cannot use the Digital Stereo hookup. Use these connections for a Dolby Digital-compatible Stereo or for a Dolby Digital logo on the TV/VCR/DVD. Use this on the Disc or case. If the Stereo is Dolby Digital-compatible, set DOLBY DIGITAL to OFF. Details are on...
... In jack. Or, refer to ON. Details are on pages eight-nine. 2 Connect a digital audio coaxial cable (not supplied) to hear the TV/VCR/DVD sound through the Stereo instead. An incorrect setting causes noise distortion and damages speakers. AUDIO OUT COAXIAL AUDIO OUT COAXIAL To Stereo's COAXIAL DIGITAL AUDIO... You cannot use the Digital Stereo hookup. Use these connections for a Dolby Digital-compatible Stereo or for a Dolby Digital logo on the TV/VCR/DVD. Use this on the Disc or case. If the Stereo is Dolby Digital-compatible, set DOLBY DIGITAL to OFF. Details are on...

User manual, English (US)
Page 11
...at the Cable Box/Satellite Receiver. 3 Press VOL. ▲/▼ to adjust the volume. If a channel is a non-memorized channel; VOLUME 20 Watching TV 11 1 STANDBY-ON PICTURE SLEEP SELECT 123 CH. 456 789 +100 0 +10 SPEED C.RESET ZOOM VOL. MUTE RECORD PLAY STOP DISC MENU DISPLAY SETUP ..., see page 18. Remember, if you are those that appear when you flip through channels. Change channels at the TV/VCR/DVD. 1 Press STANDBY-ON to turn on the TV/VCR/DVD. 2 To watch TV, press the CH. ▲/▼ buttons to channel 3, 4, or AUX. This is skipped, you still can use the ...
...at the Cable Box/Satellite Receiver. 3 Press VOL. ▲/▼ to adjust the volume. If a channel is a non-memorized channel; VOLUME 20 Watching TV 11 1 STANDBY-ON PICTURE SLEEP SELECT 123 CH. 456 789 +100 0 +10 SPEED C.RESET ZOOM VOL. MUTE RECORD PLAY STOP DISC MENU DISPLAY SETUP ..., see page 18. Remember, if you are those that appear when you flip through channels. Change channels at the TV/VCR/DVD. 1 Press STANDBY-ON to turn on the TV/VCR/DVD. 2 To watch TV, press the CH. ▲/▼ buttons to channel 3, 4, or AUX. This is skipped, you still can use the ...
User manual, English (US)
Page 12
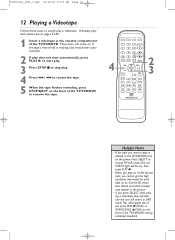
..., press PLAY B to start play. 3 Press STOP C to stop and the unit will switch to DVD mode.This will happen also if you press PLAY B(DVD) or OPEN/CLOSE A(DVD) on the front of the TV/VCR/DVD during videotape playback. Noise lines (black and white streaks) may appear in the picture. • If ... you cannot get the high resolution that would be available on . The power will come on an S-VHS VCR. If the tape's record tab is already in the cassette compartment of the TV/VCR/DVD to rewind the tape. 5 When the tape finishes rewinding, press STOP/EJECT on the power. Press SELECT to...
..., press PLAY B to start play. 3 Press STOP C to stop and the unit will switch to DVD mode.This will happen also if you press PLAY B(DVD) or OPEN/CLOSE A(DVD) on the front of the TV/VCR/DVD during videotape playback. Noise lines (black and white streaks) may appear in the picture. • If ... you cannot get the high resolution that would be available on . The power will come on an S-VHS VCR. If the tape's record tab is already in the cassette compartment of the TV/VCR/DVD to rewind the tape. 5 When the tape finishes rewinding, press STOP/EJECT on the power. Press SELECT to...
User manual, English (US)
Page 13
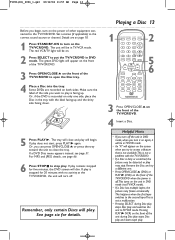
... with no activity at the TV/VCR/DVD, the unit will play remains stopped for details. The green DVD light will appear on the front of the TV/VCR/DVD. 3 Press OPEN/CLOSE A on the TV/VCR/DVD. If play and switches the unit to the TV/VCR/DVD. If play . If a DVD Disc menu appears instead, see... RETURN CLEAR SEARCH MODE REPEAT REPEAT A-B MODE AUDIO SUBTITLE ANGLE 2 5 6 3 Press OPEN/CLOSE A on the power of the TV/VCR/DVD. 4 Insert a Disc. The red VCR/TV light will appear on . 2 Press SELECT to the correct sound source or channel. Helpful Hints • If you turn off ....
... with no activity at the TV/VCR/DVD, the unit will play remains stopped for details. The green DVD light will appear on the front of the TV/VCR/DVD. 3 Press OPEN/CLOSE A on the TV/VCR/DVD. If play and switches the unit to the TV/VCR/DVD. If play . If a DVD Disc menu appears instead, see... RETURN CLEAR SEARCH MODE REPEAT REPEAT A-B MODE AUDIO SUBTITLE ANGLE 2 5 6 3 Press OPEN/CLOSE A on the power of the TV/VCR/DVD. 4 Insert a Disc. The red VCR/TV light will appear on . 2 Press SELECT to the correct sound source or channel. Helpful Hints • If you turn off ....

User manual, English (US)
Page 14
...a recording on the screen. REPEAT Button Press to enter a Track or Chapter number. +100/+10 button: Press before the number of the TV/VCR/DVD to forward a videotape. DVD Mode: Use the Number buttons to play a Disc,Title, Chapter, or Track repeatedly. Details are on page 25. Press to the next Track... which mode is active. Details are on the front of a single-digit channel. STOP C Button Press to the previous Setup menu in DVD or TV/VCR mode. Arrow Buttons Use the Arrow buttons to select or adjust menu items. RETURN Button Press to go to stop Disc or videotape playback....
...a recording on the screen. REPEAT Button Press to enter a Track or Chapter number. +100/+10 button: Press before the number of the TV/VCR/DVD to forward a videotape. DVD Mode: Use the Number buttons to play a Disc,Title, Chapter, or Track repeatedly. Details are on page 25. Press to the next Track... which mode is active. Details are on the front of a single-digit channel. STOP C Button Press to the previous Setup menu in DVD or TV/VCR mode. Arrow Buttons Use the Arrow buttons to select or adjust menu items. RETURN Button Press to go to stop Disc or videotape playback....
User manual, English (US)
Page 15
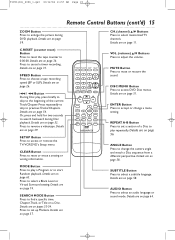
... SETUP TITLE ENTER RETURN CLEAR SEARCH MODE REPEAT REPEAT A-B MODE AUDIO SUBTITLE ANGLE CH. (channel) K/L Buttons Press to access or remove the TV/VCR/DVD's Setup menu. DISC MENU Button Press to select an audio language or sound mode. REPEAT A-B Button Press to set up Markers. AUDIO Button...two seconds to the beginning of a Disc to change a menu setting. MODE Button Press to play , press briefly to skip to search backward during DVD playback. Press to set a section of the current Track/Chapter. ANGLE Button Press to play repeatedly. Details are on page 59. VOL. (volume...
... SETUP TITLE ENTER RETURN CLEAR SEARCH MODE REPEAT REPEAT A-B MODE AUDIO SUBTITLE ANGLE CH. (channel) K/L Buttons Press to access or remove the TV/VCR/DVD's Setup menu. DISC MENU Button Press to select an audio language or sound mode. REPEAT A-B Button Press to set up Markers. AUDIO Button...two seconds to the beginning of a Disc to change a menu setting. MODE Button Press to play , press briefly to skip to search backward during DVD playback. Press to set a section of the current Track/Chapter. ANGLE Button Press to play repeatedly. Details are on page 59. VOL. (volume...
User manual, English (US)
Page 16
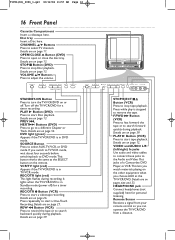
Details are on page 54. DVD light (green) Appears if the TV/VCR/DVD is in DVD mode. VCR/TV light (red) Appears if the TV/VCR/DVD is in TV/VCR mode. Details are on page 26. Press repeatedly to start tape playback. PLAY B Button (VCR) Press to start a videotape recording. HEADPHONE jack Connect...STOP OPEN/CLOSE STANDBY-ON VOLUME PREV PLAY NEXT SEARCH STOP OPEN/CLOSE SOURCE CHANNEL DVD VCR/TV REC/OTR REW PLAY F.FWD STOP/EJECT HEADPHONE VIDEO L AUDIO R SOURCE CHANNEL DVD VCR/TV REC/OTR REW PLAY F.FWD STOP/EJECT HEADPHONE VIDEO L AUDIO R STANDBY-ON...
Details are on page 54. DVD light (green) Appears if the TV/VCR/DVD is in DVD mode. VCR/TV light (red) Appears if the TV/VCR/DVD is in TV/VCR mode. Details are on page 26. Press repeatedly to start tape playback. PLAY B Button (VCR) Press to start a videotape recording. HEADPHONE jack Connect...STOP OPEN/CLOSE STANDBY-ON VOLUME PREV PLAY NEXT SEARCH STOP OPEN/CLOSE SOURCE CHANNEL DVD VCR/TV REC/OTR REW PLAY F.FWD STOP/EJECT HEADPHONE VIDEO L AUDIO R SOURCE CHANNEL DVD VCR/TV REC/OTR REW PLAY F.FWD STOP/EJECT HEADPHONE VIDEO L AUDIO R STANDBY-ON...
User manual, English (US)
Page 17
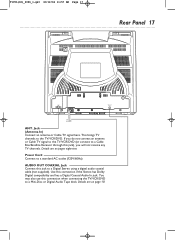
... here. Use this jack), you will not receive any TV channels. You may also use this connection when connecting the TV/VCR/DVD to a standard AC outlet (120V/60Hz). If you do not connect an antenna or Cable TV signal to the TV/VCR/DVD (or connect to a Digital Stereo using a digital audio coaxial cable (not ...the Stereo has Dolby Digital compatibility and has a Digital Coaxial Audio In jack. Details are on page 10. AUDIO OUT COAXIAL ANT. This brings TV channels to the TV/VCR/DVD. Details are on pages eight-nine. T1056(06)_2006_1.qx3 10/12/04 11:57 AM Page 17 Rear Panel 17 ANT.
... here. Use this jack), you will not receive any TV channels. You may also use this connection when connecting the TV/VCR/DVD to a standard AC outlet (120V/60Hz). If you do not connect an antenna or Cable TV signal to the TV/VCR/DVD (or connect to a Digital Stereo using a digital audio coaxial cable (not ...the Stereo has Dolby Digital compatibility and has a Digital Coaxial Audio In jack. Details are on page 10. AUDIO OUT COAXIAL ANT. This brings TV channels to the TV/VCR/DVD. Details are on pages eight-nine. T1056(06)_2006_1.qx3 10/12/04 11:57 AM Page 17 Rear Panel 17 ANT.
User manual, English (US)
Page 18
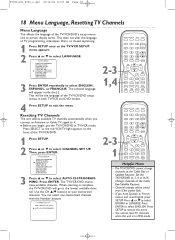
...the power fails. • If you begin, put the TV/VCR/DVD in DVD mode. Press SELECT so the red VCR/TV light appears on -screen display terms. This does not alter the language of the TV/VCR/DVD setup menus in both TV/VCR and DVD modes. 2-3 1,4 STANDBY-ON PICTURE SLEEP SELECT 123 CH... MUTE 2-3 1 RECORD PLAY STOP DISC MENU DISPLAY SETUP TITLE ENTER RETURN CLEAR SEARCH MODE REPEAT REPEAT A-B Helpful Hints • The TV/VCR/DVD cannot change channels at the Cable Box/Satellite Receiver. • Channel settings will appear inside the [ ]. TIMER PROGRAMMING SETTING CLOCK CHANNEL...
...the power fails. • If you begin, put the TV/VCR/DVD in DVD mode. Press SELECT so the red VCR/TV light appears on -screen display terms. This does not alter the language of the TV/VCR/DVD setup menus in both TV/VCR and DVD modes. 2-3 1,4 STANDBY-ON PICTURE SLEEP SELECT 123 CH... MUTE 2-3 1 RECORD PLAY STOP DISC MENU DISPLAY SETUP TITLE ENTER RETURN CLEAR SEARCH MODE REPEAT REPEAT A-B Helpful Hints • The TV/VCR/DVD cannot change channels at the Cable Box/Satellite Receiver. • Channel settings will appear inside the [ ]. TIMER PROGRAMMING SETTING CLOCK CHANNEL...

User manual, English (US)
Page 19
... will be available to add or delete. Or, you can add more channels if the TV/VCR/DVD did not memorize all your favorite channels. ● Before you wish to put the TV/VCR/DVD in DVD mode. Then, press ENTER. - CHANNEL SET UP - B ADD / DELETE CH (CATV) AUTO CH PROGRAMMING 4 Press ▲ or ...123 CH. 456 789 +100 0 +10 SPEED C.RESET ZOOM VOL. If you connected to see if you connected an Antenna to the TV/VCR/DVD, channels 2-69 will appear. TV/VCR SETUP - Helpful Hints • To confirm that a channel has been added or deleted, press the CH. ▲/▼ buttons to Cable...
... will be available to add or delete. Or, you can add more channels if the TV/VCR/DVD did not memorize all your favorite channels. ● Before you wish to put the TV/VCR/DVD in DVD mode. Then, press ENTER. - CHANNEL SET UP - B ADD / DELETE CH (CATV) AUTO CH PROGRAMMING 4 Press ▲ or ...123 CH. 456 789 +100 0 +10 SPEED C.RESET ZOOM VOL. If you connected to see if you connected an Antenna to the TV/VCR/DVD, channels 2-69 will appear. TV/VCR SETUP - Helpful Hints • To confirm that a channel has been added or deleted, press the CH. ▲/▼ buttons to Cable...
User manual, English (US)
Page 20
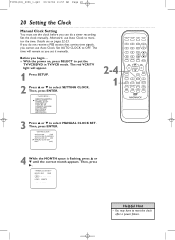
... CH [02] B MANUAL CLOCK SET D.S.T. [OFF] 4 While the MONTH space is flashing, press ▲ or ▼ until the correct month appears. The red VCR/TV light will remain as you set the clock before you can do not receive a PBS station that carries time signals, you do a timer recording. Afterward..., use Auto Clock. The time will appear. 1 Press SETUP. 2 Press ▲ or ▼ to put the TV/VCR/DVD in TV/VCR mode. TV/VCR SETUP - If you cannot use Auto Clock to select MANUAL CLOCK SET. Then, press ENTER. -
... CH [02] B MANUAL CLOCK SET D.S.T. [OFF] 4 While the MONTH space is flashing, press ▲ or ▼ until the correct month appears. The red VCR/TV light will remain as you set the clock before you can do not receive a PBS station that carries time signals, you do a timer recording. Afterward..., use Auto Clock. The time will appear. 1 Press SETUP. 2 Press ▲ or ▼ to put the TV/VCR/DVD in TV/VCR mode. TV/VCR SETUP - If you cannot use Auto Clock to select MANUAL CLOCK SET. Then, press ENTER. -

User manual, English (US)
Page 22
...SETUP. 2-3 1 STANDBY-ON PICTURE SLEEP SELECT 123 CH. 456 789 +100 0 +10 SPEED C.RESET ZOOM VOL. Details are on the TV/VCR/DVD power. ● Connect the antenna/Cable TV signal. SETTING CLOCK - Once you begin ... ● Turn on pages 18-19. ● Set the clock manually. TIMER PROGRAMMING B...SETUP TITLE ENTER RETURN CLEAR SEARCH MODE REPEAT REPEAT A-B MODE AUDIO SUBTITLE ANGLE 2 Press ▲ or ▼ to put the TV/VCR/DVD in TV/VCR mode. The red VCR/TV light will monitor the correct time and date broadcast by the PBS station. Press ENTER. - B AUTO CLOCK [ON] AUTO ...
...SETUP. 2-3 1 STANDBY-ON PICTURE SLEEP SELECT 123 CH. 456 789 +100 0 +10 SPEED C.RESET ZOOM VOL. Details are on the TV/VCR/DVD power. ● Connect the antenna/Cable TV signal. SETTING CLOCK - Once you begin ... ● Turn on pages 18-19. ● Set the clock manually. TIMER PROGRAMMING B...SETUP TITLE ENTER RETURN CLEAR SEARCH MODE REPEAT REPEAT A-B MODE AUDIO SUBTITLE ANGLE 2 Press ▲ or ▼ to put the TV/VCR/DVD in TV/VCR mode. The red VCR/TV light will monitor the correct time and date broadcast by the PBS station. Press ENTER. - B AUTO CLOCK [ON] AUTO ...


