User manual, English (US)
Page 11
...Magnavox has paid a lot of attention to navigate through the Settings menu 11 Introduction 11 TV menu 12 Installation 12 Select the menu language 12 Store TV channels 12 Weak channel installation 13 Source, Analog Audio In, Clock 14 Reset AV settings 15...3 Contents 4 Preparation 5 Wall mounting 5 Use of the remote control 8 Buttons on the back side of the TV. Your... to producing an environmentally friendly product. Model: 15MF227B, 15MF237S, or 19MF337B Serial No: Care of...call the Magnavox Customer Care Center at 1 800 705 2000. Using products with all LCD products, ...
...Magnavox has paid a lot of attention to navigate through the Settings menu 11 Introduction 11 TV menu 12 Installation 12 Select the menu language 12 Store TV channels 12 Weak channel installation 13 Source, Analog Audio In, Clock 14 Reset AV settings 15...3 Contents 4 Preparation 5 Wall mounting 5 Use of the remote control 8 Buttons on the back side of the TV. Your... to producing an environmentally friendly product. Model: 15MF227B, 15MF237S, or 19MF337B Serial No: Care of...call the Magnavox Customer Care Center at 1 800 705 2000. Using products with all LCD products, ...
User manual, English (US)
Page 13
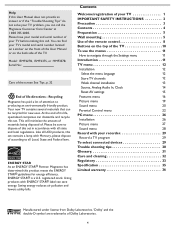
... becomes current for example - Cable box with RF IN/OUT. 6 Commonly used labels include OUTPUT or OUT. • Set the OUTPUT CH switch on the remote control. • Press the cursor down or up buttons until the AV2 signal source is correct for the TO TV jack. 75 ANTENNA CABLE HDMI...
... becomes current for example - Cable box with RF IN/OUT. 6 Commonly used labels include OUTPUT or OUT. • Set the OUTPUT CH switch on the remote control. • Press the cursor down or up buttons until the AV2 signal source is correct for the TO TV jack. 75 ANTENNA CABLE HDMI...
User manual, English (US)
Page 14
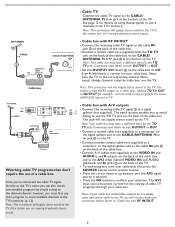
...the station you are currently transitioning from analog to highlight your set you 're not sure what HDTV programming is different than that are in your area, contact your local content provider or your digital TV set (Model label) for the TV. Please determine and comply with S-Video, component ..., you turn on : Press the power switch at the front side of the AC cord could cause a fire or electric shock. 5 Remote control: Insert the two supplied AAA batteries. Cable box with local regulations when disposing of depleted batteries. 6 Turn the TV on your language. (...
...the station you are currently transitioning from analog to highlight your set you 're not sure what HDTV programming is different than that are in your area, contact your local content provider or your digital TV set (Model label) for the TV. Please determine and comply with S-Video, component ..., you turn on : Press the power switch at the front side of the AC cord could cause a fire or electric shock. 5 Remote control: Insert the two supplied AAA batteries. Cable box with local regulations when disposing of depleted batteries. 6 Turn the TV on your language. (...
User manual, English (US)
Page 15
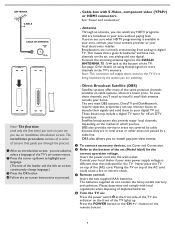
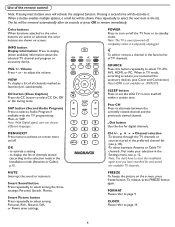
... and Connection) Note:HDMI is physically unplugged. To release, press FREEZE button again. FORMAT Please refer to activate a setting - Use of the remote control Note: Pressing most buttons once will be removed automatically after six seconds or press OK to turn itself off the TV from or to...select the next item in the favorite list of TV channels. Press repeatedly to standby mode. Note: With Digital signal, user can choose different languages. SLEEP button Press to set the LCD TV to turn on/off within a certain time. FREEZE To freeze the picture on 15MF237S. VOL +/- ...
... and Connection) Note:HDMI is physically unplugged. To release, press FREEZE button again. FORMAT Please refer to activate a setting - Use of the remote control Note: Pressing most buttons once will be removed automatically after six seconds or press OK to turn itself off the TV from or to...select the next item in the favorite list of TV channels. Press repeatedly to standby mode. Note: With Digital signal, user can choose different languages. SLEEP button Press to set the LCD TV to turn on/off within a certain time. FREEZE To freeze the picture on 15MF237S. VOL +/- ...
User manual, English (US)
Page 17
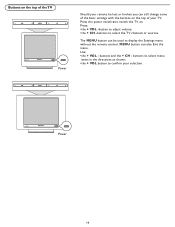
MENU button can still change some of the basic settings with the buttons on the top of the TV Power Should your remote be used to select the TV channels or sources. Buttons on the top of your TV. Press the power switch to confirm your ... you can also Exit the menu. Press: •the + VOL -button to adjust volume; •the + CH -buttons to display the Settings menu without the remote control. Power 10 Use: •the + VOL - buttons and the + CH -
MENU button can still change some of the basic settings with the buttons on the top of the TV Power Should your remote be used to select the TV channels or sources. Buttons on the top of your TV. Press the power switch to confirm your ... you can also Exit the menu. Press: •the + VOL -button to adjust volume; •the + CH -buttons to display the Settings menu without the remote control. Power 10 Use: •the + VOL - buttons and the + CH -

User manual, English (US)
Page 18
... an action, convenient instructions, help text on the specific item highlighted. By pressing the corresponding color button on the remote control to perform the required action when using on the remote control to watch the picture on your TV. Settings Picture Sound Features Parental Control Installation ESxeittings Picture Sound FInefaotures Parental...
... an action, convenient instructions, help text on the specific item highlighted. By pressing the corresponding color button on the remote control to perform the required action when using on the remote control to watch the picture on your TV. Settings Picture Sound Features Parental Control Installation ESxeittings Picture Sound FInefaotures Parental...
User manual, English (US)
Page 19
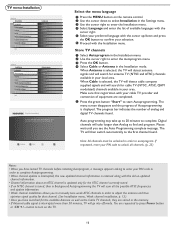
This procedure can now start Autoprogramming. Digital channels will go into off mode. button to turn on the remote control. 2 Use the cursor down and press the OK button to confirm your PIN code in order to complete Autoprogramming. &#... Once you see the Auto Programming complete message. Note: All channels must be unlocked in your cable TV provider and connection of analog and digital TV channels found . When Cable is displayed. TV menu-Installation Settings Installation Language Autoprogram Source Clock Weak channel installation Current software info Reset AV...
This procedure can now start Autoprogramming. Digital channels will go into off mode. button to turn on the remote control. 2 Use the cursor down and press the OK button to confirm your PIN code in order to complete Autoprogramming. &#... Once you see the Auto Programming complete message. Note: All channels must be unlocked in your cable TV provider and connection of analog and digital TV channels found . When Cable is displayed. TV menu-Installation Settings Installation Language Autoprogram Source Clock Weak channel installation Current software info Reset AV...

User manual, English (US)
Page 20
...with the message Audio only. When you want to put the switch in the channel list by pressing red button on the remote control; Digital channel broadcasts contain program and system data information that the channel is continuously displayed and updated as compared to the map. If ... can be displayed. Cable (analog NTSC or digital QAM) - Note: Subchannel selections The new standards employed with your TV software information. 1 Press the MENU button on the remote control. Select the "Start" by pressing green button on the remote control. 2 Use the cursor down to choose...
...with the message Audio only. When you want to put the switch in the channel list by pressing red button on the remote control; Digital channel broadcasts contain program and system data information that the channel is continuously displayed and updated as compared to the map. If ... can be displayed. Cable (analog NTSC or digital QAM) - Note: Subchannel selections The new standards employed with your TV software information. 1 Press the MENU button on the remote control. Select the "Start" by pressing green button on the remote control. 2 Use the cursor down to choose...
User manual, English (US)
Page 21
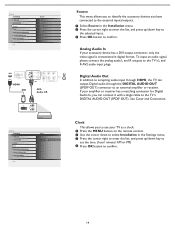
... menu. 2 Press the cursor right to enter the list, and press up /down key to the selected input. 3 Press OK button to the TV's DIGITAL AUDIO OUT (SPDIF OUT). To input an audio signal, please connect the analog audio L and R outputs to an external amplifier or receiver... Analog Audio In If your TV as a clock. 1 Press the MENU button on the remote control. 2 Use the cursor down to select Installation in digital format. If your amplifier or receiver has a matching connector for Digital Audio In, you to use your accessory device has a DVI output connector, only the video...
... menu. 2 Press the cursor right to enter the list, and press up /down key to the selected input. 3 Press OK button to the TV's DIGITAL AUDIO OUT (SPDIF OUT). To input an audio signal, please connect the analog audio L and R outputs to an external amplifier or receiver... Analog Audio In If your TV as a clock. 1 Press the MENU button on the remote control. 2 Use the cursor down to select Installation in digital format. If your amplifier or receiver has a matching connector for Digital Audio In, you to use your accessory device has a DVI output connector, only the video...
User manual, English (US)
Page 26
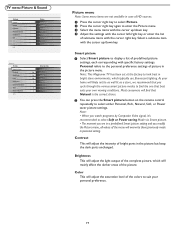
... fluorescent lighting. Personal refers to display a list of predefined picture settings, each corresponding with the cursor right key. Note: This Magnavox TV has been set at the factory to select either Personal, Rich, Natural, Soft, or Power saver picture settings. Most consumers will likely not... smart picture modes to find the one that Natural is the correct choice. 2 You can press the Smart picture button on the remote control repeatedly to look best in bright store environments, which will mainly affect the darker areas of the picture. TV menu-Picture & Sound ...
... fluorescent lighting. Personal refers to display a list of predefined picture settings, each corresponding with the cursor right key. Note: This Magnavox TV has been set at the factory to select either Personal, Rich, Natural, Soft, or Power saver picture settings. Most consumers will likely not... smart picture modes to find the one that Natural is the correct choice. 2 You can press the Smart picture button on the remote control repeatedly to look best in bright store environments, which will mainly affect the darker areas of the picture. TV menu-Picture & Sound ...
User manual, English (US)
Page 27
...overwrite those previously made in personal setting. 20 Picture format This menu item performs the same as the FORMAT button on the remote control. Dynamic contrast Enhance contrast ratio. Sound menu 1 Select Sound in a predefined Smart sound setting and you to...Settings Picture Sound Features Parental Control Installation Exit Info Settings Sound Smart sound Sound mode Alternate audio Digital audio language AVL Info Sound Smart sound Sound mode Alternate audio Digital audio language AVL Smart sound 3 Personal Speech Movies Sharpness This will adjust the sharpness of ...
...overwrite those previously made in personal setting. 20 Picture format This menu item performs the same as the FORMAT button on the remote control. Dynamic contrast Enhance contrast ratio. Sound menu 1 Select Sound in a predefined Smart sound setting and you to...Settings Picture Sound Features Parental Control Installation Exit Info Settings Sound Smart sound Sound mode Alternate audio Digital audio language AVL Info Sound Smart sound Sound mode Alternate audio Digital audio language AVL Smart sound 3 Personal Speech Movies Sharpness This will adjust the sharpness of ...
User manual, English (US)
Page 33
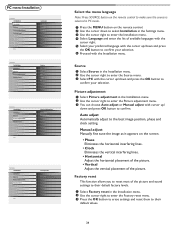
Factory reset This function allows you to reset most of the picture. Manual adjust Manually fine tune the image as it appears on the remote control. 2 Use the cursor down to select Installation in the Settings menu. 3 Use the cursor right to enter the Installation menu. 4 Select ...adjust Info Settings Installation Language Source Picture adjustment Factory reset Factory reset Start now Info Select the menu language Note: Press SOURCE button on the remote control to make sure the source is selected in PC mode. 1 Press the MENU button on the screen. • Phase Eliminates the ...
Factory reset This function allows you to reset most of the picture. Manual adjust Manually fine tune the image as it appears on the remote control. 2 Use the cursor down to select Installation in the Settings menu. 3 Use the cursor right to enter the Installation menu. 4 Select ...adjust Info Settings Installation Language Source Picture adjustment Factory reset Factory reset Start now Info Select the menu language Note: Press SOURCE button on the remote control to make sure the source is selected in PC mode. 1 Press the MENU button on the screen. • Phase Eliminates the ...

User manual, English (US)
Page 37
...This may influence the reception of other devices. Try another auto picture setting. • Check the Closed Captions control. Go to www.magnavox.com/usasupport to be certain there are supported. keep away a wireless headphone from different brands and types of HD source boxes. Check the...PC modes do not work • Check whether connections are correct. • Check whether the source is wrong. Press SOURCE button to remote control Control of approximately four feet. Possibly the operating system is correctly selected. No picture and power • Your TV has a protective...
...This may influence the reception of other devices. Try another auto picture setting. • Check the Closed Captions control. Go to www.magnavox.com/usasupport to be certain there are supported. keep away a wireless headphone from different brands and types of HD source boxes. Check the...PC modes do not work • Check whether connections are correct. • Check whether the source is wrong. Press SOURCE button to remote control Control of approximately four feet. Possibly the operating system is correctly selected. No picture and power • Your TV has a protective...


