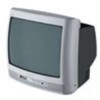

User manual, English (US)
Page 2
... these safetysymbols ITHIN 10 Dear MAGNAVOX product owner: Thank you for your confidence in the industry. Most importantly, you can count on the rear of the cabinet. P.S. Remember, to get the most comprehensive warranties and outstanding service networks in MAGNAVOX.You've selected one of the most from our convenient home shopping network. Return your Warranty Registration card today to ensure...
... these safetysymbols ITHIN 10 Dear MAGNAVOX product owner: Thank you for your confidence in the industry. Most importantly, you can count on the rear of the cabinet. P.S. Remember, to get the most comprehensive warranties and outstanding service networks in MAGNAVOX.You've selected one of the most from our convenient home shopping network. Return your Warranty Registration card today to ensure...
User manual, English (US)
Page 3
... change in any way, such as if the power-supply cord or plug is grounded so as radiators, heat regis- Damage Requiring Service - B. E. Such items could ultimately overturn the product. • Also, do not fall from tip-over. 13. Wall or Ceiling Mounting - Outdoor Antenna Grounding - Object and Liquid Entry - To prevent battery leakage that the cable ground shall be connected to...
... change in any way, such as if the power-supply cord or plug is grounded so as radiators, heat regis- Damage Requiring Service - B. E. Such items could ultimately overturn the product. • Also, do not fall from tip-over. 13. Wall or Ceiling Mounting - Outdoor Antenna Grounding - Object and Liquid Entry - To prevent battery leakage that the cable ground shall be connected to...
User manual, English (US)
Page 4
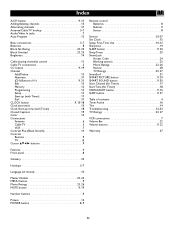
... the push of one button. Table of Contents Introduction Welcome/TV Registration 2 Safety/Precautions 3 Table of Contents 4 Features 4 Basic Cable TV Connection 5 Basic Antenna Connection 6 Basic TV to VCR (Accessory) Connection 7 Basic TV and Remote Control Operations 8 Remote Control 9 Setup Menus Menu Language 10 Cable TV Control 11 Auto Program (Setting TV Channels 12 Channel Edit 13 On-screen Menus TV Picture 14 Clock 15 On-Timer 16 Start-Up Channel 17 Start-Up Time 18 Closed Captions 19 Sleep Timer 20 Stereo Programming 21 Volume Bar 22 Here are...
... the push of one button. Table of Contents Introduction Welcome/TV Registration 2 Safety/Precautions 3 Table of Contents 4 Features 4 Basic Cable TV Connection 5 Basic Antenna Connection 6 Basic TV to VCR (Accessory) Connection 7 Basic TV and Remote Control Operations 8 Remote Control 9 Setup Menus Menu Language 10 Cable TV Control 11 Auto Program (Setting TV Channels 12 Channel Edit 13 On-screen Menus TV Picture 14 Clock 15 On-Timer 16 Start-Up Channel 17 Start-Up Time 18 Closed Captions 19 Sleep Timer 20 Stereo Programming 21 Volume Bar 22 Here are...
User manual, English (US)
Page 5
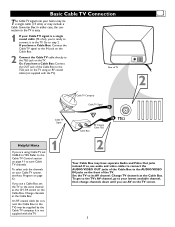
... change channels down until you see Auto Program on the TV screen. 5 In either case, the connection to the TV is easy. 1 If your home may have a Cable Box: Connect the Cable TV signal to the IN jack on the Cable Box. 2 Connect the Cable TV cable directly to the 75Ω jack on the front of TV Cable TV Company Cable TV Signal Cable TV Signal Cable Box RF Coaxial Cable 75Ω 75Ω Helpful Hints If you have separate Audio and Video Out jacks instead. If you use audio...
... change channels down until you see Auto Program on the TV screen. 5 In either case, the connection to the TV is easy. 1 If your home may have a Cable Box: Connect the Cable TV signal to the IN jack on the Cable Box. 2 Connect the Cable TV cable directly to the 75Ω jack on the front of TV Cable TV Company Cable TV Signal Cable TV Signal Cable Box RF Coaxial Cable 75Ω 75Ω Helpful Hints If you have separate Audio and Video Out jacks instead. If you use audio...

User manual, English (US)
Page 6
... rear of your antenna has flat twin-lead wire (300 ohm), you need to attach the antenna wires to the screws on a 300 to 75 ohm adapter (not supplied with TV). 2 Push the round end of the adapter or antenna cable onto the 75Ω jack on page 12. UHF Antenna U/V Combiner VHF Antenna 75Ω Rear of TV If no Video Signal present, the screen will remain black...
... rear of your antenna has flat twin-lead wire (300 ohm), you need to attach the antenna wires to the screws on a 300 to 75 ohm adapter (not supplied with TV). 2 Push the round end of the adapter or antenna cable onto the 75Ω jack on page 12. UHF Antenna U/V Combiner VHF Antenna 75Ω Rear of TV If no Video Signal present, the screen will remain black...
User manual, English (US)
Page 7
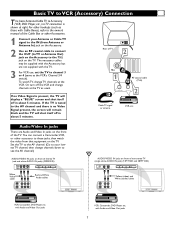
...) VIDEO AUDIO MENU - Audio/Video In jacks There are not supplied with Audio and Video Out jacks VCR, Camcorder, DVD Player, etc. VOLUME + CHANNEL POWER VCR, Camcorder, DVD Player, etc. Or, turn off the VCR and change channels at the TV as usual. Ω Rear of the Cable Box or other Accessories. 1 Connect your lowest TV channel, then change TV channels at right. with the TV. 3 For VCR use, set the TV to channel 3 or 4 (same as those with Audio and Video Out jacks 7 Set the TV to the AV channel. (Go to your Antenna or Cable TV signal...
...) VIDEO AUDIO MENU - Audio/Video In jacks There are not supplied with Audio and Video Out jacks VCR, Camcorder, DVD Player, etc. VOLUME + CHANNEL POWER VCR, Camcorder, DVD Player, etc. Or, turn off the VCR and change channels at the TV as usual. Ω Rear of the Cable Box or other Accessories. 1 Connect your lowest TV channel, then change TV channels at right. with the TV. 3 For VCR use, set the TV to channel 3 or 4 (same as those with Audio and Video Out jacks 7 Set the TV to the AV channel. (Go to your Antenna or Cable TV signal...
User manual, English (US)
Page 8
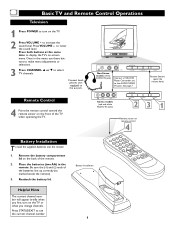
... sound level. Press both buttons at the same time to select TV channels. jack. VOLUME + CHANNEL POWER MENU VIDEO Non-Stereo models (white AUDIO IN jack) AUDIO - Reattach the battery lid. VOLUME + Connect a VCR, DVD Player, Camcorder, etc. A/CH STATUS MENU EXIT MUTE SLEEP SURF CLOCK SMART PICTURE SOUND Stereo models (red and white AUDIO IN jacks) Remote sensor on the front of the TV when operating the TV. Helpful Hints The current channel number will appear briefly when you change channels. Press STATUS/EXIT to the AUDIO/VIDEO IN jacks...
... sound level. Press both buttons at the same time to select TV channels. jack. VOLUME + CHANNEL POWER MENU VIDEO Non-Stereo models (white AUDIO IN jack) AUDIO - Reattach the battery lid. VOLUME + Connect a VCR, DVD Player, Camcorder, etc. A/CH STATUS MENU EXIT MUTE SLEEP SURF CLOCK SMART PICTURE SOUND Stereo models (red and white AUDIO IN jacks) Remote sensor on the front of the TV when operating the TV. Helpful Hints The current channel number will appear briefly when you change channels. Press STATUS/EXIT to the AUDIO/VIDEO IN jacks...
User manual, English (US)
Page 9
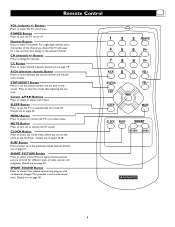
... change TV channels. Details are on page 30. 9 SMART PICTURE Button Press to see the channel number and the time on page 31. SMART SOUND Button Press to select TV channels. CC Button Press to adjust the TV sound level. Buttons Press to select or adjust menu items. SLEEP Button Press to the selected channel. Buttons Press to change to set the clock or the On-Timer. MUTE Button Press to five previously viewed channels. Buttons Press to select Closed Captions. Remote Control VOL (volume) +/- SURF Button Press to select up...
... change TV channels. Details are on page 30. 9 SMART PICTURE Button Press to see the channel number and the time on page 31. SMART SOUND Button Press to select TV channels. CC Button Press to adjust the TV sound level. Buttons Press to select or adjust menu items. SLEEP Button Press to the selected channel. Buttons Press to change to set the clock or the On-Timer. MUTE Button Press to five previously viewed channels. Buttons Press to select Closed Captions. Remote Control VOL (volume) +/- SURF Button Press to select up...
User manual, English (US)
Page 12
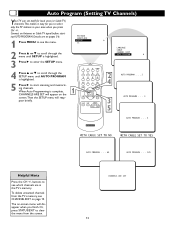
... scanning and memorizing channels. Connect an Antenna or Cable TV signal before starting AUTO PROGRAM. Details are in your area when you press CH +/-. buttons to see the menu. 2 Press 8 or 9 to scroll through the menu until SETUP is highlighted. 3 Press : to enter the SETUP menu. 4 Press 8 or 9 to scroll through the SETUP menu until AUTO PROGRAM is complete, CHANNELS ARE SET will appear on -screen menu will reappear briefly. 789 VOL+ EXIT Helpful...
... scanning and memorizing channels. Connect an Antenna or Cable TV signal before starting AUTO PROGRAM. Details are in your area when you press CH +/-. buttons to see the menu. 2 Press 8 or 9 to scroll through the menu until SETUP is highlighted. 3 Press : to enter the SETUP menu. 4 Press 8 or 9 to scroll through the SETUP menu until AUTO PROGRAM is complete, CHANNELS ARE SET will appear on -screen menu will reappear briefly. 789 VOL+ EXIT Helpful...
User manual, English (US)
Page 14
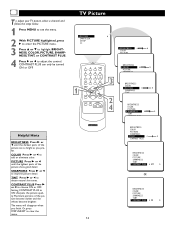
... darkest parts of the picture are as bright as you finish. to adjust the control. CONTRAST PLUS can only be turned ON or OFF. or ; to obtain natural skin tones. to choose ON or OFF. The menu will disappear when you pre- Setting CONTRAST PLUS to highlight BRIGHTNESS, COLOR, PICTURE, SHARPNESS,TINT, or CONTRAST PLUS. 4 Press : or ; T o adjust your TV picture, select a channel and...
... darkest parts of the picture are as bright as you finish. to adjust the control. CONTRAST PLUS can only be turned ON or OFF. or ; to obtain natural skin tones. to choose ON or OFF. The menu will disappear when you pre- Setting CONTRAST PLUS to highlight BRIGHTNESS, COLOR, PICTURE, SHARPNESS,TINT, or CONTRAST PLUS. 4 Press : or ; T o adjust your TV picture, select a channel and...
User manual, English (US)
Page 19
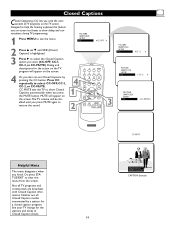
... The menu disappears when you also can set Closed Captions by a station for a closed caption program. See your TV listings for the action on the TV program will appear on -screen text boxes to help the hearing impaired, this feature uses on the screen. 4 Or, you finish. Closed Captions Closed Captioning (CC) lets you read the voice content of Closed Caption shows. Designed to show Closed EXIT Captions automatically when you press the MUTE button...
... The menu disappears when you also can set Closed Captions by a station for a closed caption program. See your TV listings for the action on the TV program will appear on -screen text boxes to help the hearing impaired, this feature uses on the screen. 4 Or, you finish. Closed Captions Closed Captioning (CC) lets you read the voice content of Closed Caption shows. Designed to show Closed EXIT Captions automatically when you press the MUTE button...
User manual, English (US)
Page 25
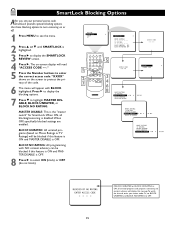
... -screen display will be blocked if this feature is ON and MASTER DISABLE is disabled.When OFF, specifically blocked settings are enabled. Press : to display the blocking options. 7 Press 9 to OFF. 25 Or, set your access code. Use these blocking options to turn censoring on Movie Ratings or TV Ratings) will read "ACCESS CODE ----." 5 Press the Number buttons to protect the privacy of the code. 6 The menu...
... -screen display will be blocked if this feature is ON and MASTER DISABLE is disabled.When OFF, specifically blocked settings are enabled. Press : to display the blocking options. 7 Press 9 to OFF. 25 Or, set your access code. Use these blocking options to turn censoring on Movie Ratings or TV Ratings) will read "ACCESS CODE ----." 5 Press the Number buttons to protect the privacy of the code. 6 The menu...
User manual, English (US)
Page 26
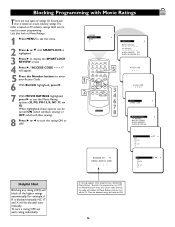
... the Number buttons to enter your access code. When highlighted, these options can be used to see the Movie Rating options: (G, PG, PG-13, R, NC 17, or X). For example, if R is highlighted. 3 Press : to display the SMARTLOCK REVIEW screen. 4 Press :."ACCESS CODE - - - -" will block all the higher ratings automatically. To watch the programming, turn a rating OFF, set each rating individually. A message appears when programming is based...
... the Number buttons to enter your access code. When highlighted, these options can be used to see the Movie Rating options: (G, PG, PG-13, R, NC 17, or X). For example, if R is highlighted. 3 Press : to display the SMARTLOCK REVIEW screen. 4 Press :."ACCESS CODE - - - -" will block all the higher ratings automatically. To watch the programming, turn a rating OFF, set each rating individually. A message appears when programming is based...
User manual, English (US)
Page 27
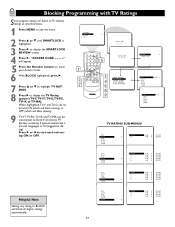
... viewing). 9 TV-Y7,TV-PG,TV-14, and TV-MA can be customized to display the TV Rating options (TV-Y,TV-Y7,TV-G,TV-PG, TV-14, or TV-MA). to turn each sub-rating ON or OFF. 5 3 4 6 8 9 TV RATING SUB-MENUS Helpful Hint Setting any rating to display the SMARTLOCK REVIEW screen. 4 Press :. Blocking Programming with TV Ratings Some program ratings are based on TV industry ratings as described below. 1 Press MENU to see the menu...
... viewing). 9 TV-Y7,TV-PG,TV-14, and TV-MA can be customized to display the TV Rating options (TV-Y,TV-Y7,TV-G,TV-PG, TV-14, or TV-MA). to turn each sub-rating ON or OFF. 5 3 4 6 8 9 TV RATING SUB-MENUS Helpful Hint Setting any rating to display the SMARTLOCK REVIEW screen. 4 Press :. Blocking Programming with TV Ratings Some program ratings are based on TV industry ratings as described below. 1 Press MENU to see the menu...
User manual, English (US)
Page 29
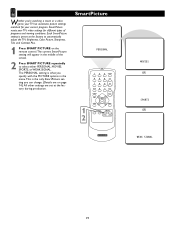
... a video game, your current program. SmartPicture resets your TV's video settings for your TV has automatic picture settings matched for different types of the screen. 2 Press SMART PICTURE repeatedly to automatically adjust the TV's Brightness, Color, Picture, Sharpness, Tint, and Contrast Plus. 1 Press SMART PICTURE on the remote control.The current SmartPicture setting will appear in the menu.This is what you specify with the PICTURE options in the middle of programs and viewing conditions...
... a video game, your current program. SmartPicture resets your TV's video settings for your TV has automatic picture settings matched for different types of the screen. 2 Press SMART PICTURE repeatedly to automatically adjust the TV's Brightness, Color, Picture, Sharpness, Tint, and Contrast Plus. 1 Press SMART PICTURE on the remote control.The current SmartPicture setting will appear in the menu.This is what you specify with the PICTURE options in the middle of programs and viewing conditions...

User manual, English (US)
Page 30
SmartSound In many cases, the volume levels of the screen (ON or OFF). 2 Press SMART SOUND repeatedly to toggle between ON or OFF. 30 This provides a more consistent sound by reducing the peaks and valleys that occur during program changes or commercial breaks. 1 Press SMART SOUND on the remote control.The current SmartSound setting will appear in the middle of broadcast programming and commercials are not the same.With SmartSound, you can have the TV level the sound.
SmartSound In many cases, the volume levels of the screen (ON or OFF). 2 Press SMART SOUND repeatedly to toggle between ON or OFF. 30 This provides a more consistent sound by reducing the peaks and valleys that occur during program changes or commercial breaks. 1 Press SMART SOUND on the remote control.The current SmartSound setting will appear in the middle of broadcast programming and commercials are not the same.With SmartSound, you can have the TV level the sound.
User manual, English (US)
Page 32
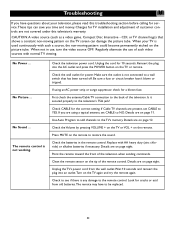
... this television's warranty. If Cable TV channels are using an AC power strip or surge suppressor, check for service.These tips can damage the picture tube. Use Auto Program to add channels to the television's 75Ω jack? Press MUTE on the tip of the remote control. Details are not covered under this troubleshooting section before calling for a blown fuse. Look for the correct setting. No Power ... Check the television power cord. Make...
... this television's warranty. If Cable TV channels are using an AC power strip or surge suppressor, check for service.These tips can damage the picture tube. Use Auto Program to add channels to the television's 75Ω jack? Press MUTE on the tip of the remote control. Details are not covered under this troubleshooting section before calling for a blown fuse. Look for the correct setting. No Power ... Check the television power cord. Make...
User manual, English (US)
Page 33
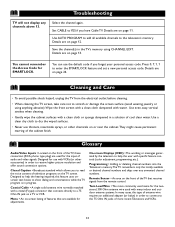
... locally available or desired channel numbers and skips over any channels above 13. Use AUTO PROGRAM to add all available channels to receive higher picture resolution and offer sound connection options. Glossary Audio/Video Inputs • Located on page 11. Remote Sensor • An area on the front of television programs on a TV or VCR. Select the channel again. Set CABLE to a 75 Ohm IN jack on the TV screen. You can use the default code if you to show...
... locally available or desired channel numbers and skips over any channels above 13. Use AUTO PROGRAM to add all available channels to receive higher picture resolution and offer sound connection options. Glossary Audio/Video Inputs • Located on page 11. Remote Sensor • An area on the front of television programs on a TV or VCR. Select the channel again. Set CABLE to a 75 Ohm IN jack on the TV screen. You can use the default code if you to show...
User manual, English (US)
Page 34
..., 26 Review 28 TV Ratings 23, 27 SmartSurf 31 SMART PICTURE button 9, 29 SMART SOUND button 9, 30 Start Channel (for Timer 17 Start Time (for Timer 18 STATUS/EXIT button 9, 15 SURF button 9, 31 Table of contents 4 Timer Active 16 Tint 14 Troubleshooting 32-33 TV Ratings 23, 27 VCR connections 7 Volume Bar 22 Volume buttons 9, 22 Warranty 37 34 Index A/CH button 9, 31 Adding/deleting channels 13 Alternating channels 31 Antenna/Cable TV hookup 5-7 Audio/Video In jacks 7 Auto Program 12 Basic connections...
..., 26 Review 28 TV Ratings 23, 27 SmartSurf 31 SMART PICTURE button 9, 29 SMART SOUND button 9, 30 Start Channel (for Timer 17 Start Time (for Timer 18 STATUS/EXIT button 9, 15 SURF button 9, 31 Table of contents 4 Timer Active 16 Tint 14 Troubleshooting 32-33 TV Ratings 23, 27 VCR connections 7 Volume Bar 22 Volume buttons 9, 22 Warranty 37 34 Index A/CH button 9, 31 Adding/deleting channels 13 Alternating channels 31 Antenna/Cable TV hookup 5-7 Audio/Video In jacks 7 Auto Program 12 Basic connections...
User manual, English (US)
Page 37
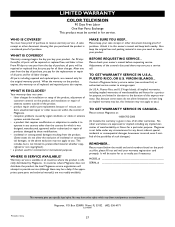
... case you buy your warranty registration card promptly. Please keep your owner's manual before requesting service. TO GET WARRANTY SERVICE IN U.S.A., PUERTO RICO, OR U.S. VIRGIN ISLANDS... Contact a Magnavox factory service center (see enclosed list) or authorized service center to return your product. Box 520890, Miami, FL 33152 (402) 536-4171 EL6541E001 Printed in for service. Warranty coverage begins the day you need to arrange repair. (In U.S.A., Puerto...
... case you buy your warranty registration card promptly. Please keep your owner's manual before requesting service. TO GET WARRANTY SERVICE IN U.S.A., PUERTO RICO, OR U.S. VIRGIN ISLANDS... Contact a Magnavox factory service center (see enclosed list) or authorized service center to return your product. Box 520890, Miami, FL 33152 (402) 536-4171 EL6541E001 Printed in for service. Warranty coverage begins the day you need to arrange repair. (In U.S.A., Puerto...


