User Manual
Page 1
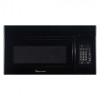
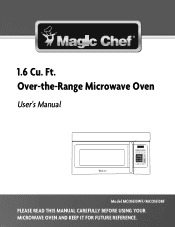
Over-the-Range Microwave Oven User's Manual Model MCO1610WF/MCO1610BF PLEASE READ THIS MANUAL CAREFULLY BEFORE USING YOUR MICROWAVE OVEN AND KEEP IT FOR FUTURE REFERENCE. Ft. 1.6 Cu.
Over-the-Range Microwave Oven User's Manual Model MCO1610WF/MCO1610BF PLEASE READ THIS MANUAL CAREFULLY BEFORE USING YOUR MICROWAVE OVEN AND KEEP IT FOR FUTURE REFERENCE. Ft. 1.6 Cu.
User Manual
Page 2
Once again, thank you for more efficient warranty service processing when warranty service is to complete the product registration on our website: www.mcappliance.com/register. Registering your product will allow for purchasing a Magic Chef product. Registering your product could act as your proof of purchase in the event of... allow us to protect your product include the following: 1. Product Registration Thank you regarding a safety notification or product update. 2. The first step to contact you for purchasing a Magic Chef product. The benefits of insurance loss.
Once again, thank you for more efficient warranty service processing when warranty service is to complete the product registration on our website: www.mcappliance.com/register. Registering your product will allow for purchasing a Magic Chef product. Registering your product could act as your proof of purchase in the event of... allow us to protect your product include the following: 1. Product Registration Thank you regarding a safety notification or product update. 2. The first step to contact you for purchasing a Magic Chef product. The benefits of insurance loss.
User Manual
Page 3
...Menu...8 Hood Function ...8 Oven Lamp...8 Timer Function ...8 Lock Function for Children ...8 Inquiring Function ...8 Speedy Cooking ...8 Display On/Off Function...8 MICROWAVE OVEN CARE...9 Cleaning the exhaust filters ...9 Surface light replacement ...9 Charcoal filter replacement ...10 Oven light replacement...10 General Cleaning ...11 TROUBLESHOOTING ...11 ASSISTANCE OR SERVICE...12 WARRANTY ...13 SPECIFICATIONS Model: Rated Voltage: Rated Input Power(Microwave): Rated Output Power(Microwave): Oven Capacity: Turntable Diameter: External Dimensions(LxWxH): Net Weight: MCO1610WF/ MCO1610BF...
...Menu...8 Hood Function ...8 Oven Lamp...8 Timer Function ...8 Lock Function for Children ...8 Inquiring Function ...8 Speedy Cooking ...8 Display On/Off Function...8 MICROWAVE OVEN CARE...9 Cleaning the exhaust filters ...9 Surface light replacement ...9 Charcoal filter replacement ...10 Oven light replacement...10 General Cleaning ...11 TROUBLESHOOTING ...11 ASSISTANCE OR SERVICE...12 WARRANTY ...13 SPECIFICATIONS Model: Rated Voltage: Rated Input Power(Microwave): Rated Output Power(Microwave): Oven Capacity: Turntable Diameter: External Dimensions(LxWxH): Net Weight: MCO1610WF/ MCO1610BF...
User Manual
Page 4
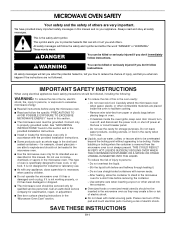
...; Install or locate the microwave oven only in this section. ■ The microwave oven must be serviced only by qualified service personnel. are placed inside the oven ignite, keep oven door closed glass jars - To reduce the risk of fire in this manual and on your appliance. Do not use the cavity for example, closed , turn oven off, and disconnect the power cord, or shut off the pad and touch electrical parts...
...; Install or locate the microwave oven only in this section. ■ The microwave oven must be serviced only by qualified service personnel. are placed inside the oven ignite, keep oven door closed glass jars - To reduce the risk of fire in this manual and on your appliance. Do not use the cavity for example, closed , turn oven off, and disconnect the power cord, or shut off the pad and touch electrical parts...
User Manual
Page 5
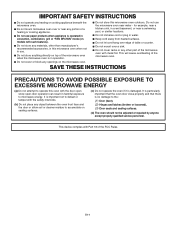
... oven door close properly and that there is important not to operate this microwave oven outdoors. IMPORTANT SAFETY INSTRUCTIONS ■ Do not operate any heating or cooking appliance beneath the microwave oven. ■ Do not mount microwave oven over a sink. ■ Do not cover racks or any other than manufacturer's recommended accessories, in this microwave oven when not in use. ■ Do not store anything directly on top of the microwave oven...
... oven door close properly and that there is important not to operate this microwave oven outdoors. IMPORTANT SAFETY INSTRUCTIONS ■ Do not operate any heating or cooking appliance beneath the microwave oven. ■ Do not mount microwave oven over a sink. ■ Do not cover racks or any other than manufacturer's recommended accessories, in this microwave oven when not in use. ■ Do not store anything directly on top of the microwave oven...
User Manual
Page 6
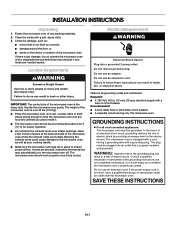
... of electric shock by providing an escape wire for proper operation. ■ Do not block the exhaust vents or air intake openings. The plug must be plugged into a grounded 3 prong outlet. If the power supply cord is properly installed and grounded. SAVE THESE INSTRUCTIONS EN-5 Location Requirements WARNING Excessive Weight Hazard Use two or more people to whether the microwave oven is any needed repairs. Blocking the exhaust vents...
... of electric shock by providing an escape wire for proper operation. ■ Do not block the exhaust vents or air intake openings. The plug must be plugged into a grounded 3 prong outlet. If the power supply cord is properly installed and grounded. SAVE THESE INSTRUCTIONS EN-5 Location Requirements WARNING Excessive Weight Hazard Use two or more people to whether the microwave oven is any needed repairs. Blocking the exhaust vents...
User Manual
Page 7
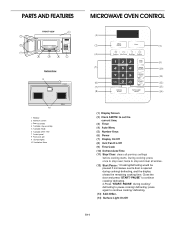
... 3 Door assembly 4 Turntable ring assembly 5 Turntable Shaft 6 Turntable glass tray 7 Control panel 8 Front vent grill 9 Surface lights 10 Ventilation filters MICROWAVE OVEN CONTROL (1) (2) (4) (5) (6) (7) (8) EXPRESS COOK 1-6 Display On/Off (3) (9) (10) (11) (12) (13) (14) (1) Display Screen (2) Clock AM/PM: to set the current time; (3) Timer (4) Auto Menu (5) Number Keys (6) Power (7) Display On/Off (8) Vent Fan H/L/Off (9) Time Cook (10) Defrost Auto/Time (11) Stop/Clear: clears all entries. (12) Start/Pause: 1.Cooking/defrosting would be paused if microwave oven's door is opened...
... 3 Door assembly 4 Turntable ring assembly 5 Turntable Shaft 6 Turntable glass tray 7 Control panel 8 Front vent grill 9 Surface lights 10 Ventilation filters MICROWAVE OVEN CONTROL (1) (2) (4) (5) (6) (7) (8) EXPRESS COOK 1-6 Display On/Off (3) (9) (10) (11) (12) (13) (14) (1) Display Screen (2) Clock AM/PM: to set the current time; (3) Timer (4) Auto Menu (5) Number Keys (6) Power (7) Display On/Off (8) Vent Fan H/L/Off (9) Time Cook (10) Defrost Auto/Time (11) Stop/Clear: clears all entries. (12) Start/Pause: 1.Cooking/defrosting would be paused if microwave oven's door is opened...
User Manual
Page 8
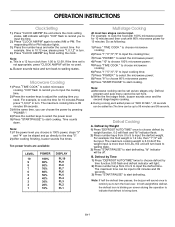
... flash; 2) Press number keys from 1:00 to start cooking. "0:00" flash to remind you need. For example: to input the derfost weight. Defrost by Weight 1) Press "DEFROST AUTO/TIME" once to choose defrost by pressing "POWER ". 4) Press the number keys to select the power level. 5) Press "START/PAUSE" to input the derfost time. Press "CLOCK AM/PM" key finish setting the clock. Press "CLOCK AM/PM",the unit enters the clock setting states. OPERATION INSTRUCTIONS Clock Setting 1).
... flash; 2) Press number keys from 1:00 to start cooking. "0:00" flash to remind you need. For example: to input the derfost weight. Defrost by Weight 1) Press "DEFROST AUTO/TIME" once to choose defrost by pressing "POWER ". 4) Press the number keys to select the power level. 5) Press "START/PAUSE" to input the derfost time. Press "CLOCK AM/PM" key finish setting the clock. Press "CLOCK AM/PM",the unit enters the clock setting states. OPERATION INSTRUCTIONS Clock Setting 1).
User Manual
Page 9
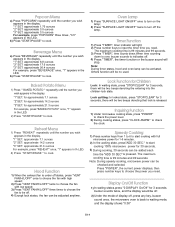
... sounds twice, and the display would be two beeps denoting the entering into the children-lock state. b) Press "START/PAUSE" to check the clock. Others function will be off. 2) Under the mode of display off the lamp. The maximum cooking time is released. Note: During timer states, hood and oven lamp can be activated. Inquiring Function 1) Under microwave cooking state, press "POWER" to check the power level. 2) During cooking states, press "CLOCK...
... sounds twice, and the display would be two beeps denoting the entering into the children-lock state. b) Press "START/PAUSE" to check the clock. Others function will be off. 2) Under the mode of display off the lamp. The maximum cooking time is released. Note: During timer states, hood and oven lamp can be activated. Inquiring Function 1) Under microwave cooking state, press "POWER" to check the power level. 2) During cooking states, press "CLOCK...
User Manual
Page 10
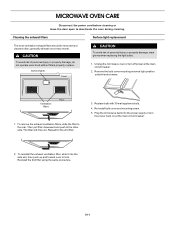
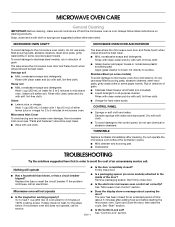
... circuit breaker. 2. generally at light position under the microwave. Reinstall the 2nd filter using the same procedure. Then pull filter downward and push to the rear. Plug the microwave back into the side slot, then push up and toward oven to deactivate the oven during cleaning. EN-9 Cleaning the exhaust filters Surface light replacement The oven ventilation exhaust filters should be removed and cleaned often; MICROWAVE OVEN CARE Disconnect the power cord before cleaning or leave the door open to lock...
... circuit breaker. 2. generally at light position under the microwave. Reinstall the 2nd filter using the same procedure. Then pull filter downward and push to the rear. Plug the microwave back into the side slot, then push up and toward oven to deactivate the oven during cleaning. EN-9 Cleaning the exhaust filters Surface light replacement The oven ventilation exhaust filters should be removed and cleaned often; MICROWAVE OVEN CARE Disconnect the power cord before cleaning or leave the door open to lock...
User Manual
Page 11
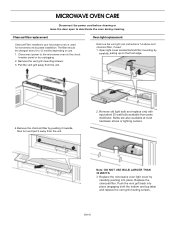
... oven during cleaning. Replace the microwave oven light cover by unplugging. 2. MICROWAVE OVEN CARE Disconnect the power cord before cleaning or leave the door open to the microwave oven at most hardware stores or lighting centers. Bulbs are also available at the circuit breaker panel or by carefully pushing into place (engaging both the bottom and top tabs) and replace the vent grill mouting screws. EN-10 Note: DO NOT USE BULB LARGER THAN 30 WATTS. 3. Charcoal filter replacement Charcoal Filter installed in your microwave oven, is used...
... oven during cleaning. Replace the microwave oven light cover by unplugging. 2. MICROWAVE OVEN CARE Disconnect the power cord before cleaning or leave the door open to the microwave oven at most hardware stores or lighting centers. Bulbs are also available at the circuit breaker panel or by carefully pushing into place (engaging both the bottom and top tabs) and replace the vent grill mouting screws. EN-10 Note: DO NOT USE BULB LARGER THAN 30 WATTS. 3. Charcoal filter replacement Charcoal Filter installed in your microwave oven, is used...
User Manual
Page 12
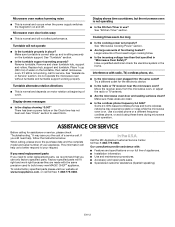
... 100% cooking power. The area where the microwave oven door and frame touch when closed ? TURNTABLE Replace turntable immediately after adding food and before starting the microwave oven. Remove packaging spacer, then firmly close door. ■ Is the electronic microwave oven control set ? The door has been closed should be kept clean. Rinse with clean water and dry with soft, lint-free cloth. See "Start" section. Replace the fuse or reset the circuit breaker. If the problem continues, call...
... 100% cooking power. The area where the microwave oven door and frame touch when closed ? TURNTABLE Replace turntable immediately after adding food and before starting the microwave oven. Remove packaging spacer, then firmly close door. ■ Is the electronic microwave oven control set ? The door has been closed should be kept clean. Rinse with clean water and dry with soft, lint-free cloth. See "Start" section. Replace the fuse or reset the circuit breaker. If the problem continues, call...
User Manual
Page 13
... during microwave oven operation. Call the MC Appliance Customer Service Center toll free: 1-888-775-0202. Remove and clean turntable hub, support and rollers. ASSISTANCE OR SERVICE Before calling for the electronic device. ■ Is the radio or TV receiver near the microwave oven? If you need replacement parts If you need to reset Clock. In the U.S.A. Do not operate the microwave oven without turntable and turntable support working , call toll free: 1-888-775-0202. See "Kitchen Timer...
... during microwave oven operation. Call the MC Appliance Customer Service Center toll free: 1-888-775-0202. Remove and clean turntable hub, support and rollers. ASSISTANCE OR SERVICE Before calling for the electronic device. ■ Is the radio or TV receiver near the microwave oven? If you need replacement parts If you need to reset Clock. In the U.S.A. Do not operate the microwave oven without turntable and turntable support working , call toll free: 1-888-775-0202. See "Kitchen Timer...
User Manual
Page 14
... to failure of the unit. • Inside components such as turntable, roller guide, light bulbs, etc. • Repairs performed by unauthorized service agents. • Service calls that do not involve defects in material and workmanship such as instructions on this warranty, the consumer is not installed in accordance with published installation instructions. • Refunds for non repairable products are hereby limited to one year...
... to failure of the unit. • Inside components such as turntable, roller guide, light bulbs, etc. • Repairs performed by unauthorized service agents. • Service calls that do not involve defects in material and workmanship such as instructions on this warranty, the consumer is not installed in accordance with published installation instructions. • Refunds for non repairable products are hereby limited to one year...

User Manual
Page 15
www.mcappliance.com Printed in China N d/b/a MC Appliance Corporation. Magic Chef®logo is a registered trademark of CNA International, Inc. CNA International, Inc. All rights reserved.
www.mcappliance.com Printed in China N d/b/a MC Appliance Corporation. Magic Chef®logo is a registered trademark of CNA International, Inc. CNA International, Inc. All rights reserved.


