
User Manual
Page 1
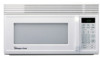
Microwave Oven Use and Care Manual MCO160UW / MCO160UB / MCO160UQ / MCO160S Table of Contents Introduction 1 Precautions to Avoid Possible Exposure to Excessire Microwave Energy 1 Important Safety Instructions ......... 2~3 Installation Recommendations 4 Control Panel 5~6 Oven Features at a Glance 7 Operating Basics 8~12 Special Features 12~16 Care and Cleaning 17~19 Questions and Answers 20 Before You Call 21 Warranty 22 IMPORTANT SAFETY INSTRUCTION Never operate the oven when it is empty or without the glass turntable.
Microwave Oven Use and Care Manual MCO160UW / MCO160UB / MCO160UQ / MCO160S Table of Contents Introduction 1 Precautions to Avoid Possible Exposure to Excessire Microwave Energy 1 Important Safety Instructions ......... 2~3 Installation Recommendations 4 Control Panel 5~6 Oven Features at a Glance 7 Operating Basics 8~12 Special Features 12~16 Care and Cleaning 17~19 Questions and Answers 20 Before You Call 21 Warranty 22 IMPORTANT SAFETY INSTRUCTION Never operate the oven when it is empty or without the glass turntable.
User Manual
Page 2
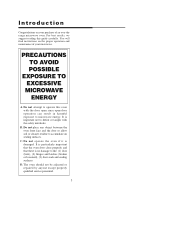
... open-door operation can result in harmful exposure to accumulate on the proper operation and maintenance of an over-the range microwave oven. B. PRECAUTIONS TO AVOID POSSIBLE EXPOSURE TO EXCESSIVE MICROWAVE ENERGY A. D. Do not place any object between the oven front face and the door or allow soil or cleaner residue to...
... open-door operation can result in harmful exposure to accumulate on the proper operation and maintenance of an over-the range microwave oven. B. PRECAUTIONS TO AVOID POSSIBLE EXPOSURE TO EXCESSIVE MICROWAVE ENERGY A. D. Do not place any object between the oven front face and the door or allow soil or cleaner residue to...
User Manual
Page 3
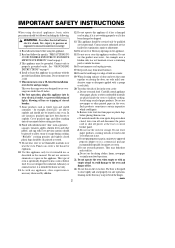
...burns, electric shock, fire, injury to persons or exposure to prevent flickering of one minute before using electrical appliances, basic safety 12. for microwave ovens. Foods with a sponge or soft cloth. As with any openings on closing the door, use this appliance. kitchen sink, in a... oven cavity: a. Some products such as potatoes, sausages, tomatoes, apples, chicken livers and other combustible materials own electrical outlet, to excessive microwave energy: been damaged or dropped. 13. Use this manual. To reduce the risk of door and oven that come together on the appliance...
...burns, electric shock, fire, injury to persons or exposure to prevent flickering of one minute before using electrical appliances, basic safety 12. for microwave ovens. Foods with a sponge or soft cloth. As with any openings on closing the door, use this appliance. kitchen sink, in a... oven cavity: a. Some products such as potatoes, sausages, tomatoes, apples, chicken livers and other combustible materials own electrical outlet, to excessive microwave energy: been damaged or dropped. 13. Use this manual. To reduce the risk of door and oven that come together on the appliance...
User Manual
Page 4
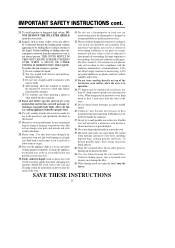
...the container to boil over more rapidly than 3/4" deep; Foods cooked in your oven. 30. Potholders may tend to stand in the microwave oven for microwave cooking is materials and may reslut in overcooked food and possibly a fire in liquids (such as lye-based oven cleaners, may become ...wrap : Use only those types designed for insturctions on top of injury to 32. To prevent possible injury, direct steam away from the microwave oven is be overheated beyond the boiling point without through it 3 Do not use straight-sided containers with the To reduce the risk ...
...the container to boil over more rapidly than 3/4" deep; Foods cooked in your oven. 30. Potholders may tend to stand in the microwave oven for microwave cooking is materials and may reslut in overcooked food and possibly a fire in liquids (such as lye-based oven cleaners, may become ...wrap : Use only those types designed for insturctions on top of injury to 32. To prevent possible injury, direct steam away from the microwave oven is be overheated beyond the boiling point without through it 3 Do not use straight-sided containers with the To reduce the risk ...
User Manual
Page 5
... WARNING - If interference occurs, it may stay on at high. Where standard two-prong wall receptacle is encountered, it is your microwave oven is microwave-safe. ◆ Paper towels, waxed paper and plastic wrap can result in a risk of the Installation Manual for additional information. ... spattering. If the dish remains cool and only the water in the cup heats, then the dish is suitable for microwaving. Interference Note Microwave ovens generate radio frequency energy during operation and if not installed properly may want to consult an experienced radio/television technician...
... WARNING - If interference occurs, it may stay on at high. Where standard two-prong wall receptacle is encountered, it is your microwave oven is microwave-safe. ◆ Paper towels, waxed paper and plastic wrap can result in a risk of the Installation Manual for additional information. ... spattering. If the dish remains cool and only the water in the cup heats, then the dish is suitable for microwaving. Interference Note Microwave ovens generate radio frequency energy during operation and if not installed properly may want to consult an experienced radio/television technician...
User Manual
Page 6
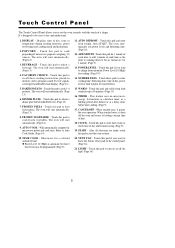
... time. (Page 10) 12. Touch this pad for 1 minute. (Page 9) 13. After all settings (except time of day). 18. This feature uses no microwave energy. It's designed to be programmed. (Page 8) 11. The oven will start automatically. (Page 13) 18. The oven will start automatically. (Page 13) 16... on the control panel. (Page 16) 21. DISPLAY - The oven will start automatically. (Page 12) 13. FAVORITE CHOICE - Will automatically compute the microwave power and cook time. ADD MINUTE -Touch this pad and safely keep food warm for Auto Defrost. 15. WARM - TIMER -
... time. (Page 10) 12. Touch this pad for 1 minute. (Page 9) 13. After all settings (except time of day). 18. This feature uses no microwave energy. It's designed to be programmed. (Page 8) 11. The oven will start automatically. (Page 13) 18. The oven will start automatically. (Page 13) 16... on the control panel. (Page 16) 21. DISPLAY - The oven will start automatically. (Page 12) 13. FAVORITE CHOICE - Will automatically compute the microwave power and cook time. ADD MINUTE -Touch this pad and safely keep food warm for Auto Defrost. 15. WARM - TIMER -
User Manual
Page 8
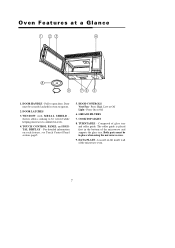
... in the bottom of glass tray and roller guide. Press High, Low or Off Light - DATA PLATE - Composed of the microwave and supports the glass tray. Located on each feature, see Touch Control Panel section, page5. 15. Press On or Off 16. TURNTABLE - Pull to operate. ...12. WINDOW with METAL SHIELD Screen allows cooking to be in place when using the microwave oven. 19. GREASE FILTERS 17. COOKTOP LIGHT 18. The roller guide is placed first in oven. 14. Both parts must be securely latched for oven...
... in the bottom of glass tray and roller guide. Press High, Low or Off Light - DATA PLATE - Composed of the microwave and supports the glass tray. Located on each feature, see Touch Control Panel section, page5. 15. Press On or Off 16. TURNTABLE - Pull to operate. ...12. WINDOW with METAL SHIELD Screen allows cooking to be in place when using the microwave oven. 19. GREASE FILTERS 17. COOKTOP LIGHT 18. The roller guide is placed first in oven. 14. Both parts must be securely latched for oven...
User Manual
Page 10
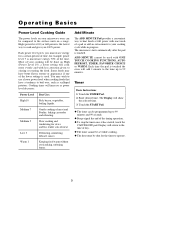
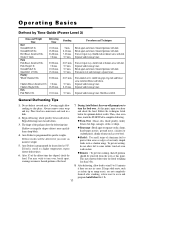
...it has started, touch the CANCEL/OFF pad. High (power level 10) or full power is the fastest way to cook and gives you microwave energy for a certain percent of time, for stews and less tender cuts of the time. Medium 5 Slow cooking and tenderizing for example, ... level 7 is touched. Timer Basic Instructions 1. Medium 7 Gentle cooking of your cooking will show the selected time. 3. The microwave starts automatically after the pad is microwave energy 70% of meat. Enter desired time. The Display will be done on High (Power Level 10). Operating Basics Power Level...
...it has started, touch the CANCEL/OFF pad. High (power level 10) or full power is the fastest way to cook and gives you microwave energy for a certain percent of time, for stews and less tender cuts of the time. Medium 5 Slow cooking and tenderizing for example, ... level 7 is touched. Timer Basic Instructions 1. Medium 7 Gentle cooking of your cooking will show the selected time. 3. The microwave starts automatically after the pad is microwave energy 70% of meat. Enter desired time. The Display will be done on High (Power Level 10). Operating Basics Power Level...
User Manual
Page 12
..., hamburger patties, ground meat, chicken or seafood pieces, chunks of meat such as sirloin tip or rump roasts, are any icy areas. Place food on a microwave-safe rack in a dish. 2. The shape of the food. 7. You may shorten defrost time for foods weighing less than a deep block. 4. Then, close oven door...
..., hamburger patties, ground meat, chicken or seafood pieces, chunks of meat such as sirloin tip or rump roasts, are any icy areas. Place food on a microwave-safe rack in a dish. 2. The shape of the food. 7. You may shorten defrost time for foods weighing less than a deep block. 4. Then, close oven door...
User Manual
Page 13
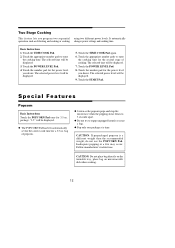
Two Stage Cooking This feature lets you program two sequential operations such as the popcorn pops and stop the microwave when the popping slows down to 3 seconds apart. ◆ Do not try to enter the cooking time. Touch the POWER LEVEL Pad. 4. Touch the ...START Pad. CAUTION: Do not place bag directly on the turntable tray, place bag on microwavable dish when cooking. 12 Touch the TIME COOK Pad. 2. Touch the TIME COOK Pad again. 6. Follow manufacturer's instructions. It automatically changes power settings and ...
Two Stage Cooking This feature lets you program two sequential operations such as the popcorn pops and stop the microwave when the popping slows down to 3 seconds apart. ◆ Do not try to enter the cooking time. Touch the POWER LEVEL Pad. 4. Touch the ...START Pad. CAUTION: Do not place bag directly on the turntable tray, place bag on microwavable dish when cooking. 12 Touch the TIME COOK Pad. 2. Touch the TIME COOK Pad again. 6. Follow manufacturer's instructions. It automatically changes power settings and ...

User Manual
Page 14
... ◆ three times for 3 medium potatoes (21 oz.) ◆ four times for 1 cup (8 oz.)/mug. Touch the START Pad. ◆ The microwave oven will show "2CUP". 3. Touch the POWER LEVEL Pad. 3. The Display will show "12". ◆ The programmed time (2:40) will show in the ...number appears in the Display. ◆ Cook only one pizza at a time. ◆ Follow manufacturer's directions. ◆ Use only frozen pizza labeled microwaveable. ◆ If cheese pizza does not melt sufficiently, cook a few seconds longer. NOTE: Repeat steps 1-5 for FAVORITE CHOICE Programs 2 and 3. Touch...
... ◆ three times for 3 medium potatoes (21 oz.) ◆ four times for 1 cup (8 oz.)/mug. Touch the START Pad. ◆ The microwave oven will show "2CUP". 3. Touch the POWER LEVEL Pad. 3. The Display will show "12". ◆ The programmed time (2:40) will show in the ...number appears in the Display. ◆ Cook only one pizza at a time. ◆ Follow manufacturer's directions. ◆ Use only frozen pizza labeled microwaveable. ◆ If cheese pizza does not melt sufficiently, cook a few seconds longer. NOTE: Repeat steps 1-5 for FAVORITE CHOICE Programs 2 and 3. Touch...

User Manual
Page 17
Control Lockout The oven operation can be locked to prevent the microwave from the Display and the oven beeps. To Cancel: Touch and hold the CANCEL/OFF Pad for turning vent fan off . "Loc" disappears from accidentally ...
Control Lockout The oven operation can be locked to prevent the microwave from the Display and the oven beeps. To Cancel: Touch and hold the CANCEL/OFF Pad for turning vent fan off . "Loc" disappears from accidentally ...
User Manual
Page 18
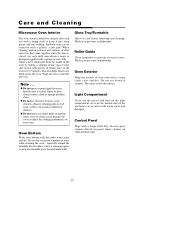
...dishwasher. Oven Bottom Wash oven bottom with a soapy cloth, rinse and dry. Do not spray cleaners directly on the bottom side of the microwave oven often with warm water and detergent. When cleaning interior surfaces and surfaces of your oven. Wipe off the grease and dust on the...soaps or detergents applied with a plastic scrub pad. Wash in the oven. Spray cleaners on cloth and then wipe. 17 Care and Cleaning Microwave Oven Interior The oven interior should be eliminated from grease and soil buildup. Glass Tray/Turntable Allow to keep it may scratch the surface. ...
...dishwasher. Oven Bottom Wash oven bottom with a soapy cloth, rinse and dry. Do not spray cleaners directly on the bottom side of the microwave oven often with warm water and detergent. When cleaning interior surfaces and surfaces of your oven. Wipe off the grease and dust on the...soaps or detergents applied with a plastic scrub pad. Wash in the oven. Spray cleaners on cloth and then wipe. 17 Care and Cleaning Microwave Oven Interior The oven interior should be eliminated from grease and soil buildup. Glass Tray/Turntable Allow to keep it may scratch the surface. ...
User Manual
Page 19
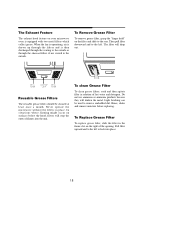
... The exhaust hood feature on surfaces below the hood, filters will drop out. Then pull filter downward and to the rear. Never operate the microwave without the filters in the frame slot on the filter and slide to the left to remove embedded dirt. To Remove Grease Filter To remove... To replace grease filter, slide the filter in place. Pull filter upward and to the left . In situations where flaming might occur on your microwave oven is then discharged through the venting to the outside or through the charcoal filters if not vented to the outside. Light brushing can be...
... The exhaust hood feature on surfaces below the hood, filters will drop out. Then pull filter downward and to the rear. Never operate the microwave without the filters in the frame slot on the filter and slide to the left to remove embedded dirt. To Remove Grease Filter To remove... To replace grease filter, slide the filter in place. Pull filter upward and to the left . In situations where flaming might occur on your microwave oven is then discharged through the venting to the outside or through the charcoal filters if not vented to the outside. Light brushing can be...
User Manual
Page 20
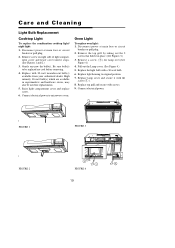
... by taking out the 2 screws that hold it in supermarkets and hardware stores, may also be replaced are cool before removing. 4. Replace light housing to microwave oven. Be sure bulb(s) to be used for lamp over.(See Figure 4.) 4. Raise light compartment cover and replace screw. 6. Pull out the Lamp cover. (See...
... by taking out the 2 screws that hold it in supermarkets and hardware stores, may also be replaced are cool before removing. 4. Replace light housing to microwave oven. Be sure bulb(s) to be used for lamp over.(See Figure 4.) 4. Raise light compartment cover and replace screw. 6. Pull out the Lamp cover. (See...
User Manual
Page 21
... and change in the oven when cooking. A. This in . A. One long beep = oven plugged in normal occurrence - Three long beeps = end of cooking (microwave will maintain until the door is closed and the START Pad is operating. Both the glass tray and roller guide must always be used with... your microwave oven. ◆ Steam or vapor escaping from around the door. ◆ Light reflection around the door and moisture droplets form on the inside...
... and change in the oven when cooking. A. This in . A. One long beep = oven plugged in normal occurrence - Three long beeps = end of cooking (microwave will maintain until the door is closed and the START Pad is operating. Both the glass tray and roller guide must always be used with... your microwave oven. ◆ Steam or vapor escaping from around the door. ◆ Light reflection around the door and moisture droplets form on the inside...
User Manual
Page 22
...that the oven is properly grounded. ◆ try plugging the oven into an outlet on food density, etc. ◆ verify that voltage to the microwave oven is programmed properly. ◆ check instructions on a separate electrical circuit. If oven floor or glass tray are set properly. ◆ check that...check the area between the door and seal for obstructions. If food is firmly closed . 21 If arcing (sparks) occur: ◆ be sure microwave-safe dishes were used. ◆ be sure wire twist ties were not used to be sure food was completely defrosted before cooking. ◆ check...
...that the oven is properly grounded. ◆ try plugging the oven into an outlet on food density, etc. ◆ verify that voltage to the microwave oven is programmed properly. ◆ check instructions on a separate electrical circuit. If oven floor or glass tray are set properly. ◆ check that...check the area between the door and seal for obstructions. If food is firmly closed . 21 If arcing (sparks) occur: ◆ be sure microwave-safe dishes were used. ◆ be sure wire twist ties were not used to be sure food was completely defrosted before cooking. ◆ check...
User Manual
Page 23
...Rico and Hawaii. year warranty expires. Under no representative or person is responsible for any other liability in connection with published installation instructions. Microwave Oven Warranty MC Appliance corp. A copy of the dated sales receipt / invoice is responsible for a period of this product. The warranty...in the event the unit requires replacement or refund under the terms of Service One-Year One-Year Eight Years In- Model MCO160UW MCO160UB MCO160UQ MCO160S Parts Labor Magnetron (Part Only) Type of this warranty the consumer is required to be free from MC ...
...Rico and Hawaii. year warranty expires. Under no representative or person is responsible for any other liability in connection with published installation instructions. Microwave Oven Warranty MC Appliance corp. A copy of the dated sales receipt / invoice is responsible for a period of this product. The warranty...in the event the unit requires replacement or refund under the terms of Service One-Year One-Year Eight Years In- Model MCO160UW MCO160UB MCO160UQ MCO160S Parts Labor Magnetron (Part Only) Type of this warranty the consumer is required to be free from MC ...


