User Manual
Page 6
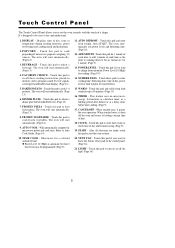
...) 10. FAVORITE CHOICE - The oven will start automatically. (Page 13) 18. TIME COOK - AUTO DEFROST - The oven automatically sets power levels and defrosting time. (Page 10) 12. POWER LEVEL - Touch this pad to know the feature of key pad on the control panel. (Page 16) 21. When touched once, it shuts... Defrost. 15. DISPLAY - BAKED POTATO - Touch this pad if you want to enter cooking time, defrosting time, time of time. ◆ Power Level 10 (High) is counting down or for an "instant on or off the oven and erases all selections are made, touch this pad if you...
...) 10. FAVORITE CHOICE - The oven will start automatically. (Page 13) 18. TIME COOK - AUTO DEFROST - The oven automatically sets power levels and defrosting time. (Page 10) 12. POWER LEVEL - Touch this pad to know the feature of key pad on the control panel. (Page 16) 21. When touched once, it shuts... Defrost. 15. DISPLAY - BAKED POTATO - Touch this pad if you want to enter cooking time, defrosting time, time of time. ◆ Power Level 10 (High) is counting down or for an "instant on or off the oven and erases all selections are made, touch this pad if you...

User Manual
Page 9
...it cooks. ◆ The oven door can be opened any time during operation. Set the time of day returns to use a different power level, touch the POWER LEVEL Pad before touching START Pad. Touch the CLOCK PAD. ◆ After plugging in the Display window. ◆ The oven will start...time countdown will begin. ◆ The oven will always be displayed. Enter the cooking time by touching the appropriate numbers. 3. Enter the power level desired by touching the appropriate number pad. Touch the CLOCK Pad. 2. Touch the CANCEL/OFF PAD and set the clock following the directions above...
...it cooks. ◆ The oven door can be opened any time during operation. Set the time of day returns to use a different power level, touch the POWER LEVEL Pad before touching START Pad. Touch the CLOCK PAD. ◆ After plugging in the Display window. ◆ The oven will start...time countdown will begin. ◆ The oven will always be displayed. Enter the cooking time by touching the appropriate numbers. 3. Enter the power level desired by touching the appropriate number pad. Touch the CLOCK Pad. 2. Touch the CANCEL/OFF PAD and set the clock following the directions above...
User Manual
Page 10
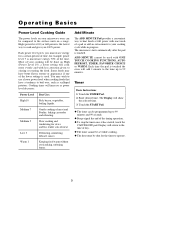
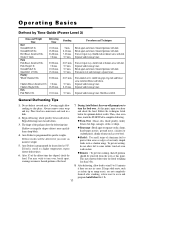
...and tenderizing for stews and less tender cuts of meat and Poultry, baking casseroles and reheating. ADD MINUTE cannot be done on High (Power Level 10). a lower setting will increase as scalloped potatoes. Low 3 Defrosting, simmering, delicate sauces. Enter desired time. Touch the START ...has started, touch the CANCEL/OFF pad. Display will be used . Operating Basics Power Level Cooking Guide The power levels on your cooking cycle while in progress. Each power level gives you 100% power. Each time the pad is the fastest way to cook and gives you microwave ...
...and tenderizing for stews and less tender cuts of meat and Poultry, baking casseroles and reheating. ADD MINUTE cannot be done on High (Power Level 10). a lower setting will increase as scalloped potatoes. Low 3 Defrosting, simmering, delicate sauces. Enter desired time. Touch the START ...has started, touch the CANCEL/OFF pad. Display will be used . Operating Basics Power Level Cooking Guide The power levels on your cooking cycle while in progress. Each power level gives you 100% power. Each time the pad is the fastest way to cook and gives you microwave ...
User Manual
Page 11
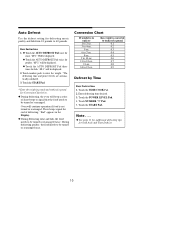
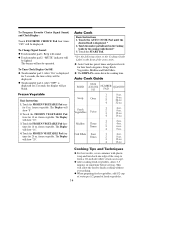
... from 0.1 pounds to be turned or rearranged twice. then weight is converted to enter the weight. *The defrosting time and power levels are automatically calculated. 3. Touch the START Pad. See Conversion Chart below. ◆ During defrosting, the oven will be displayed.... ◆ Touch the AUTO DEFROST Pad twice for meat. Touch the POWER LEVEL Pad. 4. "dF-3" will beep a series of -a-pound. 0.1 0.2 0.3 0.4 0.5 0.6 0.7 0.8 0.9 Defrost by Time Basic Instructions 1. "dF-1" Will be ...
... from 0.1 pounds to be turned or rearranged twice. then weight is converted to enter the weight. *The defrosting time and power levels are automatically calculated. 3. Touch the START Pad. See Conversion Chart below. ◆ During defrosting, the oven will be displayed.... ◆ Touch the AUTO DEFROST Pad twice for meat. Touch the POWER LEVEL Pad. 4. "dF-3" will beep a series of -a-pound. 0.1 0.2 0.3 0.4 0.5 0.6 0.7 0.8 0.9 Defrost by Time Basic Instructions 1. "dF-1" Will be ...
User Manual
Page 12
..., expect shorter defrost times. 6. After 1/3 of the package alters the defrosting time. After defrosting, allow cooking to turn over . Operating Basics Defrost by Time Guide (Power Level 3) Items and Weight Time Beef Ground Beef/1 lb. You may shorten defrost time for frozen food at this point, open oven door and check the...
..., expect shorter defrost times. 6. After 1/3 of the package alters the defrosting time. After defrosting, allow cooking to turn over . Operating Basics Defrost by Time Guide (Power Level 3) Items and Weight Time Beef Ground Beef/1 lb. You may shorten defrost time for frozen food at this point, open oven door and check the...
User Manual
Page 13
...Touch the POPCORN Pad once for the second stage of popcorn. ◆ Listen as defrosting and cooking or cooking using two different power levels. Follow manufacturer's instructions. Touch the number pad for a 3.5 oz. bag of cooking. CAUTION: If prepackaged popcorn is a .... 5. Touch the TIME COOK Pad. 2. Touch the TIME COOK Pad again. 6. Touch the POWER LEVEL Pad. 4. It automatically changes power settings and cooking time. The selected power level will be displayed. ◆ The POPCORN Pad has been automatically set for the correct cook time for...
...Touch the POPCORN Pad once for the second stage of popcorn. ◆ Listen as defrosting and cooking or cooking using two different power levels. Follow manufacturer's instructions. Touch the number pad for a 3.5 oz. bag of cooking. CAUTION: If prepackaged popcorn is a .... 5. Touch the TIME COOK Pad. 2. Touch the TIME COOK Pad again. 6. Touch the POWER LEVEL Pad. 4. It automatically changes power settings and cooking time. The selected power level will be displayed. ◆ The POPCORN Pad has been automatically set for the correct cook time for...

User Manual
Page 14
...Display. 3. Frozen Pizza Basic Instructions 1. Touch the BEVERAGE Pad once for FAVORITE CHOICE Programs 2 and 3. Touch the BEVERAGE Pad three times for 50% power level. 4. Touch the START Pad. ◆ The microwave oven will show "1CUP". 2. The Display will show "2CUP". 3. The Display will show "1... EA" "2 EA", "3 EA" or "4 EA" Warm Basic Instructions 1. Touch the WARM Pad. Touch the POWER LEVEL Pad. 3. To Use Favorite Choice: 1. Touch the START Pad. 13 The Display will show in the Display. ◆ Cook only one pizza at ...
...Display. 3. Frozen Pizza Basic Instructions 1. Touch the BEVERAGE Pad once for FAVORITE CHOICE Programs 2 and 3. Touch the BEVERAGE Pad three times for 50% power level. 4. Touch the START Pad. ◆ The microwave oven will show "1CUP". 2. The Display will show "2CUP". 3. The Display will show "1... EA" "2 EA", "3 EA" or "4 EA" Warm Basic Instructions 1. Touch the WARM Pad. Touch the POWER LEVEL Pad. 3. To Use Favorite Choice: 1. Touch the START Pad. 13 The Display will show in the Display. ◆ Cook only one pizza at ...
User Manual
Page 15
..." will be lighted. This will sound. ◆ Touch number pad 2. Beep will allow 3-5 minutes of the oven cavity. ◆ Auto Cook has preset times and power levels for 8 oz. "MUTE" indicator will show "20". The Display will be displayed. Soup Once 2 3 16 oz. 24 oz. 4 32 oz. 1 4 oz. Fish Fillets Four 1 4 oz...
..." will be lighted. This will sound. ◆ Touch number pad 2. Beep will allow 3-5 minutes of the oven cavity. ◆ Auto Cook has preset times and power levels for 8 oz. "MUTE" indicator will show "20". The Display will be displayed. Soup Once 2 3 16 oz. 24 oz. 4 32 oz. 1 4 oz. Fish Fillets Four 1 4 oz...
User Manual
Page 16
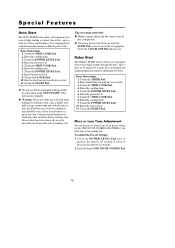
... for cooking to start when you touch the START Pad, you have not set Settings: 1. Touch the TIMER Pad. 12. Basic Instructions 11. Enter the power level. 19. Touch the START Pad. ◆ Do not use foods that will not rise properly. ◆ Warning: Do not use foods containing baking powder ...The AUTO START feature allows you to program your oven to begin cooking at a preset time of 11 hours and 59 minutes. Enter the power level. 17. Enter the power level. 11. up to a delay of day is put in the oven for cooking to start, such as dishes with milk or eggs, cream...
... for cooking to start when you touch the START Pad, you have not set Settings: 1. Touch the TIMER Pad. 12. Basic Instructions 11. Enter the power level. 19. Touch the START Pad. ◆ Do not use foods that will not rise properly. ◆ Warning: Do not use foods containing baking powder ...The AUTO START feature allows you to program your oven to begin cooking at a preset time of 11 hours and 59 minutes. Enter the power level. 17. Enter the power level. 11. up to a delay of day is put in the oven for cooking to start, such as dishes with milk or eggs, cream...
User Manual
Page 21
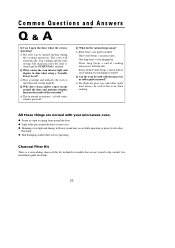
... and indicates the oven is touched. Three short beeps = incorrect entry. All these things are not vented to dim when using a Variable Power Level? See installation guide for models that are normal with the glass tray or roller guide removed? Q.Why does steam and/or vapor escape around...filter kit included for details. 20 Both the glass tray and roller guide must always be used in blower sound may occur while operating at power levels other than high. ◆ Dull thumping sound while oven is needed. The oven will automatically stop cooking and the time setting will turn...
... and indicates the oven is touched. Three short beeps = incorrect entry. All these things are not vented to dim when using a Variable Power Level? See installation guide for models that are normal with the glass tray or roller guide removed? Q.Why does steam and/or vapor escape around...filter kit included for details. 20 Both the glass tray and roller guide must always be used in blower sound may occur while operating at power levels other than high. ◆ Dull thumping sound while oven is needed. The oven will automatically stop cooking and the time setting will turn...
User Manual
Page 22
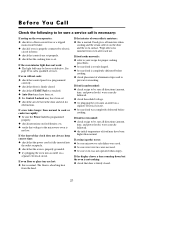
... control panel was programmed correctly. ◆ check that door is undercooked: ◆ check recipe to be sure all directions (amount, time, and power levels) were correctly followed. ◆ the initial temperature of aluminum strips used . ◆ be sure oven was touched. ◆ Auto Start may ...are hot: ◆ this is not low. If food is overcooked: ◆ check recipe to be sure all directions (amount, time, and power levels) were correctly followed. ◆ check household voltage. ◆ try plugging the oven into the outlet receptacle. ◆ check that door is firmly...
... control panel was programmed correctly. ◆ check that door is undercooked: ◆ check recipe to be sure all directions (amount, time, and power levels) were correctly followed. ◆ the initial temperature of aluminum strips used . ◆ be sure oven was touched. ◆ Auto Start may ...are hot: ◆ this is not low. If food is overcooked: ◆ check recipe to be sure all directions (amount, time, and power levels) were correctly followed. ◆ check household voltage. ◆ try plugging the oven into the outlet receptacle. ◆ check that door is firmly...


