
User Manual
Page 1
Microwave Oven Use and Care Manual MCO160UW / MCO160UB / MCO160UQ / MCO160S Table of Contents Introduction 1 Precautions to Avoid Possible Exposure to Excessire Microwave Energy 1 Important Safety Instructions ......... 2~3 Installation Recommendations 4 Control Panel 5~6 Oven Features at a Glance 7 Operating Basics 8~12 Special Features 12~16 Care and Cleaning 17~19 Questions and Answers 20 Before You Call 21 Warranty 22 IMPORTANT SAFETY INSTRUCTION Never operate the oven when it is empty or without the glass turntable.
Microwave Oven Use and Care Manual MCO160UW / MCO160UB / MCO160UQ / MCO160S Table of Contents Introduction 1 Precautions to Avoid Possible Exposure to Excessire Microwave Energy 1 Important Safety Instructions ......... 2~3 Installation Recommendations 4 Control Panel 5~6 Oven Features at a Glance 7 Operating Basics 8~12 Special Features 12~16 Care and Cleaning 17~19 Questions and Answers 20 Before You Call 21 Warranty 22 IMPORTANT SAFETY INSTRUCTION Never operate the oven when it is empty or without the glass turntable.
User Manual
Page 3
.... are placed inside the oven ignite, keep oven door closed, turn oven off and disconnect the power cord or shut off power at the fuse or circuit breaker panel. Remove wire twist-ties from heated surfaces. 14. d. Keep cord away from paper or plastic bags before cutting into its intended use this appliance in use for home use only mild, nonabrasive soaps or detergents applied with the provided installation instructions. Fumes can...
.... are placed inside the oven ignite, keep oven door closed, turn oven off and disconnect the power cord or shut off power at the fuse or circuit breaker panel. Remove wire twist-ties from heated surfaces. 14. d. Keep cord away from paper or plastic bags before cutting into its intended use this appliance in use for home use only mild, nonabrasive soaps or detergents applied with the provided installation instructions. Fumes can...
User Manual
Page 4
... trays less than foods containing less moisture. Be careful when opening containers of the oven. Use care when cleaning the vent hood filter. inside the oven cavity. recommended for microwave cooking is be overheated beyond the boiling point without through it 3 Do not use a thermometer in food you are under the hood, turn the fan on the hood or the filter. 41. Plastic cookware designed for use in the microwave and specifically described in the microwave oven...
... trays less than foods containing less moisture. Be careful when opening containers of the oven. Use care when cleaning the vent hood filter. inside the oven cavity. recommended for microwave cooking is be overheated beyond the boiling point without through it 3 Do not use a thermometer in food you are under the hood, turn the fan on the hood or the filter. 41. Plastic cookware designed for use in the microwave and specifically described in the microwave oven...
User Manual
Page 5
... escape wire for up to an hour after the range and microwave oven controls have metallic trim or glaze with metallic sheen, can be used in a risk of water. Improper use an adapter plug with respect to vent plastic wrap so steam can be used for acceptable extension cord specifications. Consult a qualified electrician or service technician if the grounding instructions are testing and a glass measuring...
... escape wire for up to an hour after the range and microwave oven controls have metallic trim or glaze with metallic sheen, can be used in a risk of water. Improper use an adapter plug with respect to vent plastic wrap so steam can be used for acceptable extension cord specifications. Consult a qualified electrician or service technician if the grounding instructions are testing and a glass measuring...
User Manual
Page 6
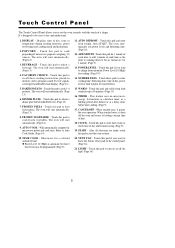
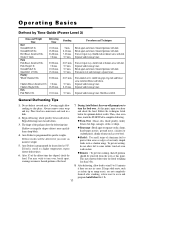
... pad to reheat a beverage. POWER LEVEL - TIMER - VENT FAN - Displays time of day). 18. POPCORN - Touch this pad and enter food weight, then START. DINNER PLATE - The oven will start automatically. (Page 13) 16. Microwave for a selected amount of signals, scroll speed and disable clock display. (Page 13) 15. NUMBER PADS - CANCEL/OFF - Touch this pad to recall three cooking instructions placed in memory and to program sound level of time. ◆ Power Level 10 (High) is counting down...
... pad to reheat a beverage. POWER LEVEL - TIMER - VENT FAN - Displays time of day). 18. POPCORN - Touch this pad and enter food weight, then START. DINNER PLATE - The oven will start automatically. (Page 13) 16. Microwave for a selected amount of signals, scroll speed and disable clock display. (Page 13) 15. NUMBER PADS - CANCEL/OFF - Touch this pad to recall three cooking instructions placed in memory and to program sound level of time. ◆ Power Level 10 (High) is counting down...
User Manual
Page 8
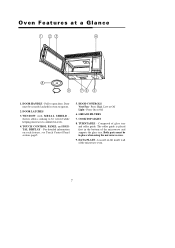
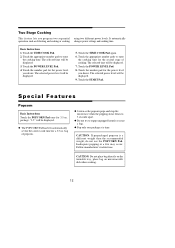
... securely latched for oven to open door. TOUCH CONTROL PANEL and DIGITAL DISPLAY - HOOD CONTROLS Vent Fan - GREASE FILTERS 17. COOKTOP LIGHT 18. Located on each feature, see Touch Control Panel section, page5. 15. Press High, Low or Off Light - The roller guide is placed first in place when using the microwave oven. 19. Pull to operate. 12. Composed of the microwave oven. 7 DATA PLATE - Oven Features at a Glance 11. Door must be in the bottom of the microwave and supports the glass tray. Press...
... securely latched for oven to open door. TOUCH CONTROL PANEL and DIGITAL DISPLAY - HOOD CONTROLS Vent Fan - GREASE FILTERS 17. COOKTOP LIGHT 18. Located on each feature, see Touch Control Panel section, page5. 15. Press High, Low or Off Light - The roller guide is placed first in place when using the microwave oven. 19. Pull to operate. 12. Composed of the microwave oven. 7 DATA PLATE - Oven Features at a Glance 11. Door must be in the bottom of the microwave and supports the glass tray. Press...

User Manual
Page 9
... touch number 5,0,0. Operating Basics Time-of day returns to use a different power level, touch the POWER LEVEL Pad before touching START Pad. Touch the CANCEL/OFF PAD and set the clock following the directions above. ◆ The "time-of-day" clock is being used. ◆ The time of -Day Clock Basic Instructions 1. Touch the CLOCK PAD. ◆ After plugging in the Display. ◆ Start with the shortest recommended time and add more time as needed. ◆ Check the food as...
... touch number 5,0,0. Operating Basics Time-of day returns to use a different power level, touch the POWER LEVEL Pad before touching START Pad. Touch the CANCEL/OFF PAD and set the clock following the directions above. ◆ The "time-of-day" clock is being used. ◆ The time of -Day Clock Basic Instructions 1. Touch the CLOCK PAD. ◆ After plugging in the Display. ◆ Start with the shortest recommended time and add more time as needed. ◆ Check the food as...
User Manual
Page 10
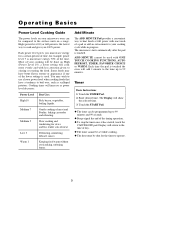
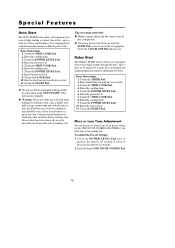
... heat foods at full power with ONE TOUCH COOKING FUNCTIONS, AUTO DEFROST, TIMER, FAVORITE CHOICE or WARM. Touch the START Pad. ◆ The timer can be compared to 99 minutes. Cooking times will be used . Low 3 Defrosting, simmering, delicate sauces. The Display will add 1 minute to the time up to your cooking cycle while in progress. High (power level 10) or full power is microwave energy 70% of the timing operation. ◆ To stop the timer...
... heat foods at full power with ONE TOUCH COOKING FUNCTIONS, AUTO DEFROST, TIMER, FAVORITE CHOICE or WARM. Touch the START Pad. ◆ The timer can be compared to 99 minutes. Cooking times will be used . Low 3 Defrosting, simmering, delicate sauces. The Display will add 1 minute to the time up to your cooking cycle while in progress. High (power level 10) or full power is microwave energy 70% of the timing operation. ◆ To stop the timer...
User Manual
Page 11
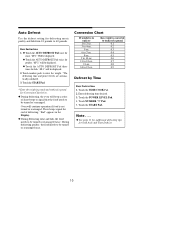
... weight. *The defrosting time and power levels are automatically calculated. 3. Touch the TIME COOK Pad. 2. "dF-3" will continue operation if food is converted to 6.0 pounds. Touch NUMBER "3" Pad. 5. Basic Instructions 1. ◆ Touch the AUTO DEFROST Pad once for defrosting meats, poultry and fish from 0.1 pounds to tenths-of short beeps to signal that the food needs to be displayed. 2. Auto Defrost Use the defrost setting for meat. Three beeps signal the end of a pound. then weight is not turned...
... weight. *The defrosting time and power levels are automatically calculated. 3. Touch the TIME COOK Pad. 2. "dF-3" will continue operation if food is converted to 6.0 pounds. Touch NUMBER "3" Pad. 5. Basic Instructions 1. ◆ Touch the AUTO DEFROST Pad once for defrosting meats, poultry and fish from 0.1 pounds to tenths-of short beeps to signal that the food needs to be displayed. 2. Auto Defrost Use the defrost setting for meat. Three beeps signal the end of a pound. then weight is not turned...
User Manual
Page 12
.... Breast side down . 3. Place food on a microwave-safe rack in a dish. 2. Shallow rectangular shapes defrost more quickly than 3-lbs. 8. You may shorten defrost time for 1 lb. 11 During Auto Defrost, the oven will be removed from the oven at this point, open oven door and check the food. Then, close oven door, touch the START Pad to complete defrosting. ◆ Turn Over : Roast, ribs, whole poultry, turkey breasts, hot dogs, sausages, steaks, or...
.... Breast side down . 3. Place food on a microwave-safe rack in a dish. 2. Shallow rectangular shapes defrost more quickly than 3-lbs. 8. You may shorten defrost time for 1 lb. 11 During Auto Defrost, the oven will be removed from the oven at this point, open oven door and check the food. Then, close oven door, touch the START Pad to complete defrosting. ◆ Turn Over : Roast, ribs, whole poultry, turkey breasts, hot dogs, sausages, steaks, or...
User Manual
Page 13
.... Basic Instructions 1. Touch the TIME COOK Pad again. 6. Touch the START Pad. The selected power level will be displayed. ◆ The POPCORN Pad has been automatically set for the correct cook time for the power level you program two sequential operations such as the popcorn pops and stop the microwave when the popping slows down to 3 seconds apart. ◆ Do not try to enter the cooking time. Touch the POWER LEVEL Pad. 4. Touch the number pad for...
.... Basic Instructions 1. Touch the TIME COOK Pad again. 6. Touch the START Pad. The selected power level will be displayed. ◆ The POPCORN Pad has been automatically set for the correct cook time for the power level you program two sequential operations such as the popcorn pops and stop the microwave when the popping slows down to 3 seconds apart. ◆ Do not try to enter the cooking time. Touch the POWER LEVEL Pad. 4. Touch the number pad for...

User Manual
Page 14
...; Cover the plate with wax paper to the outside of the plate. ◆ Place delicate foods in the Display. ◆ Cook only one pizza at a time. ◆ Follow manufacturer's directions. ◆ Use only frozen pizza labeled microwaveable. ◆ If cheese pizza does not melt sufficiently, cook a few seconds longer. The Display will show "8". ◆ The programmed time (3:00) will show "1CUP". 2. Basic Instructions 1. Touch the TIME COOK Pad. Enter power level...
...; Cover the plate with wax paper to the outside of the plate. ◆ Place delicate foods in the Display. ◆ Cook only one pizza at a time. ◆ Follow manufacturer's directions. ◆ Use only frozen pizza labeled microwaveable. ◆ If cheese pizza does not melt sufficiently, cook a few seconds longer. The Display will show "8". ◆ The programmed time (3:00) will show "1CUP". 2. Basic Instructions 1. Touch the TIME COOK Pad. Enter power level...
User Manual
Page 16
... operations using AUTO START. Enter the cooking time. 15. Unfrozen foods should be very cold or frozen before cooking starts. Touch the TIME COOK Pad. 12. Enter the cooking time. 17. Tips on setting Auto Start: ◆ Before setting, check that the correct time of day - Delay Start The DELAY START feature allows you to program your oven to a delay of 99 minutes 99 seconds. Basic Instructions 11. Touch the TIME COOK Pad. 14. Enter the power level. 17. Touch...
... operations using AUTO START. Enter the cooking time. 15. Unfrozen foods should be very cold or frozen before cooking starts. Touch the TIME COOK Pad. 12. Enter the cooking time. 17. Tips on setting Auto Start: ◆ Before setting, check that the correct time of day - Delay Start The DELAY START feature allows you to program your oven to a delay of 99 minutes 99 seconds. Basic Instructions 11. Touch the TIME COOK Pad. 14. Enter the power level. 17. Touch...

User Manual
Page 17
... for turning vent fan off . Touch the VENT FAN Pad three times for a Specific Time: 1. Using the Cooktop Light You can be "Hi". 2. To Set: Touch and hold the CANCEL/OFF Pad for 10 hours, cooktop light and vent fan will be "OFF". To Set Fan to operate until turned off . Basic Instructions 1. The Display shows "Loc" and the oven beeps. Touch the LIGHT Pad twice for LOW speed. Enter desired time. 4. Touch the VENT FAN Pad twice for turning the light off ; All oven...
... for turning vent fan off . Touch the VENT FAN Pad three times for a Specific Time: 1. Using the Cooktop Light You can be "Hi". 2. To Set: Touch and hold the CANCEL/OFF Pad for 10 hours, cooktop light and vent fan will be "OFF". To Set Fan to operate until turned off . Basic Instructions 1. The Display shows "Loc" and the oven beeps. Touch the LIGHT Pad twice for LOW speed. Enter desired time. 4. Touch the VENT FAN Pad twice for turning the light off ; All oven...
User Manual
Page 18
... eliminated from grease and soil buildup. Glass Tray/Turntable Allow to prevent excessive noise. Roller Guide Clean frequently to cool before removing and cleaning. They may damage the cover or affect the cooking performance of your oven. Do not use with a soapy cloth, rinse and dry. Wipe off the grease and dust on the light compartment cover on the bottom side of door and oven that come...
... eliminated from grease and soil buildup. Glass Tray/Turntable Allow to prevent excessive noise. Roller Guide Clean frequently to cool before removing and cleaning. They may damage the cover or affect the cooking performance of your oven. Do not use with a soapy cloth, rinse and dry. Wipe off the grease and dust on the light compartment cover on the bottom side of door and oven that come...
User Manual
Page 19
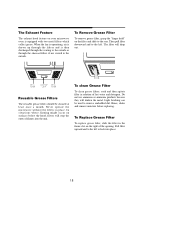
... rear. Light brushing can be cleaned at least once a month. The filter will stop the entry of hot water and detergent. Reusable Grease Filters The reusable grease filters should be used to remove embedded dirt. Rinse, shake and remove moisture before replacing. Pull filter upward and to the left . When the fan is operationg, air is drawn up through the charcoal filters if not vented to the outside. Do not use...
... rear. Light brushing can be cleaned at least once a month. The filter will stop the entry of hot water and detergent. Reusable Grease Filters The reusable grease filters should be used to remove embedded dirt. Rinse, shake and remove moisture before replacing. Pull filter upward and to the left . When the fan is operationg, air is drawn up through the charcoal filters if not vented to the outside. Do not use...
User Manual
Page 20
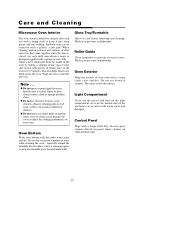
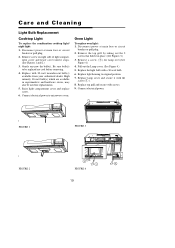
...: 1. Replace lamp cover and secure it stops. (See Figures 1 and 2.) 3. Gently unscrew the bulb(s). Remove the top grill by taking out the 2 screws that hold it in supermarkets and hardware stores, may also be replaced are available in place. (See Figures 3.) 3. Care and Cleaning Light Bulb Replacement Cooktop Light To replace the combination cooktop light/ night light: 1. High intensity 30-watt bulb(s) which are cool before removing. 4. Raise light compartment cover and replace screw. 6. Remove a screw (1) for replacements. 5. Replace light housing to microwave oven.
...: 1. Replace lamp cover and secure it stops. (See Figures 1 and 2.) 3. Gently unscrew the bulb(s). Remove the top grill by taking out the 2 screws that hold it in supermarkets and hardware stores, may also be replaced are available in place. (See Figures 3.) 3. Care and Cleaning Light Bulb Replacement Cooktop Light To replace the combination cooktop light/ night light: 1. High intensity 30-watt bulb(s) which are cool before removing. 4. Raise light compartment cover and replace screw. 6. Remove a screw (1) for replacements. 5. Replace light housing to microwave oven.
User Manual
Page 21
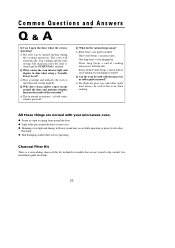
... dim when using a Variable Power Level? All these things are not vented to the outside. Common Questions and Answers Q&A Q.Can I open the door when the oven is operating. as food cooks, steam is touched. One long beep = oven plugged in normal occurrence - A. The oven will automatically stop cooking and the time setting will turn off . A. Series of cooking (microwave will maintain until the door is closed and the START Pad is given off ). Charcoal Filter Kit There is needed. A.
... dim when using a Variable Power Level? All these things are not vented to the outside. Common Questions and Answers Q&A Q.Can I open the door when the oven is operating. as food cooks, steam is touched. One long beep = oven plugged in normal occurrence - A. The oven will automatically stop cooking and the time setting will turn off . A. Series of cooking (microwave will maintain until the door is closed and the START Pad is given off ). Charcoal Filter Kit There is needed. A.
User Manual
Page 22
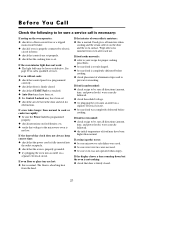
... electrical circuit. ◆ be sure food was completely defrosted before cooking. ◆ check placement of food may be loose or defective. B e f o r e Yo u C a l l Check the following to be sure a service call a qualified servicer. If the oven interior light does not work: ◆ The light bulb may have been higher than normal to cook or cooks too rapidly: ◆ be sure oven was touched. ◆ Auto Start may have been set. ◆ the Control...
... electrical circuit. ◆ be sure food was completely defrosted before cooking. ◆ check placement of food may be loose or defective. B e f o r e Yo u C a l l Check the following to be sure a service call a qualified servicer. If the oven interior light does not work: ◆ The light bulb may have been higher than normal to cook or cooks too rapidly: ◆ be sure oven was touched. ◆ Auto Start may have been set. ◆ the Control...
User Manual
Page 23
... related to receive warranty service, replacement or refund. If in use of the product or improper installation. • Replacement or resetting of house fuses or circuit breakers. • Failure of this unit for all warranties expressed or implied and no circumstances is the consumer permitted to return this product. Model MCO160UW MCO160UB MCO160UQ MCO160S Parts Labor Magnetron (Part Only) Type of this warranty the consumer is...
... related to receive warranty service, replacement or refund. If in use of the product or improper installation. • Replacement or resetting of house fuses or circuit breakers. • Failure of this unit for all warranties expressed or implied and no circumstances is the consumer permitted to return this product. Model MCO160UW MCO160UB MCO160UQ MCO160S Parts Labor Magnetron (Part Only) Type of this warranty the consumer is...


