User Manual
Page 1
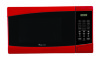
PN: ft. 0.9 cu. Microwave Oven MCM991RSL Instruction Manual Before operating this oven, please read these instructions completely.
PN: ft. 0.9 cu. Microwave Oven MCM991RSL Instruction Manual Before operating this oven, please read these instructions completely.

User Manual
Page 2
In the event that warranty service is to contact you regarding a safety notification or product update. 2. The first step in protecting your new product is required, registering your product include the following. 1. Product Registration Copy Thank you for purchasing a Magic Chef product. In the event of purchase. Registering your proof of ... registration form on our website at www.mcappliance.com/register .The benefits of registering your product will allow for purchasing a Magic Chef product. Once again thank you for more efficient warranty service processing. 3.
In the event that warranty service is to contact you regarding a safety notification or product update. 2. The first step in protecting your new product is required, registering your product include the following. 1. Product Registration Copy Thank you for purchasing a Magic Chef product. In the event of purchase. Registering your proof of ... registration form on our website at www.mcappliance.com/register .The benefits of registering your product will allow for purchasing a Magic Chef product. Once again thank you for more efficient warranty service processing. 3.

User Manual
Page 3
....It is particularly important that the oven door close properly and that there is important not to defeat or tamper with the door open since open-door operation can result in harmful exposure to the: (1) door (bent), (2) hinges and latches (broken or loosened), (3) door seals and sealing surfaces. (d) The oven should not be adjusted or repaired by anyone except properly qualified service personnel.
....It is particularly important that the oven door close properly and that there is important not to defeat or tamper with the door open since open-door operation can result in harmful exposure to the: (1) door (bent), (2) hinges and latches (broken or loosened), (3) door seals and sealing surfaces. (d) The oven should not be adjusted or repaired by anyone except properly qualified service personnel.

User Manual
Page 4
... FEATURES...7 TURNTABLE...7 z MICROWAVE OVEN CONTROL...7 DISPLAY...7 START...8 ADD 30 SECONDS...8 EXPRESS COOK...8 STOP/CLEAR...8 CLOCK...8 TONES...8 KITCHEN TIMER...8 CONTROL LOCK ...8 z MICROWAVE OVEN USE...9 FOOD CHARACTERISTICS...9 COOKING GUIDELINES...9 COOKWARE AND DINNERWARE...9 ALUMINUM FOIL AND METAL...10 MICROWAVE COOKING POWER...10 MANUAL COOKING...11 COOKING IN STAGES...11 DEFROST...11 MEMORY...12 POPCORN...12 POTATO...12 PIZZA...13 BEVERAGE...13 DINNER PLATE...13 FROZEN VEGETABLE ...13 z CARE OF YOUR MICROWAVE OVEN...14 z BEFORE YOU CALL FOR SERVICE...15 z CARE AND CLEANING...15...
... FEATURES...7 TURNTABLE...7 z MICROWAVE OVEN CONTROL...7 DISPLAY...7 START...8 ADD 30 SECONDS...8 EXPRESS COOK...8 STOP/CLEAR...8 CLOCK...8 TONES...8 KITCHEN TIMER...8 CONTROL LOCK ...8 z MICROWAVE OVEN USE...9 FOOD CHARACTERISTICS...9 COOKING GUIDELINES...9 COOKWARE AND DINNERWARE...9 ALUMINUM FOIL AND METAL...10 MICROWAVE COOKING POWER...10 MANUAL COOKING...11 COOKING IN STAGES...11 DEFROST...11 MEMORY...12 POPCORN...12 POTATO...12 PIZZA...13 BEVERAGE...13 DINNER PLATE...13 FROZEN VEGETABLE ...13 z CARE OF YOUR MICROWAVE OVEN...14 z BEFORE YOU CALL FOR SERVICE...15 z CARE AND CLEANING...15...
User Manual
Page 5
... both before using the oven. 20. e) Use extreme care when inserting a spoon or other combustible materials are able to be overheated beyond the boiling point without the glass tray in use . 17. Connect only to overheating and fire. 21. Install or locate this appliance outdoors. b) Remove wire twist-ties from heated surfaces. 14. As with the provided installation instructions. 15. c) If materials inside the oven to...
... both before using the oven. 20. e) Use extreme care when inserting a spoon or other combustible materials are able to be overheated beyond the boiling point without the glass tray in use . 17. Connect only to overheating and fire. 21. Install or locate this appliance outdoors. b) Remove wire twist-ties from heated surfaces. 14. As with the provided installation instructions. 15. c) If materials inside the oven to...

User Manual
Page 6
... on the appliance. The plug must be determined by turning the equipment off and on different branch circuits. WARNING: Do not cut or remove the third (ground) prong from the receiver. • Plug the microwave oven into an outlet that is properly installed and grounded. WARNING: Improper use only a 3-wire extension cord that has a 3-blade grounding plug, and a 3-slot receptacle...
... on the appliance. The plug must be determined by turning the equipment off and on different branch circuits. WARNING: Do not cut or remove the third (ground) prong from the receiver. • Plug the microwave oven into an outlet that is properly installed and grounded. WARNING: Improper use only a 3-wire extension cord that has a 3-blade grounding plug, and a 3-slot receptacle...
User Manual
Page 7
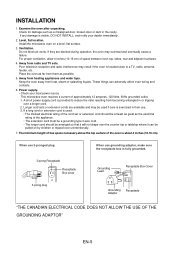
... notify your local power source. Longer cord sets or extension cords are blocked during operation, the oven may result if the oven is fully grounded. 3-prong Receptacle Receptacle Box cover Grounding Lead Receptacle Box Cover 3-prong plug Grounding Receptacle Adaptor "THE CANADIAN ELECTRICAL CODE DOES NOT ALLOW THE USE OF THE GROUNDING ADAPTOR" EN-5 When use 3-pronged plug When use . 3. INSTALLATION 1. Examine the oven after unpacking...
... notify your local power source. Longer cord sets or extension cords are blocked during operation, the oven may result if the oven is fully grounded. 3-prong Receptacle Receptacle Box cover Grounding Lead Receptacle Box Cover 3-prong plug Grounding Receptacle Adaptor "THE CANADIAN ELECTRICAL CODE DOES NOT ALLOW THE USE OF THE GROUNDING ADAPTOR" EN-5 When use 3-pronged plug When use . 3. INSTALLATION 1. Examine the oven after unpacking...

User Manual
Page 8
SPECIFICATIONS POWER SUPPLY INPUT POWER MICROWAVE ENERGY OUTPUT FREQUENCY OUTSIDE DIMENSIONS (W H D) CAVITY DIMENSIONS (W H D) CAVITY VOLUME NET WEIGHT TIMER POWER LEVELS * Specifications are subject to change without notice. 120V AC, 60Hz SINGLE PHASE WITH GROUNDING 1350 W 900 W 2,450MHz 485x292.5x380 mm (19.1x11.5x15.0 in) 314x221x348 mm (12.4x8.7x13.7 in) 0.9 cu.ft APPROX. 29.1 lbs. 99 min. 99 sec. 10 Levels 19 .1 15.0 11.5 EN-6
SPECIFICATIONS POWER SUPPLY INPUT POWER MICROWAVE ENERGY OUTPUT FREQUENCY OUTSIDE DIMENSIONS (W H D) CAVITY DIMENSIONS (W H D) CAVITY VOLUME NET WEIGHT TIMER POWER LEVELS * Specifications are subject to change without notice. 120V AC, 60Hz SINGLE PHASE WITH GROUNDING 1350 W 900 W 2,450MHz 485x292.5x380 mm (19.1x11.5x15.0 in) 314x221x348 mm (12.4x8.7x13.7 in) 0.9 cu.ft APPROX. 29.1 lbs. 99 min. 99 sec. 10 Levels 19 .1 15.0 11.5 EN-6

User Manual
Page 9
... E. Display G. Place the turntable on the microwave oven cavity bottom. 3. A B C DE F G MICROWAVE OVEN CONTROL A. Turntable B. Roller Guide The turntable can rotate in either direction to reorder any other time, a power failure has occurred.Reset the clock if needed.See "Clock" section. To Install: 1. Control panel Turntable A B C A. For best cooking results, do not operate the microwave oven without having the turntable in the display. Display When power is in the display at any of the parts. EN-7 Microwave oven light C. PARTS AND FEATURES This manual may...
... E. Display G. Place the turntable on the microwave oven cavity bottom. 3. A B C DE F G MICROWAVE OVEN CONTROL A. Turntable B. Roller Guide The turntable can rotate in either direction to reorder any other time, a power failure has occurred.Reset the clock if needed.See "Clock" section. To Install: 1. Control panel Turntable A B C A. For best cooking results, do not operate the microwave oven without having the turntable in the display. Display When power is in the display at any of the parts. EN-7 Microwave oven light C. PARTS AND FEATURES This manual may...
User Manual
Page 10
... touching START/+30SEC. Express Cook Each of the EXPRESS COOK controls (number pads 1-6) automatically starts the microwave oven at 100% power for 3 seconds until one long tone sounds and the display clears to show an outline of the microwave oven. A cooking program may be seen for 5 minutes. 3. See "Control Lock" section. Touch CLOCK control "00:00" will return to lock and unlock the control panel. The Kitchen Timer may be resumed by opening the door and then touching STOP/CANCEL. Touch STOP...
... touching START/+30SEC. Express Cook Each of the EXPRESS COOK controls (number pads 1-6) automatically starts the microwave oven at 100% power for 3 seconds until one long tone sounds and the display clears to show an outline of the microwave oven. A cooking program may be seen for 5 minutes. 3. See "Control Lock" section. Touch CLOCK control "00:00" will return to lock and unlock the control panel. The Kitchen Timer may be resumed by opening the door and then touching STOP/CANCEL. Touch STOP...
User Manual
Page 11
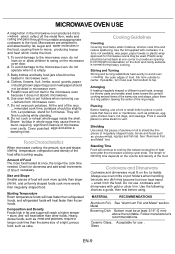
MICROWAVE OVEN USE A magnetron in the microwave oven produces micro waves which cooks the food. 1. Baby bottles and baby food jars should not be slightly firm. Paraffin wax will finish cooking while standing. 8. Size and Shape Smaller pieces of irregularly shaped foods, bones and foods such as chicken wings, leg tips and fish tail. Starting Temperature Room temperature foods will heat faster than refrigerated foods, and refrigerated foods will cook more quickly than...
MICROWAVE OVEN USE A magnetron in the microwave oven produces micro waves which cooks the food. 1. Baby bottles and baby food jars should not be slightly firm. Paraffin wax will finish cooking while standing. 8. Size and Shape Smaller pieces of irregularly shaped foods, bones and foods such as chicken wings, leg tips and fish tail. Starting Temperature Room temperature foods will heat faster than refrigerated foods, and refrigerated foods will cook more quickly than...
User Manual
Page 12
... for the suggested cooking power of specific foods. Place cookware or dinnerware in the microwave oven. Aluminum foil and some models),aluminum foil for use oven mitts or pot holders when removing dishes from the microwave oven. Microwave Cooking Power Many recipes for microwave cooking specify which cooking power to the microwave oven. PERCENT/ NUMBER USE NAME 100%, High 10 (default setting) Quick heating convenience foods and foods with another metal object during microwave cooking. Cooking and heating foods that need a cook power lower than high...
... for the suggested cooking power of specific foods. Place cookware or dinnerware in the microwave oven. Aluminum foil and some models),aluminum foil for use oven mitts or pot holders when removing dishes from the microwave oven. Microwave Cooking Power Many recipes for microwave cooking specify which cooking power to the microwave oven. PERCENT/ NUMBER USE NAME 100%, High 10 (default setting) Quick heating convenience foods and foods with another metal object during microwave cooking. Cooking and heating foods that need a cook power lower than high...
User Manual
Page 13
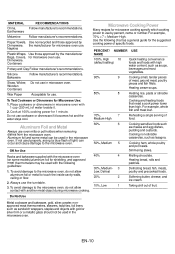
... the set cook time. To Defrost by Weight: 1. Touch START/+30SEC. To Cook in microwave-safe baking dish. Touch POWER. Enter the number of food such as a guide. Unwrap foods and remove lids (for second stage programming. Do not cover. Place food, uncovered, on the turntable and close the door. 2. Touch STOP/CANCEL at any time during the cycling stage. If cooking with foil before defrosting. 2. Touch START/+30SEC. Touch START/+30SEC. To Use Defrost As First Stage: Touch Defrost once. The default power level is...
... the set cook time. To Defrost by Weight: 1. Touch START/+30SEC. To Cook in microwave-safe baking dish. Touch POWER. Enter the number of food such as a guide. Unwrap foods and remove lids (for second stage programming. Do not cover. Place food, uncovered, on the turntable and close the door. 2. Touch STOP/CANCEL at any time during the cycling stage. If cooking with foil before defrosting. 2. Touch START/+30SEC. Touch START/+30SEC. To Use Defrost As First Stage: Touch Defrost once. The default power level is...

User Manual
Page 14
... program. 2. Touch START/+30SEC. Follow manufacturer's instructions when using a microwave popcorn popper. 4. Touch START/+30SEC. . Touch STOP/CANCEL at any time during the countdown to 1 pop every 1 or 2 seconds, then stop the cycle. 1. Pop only one package of potatoes (see chart). 3. Set the program, following the instructions in "Manual Cooking" or "Cooking in the display for popping to slow to pause or cancel cooking. 1. Touch POPCORN to the side (not centered). For bag sizes...
... program. 2. Touch START/+30SEC. Follow manufacturer's instructions when using a microwave popcorn popper. 4. Touch START/+30SEC. . Touch STOP/CANCEL at any time during the countdown to 1 pop every 1 or 2 seconds, then stop the cycle. 1. Pop only one package of potatoes (see chart). 3. Set the program, following the instructions in "Manual Cooking" or "Cooking in the display for popping to slow to pause or cancel cooking. 1. Touch POPCORN to the side (not centered). For bag sizes...

User Manual
Page 15
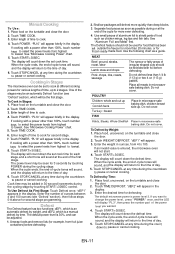
... sound, and the display will count down the cook time. Place food on a paper towel or paper plate. Touch STOP/CANCEL at any time during the countdown to pause or cancel heating. To Use PIZZA: 1. To Use BEVERAGE: 1. Touch STOP/CANCEL at any time during the countdown to pause or cancel heating. Place pizza on the turntable and close the door. 2. Place cup(s) on the turntable and close the door...
... sound, and the display will count down the cook time. Place food on a paper towel or paper plate. Touch STOP/CANCEL at any time during the countdown to pause or cancel heating. To Use PIZZA: 1. To Use BEVERAGE: 1. Touch STOP/CANCEL at any time during the countdown to pause or cancel heating. Place pizza on the turntable and close the door. 2. Place cup(s) on the turntable and close the door...

User Manual
Page 16
... microwave oven is hot, ALLOW TO COOL before cleaning or placing it in a hazardous situation. 1 Unplug the power cord before cleaning any food deposits removed. Wash the tray in warm sudsy water or in ROLLER GUIDE 1 The ROLLER GUIDE and oven floor should be cleaned frequently to seep into the ventilation openings. 4 If the Control Panel becomes wet, clean with a soft, dry cloth. GLASS TRAY 1 DO NOT operate the oven without the Glass Tray...
... microwave oven is hot, ALLOW TO COOL before cleaning or placing it in a hazardous situation. 1 Unplug the power cord before cleaning any food deposits removed. Wash the tray in warm sudsy water or in ROLLER GUIDE 1 The ROLLER GUIDE and oven floor should be cleaned frequently to seep into the ventilation openings. 4 If the Control Panel becomes wet, clean with a soft, dry cloth. GLASS TRAY 1 DO NOT operate the oven without the Glass Tray...

User Manual
Page 17
... not touch the interior walls. The oven should be used. 2. Check that could adversely affect the life of the surface that the power cord is still a problem, contact the service station. CARE AND CLEANING Although your house. * Sparking in your oven is provided with safety interlocks. 2. Wipe the sealing area frequently with metal trim should not be subjected to strain, for a blown circuit fuse or...
... not touch the interior walls. The oven should be used. 2. Check that could adversely affect the life of the surface that the power cord is still a problem, contact the service station. CARE AND CLEANING Although your house. * Sparking in your oven is provided with safety interlocks. 2. Wipe the sealing area frequently with metal trim should not be subjected to strain, for a blown circuit fuse or...
User Manual
Page 18
With microwave cooking, the heat is removed from the oven. Cooking guide times and heat settings are made to allow light to pass through . * Q : Why do eggs sometimes pop? * A : When baking or poaching eggs, the yolk may pop due to steam build-up enough internal heat to allow the cooking process to continue, even after the food is in the food, not in either direction? * A : Yes. Never...
With microwave cooking, the heat is removed from the oven. Cooking guide times and heat settings are made to allow light to pass through . * Q : Why do eggs sometimes pop? * A : When baking or poaching eggs, the yolk may pop due to steam build-up enough internal heat to allow the cooking process to continue, even after the food is in the food, not in either direction? * A : Yes. Never...
User Manual
Page 19
... food is the commercially prepared Microwave Popcorn product. Longer popping does not yield more cooking. This can quickly dry out, burn or catch on the oven tray. Food Never use recycled paper products as a child hanging on sealing surfaces. Do not attempt to defeat or tamper with low moisture carefully. ARCING If you should put packaged Microwave Popcorn bags directly on fire. USE YOUR MICROWAVE OVEN SAFELY General Use...
... food is the commercially prepared Microwave Popcorn product. Longer popping does not yield more cooking. This can quickly dry out, burn or catch on the oven tray. Food Never use recycled paper products as a child hanging on sealing surfaces. Do not attempt to defeat or tamper with low moisture carefully. ARCING If you should put packaged Microwave Popcorn bags directly on fire. USE YOUR MICROWAVE OVEN SAFELY General Use...
User Manual
Page 20
... of this unit to be free from defects in use of the product or improper installation. • Replacement or resetting of house fuses or circuit breakers. • Failure of this unit for all transportation expenses to return the unit to our factory prior to any subsequent owner(s). A copy of one - Model Parts Labor Magnetron (Part Only) Type of Service MCM991RSL One-Year One-Year...
... of this unit to be free from defects in use of the product or improper installation. • Replacement or resetting of house fuses or circuit breakers. • Failure of this unit for all transportation expenses to return the unit to our factory prior to any subsequent owner(s). A copy of one - Model Parts Labor Magnetron (Part Only) Type of Service MCM991RSL One-Year One-Year...


