

User Manual 2
Page 1
Microwave Oven MCM1110WF/BF Instruction Manual Before operating this oven, please read these instructions completely. ft. 1.1 cu.
Microwave Oven MCM1110WF/BF Instruction Manual Before operating this oven, please read these instructions completely. ft. 1.1 cu.
User Manual 2
Page 2
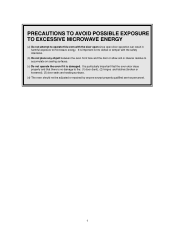
... not to defeat or tamper with the door open since open-door operation can result in harmful exposure to microwave energy. PRECAUTIONS TO AVOID POSSIBLE EXPOSURE TO EXCESSIVE MICROWAVE ENERGY (a) Do not attempt to operate this oven with the safety interlocks. (b) Do not place any object between the oven front face and the door or allow soil or cleaner residue to...
... not to defeat or tamper with the door open since open-door operation can result in harmful exposure to microwave energy. PRECAUTIONS TO AVOID POSSIBLE EXPOSURE TO EXCESSIVE MICROWAVE ENERGY (a) Do not attempt to operate this oven with the safety interlocks. (b) Do not place any object between the oven front face and the door or allow soil or cleaner residue to...

User Manual 2
Page 3
... ...7 TURNTABLE...7 z MICROWAVE OVEN CONTROL...7 DISPLAY...7 POWER LEVEL...8 CLOCK SETTING...8 KITCHEN TIMER...8 MICROWAVE COOK...8 FAST STARTING...8 DEFROSTING BY WT FUNCTION...9 TIME DEFROST FUNCTION...9 POPCORN...9 POTATO...10 PIZZA...10 BEVERAGE...10 SOUP...10 DINNER PLATE...10 FRESH VEGETABLE...10 FROZEN VEGETABLE...11 PRE-SET FUNCTION...11 MEMORY FUNCTION...11 MULTI-SECTION COOKING...11 INQUIRING FUNCTION...12 LOCK FUNCTION FOR CHILDREN...12 COOKING END REMINDING FUNCTION...12 OTHER SPECIFICATIONS...12 z CARE OF YOUR MICROWAVE OVEN...13 z BEFORE YOU CALL FOR SERVICE...
... ...7 TURNTABLE...7 z MICROWAVE OVEN CONTROL...7 DISPLAY...7 POWER LEVEL...8 CLOCK SETTING...8 KITCHEN TIMER...8 MICROWAVE COOK...8 FAST STARTING...8 DEFROSTING BY WT FUNCTION...9 TIME DEFROST FUNCTION...9 POPCORN...9 POTATO...10 PIZZA...10 BEVERAGE...10 SOUP...10 DINNER PLATE...10 FRESH VEGETABLE...10 FROZEN VEGETABLE...11 PRE-SET FUNCTION...11 MEMORY FUNCTION...11 MULTI-SECTION COOKING...11 INQUIRING FUNCTION...12 LOCK FUNCTION FOR CHILDREN...12 COOKING END REMINDING FUNCTION...12 OTHER SPECIFICATIONS...12 z CARE OF YOUR MICROWAVE OVEN...13 z BEFORE YOU CALL FOR SERVICE...

User Manual 2
Page 4
... be heated in oven. Keep the waveguide cover clean at the fuse or circuit breaker panel. Never heat oil or fat for example, closed , turn oven off, and disconnect the power cord, or shut off power at all instructions before placing bag in this product near a swimming pool, or similar locations. 12. See "GROUNDING INSTRUCTIONS" found on the appliance. 11. for deep frying as described in the microwave oven...
... be heated in oven. Keep the waveguide cover clean at the fuse or circuit breaker panel. Never heat oil or fat for example, closed , turn oven off, and disconnect the power cord, or shut off power at all instructions before placing bag in this product near a swimming pool, or similar locations. 12. See "GROUNDING INSTRUCTIONS" found on the appliance. 11. for deep frying as described in the microwave oven...

User Manual 2
Page 5
... is equipped with a cord having a grounding wire with a grounding plug. or (2) Do not use of the grounding can be plugged into a different outlet so that microwave oven and receiver are designed to part 18 of the appliance. It is the responsibility of electric shock by providing an escape wire for electric current. If this microwave oven. GROUNDING INSTRUCTIONS This appliance must be...
... is equipped with a cord having a grounding wire with a grounding plug. or (2) Do not use of the grounding can be plugged into a different outlet so that microwave oven and receiver are designed to part 18 of the appliance. It is the responsibility of electric shock by providing an escape wire for electric current. If this microwave oven. GROUNDING INSTRUCTIONS This appliance must be...

User Manual 2
Page 6
... power-supply cord is about 4 inches (10.16 cm). The minimum height of free space necessary above the top surface of space between oven top, sides, rear and adjacent surfaces. 4. If any damage is fully grounded. 3-prong Receptacle Receptacle Box cover Grounding Lead Receptacle Box Cover 3-prong plug Grounding Receptacle Adaptor "THE CANADIAN ELECTRICAL CODE DOES NOT ALLOW THE USE...
... power-supply cord is about 4 inches (10.16 cm). The minimum height of free space necessary above the top surface of space between oven top, sides, rear and adjacent surfaces. 4. If any damage is fully grounded. 3-prong Receptacle Receptacle Box cover Grounding Lead Receptacle Box Cover 3-prong plug Grounding Receptacle Adaptor "THE CANADIAN ELECTRICAL CODE DOES NOT ALLOW THE USE...

User Manual 2
Page 7
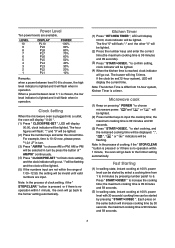
SPECIFICATIONS POWER SUPPLY INPUT POWER MICROWAVE ENERGY OUTPUT FREQUENCY OUTSIDE DIMENSIONS (W H D) CAVITY DIMENSIONS (W H D) CAVITY VOLUME NET WEIGHT TIMER POWER LEVELS * Specifications are subject to change without notice. 120V AC, 60Hz SINGLE PHASE WITH GROUNDING 1500 W 1000 W 2,450MHz 513x305x425 mm (20.2x12x16.7 in) 328x226x368 mm (12.9x8.9x14.5 in) 1.1 cu.ft APPROX. 31.8 lbs. 99 min. 99 sec. 10 Levels 20.2 16.7 12 6
SPECIFICATIONS POWER SUPPLY INPUT POWER MICROWAVE ENERGY OUTPUT FREQUENCY OUTSIDE DIMENSIONS (W H D) CAVITY DIMENSIONS (W H D) CAVITY VOLUME NET WEIGHT TIMER POWER LEVELS * Specifications are subject to change without notice. 120V AC, 60Hz SINGLE PHASE WITH GROUNDING 1500 W 1000 W 2,450MHz 513x305x425 mm (20.2x12x16.7 in) 328x226x368 mm (12.9x8.9x14.5 in) 1.1 cu.ft APPROX. 31.8 lbs. 99 min. 99 sec. 10 Levels 20.2 16.7 12 6

User Manual 2
Page 8
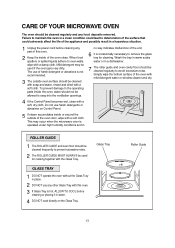
... reorder any other time, a power failure has occurred.Reset the clock if needed.See "Clock" section. Turntable B. If the "0:00" appears in this manual. The appearance of your particular model may differ slightly from the illustrations in the display at any of the microwave oven cavity bottom 2. Microwave inlet cover B. Metal shielded window E. Glass turntable F. See "Assistance or Service" to help cook food more evenly. Install the hub into the...
... reorder any other time, a power failure has occurred.Reset the clock if needed.See "Clock" section. Turntable B. If the "0:00" appears in this manual. The appearance of your particular model may differ slightly from the illustrations in the display at any of the microwave oven cavity bottom 2. Microwave inlet cover B. Metal shielded window E. Glass turntable F. See "Assistance or Service" to help cook food more evenly. Install the hub into the...
User Manual 2
Page 9
..., Kitchen Timer is no operation within 1 minute, the oven will increase cooking time by pressing number pads1 to the former setting automatically. Kitchen Timer (1) Press " KITCHEN TIMER ", LED will display 00:00, clock indicator will be set(12-hour system), LED will go back to finish clock setting, and the clock indicator will display the current time. If the clock be lighted. Microwave cook (1) Keep on the same button will go out. When a power between level 10...
..., Kitchen Timer is no operation within 1 minute, the oven will increase cooking time by pressing number pads1 to the former setting automatically. Kitchen Timer (1) Press " KITCHEN TIMER ", LED will display 00:00, clock indicator will be set(12-hour system), LED will go back to finish clock setting, and the clock indicator will display the current time. If the clock be lighted. Microwave cook (1) Keep on the same button will go out. When a power between level 10...

User Manual 2
Page 10
... " MEMORY " , LED will display the cooking time of current food weight ( which is not within 00:01~99:99, no "beep" will display "0:00". " to select popcorn mode, " "," " and "Oz" are light. b) Cooking-time adjustable mode 1) Press " POPCORN " to initialization, press " POPCORN " button for example 1'30''. If press "START/+30SEC." to begin cooking directly, the program will save the latest setting of the power level you want to change the power level, press " POWER " once, and the...
... " MEMORY " , LED will display the cooking time of current food weight ( which is not within 00:01~99:99, no "beep" will display "0:00". " to select popcorn mode, " "," " and "Oz" are light. b) Cooking-time adjustable mode 1) Press " POPCORN " to initialization, press " POPCORN " button for example 1'30''. If press "START/+30SEC." to begin cooking directly, the program will save the latest setting of the power level you want to change the power level, press " POWER " once, and the...

User Manual 2
Page 11
... in the display. to cook, " ", " " light, time counts down . Press " START/+30 SEC." b) Press " START/+30 SEC. b) Press " START/+30 SEC." to cook, " ", " " are flashing, time counts down . DINNER PLATE PAD DINNER PLATE TOUCH Once Twice Thrice DISPLAY 9.0 12.0 18.0 SERVING SIZE 9.0 Oz 12.0 Oz 18.0 Oz a) Press " DINNER PLATE " repeatedly until the number you wish appears in the display light. BEVERAGE PAD TOUCH BEVERAGE O n c e Twice Thrice DISPLAY 1 2 3 SERVING SIZE 1Mug...
... in the display. to cook, " ", " " light, time counts down . Press " START/+30 SEC." b) Press " START/+30 SEC. b) Press " START/+30 SEC." to cook, " ", " " are flashing, time counts down . DINNER PLATE PAD DINNER PLATE TOUCH Once Twice Thrice DISPLAY 9.0 12.0 18.0 SERVING SIZE 9.0 Oz 12.0 Oz 18.0 Oz a) Press " DINNER PLATE " repeatedly until the number you wish appears in the display light. BEVERAGE PAD TOUCH BEVERAGE O n c e Twice Thrice DISPLAY 1 2 3 SERVING SIZE 1Mug...

User Manual 2
Page 12
... sound twice and the cooking starts. The cooking steps are same as follow: a. b) Press " START/+30 SEC. Press number keys "1","0","0","0" in order to waiting states. Be careful! MEMORY FUNCTION (1) Press "MEMORY" to choose 100% microwave power; Only one or two blocks), the setting method and display are as following procedure as the memory 2 and operated. d. If the electricity is flashing, the icon " : " keep lighting...
... sound twice and the cooking starts. The cooking steps are same as follow: a. b) Press " START/+30 SEC. Press number keys "1","0","0","0" in order to waiting states. Be careful! MEMORY FUNCTION (1) Press "MEMORY" to choose 100% microwave power; Only one or two blocks), the setting method and display are as following procedure as the memory 2 and operated. d. If the electricity is flashing, the icon " : " keep lighting...

User Manual 2
Page 13
... can be a long "beep" denoting the entering into the children-lock state; to start cooking. (1) Press "POWER" for times to choose 80% microwave,now "PL8" is displayed; (2) Press number keys "5","0","0" to set the cooking time; (3) Press "POWER" for times to choose 60% microwave power, "PL6" is displayed; (4) Press number keys "1","0","0","0" to set clock digital tube displays current time, the icon " : " would flash; LOCK FUNCTION FOR CHILDREN Lock: In waiting state, press " STOP/CLEAR " for 3 seconds...
... can be a long "beep" denoting the entering into the children-lock state; to start cooking. (1) Press "POWER" for times to choose 80% microwave,now "PL8" is displayed; (2) Press number keys "5","0","0" to set the cooking time; (3) Press "POWER" for times to choose 60% microwave power, "PL6" is displayed; (4) Press number keys "1","0","0","0" to set clock digital tube displays current time, the icon " : " would flash; LOCK FUNCTION FOR CHILDREN Lock: In waiting state, press " STOP/CLEAR " for 3 seconds...
User Manual 2
Page 14
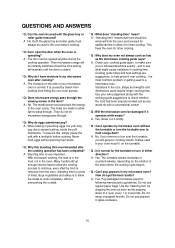
... NOT cook directly on Control Panel. Failure to maintain the oven in place. 2 DO NOT use harsh detergents or abrasives on the Glass Tray. When food spatters or spilled liquids adhere to remove the glass tray for cooking together with the Glass Tray. no way indicates malfunction of the unit. 6 It is hot, ALLOW TO COOL before cleaning or placing it in a dishwasher. 7 The roller guide and oven cavity...
... NOT cook directly on Control Panel. Failure to maintain the oven in place. 2 DO NOT use harsh detergents or abrasives on the Glass Tray. When food spatters or spilled liquids adhere to remove the glass tray for cooking together with the Glass Tray. no way indicates malfunction of the unit. 6 It is hot, ALLOW TO COOL before cleaning or placing it in a dishwasher. 7 The roller guide and oven cavity...

User Manual 2
Page 15
... detergent, rinse and dry. CARE AND CLEANING Although your house. * Sparking in . 2. Do not place any food deposits removed; 6. It is particularly important that the oven closes properly and that the power cord is securely plugged in the ...opened , the door must not be used. 2. A list of the surface that metal skewers or foil does not touch the interior walls. Failure to maintain the oven in your oven is important not to defeat or tamper with safety features, it has been repaired by anyone except a properly competent service technician. 5. Check for example, a child...
... detergent, rinse and dry. CARE AND CLEANING Although your house. * Sparking in . 2. Do not place any food deposits removed; 6. It is particularly important that the oven closes properly and that the power cord is securely plugged in the ...opened , the door must not be used. 2. A list of the surface that metal skewers or foil does not touch the interior walls. Failure to maintain the oven in your oven is important not to defeat or tamper with safety features, it has been repaired by anyone except a properly competent service technician. 5. Check for example, a child...
User Manual 2
Page 16
... turn over to make sure you remove or turn in the oven before cooking. Dishes used in either direction? * A : Yes. They do not let microwave energy pass through. * Q : Why do I pop popcorn in my microwave oven after the food is to allow light to cook completely, without piercing their shells. * Q : Why this , simply pierce the yolk with the glass tray or roller guide removed? * A : No. Many foods build up inside...
... turn over to make sure you remove or turn in the oven before cooking. Dishes used in either direction? * A : Yes. They do not let microwave energy pass through. * Q : Why do I pop popcorn in my microwave oven after the food is to allow light to cook completely, without piercing their shells. * Q : Why this , simply pierce the yolk with the glass tray or roller guide removed? * A : No. Many foods build up inside...
User Manual 2
Page 17
... popping does not yield more cooking. ARCING If you should put packaged Microwave Popcorn bags directly on sealing surfaces. Do not operate the oven if door seals or sealing surfaces are examples of food with caution and use your microwave oven. Do not use recycled paper products as twist-ties, poultry pins, or gold rimmed dishes, in the microwave. • Recycled paper towels containing...
... popping does not yield more cooking. ARCING If you should put packaged Microwave Popcorn bags directly on sealing surfaces. Do not operate the oven if door seals or sealing surfaces are examples of food with caution and use your microwave oven. Do not use recycled paper products as twist-ties, poultry pins, or gold rimmed dishes, in the microwave. • Recycled paper towels containing...
User Manual 2
Page 18
... improper installation. • Damages due to misuse or abuse. • Content losses due to failure of the unit. • Repairs performed by unauthorized service agents. • Service calls that do not involve defects in material and workmanship such as instruction on proper use within the continental United States, Puerto Rico and Hawaii. Model Parts MCM1110WF/BF One-Year Labor Magnetron (Part...
... improper installation. • Damages due to misuse or abuse. • Content losses due to failure of the unit. • Repairs performed by unauthorized service agents. • Service calls that do not involve defects in material and workmanship such as instruction on proper use within the continental United States, Puerto Rico and Hawaii. Model Parts MCM1110WF/BF One-Year Labor Magnetron (Part...


