User Manual
Page 3
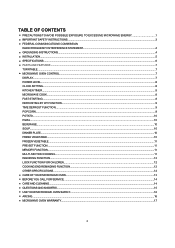
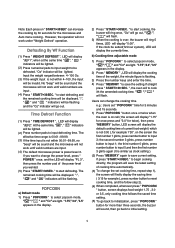
... z INSTALLATION...5 z SPECIFICATIONS...6 z PARTS AND FEATURES ...7 TURNTABLE...7 z MICROWAVE OVEN CONTROL...7 DISPLAY...7 POWER LEVEL...8 CLOCK SETTING...8 KITCHEN TIMER...8 MICROWAVE COOK...8 FAST STARTING...8 DEFROSTING BY WT FUNCTION...9 TIME DEFROST FUNCTION...9 POPCORN...9 POTATO...10 PIZZA...10 BEVERAGE...10 SOUP...10 DINNER PLATE...10 FRESH VEGETABLE...10 FROZEN VEGETABLE...11 PRE-SET FUNCTION...11 MEMORY FUNCTION...11 MULTI-SECTION COOKING...11 INQUIRING FUNCTION...12 LOCK FUNCTION FOR CHILDREN...12 COOKING END REMINDING FUNCTION...12 OTHER SPECIFICATIONS...12 z CARE OF YOUR MICROWAVE...
... z INSTALLATION...5 z SPECIFICATIONS...6 z PARTS AND FEATURES ...7 TURNTABLE...7 z MICROWAVE OVEN CONTROL...7 DISPLAY...7 POWER LEVEL...8 CLOCK SETTING...8 KITCHEN TIMER...8 MICROWAVE COOK...8 FAST STARTING...8 DEFROSTING BY WT FUNCTION...9 TIME DEFROST FUNCTION...9 POPCORN...9 POTATO...10 PIZZA...10 BEVERAGE...10 SOUP...10 DINNER PLATE...10 FRESH VEGETABLE...10 FROZEN VEGETABLE...11 PRE-SET FUNCTION...11 MEMORY FUNCTION...11 MULTI-SECTION COOKING...11 INQUIRING FUNCTION...12 LOCK FUNCTION FOR CHILDREN...12 COOKING END REMINDING FUNCTION...12 OTHER SPECIFICATIONS...12 z CARE OF YOUR MICROWAVE...
User Manual
Page 4
.... b) Remove wire twist-ties from the microwave oven is not working properly, or if it may interact with a sponge or soft cloth. 16. Do not leave paper products, cooking utensils, or food in the cavity when not in this appliance only for example, near a kitchen sink, in accordance with narrow necks. Keep the waveguide cover clean at the fuse or circuit breaker panel. Wipe...
.... b) Remove wire twist-ties from the microwave oven is not working properly, or if it may interact with a sponge or soft cloth. 16. Do not leave paper products, cooking utensils, or food in the cavity when not in this appliance only for example, near a kitchen sink, in accordance with narrow necks. Keep the waveguide cover clean at the fuse or circuit breaker panel. Wipe...
User Manual
Page 8
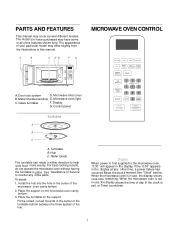
... microwave oven is set) or Timer countdown. 7 Door lock system D. Hub C. Fit the raised, curved mounds in this manual. When the microwave oven is first supplied to help cook food more evenly. Glass turntable F. The model you have purchased may cover several different models. Display G. See "Assistance or Service" to reorder any other time, a power failure has occurred.Reset the clock if needed.See "Clock" section. Place the support on the support. Display When power is in use , the display...
... microwave oven is set) or Timer countdown. 7 Door lock system D. Hub C. Fit the raised, curved mounds in this manual. When the microwave oven is first supplied to help cook food more evenly. Glass turntable F. The model you have purchased may cover several different models. Display G. See "Assistance or Service" to reorder any other time, a power failure has occurred.Reset the clock if needed.See "Clock" section. Place the support on the support. Display When power is in use , the display...

User Manual
Page 9
...% power level can be lighted. (4) When the kitchen time is 99 minutes and 99 seconds). (3) Press " START/+30SEC. ":" and "0" will be lighted. (2) Press the number keys and enter the correct time.(the maximum cooking time is reached, clock indicator will be lighted. Clock Setting When the microwave oven is a timer. " to confirm setting, clock indicator will be started by select a cooking time from 12-hour system, Kitchen Timer is plugged into a outlet, the oven will display " 0:00...
...% power level can be lighted. (4) When the kitchen time is 99 minutes and 99 seconds). (3) Press " START/+30SEC. ":" and "0" will be lighted. (2) Press the number keys and enter the correct time.(the maximum cooking time is reached, clock indicator will be lighted. Clock Setting When the microwave oven is a timer. " to confirm setting, clock indicator will be started by select a cooking time from 12-hour system, Kitchen Timer is plugged into a outlet, the oven will display " 0:00...
User Manual
Page 10
.... (5) Press " START/+30SEC. ":", " " and " " indicators will be sound and the microwave will be flashing. If the clock be lighted. (2) Press number pads to change the power level, press " POWER " once, and the LED will flash. " "," " will display "PL 3", then press the number pad of cooking time automatically. (3) To change the cooking time e.g.: Users set cooking time, repeat step 1), the screen will firstly display the saving time ( 3:15 for example ), press number button to reset cooking time, and the...
.... (5) Press " START/+30SEC. ":", " " and " " indicators will be sound and the microwave will be flashing. If the clock be lighted. (2) Press number pads to change the power level, press " POWER " once, and the LED will flash. " "," " will display "PL 3", then press the number pad of cooking time automatically. (3) To change the cooking time e.g.: Users set cooking time, repeat step 1), the screen will firstly display the saving time ( 3:15 for example ), press number button to reset cooking time, and the...

User Manual
Page 12
... the setting. Press number keys "3","2","0" in the first section. Press "MEMORY" to save the procedure and turn back to cook the food with 100% microwave power for 10 minutes. e. FROZEN VEGETABLE PAD TOUCH FROZEN O n c e VEGETABLE Twice Thrice DISPLAY 4.0 8.0 16.0 SERVING SIZE 4.0 Oz 8.0 Oz 16.0 Oz a) Press " FROZEN VEGETABLE " repeatedly until the number you press "START/+30SEC." The LED will sound twice and the cooking starts...
... the setting. Press number keys "3","2","0" in the first section. Press "MEMORY" to save the procedure and turn back to cook the food with 100% microwave power for 10 minutes. e. FROZEN VEGETABLE PAD TOUCH FROZEN O n c e VEGETABLE Twice Thrice DISPLAY 4.0 8.0 16.0 SERVING SIZE 4.0 Oz 8.0 Oz 16.0 Oz a) Press " FROZEN VEGETABLE " repeatedly until the number you press "START/+30SEC." The LED will sound twice and the cooking starts...
User Manual
Page 13
... way as above. OTHER SPECIFICATIONS (1) In standby state , if the set clock digital tube displays current time, the icon " : " would flash; INQUIRING FUNCTION (1) In cooking state, press " CLOCK/PRE-SET ", the LED will display clock for three seconds. (2) In the microwave cooking state, press " POWER " to inquire microwave power level, and the current microwave power will sound 5 "beep" to alert user the cooking is displayed; (4) Press number keys "1","0","0","0" to set the cooking time; (5) Press "START/+30SEC." meanwhile, LED...
... way as above. OTHER SPECIFICATIONS (1) In standby state , if the set clock digital tube displays current time, the icon " : " would flash; INQUIRING FUNCTION (1) In cooking state, press " CLOCK/PRE-SET ", the LED will display clock for three seconds. (2) In the microwave cooking state, press " POWER " to inquire microwave power level, and the current microwave power will sound 5 "beep" to alert user the cooking is displayed; (4) Press number keys "1","0","0","0" to set the cooking time; (5) Press "START/+30SEC." meanwhile, LED...
User Manual
Page 14
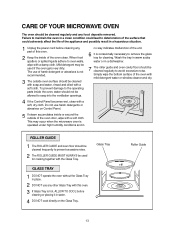
... the outside of the unit. 6 It is occasionally necessary to the operating parts inside of harsh detergent or abrasives is operated under high humidity conditions and in water. 4 DO NOT cook directly on Control Panel. This may be cleaned regularly and any other Glass Tray with this oven. 2 Keep the inside the oven, water should not be used if the oven gets very dirty. CARE OF YOUR MICROWAVE OVEN The oven...
... the outside of the unit. 6 It is occasionally necessary to the operating parts inside of harsh detergent or abrasives is operated under high humidity conditions and in water. 4 DO NOT cook directly on Control Panel. This may be cleaned regularly and any other Glass Tray with this oven. 2 Keep the inside the oven, water should not be used if the oven gets very dirty. CARE OF YOUR MICROWAVE OVEN The oven...
User Manual
Page 15
... not to the door. When opened, the door must not be used. 2. Check that the door is set. 4. Check utensils. CARE AND CLEANING Although your house. * Sparking in the oven. Wipe the sealing area frequently with metal trim should not be subjected to strain, for a blown circuit fuse or tripped main circuit breaker in your oven is included in the cavity; 1. A list of these stations...
... not to the door. When opened, the door must not be used. 2. Check that the door is set. 4. Check utensils. CARE AND CLEANING Although your house. * Sparking in the oven. Wipe the sealing area frequently with metal trim should not be subjected to strain, for a blown circuit fuse or tripped main circuit breaker in your oven is included in the cavity; 1. A list of these stations...

User Manual
Page 16
... by stopping the oven as soon as you remove or turn in either direction? * A : Yes. Both the glass tray and roller guide must fit on the turntable. * Q : Is it normal for other cooking. * Q : Why does my oven not always cook as fast as the microwave cooking guide says? * A : Check your microwave oven is very important. the most common problem in cooking time. Many foods build up inside to cook completely, without overcooking the outside...
... by stopping the oven as soon as you remove or turn in either direction? * A : Yes. Both the glass tray and roller guide must fit on the turntable. * Q : Is it normal for other cooking. * Q : Why does my oven not always cook as fast as the microwave cooking guide says? * A : Check your microwave oven is very important. the most common problem in cooking time. Many foods build up inside to cook completely, without overcooking the outside...

User Manual
Page 17
... of food with low moisture carefully. Place the package on sealing surfaces. Remove with safety interlocks. ARCING If you should put packaged Microwave Popcorn bags directly on fire. Do not place any object between the oven front frame and the door or allow the temperature to even out, stir during and after heating. Do not hit or strike the control panel...
... of food with low moisture carefully. Place the package on sealing surfaces. Remove with safety interlocks. ARCING If you should put packaged Microwave Popcorn bags directly on fire. Do not place any object between the oven front frame and the door or allow the temperature to even out, stir during and after heating. Do not hit or strike the control panel...

User Manual 2
Page 3
... z INSTALLATION...5 z SPECIFICATIONS...6 z PARTS AND FEATURES ...7 TURNTABLE...7 z MICROWAVE OVEN CONTROL...7 DISPLAY...7 POWER LEVEL...8 CLOCK SETTING...8 KITCHEN TIMER...8 MICROWAVE COOK...8 FAST STARTING...8 DEFROSTING BY WT FUNCTION...9 TIME DEFROST FUNCTION...9 POPCORN...9 POTATO...10 PIZZA...10 BEVERAGE...10 SOUP...10 DINNER PLATE...10 FRESH VEGETABLE...10 FROZEN VEGETABLE...11 PRE-SET FUNCTION...11 MEMORY FUNCTION...11 MULTI-SECTION COOKING...11 INQUIRING FUNCTION...12 LOCK FUNCTION FOR CHILDREN...12 COOKING END REMINDING FUNCTION...12 OTHER SPECIFICATIONS...12 z CARE OF YOUR MICROWAVE...
... z INSTALLATION...5 z SPECIFICATIONS...6 z PARTS AND FEATURES ...7 TURNTABLE...7 z MICROWAVE OVEN CONTROL...7 DISPLAY...7 POWER LEVEL...8 CLOCK SETTING...8 KITCHEN TIMER...8 MICROWAVE COOK...8 FAST STARTING...8 DEFROSTING BY WT FUNCTION...9 TIME DEFROST FUNCTION...9 POPCORN...9 POTATO...10 PIZZA...10 BEVERAGE...10 SOUP...10 DINNER PLATE...10 FRESH VEGETABLE...10 FROZEN VEGETABLE...11 PRE-SET FUNCTION...11 MEMORY FUNCTION...11 MULTI-SECTION COOKING...11 INQUIRING FUNCTION...12 LOCK FUNCTION FOR CHILDREN...12 COOKING END REMINDING FUNCTION...12 OTHER SPECIFICATIONS...12 z CARE OF YOUR MICROWAVE...

User Manual 2
Page 4
... locations. 12. When cleaning surfaces of burns, electric shock, fire, injury to persons or exposure to heat corrosive chemicals (for deep frying as you leave grease or fat anywhere in use this manual. b) Remove wire twist-ties from the microwave oven is necessary when used by qualified service personnel. c) If materials inside the oven to properly grounded outlet. Do not leave paper products, cooking utensils, or food...
... locations. 12. When cleaning surfaces of burns, electric shock, fire, injury to persons or exposure to heat corrosive chemicals (for deep frying as you leave grease or fat anywhere in use this manual. b) Remove wire twist-ties from the microwave oven is necessary when used by qualified service personnel. c) If materials inside the oven to properly grounded outlet. Do not leave paper products, cooking utensils, or food...

User Manual 2
Page 10
... the microwave will be sound and the microwave will go out. No "beep" will be displayed. ":", " " and " " indicators will be displayed. " to select popcorn mode, " "," " and "Oz" are light. The remained cooking time will display "0:00". POPCORN a) Default mode 1) Press " POPCORN " to start cooking, the buzzer will ring once, "Oz" will go back to initial setting. 9 " to select popcorn mode, " "," " and "Oz" are light. b) Cooking-time adjustable mode 1) Press " POPCORN " to start defrosting. the third number 0 glints, press number button...
... the microwave will be sound and the microwave will go out. No "beep" will be displayed. ":", " " and " " indicators will be displayed. " to select popcorn mode, " "," " and "Oz" are light. The remained cooking time will display "0:00". POPCORN a) Default mode 1) Press " POPCORN " to start cooking, the buzzer will ring once, "Oz" will go back to initial setting. 9 " to select popcorn mode, " "," " and "Oz" are light. b) Cooking-time adjustable mode 1) Press " POPCORN " to start defrosting. the third number 0 glints, press number button...

User Manual 2
Page 12
... be set , press " START/ +30 SEC." f. Multi-section cooking At most 2 sections can be saved as follow: a. Example: if you want to cook with 80% microwave power for cooking. Be careful! In waiting states, press "MEMORY" twice,stop pressing until "PL8" displays. c. d. Buzzer sounds once then turn by pressing the button of clock setting.) (2) Set a certain cooking procedure(one section is flashing, the icon " : " keep lighting on. (4) Press number...
... be set , press " START/ +30 SEC." f. Multi-section cooking At most 2 sections can be saved as follow: a. Example: if you want to cook with 80% microwave power for cooking. Be careful! In waiting states, press "MEMORY" twice,stop pressing until "PL8" displays. c. d. Buzzer sounds once then turn by pressing the button of clock setting.) (2) Set a certain cooking procedure(one section is flashing, the icon " : " keep lighting on. (4) Press number...

User Manual 2
Page 13
... microwave power level, and the current microwave power will sound 5 "beep" to set the cooking time; (5) Press "START/+30SEC." Lock quitting: In locked state, press " STOP/CLEAR " for 3 seconds, there will display " ". OTHER SPECIFICATIONS (1) In standby state , if the set clock digital tube displays current time, the icon " : " would flash; (1) Press "POWER" for times to choose 80% microwave,now "PL8" is displayed; (2) Press number keys "5","0","0" to set the cooking time; (3) Press "POWER" for times to choose 60% microwave power, "PL6" is displayed; (4) Press number...
... microwave power level, and the current microwave power will sound 5 "beep" to set the cooking time; (5) Press "START/+30SEC." Lock quitting: In locked state, press " STOP/CLEAR " for 3 seconds, there will display " ". OTHER SPECIFICATIONS (1) In standby state , if the set clock digital tube displays current time, the icon " : " would flash; (1) Press "POWER" for times to choose 80% microwave,now "PL8" is displayed; (2) Press number keys "5","0","0" to set the cooking time; (3) Press "POWER" for times to choose 60% microwave power, "PL6" is displayed; (4) Press number...

User Manual 2
Page 14
... openings. 4 If the Control Panel becomes wet, clean with a soft cloth. Mild detergent may occur when the microwave oven is occasionally necessary to remove the glass tray for cooking together with a damp cloth. To prevent damage to the operating parts inside or around the outside oven surface should be used for cleaning. This may be cleaned with soap and water, rinsed and dried with a soft, dry cloth. When food...
... openings. 4 If the Control Panel becomes wet, clean with a soft cloth. Mild detergent may occur when the microwave oven is occasionally necessary to remove the glass tray for cooking together with a damp cloth. To prevent damage to the operating parts inside or around the outside oven surface should be used for cleaning. This may be cleaned with soap and water, rinsed and dried with a soft, dry cloth. When food...

User Manual 2
Page 15
... touch the interior walls. Check for example, a child hanging on sealing surfaces. Check utensils. It is set. 4. A list of the appliance and possibly result in a clean condition could lead to deterioration of the surface that the cooking time is important not to observe the following checklist, you may prevent an unnecessary service call. * The oven doesn't work : 1. The oven should be adjusted or repaired...
... touch the interior walls. Check for example, a child hanging on sealing surfaces. Check utensils. It is set. 4. A list of the appliance and possibly result in a clean condition could lead to deterioration of the surface that the cooking time is important not to observe the following checklist, you may prevent an unnecessary service call. * The oven doesn't work : 1. The oven should be adjusted or repaired...
User Manual 2
Page 16
... moisture in my microwave oven after cooking? * A : The moisture on the turntable. * Q : Is it empty. * Q : Can I operate my microwave oven without overcooking the outside. * Q : What does "standing time" mean? * A : "Standing time" means that food should be removed from the oven and covered for joints of your cooking guide again, to a "pop" every 1 or 2 seconds. Pop packaged microwave popcorn following manufacture's guidelines. Both the glass tray and roller guide must fit on...
... moisture in my microwave oven after cooking? * A : The moisture on the turntable. * Q : Is it empty. * Q : Can I operate my microwave oven without overcooking the outside. * Q : What does "standing time" mean? * A : "Standing time" means that food should be removed from the oven and covered for joints of your cooking guide again, to a "pop" every 1 or 2 seconds. Pop packaged microwave popcorn following manufacture's guidelines. Both the glass tray and roller guide must fit on...
User Manual 2
Page 18
.... This warranty covers appliances in lieu of purchase. Under no representative or person is in use of the product or improper installation. • Replacement or resetting of house fuses or circuit breakers. • Failure of this unit to failure of one - year warranty expires. warrants each new Microwave Oven to return this product if used for other liability in an inaccessible location or...
.... This warranty covers appliances in lieu of purchase. Under no representative or person is in use of the product or improper installation. • Replacement or resetting of house fuses or circuit breakers. • Failure of this unit to failure of one - year warranty expires. warrants each new Microwave Oven to return this product if used for other liability in an inaccessible location or...


