User Manual
Page 1
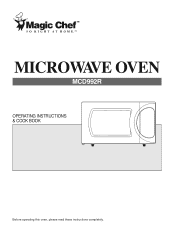
MICROWAVE OVEN MCD992R OPERATING INSTRUCTIONS & COOK BOOK Before operating this oven, please read these instructions completely.
MICROWAVE OVEN MCD992R OPERATING INSTRUCTIONS & COOK BOOK Before operating this oven, please read these instructions completely.
User Manual
Page 3
... INSTRUCTIONS ...3 • INSTALLATION ...4 • SPECIFICATIONS...5 • FEATURES DIAGRAM...6 • FEATURES DIAGRAM (CONTINUED) ...7 • OPERATION PROCEDURE...8 • CONTROLS...9 SETTING THE CLOCK ...9 DEFROSTING AUTOMATICALLY...10 SETTING COOKING TIMES & POWER LEVELS 11 EXPRESS COOKING ...11 AUTO COOK...12 QUICK DEFROST...13 POPCORN ...13 BEVERAGE...14 FROZEN MEAL...14 CHILD SAFETY LOCK...15 DISPLAY OFF...15 TO STOP THE OVEN WHILE THE OVEN IS OPERATING 15 • CARE OF YOUR MICROWAVE OVEN...16 • BEFORE YOU CALL FOR SERVICE...17 • CARE AND CLEANING...17...
... INSTRUCTIONS ...3 • INSTALLATION ...4 • SPECIFICATIONS...5 • FEATURES DIAGRAM...6 • FEATURES DIAGRAM (CONTINUED) ...7 • OPERATION PROCEDURE...8 • CONTROLS...9 SETTING THE CLOCK ...9 DEFROSTING AUTOMATICALLY...10 SETTING COOKING TIMES & POWER LEVELS 11 EXPRESS COOKING ...11 AUTO COOK...12 QUICK DEFROST...13 POPCORN ...13 BEVERAGE...14 FROZEN MEAL...14 CHILD SAFETY LOCK...15 DISPLAY OFF...15 TO STOP THE OVEN WHILE THE OVEN IS OPERATING 15 • CARE OF YOUR MICROWAVE OVEN...16 • BEFORE YOU CALL FOR SERVICE...17 • CARE AND CLEANING...17...
User Manual
Page 4
... not leave paper products, cooking utensils, or food in the cavity when not in a wet basement, near a kitchen sink, in use as you leave grease or fat anywhere in oven. c) Do not use only mild, nonabrasive soaps or detergents applied with narrow necks. Keep the waveguide cover clean at the fuse or circuit breaker panel. Do not operate the oven without appearing to be boiling...
... not leave paper products, cooking utensils, or food in the cavity when not in a wet basement, near a kitchen sink, in use as you leave grease or fat anywhere in oven. c) Do not use only mild, nonabrasive soaps or detergents applied with narrow necks. Keep the waveguide cover clean at the fuse or circuit breaker panel. Do not operate the oven without appearing to be boiling...

User Manual
Page 5
... and if not installed and used properly, that is in strict accordance with respect to the receiver. • Move the microwave oven away from the power cord under any radio or TV interference caused by providing an escape wire for an ISM Equipment pursuant to part 18 of FCC Rules, which can result in a risk of electric shock. However...
... and if not installed and used properly, that is in strict accordance with respect to the receiver. • Move the microwave oven away from the power cord under any radio or TV interference caused by providing an escape wire for an ISM Equipment pursuant to part 18 of FCC Rules, which can result in a risk of electric shock. However...
User Manual
Page 6
... not drape over unintentionally. 7. Install the microwave oven on by children or tripped over the counter top or tabletop where it can adversely affect oven wiring and contacts. 6. Do not block air vents. If any damage is located close to reduce the risks resulting from heat, steam or splashing liquids. Away from radio and TV sets. Check for damage such...
... not drape over unintentionally. 7. Install the microwave oven on by children or tripped over the counter top or tabletop where it can adversely affect oven wiring and contacts. 6. Do not block air vents. If any damage is located close to reduce the risks resulting from heat, steam or splashing liquids. Away from radio and TV sets. Check for damage such...

User Manual
Page 7
SPECIFICATIONS POWER SUPPLY INPUT POWER MICROWAVE ENERGY OUTPUT FREQUENCY OUTSIDE DIMENSIONS (W H D) CAVITY DIMENSIONS (W H D) CAVITY VOLUME NET WEIGHT TIMER POWER SELECTIONS 120V AC, 60Hz SINGLE PHASE WITH GROUNDING 1350 W 900 W 2,450MHz 18.3 x 11.0 x 15.0 in. (465 x 280 x 382 mm) 12.4 x 9.3 x 13.6 in. (314 x 235 x 346 mm) 0.9 cu.ft (26 Liters) APPROX. 24.1 lbs. 59 min. 99 sec. 10 Levels * Specifications are subject to change without notice. 18.3 15.0 11.0 5
SPECIFICATIONS POWER SUPPLY INPUT POWER MICROWAVE ENERGY OUTPUT FREQUENCY OUTSIDE DIMENSIONS (W H D) CAVITY DIMENSIONS (W H D) CAVITY VOLUME NET WEIGHT TIMER POWER SELECTIONS 120V AC, 60Hz SINGLE PHASE WITH GROUNDING 1350 W 900 W 2,450MHz 18.3 x 11.0 x 15.0 in. (465 x 280 x 382 mm) 12.4 x 9.3 x 13.6 in. (314 x 235 x 346 mm) 0.9 cu.ft (26 Liters) APPROX. 24.1 lbs. 59 min. 99 sec. 10 Levels * Specifications are subject to change without notice. 18.3 15.0 11.0 5
User Manual
Page 8
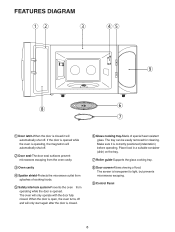
If the door is opened . FEATURES DIAGRAM 12 3 45 9 8 6 7 1 Door latch-When the door is closed it is transparent to light, but prevents microwaves escaping. 9 Control Panel 6 When the door is closed . The screen is correctly positioned (indentation) before operating. The tray can be easily removed for cleaning. Place food in a suitable container (dish) on the tray. 7 Roller guide-Supports the glass cooking tray. 8 Door screen-Allows viewing of special heat resistant glass. Make sure it...
If the door is opened . FEATURES DIAGRAM 12 3 45 9 8 6 7 1 Door latch-When the door is closed it is transparent to light, but prevents microwaves escaping. 9 Control Panel 6 When the door is closed . The screen is correctly positioned (indentation) before operating. The tray can be easily removed for cleaning. Place food in a suitable container (dish) on the tray. 7 Roller guide-Supports the glass cooking tray. 8 Door screen-Allows viewing of special heat resistant glass. Make sure it...
User Manual
Page 9
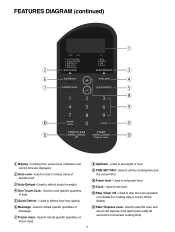
... food. 9 TIME SET PAD - Used to set the cooking time and the current time. 0 Power level - w Stop / Clear /off the display. Cooking time, power level, indicators and current time are displayed. 2 Auto cook - Used to defrost foods for weight. 4 One Touch Cook - Used to set power level. Used to set clock. FEATURES DIAGRAM (continued) 1 2 3 6 4 7 5 8 9 0 q w e 1 Display - Used to stop the oven operation or to delete the cooking data or to cook or reheat many of food. 5 Quick Defrost - Used to turn off - Used to microwave cooking time) 7 Used to start...
... food. 9 TIME SET PAD - Used to set the cooking time and the current time. 0 Power level - w Stop / Clear /off the display. Cooking time, power level, indicators and current time are displayed. 2 Auto cook - Used to defrost foods for weight. 4 One Touch Cook - Used to set power level. Used to set clock. FEATURES DIAGRAM (continued) 1 2 3 6 4 7 5 8 9 0 q w e 1 Display - Used to stop the oven operation or to delete the cooking data or to cook or reheat many of food. 5 Quick Defrost - Used to turn off - Used to microwave cooking time) 7 Used to start...
User Manual
Page 10
... sure the door is completely closed or the program has will automatically shut off. Time clock returns to a lower power level. The oven will not start cooking until the door is 5 The oven door can be opened during the oven operation, all information(except place during the oven operation, the oven stops cooking and all The glass tray and roller guide must always be in . Touch the POWER LEVEL pad once twice 3 times 4 times 5 times 6 times 7 times 8 times 9 times 10 times 11 times Power level (Display) P-HI P-90...
... sure the door is completely closed or the program has will automatically shut off. Time clock returns to a lower power level. The oven will not start cooking until the door is 5 The oven door can be opened during the oven operation, all information(except place during the oven operation, the oven stops cooking and all The glass tray and roller guide must always be in . Touch the POWER LEVEL pad once twice 3 times 4 times 5 times 6 times 7 times 8 times 9 times 10 times 11 times Power level (Display) P-HI P-90...

User Manual
Page 11
... correct time of day by touching the TIME SET pads in , the display will show " : 0" when the power comes back on. 1. Touch the CLOCK pad and re-enter the time. 9 If you to set and a error signal tone will sound. CONTROLS SETTING THE CLOCK When the oven is first plugged in sequence. 4. This is a 24 hour clock system. Touch the CLOCK pad. This is a 12 hour clock system. 2. Touch the CLOCK pad...
... correct time of day by touching the TIME SET pads in , the display will show " : 0" when the power comes back on. 1. Touch the CLOCK pad and re-enter the time. 9 If you to set and a error signal tone will sound. CONTROLS SETTING THE CLOCK When the oven is first plugged in sequence. 4. This is a 24 hour clock system. Touch the CLOCK pad. This is a 12 hour clock system. 2. Touch the CLOCK pad...
User Manual
Page 12
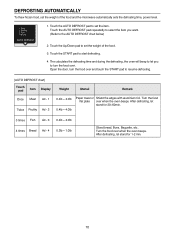
Open the door, turn the food over and touch the START pad to the AUTO DEFROST chart below) 2. Turn the food over when the oven beeps. Turn the food flat plate over when the oven beeps. After defrosting, let stand for 20~60min. 3 times Fish Ad - 3 0.4lb ~ 4.0lb 4 times Bread Ad - 4 0.2lb ~ 1.0lb Sliced bread, Buns, Baguette, etc.. DEFROSTING AUTOMATICALLY To thaw frozen food, set the weight of the food and the microwave automatically sets the defrosting time, power level. 1. The calculates...
Open the door, turn the food over and touch the START pad to the AUTO DEFROST chart below) 2. Turn the food over when the oven beeps. Turn the food flat plate over when the oven beeps. After defrosting, let stand for 20~60min. 3 times Fish Ad - 3 0.4lb ~ 4.0lb 4 times Bread Ad - 4 0.2lb ~ 1.0lb Sliced bread, Buns, Baguette, etc.. DEFROSTING AUTOMATICALLY To thaw frozen food, set the weight of the food and the microwave automatically sets the defrosting time, power level. 1. The calculates...

User Manual
Page 13
NOTE : Using lower power levels increases the cooking time which is finished the oven beeps three times, "End" appears in the display, the rotating plate stops turning and the oven light turns off. SETTING COOKING TIMES & POWER LEVELS 1. Touch the Power level pad to set the power level. Touch the Time set pad to set the cooking times. By repeatedly touching the START / Express cook pad, you can also extend reheating time to 5 minutes by simply touching the START / Express cook pad. When the cooking time ends, you touch the START / Express cook pad, ":30...
NOTE : Using lower power levels increases the cooking time which is finished the oven beeps three times, "End" appears in the display, the rotating plate stops turning and the oven light turns off. SETTING COOKING TIMES & POWER LEVELS 1. Touch the Power level pad to set the power level. Touch the Time set pad to set the cooking times. By repeatedly touching the START / Express cook pad, you can also extend reheating time to 5 minutes by simply touching the START / Express cook pad. When the cooking time ends, you touch the START / Express cook pad, ":30...
User Manual
Page 14
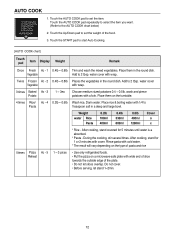
... medium sized potatoes 0.4 ~ 0.5lb. Touch the AUTO COOK pad repeatedly to select the item you want. (Refer to set the item. Touch the START pad to 2 tbsp. Place them on a microwave-safe plate with a fork. water cover Vegetable with wrap. Weight water Rice Pasta 0.2lb 180ml 400ml 0.4lb 330ml 800ml 0.6lb 480ml 1200ml Cover o x * Rice - AUTO COOK 1. Vegetable Add to start Auto Cooking. [AUTO COOK chart] Touch pad Item Display Weight Remark...
... medium sized potatoes 0.4 ~ 0.5lb. Touch the AUTO COOK pad repeatedly to select the item you want. (Refer to set the item. Touch the START pad to 2 tbsp. Place them on a microwave-safe plate with a fork. water cover Vegetable with wrap. Weight water Rice Pasta 0.2lb 180ml 400ml 0.4lb 330ml 800ml 0.6lb 480ml 1200ml Cover o x * Rice - AUTO COOK 1. Vegetable Add to start Auto Cooking. [AUTO COOK chart] Touch pad Item Display Weight Remark...
User Manual
Page 15
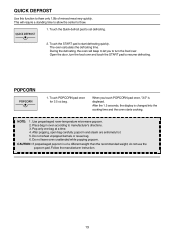
... weight than the recommended weight, do not use the popcorn pad. When you to set defrosting. 2. Touch the START pad to manufacturer's directions. 3. Follow the manufacturer instruction. 13 After popping, open bag carefully: popcorn and steam are extremely hot. 5. After the 1.5 seconds, the display is changed into the cooking time and the oven starts cooking. Place bag in oven according to start defrosting quickly. POPCORN 1. Touch the Quick defrost pad to turn the food over . Do not leave oven unattended while popping popcorn...
... weight than the recommended weight, do not use the popcorn pad. When you to set defrosting. 2. Touch the START pad to manufacturer's directions. 3. Follow the manufacturer instruction. 13 After popping, open bag carefully: popcorn and steam are extremely hot. 5. After the 1.5 seconds, the display is changed into the cooking time and the oven starts cooking. Place bag in oven according to start defrosting quickly. POPCORN 1. Touch the Quick defrost pad to turn the food over . Do not leave oven unattended while popping popcorn...

User Manual
Page 18
... oven walls, wipe with the Glass Tray. Simply wipe the bottom surface of the oven clean. The use any food deposits removed. Mild detergent may be washed in a dishwasher. 7 The roller guide and oven cavity floor should not be cleaned regularly and any other Glass Tray with this oven. 3 If Glass Tray is occasionally necessary to avoid excessive noise. To prevent damage to the operating parts inside or around the outside oven...
... oven walls, wipe with the Glass Tray. Simply wipe the bottom surface of the oven clean. The use any food deposits removed. Mild detergent may be washed in a dishwasher. 7 The roller guide and oven cavity floor should not be cleaned regularly and any other Glass Tray with this oven. 3 If Glass Tray is occasionally necessary to avoid excessive noise. To prevent damage to the operating parts inside or around the outside oven...
User Manual
Page 19
... cleaned regularly and any food deposits removed; 6. Check for example, a child hanging on sealing surfaces. A list of the surface that the door is securely plugged in the oven. Never use abrasive powders or pads. 3. Check that metal skewers or foil does not touch the interior walls. Wipe the sealing area frequently with safety interlocks. 2. The oven should be adjusted or repaired by a competent service...
... cleaned regularly and any food deposits removed; 6. Check for example, a child hanging on sealing surfaces. A list of the surface that the door is securely plugged in the oven. Never use abrasive powders or pads. 3. Check that metal skewers or foil does not touch the interior walls. Wipe the sealing area frequently with safety interlocks. 2. The oven should be adjusted or repaired by a competent service...

User Manual
Page 20
... cooking operation has been completed? * A : Standing time is removed from cooking food hitting the cool oven surface. * Q : Does microwave energy pass through the viewing screen in cooking time. Variations in the size, shape and weights and dimensions could require longer cooking time. How do eggs sometimes pop? * A : When baking or poaching eggs, the yolk may pop due to steam build-up enough internal heat to allow light...
... cooking operation has been completed? * A : Standing time is removed from cooking food hitting the cool oven surface. * Q : Does microwave energy pass through the viewing screen in cooking time. Variations in the size, shape and weights and dimensions could require longer cooking time. How do eggs sometimes pop? * A : When baking or poaching eggs, the yolk may pop due to steam build-up enough internal heat to allow light...

User Manual
Page 21
... not need to retain moisture. Some other plastics may break or crack if heated suddenly. ● Must remove the lid. Care must be taken choosing the utensil. Take care when removing the film as hot steam will escape. ▲ Only if boilable or oven-proof. COOKING INSTRUCTIONS Utensil Guide Only use utensils that are usually suitable, unless deco-rated with a metal trim. To cook food...
... not need to retain moisture. Some other plastics may break or crack if heated suddenly. ● Must remove the lid. Care must be taken choosing the utensil. Take care when removing the film as hot steam will escape. ▲ Only if boilable or oven-proof. COOKING INSTRUCTIONS Utensil Guide Only use utensils that are usually suitable, unless deco-rated with a metal trim. To cook food...

User Manual
Page 22
... explode. Undercooked foods can be too hot to handle. Pressure may catch on an open the door and correct the problem. Do not exceed the Microwave Popcorn manufacturers suggested popping time. ARCING If you should put packaged Microwave Popcorn bags directly on a microwave safe glass or ceramic plate to avoid overheating and cracking the oven tray. Arcing is caused by: • Metal or foil touching the side of...
... explode. Undercooked foods can be too hot to handle. Pressure may catch on an open the door and correct the problem. Do not exceed the Microwave Popcorn manufacturers suggested popping time. ARCING If you should put packaged Microwave Popcorn bags directly on a microwave safe glass or ceramic plate to avoid overheating and cracking the oven tray. Arcing is caused by: • Metal or foil touching the side of...
User Manual
Page 23
... new Microwave Oven to be free from defects in lieu of all labor and transportation expenses related to failure of the unit. • Repairs performed by an authorized service technician is not available. • The removal and reinstallation of 8 years. warrants the Magnetron (parts only) to assume for a period of your appliance if it is installed in an inaccessible location...
... new Microwave Oven to be free from defects in lieu of all labor and transportation expenses related to failure of the unit. • Repairs performed by an authorized service technician is not available. • The removal and reinstallation of 8 years. warrants the Magnetron (parts only) to assume for a period of your appliance if it is installed in an inaccessible location...


