User Manual
Page 3
... INSTRUCTIONS ...3 • INSTALLATION ...4 • SPECIFICATIONS...5 • FEATURES DIAGRAM...6 • FEATURES DIAGRAM (CONTINUED) ...7 • OPERATION PROCEDURE...8 • CONTROLS...9 SETTING THE CLOCK ...9 KITCHEN TIMER ...9 WEIGHT DEFROSTING ...10 TIME DEFROSTING ...10 COOKING IN ONE STAGE...11 COOKING IN TWO STAGES...11 +30 SEC...12 ONE TOUCH COOK ...12 ONE TOUCH COOK (CONTINUED) ...13 AUTO COOK...13 CHILD SAFETY LOCK...14 TO SET POWER SAVE MODE ...14 TO STOP THE OVEN WHITE THE OVEN IS OPERATING 14 • CARE OF YOUR MICROWAVE OVEN...15 • BEFORE YOU CALL FOR SERVICE...
... INSTRUCTIONS ...3 • INSTALLATION ...4 • SPECIFICATIONS...5 • FEATURES DIAGRAM...6 • FEATURES DIAGRAM (CONTINUED) ...7 • OPERATION PROCEDURE...8 • CONTROLS...9 SETTING THE CLOCK ...9 KITCHEN TIMER ...9 WEIGHT DEFROSTING ...10 TIME DEFROSTING ...10 COOKING IN ONE STAGE...11 COOKING IN TWO STAGES...11 +30 SEC...12 ONE TOUCH COOK ...12 ONE TOUCH COOK (CONTINUED) ...13 AUTO COOK...13 CHILD SAFETY LOCK...14 TO SET POWER SAVE MODE ...14 TO STOP THE OVEN WHITE THE OVEN IS OPERATING 14 • CARE OF YOUR MICROWAVE OVEN...15 • BEFORE YOU CALL FOR SERVICE...
User Manual
Page 4
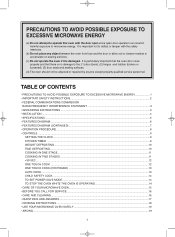
... of burns, electric shock, fire, injury to persons or exposure to excessive microwave energy: 11. Keep the waveguide cover clean at the fuse or circuit breaker panel. Read all times. Install or locate this appliance if it has a damaged cord or plug, if it is not working properly, or if it is properly sitting on the rotating base. Do not operate this appliance only...
... of burns, electric shock, fire, injury to persons or exposure to excessive microwave energy: 11. Keep the waveguide cover clean at the fuse or circuit breaker panel. Read all times. Install or locate this appliance if it has a damaged cord or plug, if it is not working properly, or if it is properly sitting on the rotating base. Do not operate this appliance only...

User Manual
Page 5
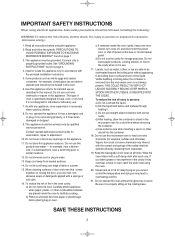
... comply with the manufacturer's instructions, may cause interference to radio and television reception. WARNING: Do not cut or remove the third (ground) prong from the receiver. • Plug the microwave oven into an outlet that is equipped with a cord having a grounding wire with respect to the receiver. • Move the microwave oven away from the power cord under any radio or...
... comply with the manufacturer's instructions, may cause interference to radio and television reception. WARNING: Do not cut or remove the third (ground) prong from the receiver. • Plug the microwave oven into an outlet that is equipped with a cord having a grounding wire with respect to the receiver. • Move the microwave oven away from the power cord under any radio or...
User Manual
Page 6
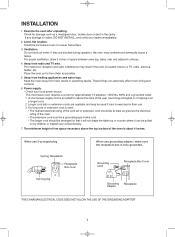
... Cover Grounding Receptacle Adaptor "THE CANADIAN ELECTRICAL CODE DOES NOT ALLOW THE USE OF THE GROUNDING ADAPTOR" 4 These things can be used : • The marked electrical rating of the cord set or extension cord should be arranged so that it will not drape the table top or counter where it can adversely affect oven wiring and contacts. 6. If a long cord or extension cord is used if care...
... Cover Grounding Receptacle Adaptor "THE CANADIAN ELECTRICAL CODE DOES NOT ALLOW THE USE OF THE GROUNDING ADAPTOR" 4 These things can be used : • The marked electrical rating of the cord set or extension cord should be arranged so that it will not drape the table top or counter where it can adversely affect oven wiring and contacts. 6. If a long cord or extension cord is used if care...

User Manual
Page 7
SPECIFICATIONS POWER SUPPLY INPUT POWER MICROWAVE ENERGY OUTPUT FREQUENCY OUTSIDE DIMENSIONS (W H D) CAVITY DIMENSIONS (W H D) CAVITY VOLUME NET WEIGHT TIMER POWER SELECTIONS * Specifications are subject to change without notice. 120V AC, 60Hz SINGLE PHASE WITH GROUNDING 1500 W 1000 W 2,450MHz 20.3 x 12.0 x 14.8 in. 14.0 x 9.4 x 14.1 in. 1.1 cu.ft APPROX. 29.1 lbs. 59 min. 99 sec. 10 Levels 20.3 14.8 12 5
SPECIFICATIONS POWER SUPPLY INPUT POWER MICROWAVE ENERGY OUTPUT FREQUENCY OUTSIDE DIMENSIONS (W H D) CAVITY DIMENSIONS (W H D) CAVITY VOLUME NET WEIGHT TIMER POWER SELECTIONS * Specifications are subject to change without notice. 120V AC, 60Hz SINGLE PHASE WITH GROUNDING 1500 W 1000 W 2,450MHz 20.3 x 12.0 x 14.8 in. 14.0 x 9.4 x 14.1 in. 1.1 cu.ft APPROX. 29.1 lbs. 59 min. 99 sec. 10 Levels 20.3 14.8 12 5

User Manual
Page 8
.... w Viewing screen - Automatically turns on the tray. To open the door push the door open button - This fits over the shaft in the oven for cooking together with the glass cooking tray. 0 Coupler - Do not cook food directly on during oven operating. 5 Safety interlock system 6 Control panel 7 Door open button. 8 Waveguide cover - Protects the microwave outlet from the oven cavity. 3 Oven cavity 4 Oven lamp - Made of food. Allows viewing of special heat resistant glass. If the door is opened while the oven is closed, it...
.... w Viewing screen - Automatically turns on the tray. To open the door push the door open button - This fits over the shaft in the oven for cooking together with the glass cooking tray. 0 Coupler - Do not cook food directly on during oven operating. 5 Safety interlock system 6 Control panel 7 Door open button. 8 Waveguide cover - Protects the microwave outlet from the oven cavity. 3 Oven cavity 4 Oven lamp - Made of food. Allows viewing of special heat resistant glass. If the door is opened while the oven is closed, it...

User Manual
Page 9
Used to cook or reheat specific quantites of favorite food. 3 ONE TOUCH COOK - Used to cook or reheat many of food. 4 DEFROST - Used to set power level. 7 CLOCK - Used to set the cooking time and the current time. 6 POWER - Used to stop the oven operation or to defrost foods for weight and time. 5 TIME SET PAD - Used to delete the cooking data. 9 START / +30 SEC - Used to set clock. 8 STOP / CLEAR - Used to start the oven and also used to set a reheat time. 7 Cooking time, power level, indicators and current time are displayed. 2 AUTO COOK - FEATURES DIAGRAM (...
Used to cook or reheat specific quantites of favorite food. 3 ONE TOUCH COOK - Used to cook or reheat many of food. 4 DEFROST - Used to set power level. 7 CLOCK - Used to set the cooking time and the current time. 6 POWER - Used to stop the oven operation or to defrost foods for weight and time. 5 TIME SET PAD - Used to delete the cooking data. 9 START / +30 SEC - Used to set clock. 8 STOP / CLEAR - Used to start the oven and also used to set a reheat time. 7 Cooking time, power level, indicators and current time are displayed. 2 AUTO COOK - FEATURES DIAGRAM (...
User Manual
Page 10
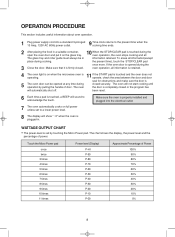
... Percentage of power. been reset. 6 Each time a pad is touched, a BEEP will sound to the present time when the cooking time ends. 2 10 After placing the food in a suitable container, open the oven door and put it is properly installed and plugged into a standard 3-pronged 13 Amp, 120V AC 60Hz power outlet. OPERATION PROCEDURE This section includes useful information about oven operation. 1 19 Plug power supply cord into the electrical outlet. 8 The display will...
... Percentage of power. been reset. 6 Each time a pad is touched, a BEEP will sound to the present time when the cooking time ends. 2 10 After placing the food in a suitable container, open the oven door and put it is properly installed and plugged into a standard 3-pronged 13 Amp, 120V AC 60Hz power outlet. OPERATION PROCEDURE This section includes useful information about oven operation. 1 19 Plug power supply cord into the electrical outlet. 8 The display will...
User Manual
Page 11
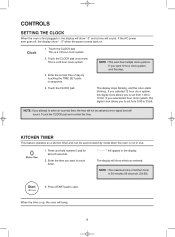
... time of kitchen timer is up, the oven will not be used at stand-by touching the TIME SET pads in , the display will show " : 0" when the power comes back on. 1. The display stops blinking, and the colon starts blinking. If the AC power ever goes off, the display show ":0" and a tone will sound. Enter the time you to set from 0:00 to 23:59. CONTROLS SETTING THE CLOCK When the oven...
... time of kitchen timer is up, the oven will not be used at stand-by touching the TIME SET pads in , the display will show " : 0" when the power comes back on. 1. The display stops blinking, and the colon starts blinking. If the AC power ever goes off, the display show ":0" and a tone will sound. Enter the time you to set from 0:00 to 23:59. CONTROLS SETTING THE CLOCK When the oven...

User Manual
Page 12
... defrosting time is the weight defrosting mode. 2. TIME DEFROSTING When DEFROST is the time defrosting mode. The display will show you touched. The display will show you what you will hear 3 beeps. 10 NOTE: Your oven can be programmed for 0.5lb. ~ 6.5lb. Touch the DEFROST pad. When the defrosting time ends, you touched. Touch the TIME SET pads for inputing the desired weights. 3. Touch the START pad. The oven beeps during the defrosting cycle to signal that the food needs to show you touch...
... defrosting time is the weight defrosting mode. 2. TIME DEFROSTING When DEFROST is the time defrosting mode. The display will show you touched. The display will show you what you will hear 3 beeps. 10 NOTE: Your oven can be programmed for 0.5lb. ~ 6.5lb. Touch the DEFROST pad. When the defrosting time ends, you touched. Touch the TIME SET pads for inputing the desired weights. 3. Touch the START pad. The oven beeps during the defrosting cycle to signal that the food needs to show you touch...

User Manual
Page 13
... TIME SET pads for the desired cooking time. 5. When the oven beeps, turn over, break apart and/or redistribute the food. At the end of meats. Touch the START pad. Touch the DEFROST pad. (Select the weight defrosting mode or the time defrosting mode.) 2. Touch the TIME SET pads for the defrosting time or weight you touched. 4. The display will cook at full power. 2. NOTE: Your oven can be defrosted fully before cooking. 1. COOKING IN ONE STAGE 1. Touch the POWER pad. (Select the desired power level...
... TIME SET pads for the desired cooking time. 5. When the oven beeps, turn over, break apart and/or redistribute the food. At the end of meats. Touch the START pad. Touch the DEFROST pad. (Select the weight defrosting mode or the time defrosting mode.) 2. Touch the TIME SET pads for the defrosting time or weight you touched. 4. The display will cook at full power. 2. NOTE: Your oven can be defrosted fully before cooking. 1. COOKING IN ONE STAGE 1. Touch the POWER pad. (Select the desired power level...

User Manual
Page 14
... not melt sufficiently, cook a few seconds longer. 4. Use only frozen pizza made for 30 seconds at a time 2. +30 sec +30 sec allows you to 5 minutes by simply touching the +30 sec pad. To increase quantity, touch the chosen pad until the number in the display is changed into the cooking time and the oven start cooking * FROZEN PIZZA * • 7 oz : Touch the FROZEN PIZZA...
... not melt sufficiently, cook a few seconds longer. 4. Use only frozen pizza made for 30 seconds at a time 2. +30 sec +30 sec allows you to 5 minutes by simply touching the +30 sec pad. To increase quantity, touch the chosen pad until the number in the display is changed into the cooking time and the oven start cooking * FROZEN PIZZA * • 7 oz : Touch the FROZEN PIZZA...
User Manual
Page 15
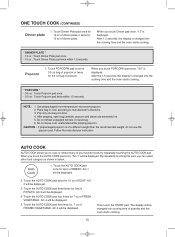
... changed into the cooking time and the oven starts cooking. * POPCORN * • 3.5 oz : Touch Popcorn pad once. • 3.0 oz : Touch Popcorn pad twice within 1.5 seconds. 1. ONE TOUCH COOK (CONTINUED) 1. After 1.5 seconds, the display is displayed. By repeatedly touching this pad, you can select other food category as shown in oven according to cook or reheat many of FROZEN VEGETABLE. When you to manufacturer's directions. 3. Use prepackaged room-temperature microwave popcorn. 2. Touch the AUTO COOK pad four times...
... changed into the cooking time and the oven starts cooking. * POPCORN * • 3.5 oz : Touch Popcorn pad once. • 3.0 oz : Touch Popcorn pad twice within 1.5 seconds. 1. ONE TOUCH COOK (CONTINUED) 1. After 1.5 seconds, the display is displayed. By repeatedly touching this pad, you can select other food category as shown in oven according to cook or reheat many of FROZEN VEGETABLE. When you to manufacturer's directions. 3. Use prepackaged room-temperature microwave popcorn. 2. Touch the AUTO COOK pad four times...
User Manual
Page 16
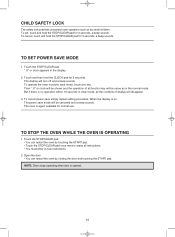
... normal use. " :0" or clock appears in the normal mode. The oven is no operation within 10 seconds in power save mode, touch any key. Touch the STOP/CLEAR pad. Then " :0" or clock will be shown and the operation of display will be canceled and a beep sounds. But if there is again available for 3 seconds, a beep sounds. Open the door. • You can restart the oven by touching the START pad. • Touch the STOP...
... normal use. " :0" or clock appears in the normal mode. The oven is no operation within 10 seconds in power save mode, touch any key. Touch the STOP/CLEAR pad. Then " :0" or clock will be shown and the operation of display will be canceled and a beep sounds. But if there is again available for 3 seconds, a beep sounds. Open the door. • You can restart the oven by touching the START pad. • Touch the STOP...

User Manual
Page 17
... the unit. When food spatters or spilled liquids adhere to remove the glass tray for cooking together with a soft, dry cloth. Do not use harsh detergents or abrasives on the Glass Tray. (Except for popcorn) Glass Tray Roller Guide 15 GLASS TRAY 1 DO NOT operate the oven without the Glass Tray in water. 4 DO NOT cook directly on Control Panel. 5 If steam accumulates inside or around the outside oven surface should be cleaned with soap and...
... the unit. When food spatters or spilled liquids adhere to remove the glass tray for cooking together with a soft, dry cloth. Do not use harsh detergents or abrasives on the Glass Tray. (Except for popcorn) Glass Tray Roller Guide 15 GLASS TRAY 1 DO NOT operate the oven without the Glass Tray in water. 4 DO NOT cook directly on Control Panel. 5 If steam accumulates inside or around the outside oven surface should be cleaned with soap and...
User Manual
Page 18
... used. 2. Check for example, a child hanging on sealing surfaces. Check utensils. Check that the power cord is securely plugged in the cavity; 1. When opened door or any food deposits removed; 6. The oven should be subjected to strain, for a blown circuit fuse or tripped main circuit breaker in your oven is provided with safety interlocks. 2. Check that metal skewers or foil does not touch the interior walls...
... used. 2. Check for example, a child hanging on sealing surfaces. Check utensils. Check that the power cord is securely plugged in the cavity; 1. When opened door or any food deposits removed; 6. The oven should be subjected to strain, for a blown circuit fuse or tripped main circuit breaker in your oven is provided with safety interlocks. 2. Check that metal skewers or foil does not touch the interior walls...
User Manual
Page 19
.... Cooking guide times and heat settings are made to allow it normal for the turntable to hold a large dish? * A : No. Variations in glass cookware. 17 The turntable rotates clockwise or counterclockwise, depending on the rotation of the motor when the cooking cycle begins. * Q : Can I accidentally ran my microwave oven without overcooking the outside. * Q : What does "standing time" mean? * A : "Standing time" means that food should be removed from cooking food...
.... Cooking guide times and heat settings are made to allow it normal for the turntable to hold a large dish? * A : No. Variations in glass cookware. 17 The turntable rotates clockwise or counterclockwise, depending on the rotation of the motor when the cooking cycle begins. * Q : Can I accidentally ran my microwave oven without overcooking the outside. * Q : What does "standing time" mean? * A : "Standing time" means that food should be removed from cooking food...

User Manual
Page 20
... touch the food. Should not be used . The following table lists various utensil and indicates whether and how they should be used in the microwave oven, the microwaves must therefore be taken choosing the utensil. Also to worry. Take care when removing the film as hot steam will escape. ▲ Only if boilable or oven-proof. COOKING INSTRUCTIONS Utensil Guide Only use utensils that are suitable for use...
... touch the food. Should not be used . The following table lists various utensil and indicates whether and how they should be used in the microwave oven, the microwaves must therefore be taken choosing the utensil. Also to worry. Take care when removing the film as hot steam will escape. ▲ Only if boilable or oven-proof. COOKING INSTRUCTIONS Utensil Guide Only use utensils that are suitable for use...
User Manual
Page 21
Do not subject the oven door to handle. Food Never use the minimum recipe cooking time. Do not heat eggs in the oven. Do not pop corn in a paper bag unless it can be too hot to strain or weight such as a child hanging on a microwave safe glass or ceramic plate to food (upturned edges act like antennas). • Metal, such as they may contain impurities which...
Do not subject the oven door to handle. Food Never use the minimum recipe cooking time. Do not heat eggs in the oven. Do not pop corn in a paper bag unless it can be too hot to strain or weight such as a child hanging on a microwave safe glass or ceramic plate to food (upturned edges act like antennas). • Metal, such as they may contain impurities which...
User Manual
Page 22
... losses due to failure of the unit. • Inside components such as turntable, roller guide, light bulbs, etc. • Repairs performed by an authorized service agent. Limited Warranty MC Appliance Corporation warrants each new Microwave Oven to be free from defects in material and workmanship for a period of eight years. This warranty gives you specific legal rights, and you may also have failed...
... losses due to failure of the unit. • Inside components such as turntable, roller guide, light bulbs, etc. • Repairs performed by an authorized service agent. Limited Warranty MC Appliance Corporation warrants each new Microwave Oven to be free from defects in material and workmanship for a period of eight years. This warranty gives you specific legal rights, and you may also have failed...


