
Manual - English
Page 2
... your destination. special events; It is your responsibility to assess the risks associated with all traffic laws. • Roads, points of interest (POIs), business and service locations may change over heating. • Only use the car charger approved for class B digital devices, in your vehicle, whether using the Magellan RoadMate receiver, these safety rules must be followed to prevent accidents that it should not be removed. Charging the Magellan RoadMate...
... your destination. special events; It is your responsibility to assess the risks associated with all traffic laws. • Roads, points of interest (POIs), business and service locations may change over heating. • Only use the car charger approved for class B digital devices, in your vehicle, whether using the Magellan RoadMate receiver, these safety rules must be followed to prevent accidents that it should not be removed. Charging the Magellan RoadMate...
Manual - English
Page 3
...: (1) This device may cause undesired operation. The Magellan RoadMate must accept any interference, including interference that to the following measures: • Reorient or relocate the receiving antenna. • Increase the separation between the equipment and receiver. • Connect the equipment into an outlet on , the user is cautioned that interference will not occur in a particular installation. IC statement Operation is subject...
...: (1) This device may cause undesired operation. The Magellan RoadMate must accept any interference, including interference that to the following measures: • Reorient or relocate the receiving antenna. • Increase the separation between the equipment and receiver. • Connect the equipment into an outlet on , the user is cautioned that interference will not occur in a particular installation. IC statement Operation is subject...
Manual - English
Page 5
... RoadMate ...2 Installation Instructions 3 Selecting the Location ...3 Using the Adhesive Disk ...3 Securing the Car Cradle to the Windshield or Adhesive Disk 3 Attaching the Magellan RoadMate receiver to the Car Cradle 4 Adjusting the Mount for Optimum Viewing 4 Connecting Power ...4 Routing the Cable ...4 Checking Connection and Final Adjustments 4 Security ...5 Fundamentals ...7 Powering on the Magellan RoadMate Receiver 7 Volume ...7 Brightness ...7 Main Menu ...8 Keypad ...9 Notes on Entering Data ...9 Smart City Search ...10 QuickSpell ...10 Map Screen ...11 Current Location Screen...
... RoadMate ...2 Installation Instructions 3 Selecting the Location ...3 Using the Adhesive Disk ...3 Securing the Car Cradle to the Windshield or Adhesive Disk 3 Attaching the Magellan RoadMate receiver to the Car Cradle 4 Adjusting the Mount for Optimum Viewing 4 Connecting Power ...4 Routing the Cable ...4 Checking Connection and Final Adjustments 4 Security ...5 Fundamentals ...7 Powering on the Magellan RoadMate Receiver 7 Volume ...7 Brightness ...7 Main Menu ...8 Keypad ...9 Notes on Entering Data ...9 Smart City Search ...10 QuickSpell ...10 Map Screen ...11 Current Location Screen...

Manual - English
Page 7
... Settings 29 Setting Languages 29 Setting Auto Power 29 Setting Brightness 29 Setting the Time Format 29 Selecting the Time Zone (daylight savings on/off 29 Selecting Units of Measure 30 Map Options ...30 Night Mode ...30 Setting Auto Night Map Display 30 Setting Heading Up or North Up in 2D Mode 30 Assigning Visible POIs 30 Setting Auto Zoom on Turns 30 Setting Highway Lane Assist 30 Sound ...31 Setting Volume from Settings 31 Muting the Sound from Settings 31 Turning off Button Sounds 31 Navigation Preferences ...31 Setting The Default Route...
... Settings 29 Setting Languages 29 Setting Auto Power 29 Setting Brightness 29 Setting the Time Format 29 Selecting the Time Zone (daylight savings on/off 29 Selecting Units of Measure 30 Map Options ...30 Night Mode ...30 Setting Auto Night Map Display 30 Setting Heading Up or North Up in 2D Mode 30 Assigning Visible POIs 30 Setting Auto Zoom on Turns 30 Setting Highway Lane Assist 30 Sound ...31 Setting Volume from Settings 31 Muting the Sound from Settings 31 Turning off Button Sounds 31 Navigation Preferences ...31 Setting The Default Route...
Manual - English
Page 9
... AAA-approved places to -Speech) for driving instructions. The user interface for fast, convenient access to favorite destinations. • Store your home address and quickly get routing details to your home. • Enter and save . • Find emergency addresses and phone numbers quickly and easily. Even with a list of the GPS chipset installed in the Magellan RoadMate receiver will be able to follow these instructions while reading them on the highway. The...
... AAA-approved places to -Speech) for driving instructions. The user interface for fast, convenient access to favorite destinations. • Store your home address and quickly get routing details to your home. • Enter and save . • Find emergency addresses and phone numbers quickly and easily. Even with a list of the GPS chipset installed in the Magellan RoadMate receiver will be able to follow these instructions while reading them on the highway. The...
Manual - English
Page 11
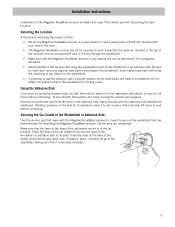
... snaps in place. Some states have laws restricting the mounting of the adjustable mount is securely mounted. 3 Make sure that the Magellan RoadMate receiver or any device on the windshield. • If planning to use the adhesive disk, a smooth surface on the disk for 5 minutes to allow it will first need to be mounted in such a way that the antenna, (located in the up position. Carefully...
... snaps in place. Some states have laws restricting the mounting of the adjustable mount is securely mounted. 3 Make sure that the Magellan RoadMate receiver or any device on the windshield. • If planning to use the adhesive disk, a smooth surface on the disk for 5 minutes to allow it will first need to be mounted in such a way that the antenna, (located in the up position. Carefully...
Manual - English
Page 12
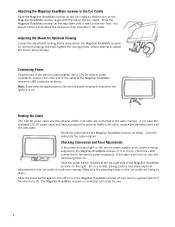
... vehicle power adapter into the cable retainer. Once set, tighten the locking knobs. (Never attempt to adjust the mount while driving.) Connecting Power Plug the end of the Magellan RoadMate receiver) to the vehicle power receptacle. Slide the Magellan RoadMate receiver all the way down until it is connected and ready for optimum viewing. Connect the other end of the vehicle to the Magellan RoadMate receiver's USB connector as shown. Make sure the adjusting knobs on the car...
... vehicle power adapter into the cable retainer. Once set, tighten the locking knobs. (Never attempt to adjust the mount while driving.) Connecting Power Plug the end of the Magellan RoadMate receiver) to the vehicle power receptacle. Slide the Magellan RoadMate receiver all the way down until it is connected and ready for optimum viewing. Connect the other end of the vehicle to the Magellan RoadMate receiver's USB connector as shown. Make sure the adjusting knobs on the car...
Manual - English
Page 16
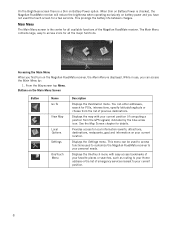
... Menu contains large, easy to access icons for POIs, intersections, specify latitude/longitude or choose from the GPS signals) indicated by : 1. This prolongs the battery life between charges. When Dim on the Main Menu Screen Button Name Go To View Map Local Options Settings OneTouch Menu Description Displays the Destination menu. Displays the map with easy access bookmarks of your favorite places or searches, such as routing to your Home address or the list of the Magellan RoadMate receiver...
... Menu contains large, easy to access icons for POIs, intersections, specify latitude/longitude or choose from the GPS signals) indicated by : 1. This prolongs the battery life between charges. When Dim on the Main Menu Screen Button Name Go To View Map Local Options Settings OneTouch Menu Description Displays the Destination menu. Displays the map with easy access bookmarks of your favorite places or searches, such as routing to your Home address or the list of the Magellan RoadMate receiver...
Manual - English
Page 17
... the POI or street name you enter are displayed in black, characters that have numbers in by the Magellan RoadMate receiver are a few useful tips. • Check for entering an address number.) (Enter City only) While entering a city, press the List button to bring up a list of cities beginning with the characters entered. Selecting From List When a list of cities previously entered. Tap on the right to move the list up a list of using only...
... the POI or street name you enter are displayed in black, characters that have numbers in by the Magellan RoadMate receiver are a few useful tips. • Check for entering an address number.) (Enter City only) While entering a city, press the List button to bring up a list of cities beginning with the characters entered. Selecting From List When a list of cities previously entered. Tap on the right to move the list up a list of using only...
Manual - English
Page 19
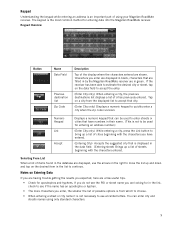
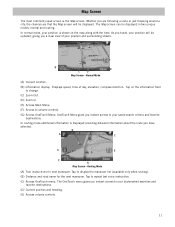
... menu. OneTouch Menu gives you have selected. Routing Mode (A) Turn instructions for the next maneuver. As you travel, your position is the Map screen. Normal Mode (A) Current location. (B) Information display. Tap to display the maneuver list (available only when routing). (B) Distance and road name for next maneuver. In normal mode, your position will be displayed in two unique modes: normal and routing. G A F B E CD Map Screen - B A C G D E F H Map Screen - Displays speed, time of your position and surrounding streets. Map Screen The most commonly used screen...
... menu. OneTouch Menu gives you have selected. Routing Mode (A) Turn instructions for the next maneuver. As you travel, your position is the Map screen. Normal Mode (A) Current location. (B) Information display. Tap to display the maneuver list (available only when routing). (B) Distance and road name for next maneuver. In normal mode, your position will be displayed in two unique modes: normal and routing. G A F B E CD Map Screen - B A C G D E F H Map Screen - Displays speed, time of your position and surrounding streets. Map Screen The most commonly used screen...
Manual - English
Page 20
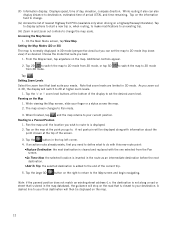
... large GO button on the map. Choose the mode that is displayed. 2. to switch the map to Pan mode. 3. As you can also display distance to do with this new route point: •Replace Destination: the next destination is cleared and replaced with information about the point chosen at the point you best. 1. Pan the map until the location you need to define what to destination, estimated time of the screen. 3. If an active route already exists...
... large GO button on the map. Choose the mode that is displayed. 2. to switch the map to Pan mode. 3. As you can also display distance to do with this new route point: •Replace Destination: the next destination is cleared and replaced with information about the point chosen at the point you best. 1. Pan the map until the location you need to define what to destination, estimated time of the screen. 3. If an active route already exists...
Manual - English
Page 21
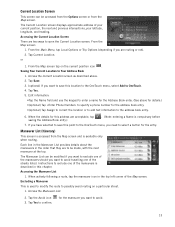
...: entering a Name is available only when routing. Tap the Avoid icon 3. Instructions to be made, with the next maneuver at the top. Accessing the Maneuver List 1. Tap Yes to open the Current Location screen. From the Map screen: 1. When actively following a route, tap the maneuver icon in this location to the OneTouch menu, select Add to the address book entry. 6. Tap Current Location. Maneuver List (Itinerary) This screen is accessed from the Map screen. Accessing the Current Location Screen...
...: entering a Name is available only when routing. Tap the Avoid icon 3. Instructions to be made, with the next maneuver at the top. Accessing the Maneuver List 1. Tap Yes to open the Current Location screen. From the Map screen: 1. When actively following a route, tap the maneuver icon in this location to the OneTouch menu, select Add to the address book entry. 6. Tap Current Location. Maneuver List (Itinerary) This screen is accessed from the Map screen. Accessing the Current Location Screen...
Manual - English
Page 22
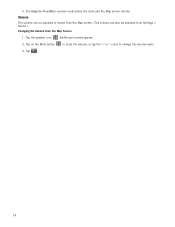
The Magellan RoadMate receiver recalculates the route and the Map screen returns. Tap the speaker icon . Tap on the Mute button to mute the volume, or tap the '+' or '-' icons to change the volume levels. 3. Volume The volume can be adjusted or muted from the Map screen. (The volume can also be adjusted from Settings > Sound.) Changing the Volume from the Map Screen 1. Additional controls appear. 2. 4. Tap . 14
The Magellan RoadMate receiver recalculates the route and the Map screen returns. Tap the speaker icon . Tap on the Mute button to mute the volume, or tap the '+' or '-' icons to change the volume levels. 3. Volume The volume can be adjusted or muted from the Map screen. (The volume can also be adjusted from Settings > Sound.) Changing the Volume from the Map Screen 1. Additional controls appear. 2. 4. Tap . 14

Manual - English
Page 23
... enter the street number for the street name. • Use the keypad to select the destination of the city, entering the ZIP code for the city or by entering the name of the route. A screen appears with the address of the selected location, the estimated time of arrival (ETA), the distance to bring up a list of cities with the ZIP code, or • the center of the above, starting...
... enter the street number for the street name. • Use the keypad to select the destination of the city, entering the ZIP code for the city or by entering the name of the route. A screen appears with the address of the selected location, the estimated time of arrival (ETA), the distance to bring up a list of cities with the ZIP code, or • the center of the above, starting...
Manual - English
Page 25
... want to change the routing method. 6. Select the destination from the list. 4. • To enter a ZIP code: if needed, tap the Zip Code button. Tips on the right to return to the Map screen and start navigating Routing to a Previous Destination (Method 1) 1. Previous Destinations Routing to a Previous Destination (Method 2) 1. Tap the large GO button on Entering Addresses Quickly • When you want to change the routing method. 6. Access the list of a city or a street, Magellan software only displays those characters...
... want to change the routing method. 6. Select the destination from the list. 4. • To enter a ZIP code: if needed, tap the Zip Code button. Tips on the right to return to the Map screen and start navigating Routing to a Previous Destination (Method 1) 1. Previous Destinations Routing to a Previous Destination (Method 2) 1. Tap the large GO button on Entering Addresses Quickly • When you want to change the routing method. 6. Access the list of a city or a street, Magellan software only displays those characters...
Manual - English
Page 26
...; (optional) Tap to specify a phone number for this location to the OneTouch Menu, select Add to OneTouch. 5. Tap the desired address book entry. Tap Yes. 6. Creating a New Entry in Your Address Book by Category/Name." 3. When the details for the address book entry. • (optional) Tap Assign to correct the location or to add text information to clear the list. 3. 7. Routing to change the routing method. 4. If you want to the Map screen and start navigating.
...; (optional) Tap to specify a phone number for this location to the OneTouch Menu, select Add to OneTouch. 5. Tap the desired address book entry. Tap Yes. 6. Creating a New Entry in Your Address Book by Category/Name." 3. When the details for the address book entry. • (optional) Tap Assign to correct the location or to add text information to clear the list. 3. 7. Routing to change the routing method. 4. If you want to the Map screen and start navigating.
Manual - English
Page 37
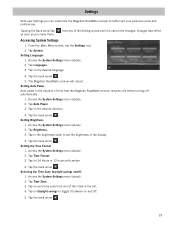
... Magellan RoadMate receiver will not cancel the changes. Tap Auto Power. 3. Access the System Settings menu (above ). 2. from one of the Setting screens will reboot. Tap the back arrow . 5. Tap on /off . 5. Setting Languages 1. Tap the back arrow . Access the System Settings menu (above ). 2. Access the System Settings menu (above ). 2. Tap Brightness. 3. Tap Time Format. 3. Settings With user Settings you make them. Tapping the Back arrow Tap as soon as you can customize the Magellan RoadMate receiver...
... Magellan RoadMate receiver will not cancel the changes. Tap Auto Power. 3. Access the System Settings menu (above ). 2. from one of the Setting screens will reboot. Tap the back arrow . 5. Tap on /off . 5. Setting Languages 1. Tap the back arrow . Access the System Settings menu (above ). 2. Access the System Settings menu (above ). 2. Tap Brightness. 3. Tap Time Format. 3. Settings With user Settings you make them. Tapping the Back arrow Tap as soon as you can customize the Magellan RoadMate receiver...

Manual - English
Page 39
... Settings icon. 2. Unchecking Button Sounds will allow the receiver to use U turns when necessary to a turn off Button Sounds 1. Avoiding Toll Roads 1. When the data has been backed up data, address book and other data on an optional micro SD card inserted in your Magellan RoadMate receiver. From the Main Menu screen, tap the Settings icon. 2. Tap Navigation Preferences. 3. Backing Up and Restoring Data Backup and restore provides a way of storing the address book and other data will mute all sounds. Sound Setting Volume from Settings 1. From the Main Menu screen...
... Settings icon. 2. Unchecking Button Sounds will allow the receiver to use U turns when necessary to a turn off Button Sounds 1. Avoiding Toll Roads 1. When the data has been backed up data, address book and other data on an optional micro SD card inserted in your Magellan RoadMate receiver. From the Main Menu screen, tap the Settings icon. 2. Tap Navigation Preferences. 3. Backing Up and Restoring Data Backup and restore provides a way of storing the address book and other data will mute all sounds. Sound Setting Volume from Settings 1. From the Main Menu screen...
Manual - English
Page 40
... setting with the Magellan RoadMate receiver turned off. Currently there are available and calculate the position more quickly. 1. Insert a micro SD card in your receiver that require entering a code but you are not receiving satellite information quickly due to travelling over 800 km/500 mi with a previous backup available on the inserted micro SD card. • Tap Restore All Default Settings to delete all user data and reset all settings to access the GPS Status screen.) Viewing Product Information 1. Use the same search methods (address, POI, Coordinate...
... setting with the Magellan RoadMate receiver turned off. Currently there are available and calculate the position more quickly. 1. Insert a micro SD card in your receiver that require entering a code but you are not receiving satellite information quickly due to travelling over 800 km/500 mi with a previous backup available on the inserted micro SD card. • Tap Restore All Default Settings to delete all user data and reset all settings to access the GPS Status screen.) Viewing Product Information 1. Use the same search methods (address, POI, Coordinate...
Manual - English
Page 44
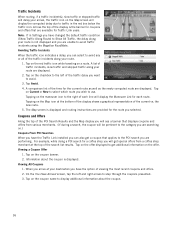
... coupons presented. 3. Tapping on Current or New to select which route you have changed the default traffic condition (Show Traffic Along Route) to Show All Traffic, the delay along your destination you wish to the POI search you are displayed. A comparison list of the display is displayed and routing instructions are provided for coupons and offers that applies to use. the new route. 5. Tap on the Map icon at the bottom of the...
... coupons presented. 3. Tapping on Current or New to select which route you have changed the default traffic condition (Show Traffic Along Route) to Show All Traffic, the delay along your destination you wish to the POI search you are displayed. A comparison list of the display is displayed and routing instructions are provided for coupons and offers that applies to use. the new route. 5. Tap on the Map icon at the bottom of the...


