
Manual - English
Page 2
... exposed to direct sunlight for your Magellan RoadMate receiver. It is your responsibility to assess the risks associated with all traffic laws. • Roads, points of the road, interfere with your Magellan RoadMate receiver. In the event that it does not obstruct the driver's view of interest (POIs), business and service locations may change over heating. • Only use the car charger approved for your state regarding windshield mounting. bridge height...
... exposed to direct sunlight for your Magellan RoadMate receiver. It is your responsibility to assess the risks associated with all traffic laws. • Roads, points of the road, interfere with your Magellan RoadMate receiver. In the event that it does not obstruct the driver's view of interest (POIs), business and service locations may change over heating. • Only use the car charger approved for your state regarding windshield mounting. bridge height...
Manual - English
Page 3
... antenna or transmitter. The Magellan RoadMate must follow the specific operating instructions for help. If this equipment. This transmitter must be installed and operated at a distance no guarantee that may cause undesired operation of the device. This device may not cause interference and 2. End users must be used with any interference received, including interference that interference will not occur in conjunction with this equipment. Operation with Part...
... antenna or transmitter. The Magellan RoadMate must follow the specific operating instructions for help. If this equipment. This transmitter must be installed and operated at a distance no guarantee that may cause undesired operation of the device. This device may not cause interference and 2. End users must be used with any interference received, including interference that interference will not occur in conjunction with this equipment. Operation with Part...
Manual - English
Page 5
... RoadMate ...2 Installation Instructions 3 Selecting the Location ...3 Using the Adhesive Disk ...3 Securing the Car Cradle to the Windshield or Adhesive Disk 3 Attaching the Magellan RoadMate receiver to the Car Cradle 4 Adjusting the Mount for Optimum Viewing 4 Connecting Power ...4 Routing the Cable ...4 Checking Connection and Final Adjustments 4 Security ...5 Fundamentals ...7 Powering on the Magellan RoadMate Receiver 7 Volume ...7 Brightness ...7 Main Menu ...8 Keypad ...9 Notes on Entering Data ...9 Smart City Search ...10 QuickSpell ...10 Map Screen ...11 Current Location Screen...
... RoadMate ...2 Installation Instructions 3 Selecting the Location ...3 Using the Adhesive Disk ...3 Securing the Car Cradle to the Windshield or Adhesive Disk 3 Attaching the Magellan RoadMate receiver to the Car Cradle 4 Adjusting the Mount for Optimum Viewing 4 Connecting Power ...4 Routing the Cable ...4 Checking Connection and Final Adjustments 4 Security ...5 Fundamentals ...7 Powering on the Magellan RoadMate Receiver 7 Volume ...7 Brightness ...7 Main Menu ...8 Keypad ...9 Notes on Entering Data ...9 Smart City Search ...10 QuickSpell ...10 Map Screen ...11 Current Location Screen...

Manual - English
Page 7
... Settings 29 Setting Languages 29 Setting Auto Power 29 Setting Brightness 29 Setting the Time Format 29 Selecting the Time Zone (daylight savings on/off 29 Selecting Units of Measure 30 Map Options ...30 Night Mode ...30 Setting Auto Night Map Display 30 Setting Heading Up or North Up in 2D Mode 30 Assigning Visible POIs 30 Setting Auto Zoom on Turns 30 Setting Highway Lane Assist 30 Sound ...31 Setting Volume from Settings 31 Muting the Sound from Settings 31 Turning off Button Sounds 31 Navigation Preferences ...31 Setting The Default Route...
... Settings 29 Setting Languages 29 Setting Auto Power 29 Setting Brightness 29 Setting the Time Format 29 Selecting the Time Zone (daylight savings on/off 29 Selecting Units of Measure 30 Map Options ...30 Night Mode ...30 Setting Auto Night Map Display 30 Setting Heading Up or North Up in 2D Mode 30 Assigning Visible POIs 30 Setting Auto Zoom on Turns 30 Setting Highway Lane Assist 30 Sound ...31 Setting Volume from Settings 31 Muting the Sound from Settings 31 Turning off Button Sounds 31 Navigation Preferences ...31 Setting The Default Route...
Manual - English
Page 9
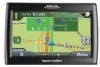
... you location, so your destination. Magellan RoadMate 147x Series Receiver The Magellan® RoadMate® receiver is a vehicle navigation product that utilizes GPS signals from the OneTouch menu. • View POIs that are ahead of you on the highway. With the Magellan RoadMate receiver you can: • Save searches and addresses under the OneTouch™ menu for fast, convenient access to favorite destinations. • Store your home address and quickly get routing information to that address. • Route to an address that...
... you location, so your destination. Magellan RoadMate 147x Series Receiver The Magellan® RoadMate® receiver is a vehicle navigation product that utilizes GPS signals from the OneTouch menu. • View POIs that are ahead of you on the highway. With the Magellan RoadMate receiver you can: • Save searches and addresses under the OneTouch™ menu for fast, convenient access to favorite destinations. • Store your home address and quickly get routing information to that address. • Route to an address that...
Manual - English
Page 11
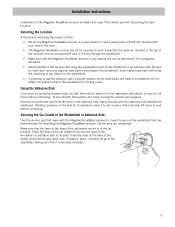
... the dash board will first need to cure before continuing. Selecting the Location A few tips on the disk for mounting the Magellan RoadMate receiver. Place the base of the car cradle firmly over the area of the sky through the windshield. • Make sure that the Magellan RoadMate receiver or any device on the windshield. • If planning to use the adhesive disk, a smooth...
... the dash board will first need to cure before continuing. Selecting the Location A few tips on the disk for mounting the Magellan RoadMate receiver. Place the base of the car cradle firmly over the area of the sky through the windshield. • Make sure that the Magellan RoadMate receiver or any device on the windshield. • If planning to use the adhesive disk, a smooth...
Manual - English
Page 12
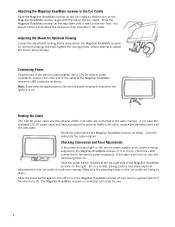
... Mount for Optimum Viewing Loosen the adjustment locking knobs and position the Magellan RoadMate receiver for optimum viewing. Routing the Cable The 12V DC power cable and the optional Traffic Link cable are firmly in the same manner. Checking Connection and Final Adjustments If the power indicator light on the vehicle power adaptor is on, power is connected and ready for use. 4 The Magellan RoadMate receiver is being supplied to the Magellan RoadMate receiver. Attaching the Magellan RoadMate receiver to the Car...
... Mount for Optimum Viewing Loosen the adjustment locking knobs and position the Magellan RoadMate receiver for optimum viewing. Routing the Cable The 12V DC power cable and the optional Traffic Link cable are firmly in the same manner. Checking Connection and Final Adjustments If the power indicator light on the vehicle power adaptor is on, power is connected and ready for use. 4 The Magellan RoadMate receiver is being supplied to the Magellan RoadMate receiver. Attaching the Magellan RoadMate receiver to the Car...
Manual - English
Page 16
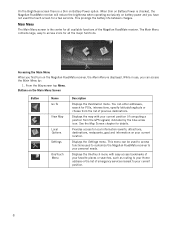
... the brightness when operating exclusively on battery power and you first turn on the Main Menu Screen Button Name Go To View Map Local Options Settings OneTouch Menu Description Displays the Destination menu. Provides access to your personal needs. You can be used to access functions used the touch screen for POIs, intersections, specify latitude/longitude or choose from the GPS signals) indicated by : 1. Accessing the Main Menu When you have not used to customize the Magellan RoadMate receiver to local information...
... the brightness when operating exclusively on battery power and you first turn on the Main Menu Screen Button Name Go To View Map Local Options Settings OneTouch Menu Description Displays the Destination menu. Provides access to your personal needs. You can be used to access functions used the touch screen for POIs, intersections, specify latitude/longitude or choose from the GPS signals) indicated by : 1. Accessing the Main Menu When you have not used to customize the Magellan RoadMate receiver to local information...
Manual - English
Page 20
... switch to the Map screen and begin navigating. Panning on the map. The map screen changes to a Panned Position 1. Routing to Pan mode. 3. A red push pin will stop on the map. 12 Tap to display options to start a new trip or, when routing, to make modifications to an existing trip. (H) Zoom in 3D, the display will then be displayed along a road or street that is not along with the one selected from 2D mode. the destination...
... switch to the Map screen and begin navigating. Panning on the map. The map screen changes to a Panned Position 1. Routing to Pan mode. 3. A red push pin will stop on the map. 12 Tap to display options to start a new trip or, when routing, to make modifications to an existing trip. (H) Zoom in 3D, the display will then be displayed along a road or street that is not along with the one selected from 2D mode. the destination...
Manual - English
Page 21
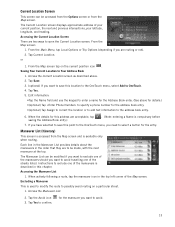
... Address Book entry.) . (Note: entering a Name is available only when routing. Excluding a Maneuver This is described in the top left corner of the Map screen. The Current Location screen displays approximate address of your current position, the next and previous intersections, your latitude, longitude, and heading. or 1. Edit information: •Tap the Name field and use the keypad to enter a name for the maneuver you want to avoid. 13 Instructions...
... Address Book entry.) . (Note: entering a Name is available only when routing. Excluding a Maneuver This is described in the top left corner of the Map screen. The Current Location screen displays approximate address of your current position, the next and previous intersections, your latitude, longitude, and heading. or 1. Edit information: •Tap the Name field and use the keypad to enter a name for the maneuver you want to avoid. 13 Instructions...

Manual - English
Page 23
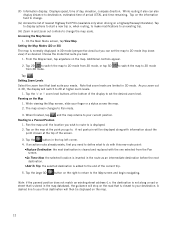
... entered. • To enter a ZIP code: if needed, tap the Zip Code button to switch to create a route from the list. 4. Tap the large GO button on the street name to bring up a list of a city. A screen appears with the zip code entered. Fastest Time). 7. (optional) Tap Options if you start typing. Tip: If you know at least a part of the city, entering the ZIP code for is used city. 1. From the Main Menu...
... entered. • To enter a ZIP code: if needed, tap the Zip Code button to switch to create a route from the list. 4. Tap the large GO button on the street name to bring up a list of a city. A screen appears with the zip code entered. Fastest Time). 7. (optional) Tap Options if you start typing. Tip: If you know at least a part of the city, entering the ZIP code for is used city. 1. From the Main Menu...
Manual - English
Page 37
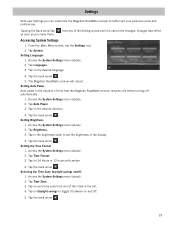
... Menu screen, tap the Settings icon. 2. Tap the back arrow . Setting Brightness 1. Tap the back arrow . Tap the back arrow . Tap Time Zone. 3. Settings With user Settings you make them. Tap Auto Power. 3. Selecting the Time Zone (daylight savings on 24 Hours or 12 hours with am/pm. 4. The Magellan RoadMate receiver will not cancel the changes. Tap Brightness. 3. Access the System Settings menu (above ). 2. Tap the back arrow . 29 Access the System Settings menu...
... Menu screen, tap the Settings icon. 2. Tap the back arrow . Setting Brightness 1. Tap the back arrow . Tap the back arrow . Tap Time Zone. 3. Settings With user Settings you make them. Tap Auto Power. 3. Selecting the Time Zone (daylight savings on 24 Hours or 12 hours with am/pm. 4. The Magellan RoadMate receiver will not cancel the changes. Tap Brightness. 3. Access the System Settings menu (above ). 2. Tap the back arrow . 29 Access the System Settings menu...
Manual - English
Page 40
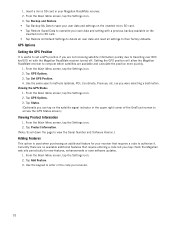
... to view the Serial Number and Software Version.) Adding Features This option is useful to their factory defaults. From the Main Menu screen, tap the Settings icon. 2. Tap Add Feature. 3. Use the same search methods (address, POI, Coordinate, Previous, etc.) as you can tap on the inserted micro SD card. • Tap Restore All Default Settings to delete all user data and reset all settings to set a GPS position if you are available and calculate the position more quickly. 1. GPS Options Setting the GPS Position...
... to view the Serial Number and Software Version.) Adding Features This option is useful to their factory defaults. From the Main Menu screen, tap the Settings icon. 2. Tap Add Feature. 3. Use the same search methods (address, POI, Coordinate, Previous, etc.) as you can tap on the inserted micro SD card. • Tap Restore All Default Settings to delete all user data and reset all settings to set a GPS position if you are available and calculate the position more quickly. 1. GPS Options Setting the GPS Position...

Manual - English
Page 44
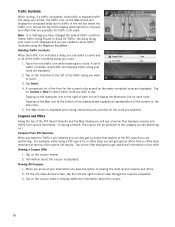
... the traffic icon. Tap on the red traffic icon while traveling on Current or New to select which route you selected. Viewing All Coupons 1. Tap on the offer. A list of the current vs. The Map screen is displayed and routing instructions are performing. Viewing a Coupon Offer 1. the new route. 5. Coupons and Offers Along the top of each route. Tap on the offer displayed to use. For example, while doing a POI search for the route you...
... the traffic icon. Tap on the red traffic icon while traveling on Current or New to select which route you selected. Viewing All Coupons 1. Tap on the offer. A list of the current vs. The Map screen is displayed and routing instructions are performing. Viewing a Coupon Offer 1. the new route. 5. Coupons and Offers Along the top of each route. Tap on the offer displayed to use. For example, while doing a POI search for the route you...
User Manual
Page 2
... vehicle type, weight, height, width, load and speed restrictions); The driver should enter data or program the Magellan RoadMate receiver while the vehicle is moving. neighborhood quality or safety; road or lane closures; special events; For example, do not leave it exposed to direct sunlight for an extended period of time. • Take care when mounting the Magellan RoadMate receiver in your vehicle, whether using the Magellan RoadMate receiver, these safety rules must be removed. Battery...
... vehicle type, weight, height, width, load and speed restrictions); The driver should enter data or program the Magellan RoadMate receiver while the vehicle is moving. neighborhood quality or safety; road or lane closures; special events; For example, do not leave it exposed to direct sunlight for an extended period of time. • Take care when mounting the Magellan RoadMate receiver in your vehicle, whether using the Magellan RoadMate receiver, these safety rules must be removed. Battery...

User Manual
Page 5
... Connection and Final Adjustments 4 Security ...6 Fundamentals ...7 Powering on the Magellan RoadMate receiver 7 Checking Battery Level 7 Volume ...8 Brightness ...8 Main Menu ...9 Keypad ...9 Selecting QWERTY or ABC Keyboard 10 Notes on Entering Data 10 Smart City Search 10 QuickSpell ...11 Map Screen ...12 Current Location Screen 14 Accessing the Current Location Screen 14 Saving Your Current Location to Your Address Book 14 Maneuver List (Itinerary 14 Accessing the Maneuver List 14 Excluding a Maneuver 14 Volume ...15 Changing the Volume from the Map Screen 15 Enter Address...
... Connection and Final Adjustments 4 Security ...6 Fundamentals ...7 Powering on the Magellan RoadMate receiver 7 Checking Battery Level 7 Volume ...8 Brightness ...8 Main Menu ...9 Keypad ...9 Selecting QWERTY or ABC Keyboard 10 Notes on Entering Data 10 Smart City Search 10 QuickSpell ...11 Map Screen ...12 Current Location Screen 14 Accessing the Current Location Screen 14 Saving Your Current Location to Your Address Book 14 Maneuver List (Itinerary 14 Accessing the Maneuver List 14 Excluding a Maneuver 14 Volume ...15 Changing the Volume from the Map Screen 15 Enter Address...
User Manual
Page 7
... POIs 31 Setting Auto Zoom on Turns 31 Setting Highway Lane Assist 31 Sound ...32 Setting Volume from Settings 32 Muting the Sound 32 Turning off Button Sounds 32 Setting Volume Levels 32 Navigation Preferences 32 Setting The Default Route Method 32 Setting The Turn Warning Alert Sounds 32 Enabling U Turn Guidance 32 Avoiding Toll Roads 32 Viewing Current Location 32 Setting Keyboard 33 Adding Features 33 GPS Options ...33 Setting the GPS Position 33 Viewing the GPS Status 33 Backing Up and Restoring Data 33 Viewing Product Information 34 Traffic...
... POIs 31 Setting Auto Zoom on Turns 31 Setting Highway Lane Assist 31 Sound ...32 Setting Volume from Settings 32 Muting the Sound 32 Turning off Button Sounds 32 Setting Volume Levels 32 Navigation Preferences 32 Setting The Default Route Method 32 Setting The Turn Warning Alert Sounds 32 Enabling U Turn Guidance 32 Avoiding Toll Roads 32 Viewing Current Location 32 Setting Keyboard 33 Adding Features 33 GPS Options ...33 Setting the GPS Position 33 Viewing the GPS Status 33 Backing Up and Restoring Data 33 Viewing Product Information 34 Traffic...
User Manual
Page 9
... to favorite destinations. • Store your home address and quickly get routing details to your home. • Enter and save . • Access AAA Member Roadside Assistance™ information from satellites to calculate your precise location and compute navigational information that can be accessed at any point of interest (POI) that has been preloaded into your Magellan RoadMate receiver. • Create a route with the improved GPS chipset, the receiver may never need routing information to many destinations. •...
... to favorite destinations. • Store your home address and quickly get routing details to your home. • Enter and save . • Access AAA Member Roadside Assistance™ information from satellites to calculate your precise location and compute navigational information that can be accessed at any point of interest (POI) that has been preloaded into your Magellan RoadMate receiver. • Create a route with the improved GPS chipset, the receiver may never need routing information to many destinations. •...

User Manual
Page 41
... data. 1. Setting the GPS position will be restored at any time. Tap Keyboard. 3. GPS Options Setting the GPS Position It is used when purchasing an additional feature for new features, enhancements or even software updates. 1. Setting Keyboard 1. The Magellan RoadMate receiver cannot append backed up data, address book and other data on an optional micro SD card inserted in the code you restore from backed up data to set a GPS position if you were selecting a destination. From the Main Menu screen, tap the Settings icon...
... data. 1. Setting the GPS position will be restored at any time. Tap Keyboard. 3. GPS Options Setting the GPS Position It is used when purchasing an additional feature for new features, enhancements or even software updates. 1. Setting Keyboard 1. The Magellan RoadMate receiver cannot append backed up data, address book and other data on an optional micro SD card inserted in the code you restore from backed up data to set a GPS position if you were selecting a destination. From the Main Menu screen, tap the Settings icon...
User Manual
Page 44
... list of viewing the most recent coupons and offers. 2. Tapping on the coupon name to Show All Traffic, the delay along your destination you are displayed. For example, while doing a POI search for the route you will display the computed delay due to traffic in Settings you have changed the default traffic condition (Show Traffic Along Route) to display additional information about the coupon is displayed and routing instructions are displayed. 2. The Map screen...
... list of viewing the most recent coupons and offers. 2. Tapping on the coupon name to Show All Traffic, the delay along your destination you are displayed. For example, while doing a POI search for the route you will display the computed delay due to traffic in Settings you have changed the default traffic condition (Show Traffic Along Route) to display additional information about the coupon is displayed and routing instructions are displayed. 2. The Map screen...


