User Manual (English)
Page 2
... manual to prevent unnecessary problem. To prevent the damage to trouble shooting guide of the unit is found, please refer to the screen, avoid touching it is squalid, please use the unit in the car becomes normal before operating the unit. 5. During operating the unit, " not available or illegal. No fierce impact to the LCD monitor when it with after-sales service center. 6. " will display if the current operation...
... manual to prevent unnecessary problem. To prevent the damage to trouble shooting guide of the unit is found, please refer to the screen, avoid touching it is squalid, please use the unit in the car becomes normal before operating the unit. 5. During operating the unit, " not available or illegal. No fierce impact to the LCD monitor when it with after-sales service center. 6. " will display if the current operation...
User Manual (English)
Page 4
Contents Before using Front panel 01 Remote control 02 Basic operations Power on/off 04 M U T E 0 4 Adjust the volume...........04 Main menu/Source menu and selection 04 Reset the unit 04 Radio mode Select radio mode........... 05 Select band 05 Auto tuning 05 Manual tuning 05 Auto save 05 Manual save 05 Local seeking 05 EQ selection 06 Recall the preset stations..... 06 RDS mode AF function 07 TA function 07 PTY function 07...
Contents Before using Front panel 01 Remote control 02 Basic operations Power on/off 04 M U T E 0 4 Adjust the volume...........04 Main menu/Source menu and selection 04 Reset the unit 04 Radio mode Select radio mode........... 05 Select band 05 Auto tuning 05 Manual tuning 05 Auto save 05 Manual save 05 Local seeking 05 EQ selection 06 Recall the preset stations..... 06 RDS mode AF function 07 TA function 07 PTY function 07...
User Manual (English)
Page 5
Contents Voice transfer 18 Hangup 18 Scan phone book........... 18 Look for calling record.......19 Play music 19 DVB-T 20 iPod mode 21 Other modes AUX 22 Rearview 22 NAVIGATION 22 Wall paper 22 SETUP Setup steps 23 Time 23 GPS 24 Radio 24 Video 24 Calibration 25 Volume 25 EQ 26 Tr o u b l e s h o o t i n g 2 7 Device Connection........29 Specifications............32 Appendix 35
Contents Voice transfer 18 Hangup 18 Scan phone book........... 18 Look for calling record.......19 Play music 19 DVB-T 20 iPod mode 21 Other modes AUX 22 Rearview 22 NAVIGATION 22 Wall paper 22 SETUP Setup steps 23 Time 23 GPS 24 Radio 24 Video 24 Calibration 25 Volume 25 EQ 26 Tr o u b l e s h o o t i n g 2 7 Device Connection........29 Specifications............32 Appendix 35
User Manual (English)
Page 6
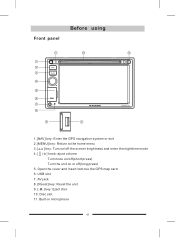
Built-in microphone 01 Open the cover and insert/remove the GPS map card 6. USB slot 7. AV jack 8. [Reset] key: Reset the unit 9. [ ] key: Eject disc 10. Front panel Before using M-DVD5561R 8 1.[NAV] key: Enter the GPS navigation system or exit 2.[MENU] key: Return to the home menu 3.[ ] key: Turn on/off the screen brightness and enter the nighttime mode 4.[ / ] knob: ajust volume Turn mute on/off(short press) Turn the unit on or off(long press) 5. Disc slot 11.
Built-in microphone 01 Open the cover and insert/remove the GPS map card 6. USB slot 7. AV jack 8. [Reset] key: Reset the unit 9. [ ] key: Eject disc 10. Front panel Before using M-DVD5561R 8 1.[NAV] key: Enter the GPS navigation system or exit 2.[MENU] key: Return to the home menu 3.[ ] key: Turn on/off the screen brightness and enter the nighttime mode 4.[ / ] knob: ajust volume Turn mute on/off(short press) Turn the unit on or off(long press) 5. Disc slot 11.
User Manual (English)
Page 7
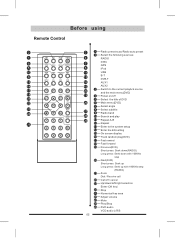
... MENU ANGLE SUBTITLE GPS 8 iPod BAND GOTO REPT A-B REPT USB B-T SETUP SEL OSD RDM DVB-T AUX1 AUX2 18 ZOOM PROG 3 Switch to the current playbck source and the main menu(DVD) Power on/off VOL OK Select the title of DVD Main menu(DVD) Select angle MUTE 8 Select subtitle Radio band AUDIO Search and play Repeat A-B Repeat Enter to the system setup 10+ Enter the EQ setting On screen display...
... MENU ANGLE SUBTITLE GPS 8 iPod BAND GOTO REPT A-B REPT USB B-T SETUP SEL OSD RDM DVB-T AUX1 AUX2 18 ZOOM PROG 3 Switch to the current playbck source and the main menu(DVD) Power on/off VOL OK Select the title of DVD Main menu(DVD) Select angle MUTE 8 Select subtitle Radio band AUDIO Search and play Repeat A-B Repeat Enter to the system setup 10+ Enter the EQ setting On screen display...
User Manual (English)
Page 9
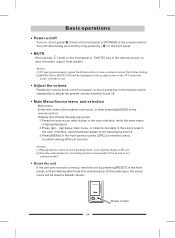
... control; Turn off by pressing [RESET] in the remote control, to shut the audio output from system. Notices: (1)Playing Source refers to switch among different sources. Reset button 04 Basic operations Power on/off Turn on remote control, to unit's working mode, such as DVD, Radio or BT, etc. (2)To some external device, its working mode is inaccessible if the device is not connected well. MUTE Short-press...
... control; Turn off by pressing [RESET] in the remote control, to shut the audio output from system. Notices: (1)Playing Source refers to switch among different sources. Reset button 04 Basic operations Power on/off Turn on remote control, to unit's working mode, such as DVD, Radio or BT, etc. (2)To some external device, its working mode is inaccessible if the device is not connected well. MUTE Short-press...
User Manual (English)
Page 12
... source after the traffic announcement has been received. If no matter what media source is touched (e.g. Using this problem. To activate AF function, touch the [AF] button on the screen. The unit returns to assist automatic tuning. Ten PTY options will display on the user interface. RDS mode The unit provides basic functions of program being broadcast (e.g. The TA function can settle this information, a radio can...
... source after the traffic announcement has been received. If no matter what media source is touched (e.g. Using this problem. To activate AF function, touch the [AF] button on the screen. The unit returns to assist automatic tuning. Ten PTY options will display on the user interface. RDS mode The unit provides basic functions of program being broadcast (e.g. The TA function can settle this information, a radio can...
User Manual (English)
Page 17
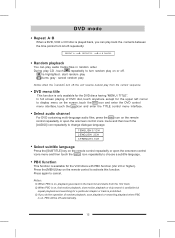
... on the screen,touch the MENU icon and enter the DVD control menu interface,touch the TITLE icon and enter the TITLE control menu interface. PBC function This function is available for the DVD discs having "MENU / TITLE". Select audio channel For DVD containing multi-language audio files, press the AUDIO icon on the remote control repeatedly or open the onscreen control icons menu and then touch the [AUDIO] icon repeatedly to change dialogue language. 1 ENGLISH...
... on the screen,touch the MENU icon and enter the DVD control menu interface,touch the TITLE icon and enter the TITLE control menu interface. PBC function This function is available for the DVD discs having "MENU / TITLE". Select audio channel For DVD containing multi-language audio files, press the AUDIO icon on the remote control repeatedly or open the onscreen control icons menu and then touch the [AUDIO] icon repeatedly to change dialogue language. 1 ENGLISH...
User Manual (English)
Page 18
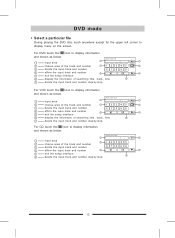
... VCD,touch the icon to display information and shown as below: 1 input area please input track: 1 _/1 7 2 choose area of the track and number 2 12345 6 3 delete the input track and number 6 7 8 9 0 4 affirm the input track and number 3 5 exit the setup interface OK 5 6 display the informaion of searching:title、track、time 4 7 delete the input track and number step by step For CD,touch the icon to display menu on the screen. DVD mode Select a particular file...
... VCD,touch the icon to display information and shown as below: 1 input area please input track: 1 _/1 7 2 choose area of the track and number 2 12345 6 3 delete the input track and number 6 7 8 9 0 4 affirm the input track and number 3 5 exit the setup interface OK 5 6 display the informaion of searching:title、track、time 4 7 delete the input track and number step by step For CD,touch the icon to display menu on the screen. DVD mode Select a particular file...
User Manual (English)
Page 22
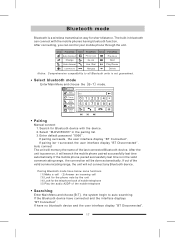
.... Select bluetooth mode Enter Main Menu and choose the [B-T] mode. If the mobile phone paired successfully last time is in the pairing list. 3.Enter default password "0000". If out of the mobile telephone Searching Enter Main Menu and choose [B-T], the system begin to all Bluetooth units is not guaranteed. If pairing succeeds, the user interface display "BT Connected", If pairing isn't suncceed,the user interface display "BT Disconnected". Bluetooth Auto Connect Change Auto Answer Call Record Phone book Dial: 01234* 56789# Pairing Manual connect 1.Search...
.... Select bluetooth mode Enter Main Menu and choose the [B-T] mode. If the mobile phone paired successfully last time is in the pairing list. 3.Enter default password "0000". If out of the mobile telephone Searching Enter Main Menu and choose [B-T], the system begin to all Bluetooth units is not guaranteed. If pairing succeeds, the user interface display "BT Connected", If pairing isn't suncceed,the user interface display "BT Disconnected". Bluetooth Auto Connect Change Auto Answer Call Record Phone book Dial: 01234* 56789# Pairing Manual connect 1.Search...
User Manual (English)
Page 23
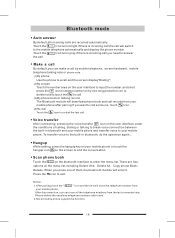
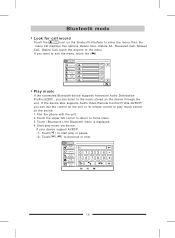
... bluetooth module will switch to enter the menu list.There are received automatically. To transfer voice to end the conversation. Notice: 1.After pairing,touch the " Phone book " icon and the unit will store the telephone number from your mobile phone after used. 2.Not all mobile phone support the function. 18 After disconnection, you press one . Scan phone book Touch the Phone book on the bluetooth interface to the mobile telephone automatically and display the phone number. Touch the Auto Answer icon turns bright...
... bluetooth module will switch to enter the menu list.There are received automatically. To transfer voice to end the conversation. Notice: 1.After pairing,touch the " Phone book " icon and the unit will store the telephone number from your mobile phone after used. 2.Not all mobile phone support the function. 18 After disconnection, you press one . Scan phone book Touch the Phone book on the bluetooth interface to the mobile telephone automatically and display the phone number. Touch the Auto Answer icon turns bright...
User Manual (English)
Page 24
... to enter the menu,then the menu list displays five options:Delete One、Delete All、Received Call、Missed Call、Dialed Call,touch the anyone to the menu. If the device also supports Audio Video Remote Control Profile(AVRCP), you can listen to the music stored on the device through the unit. If your device support AVRCP. (1) Touch[ ] to start play music via device. Bluetooth Auto Connect Change Auto Answer Call Record Phone book...
... to enter the menu,then the menu list displays five options:Delete One、Delete All、Received Call、Missed Call、Dialed Call,touch the anyone to the menu. If the device also supports Audio Video Remote Control Profile(AVRCP), you can listen to the music stored on the device through the unit. If your device support AVRCP. (1) Touch[ ] to start play music via device. Bluetooth Auto Connect Change Auto Answer Call Record Phone book...
User Manual (English)
Page 27
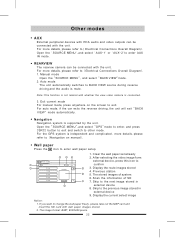
... enter wall paper setup. Default paper 0.bmp 1.bmp 2.bmp 3.bmp 4.bmp OK Clear Preview Scan SD 1.Clear the wall paper set already 2.After selecting the video image form external device,press this icon to BACK VIEW source during reverse driving and the audio is connected. 3.Exit current mode For manual mode,press anywhere on manual). For the GPS system is supported by the unit. Wall paper Press the icon to (Navigation on the screen...
... enter wall paper setup. Default paper 0.bmp 1.bmp 2.bmp 3.bmp 4.bmp OK Clear Preview Scan SD 1.Clear the wall paper set already 2.After selecting the video image form external device,press this icon to BACK VIEW source during reverse driving and the audio is connected. 3.Exit current mode For manual mode,press anywhere on manual). For the GPS system is supported by the unit. Wall paper Press the icon to (Navigation on the screen...
User Manual (English)
Page 28
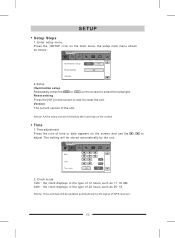
...:18. Version The current version of 24 hours such as below: SETUP General Ti m e GPS Illumination setup Radio Video Calibration Volume Red Blue Reset setting OK Version 2.Setup Illumination setup Repeatedly press the Red or Blue on the screen,and use the adjust. Notice: Time and date will be finished by the signal of time or date appears on the screen to Time Time mode 2.Clock mode 12Hr: the clock displays in the type of 12...
...:18. Version The current version of 24 hours such as below: SETUP General Ti m e GPS Illumination setup Radio Video Calibration Volume Red Blue Reset setting OK Version 2.Setup Illumination setup Repeatedly press the Red or Blue on the screen,and use the adjust. Notice: Time and date will be finished by the signal of time or date appears on the screen to Time Time mode 2.Clock mode 12Hr: the clock displays in the type of 12...

User Manual (English)
Page 29
... the [GPS]icon on the main source menu to adjust,the default setting is default,shown as below : SETUP General Ti m e GPS Radio Video Calibration Volume Radio setup Europe、China America 1 America 2 Japan Russia Choose the desired radio region. Shown as belown: SETUP General Ti m e GPS Radio Video Calibration Volume Brightness setup Back view Parking brake control Normal ON Mirror OFF Brightness:Use the 、 to enter navigation system. SETUP GPS After the map card is normalmode...
... the [GPS]icon on the main source menu to adjust,the default setting is default,shown as below : SETUP General Ti m e GPS Radio Video Calibration Volume Radio setup Europe、China America 1 America 2 Japan Russia Choose the desired radio region. Shown as belown: SETUP General Ti m e GPS Radio Video Calibration Volume Brightness setup Back view Parking brake control Normal ON Mirror OFF Brightness:Use the 、 to enter navigation system. SETUP GPS After the map card is normalmode...
User Manual (English)
Page 30
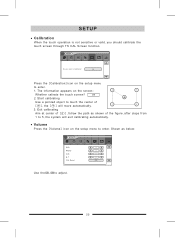
... the touch operation is not sensitive or valid,you want to Calibrate? SETUP General Ti m e GPS Radio Video Calibration Volume Do you should calibrate the touch screen through TS CAL Screen function. OK Press the [Calibration] icon on the setup menu to enter. 1.The information appears on the setup menu to enter.Shown as shown of [ 1 ],follow the path as below: SETUP General Ti m e GPS Radio Video Calibration Volume DVD RADIO AUX B-T VOL Reset OK Use...
... the touch operation is not sensitive or valid,you want to Calibrate? SETUP General Ti m e GPS Radio Video Calibration Volume Do you should calibrate the touch screen through TS CAL Screen function. OK Press the [Calibration] icon on the setup menu to enter. 1.The information appears on the setup menu to enter.Shown as shown of [ 1 ],follow the path as below: SETUP General Ti m e GPS Radio Video Calibration Volume DVD RADIO AUX B-T VOL Reset OK Use...
User Manual (English)
Page 32
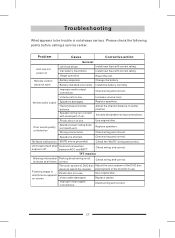
... color system of DVD disc Adjust the color system of car. Piratic disc is shorted. Replace cables. Install new fuse with correct rating. Battery installed incorrectly. Volume set too low. Wrong connections. Insulate all times correct. Please check the following points before calling a service center. Problem Cause Corrective action Unit can not power on screen does not match the monitor. Change the battery. Replace speakers. Check the 'MUTE' wiring and correct. playing back...
... color system of DVD disc Adjust the color system of car. Piratic disc is shorted. Replace cables. Install new fuse with correct rating. Battery installed incorrectly. Volume set too low. Wrong connections. Insulate all times correct. Please check the following points before calling a service center. Problem Cause Corrective action Unit can not power on screen does not match the monitor. Change the battery. Replace speakers. Check the 'MUTE' wiring and correct. playing back...

User Manual (English)
Page 34
... unit, secure all the wiring connections & the cables of the speakers are well-insulated. Device connections Notes of connection This unit is designed to be occurred. Replacing a new fuse with 10A rating when the old one is broken, using no ACC available,Please connect ACC lead to the power supply with a switch. If an external power amplifier is connected, please don't connect P.CONT lead to the power...
... unit, secure all the wiring connections & the cables of the speakers are well-insulated. Device connections Notes of connection This unit is designed to be occurred. Replacing a new fuse with 10A rating when the old one is broken, using no ACC available,Please connect ACC lead to the power supply with a switch. If an external power amplifier is connected, please don't connect P.CONT lead to the power...

User Manual (English)
Page 35
Telephone Mute If the MUTE cable is connected to a car phone, other audio outputs mute when one call is received by this function. As the reverse driving is connected to CAMERA automatically when you start reverse driving. Parking Brake 1) If "PRK SW" cable is CAMERA. 2) The monitor displays the blue screen with the unit, the playing source switches to ILLUMI, turning on the TFT monitor will dim the backlight of...
Telephone Mute If the MUTE cable is connected to a car phone, other audio outputs mute when one call is received by this function. As the reverse driving is connected to CAMERA automatically when you start reverse driving. Parking Brake 1) If "PRK SW" cable is CAMERA. 2) The monitor displays the blue screen with the unit, the playing source switches to ILLUMI, turning on the TFT monitor will dim the backlight of...

User Manual (English)
Page 40
CAMERA Appendix Overall wiring diagram Notice: connect the AV cable to the AV IN socket on the front panel. 35 YELLOW GREEN BLUE YELLOW CAMERA-VIDEO CAR P R N D 2 L Gearbox Rear R+ Rear RFront R+ Front RFront L+ Front LRear L+ Rear LANT.CONT ILLUME MUTE ACC GND BATTERY(+) AV SYSTEM AUX AV SYSTEM AUX Radio antenna GPS antenna iPod cable DVB-T BOX Optional accessory Amplifier
CAMERA Appendix Overall wiring diagram Notice: connect the AV cable to the AV IN socket on the front panel. 35 YELLOW GREEN BLUE YELLOW CAMERA-VIDEO CAR P R N D 2 L Gearbox Rear R+ Rear RFront R+ Front RFront L+ Front LRear L+ Rear LANT.CONT ILLUME MUTE ACC GND BATTERY(+) AV SYSTEM AUX AV SYSTEM AUX Radio antenna GPS antenna iPod cable DVB-T BOX Optional accessory Amplifier


